While I understand options like acoustic wool makes a very good sound/vibration insulator, I’d rather not have something that messy in my ‘bot. I’d be happy to use a material that doesn’t insulate as well, as long as it is clean.
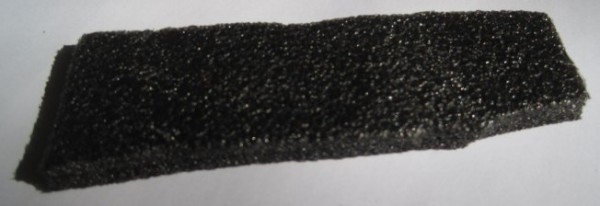
I found this short strip of gray/black foam padding lying around my house among my daughter’s things. She had no recollection where she acquired it and believed she might have another piece somewhere. My MakerBot Cupcake CNC came with a large amount of this kind of padding – but it was pink. I didn’t have any of the pink stuff left over, otherwise I would have used it in place of the cardboard as the insulating material for my DrawBot’s stepper motors.
So – do you know the name of this foam padding? Do you know where I could pick up a few square inches of it to use as a sound/vibration insulator for my DrawBot’s stepper motors?
I’ve found that backing out the filament after each print, while a pain, has been helpful in avoiding extruder jams. Or, rather, I have found fewer extruder jams while doing this. 1
I suspect the reason this has helped is that it removes from the PTFE insulator any of the remaining plastic that might have been about to ooze near the barrel top. Have you found that this helps you?
Not to confuse coincidence, correlation and causation, but I have also found fewer extruder jams when wearing my underwear inside out… [↩]
A little while ago someone posted on the MakerBot Operators group that they were looking for printed pulleys. Apparently he had managed to scavenge or hack together everything else.
This got me wondering – what printed parts would someone need to get a MakerBot rolling? There’s the obvious printed pulleys. If I had a friend who was putting one together, I’d probably want to give them a spare insulator retainer ring and Z axis pulley. What else should be in a MakerBot starter/welcome kit?
Well, not really playing. But, I suppose not really “working” either. Here’s how my experiments in unclogging a clogged extruder barrel went:
You can see where there is some minor plastic residue left over from the PLA in PTFE insulator which oozed into the threads. I had used a precision screw driver to follow along the threads and chip out plastic.
PTFE insulator, mostly clean
Here’s the clogged barrel. I had chipped out plastic from the threads using the same precision screwdriver. You can see some of the scar marks from my brilliant idea to use a wrench on the smooth part of the barrel at one point. (FYI, that was sarcasm – don’t use a wrench on the barrel. It was, in fact, a bad idea). I was totally unable to remove the nozzle from the barrel.
Extruder barrel, clogged
This was my idea for the setup so that the flame/heat would not discolor everything. You can see where the nozzle has gotten a thin layer of black ABS fused to it. Again, you can also see the marks on the nozzle where I tried to use a wrench. And, again, not a good idea. All I managed to do was just scar it up.
Extruder barrel with nut partway on
This is similar to the setup I settled on for trying to unclog the barrel. I’m going to cut the suspense and let you know – this doesn’t work and you shouldn’t try it. This setup did not work for two very important reasons you can learn from. First, it was too low to the ground and the blow torch kept going out when I tilted it to get to the heater barrel. Second, it relied on kitchen tiles – which is a terrible terrible idea.
Kitchen tiles - good intentions, bad idea
Here’s the next part of the setup: blow torch, flint, wrench for picking up hot things, and fire extinguisher. Off camera right is a garden hose. Again, this setup relies on kitchen tiles – which will actually shatter when this kind of heat is applied. So don’t do it. Oh, and it turned out I did have a blow torch – but it was empty. :)
Setup - empty propane tank, bad kitchen tiles
This is a better setup – with a brand new propane tank – but still a terrible idea with kitchen tiles.
Setup - FULL propane tank, bad kitchen tiles
This was a good setup. Friend nearby with a garden hose and fire extinguisher, no nut on the barrel so it sits in the washer and is easier for me to heat the entire barrel, suspended in air by a metal hook, held down by a big rock, high enough that I didn’t have to tilt the blow torch. Here you can see the scorched and shattered kitchen tile in the pile on the right.
GOOD setup with extruder barrel suspended in air by metal
Since I was in charge of the blow torch and my friend had the fire safety equipment I really only pictures of stuff as it was in a relatively cool state. This means I did not get a picture of the barrel as I was heating it – I had gotten it glowing red hot which was pretty nifty. I also missed out on getting a picture of flame spewing from the nozzle as the ABS inside ignited. It was like a mini flame thrower tossing out a thick black smoke.
I was expecting some of the ABS to leak out of the bottom – but the barrel was essentially clean. I could see all the way through the nozzle with no problem.
I’ve managed to clear out the PTFE insulator pretty well. I pulled the entire heater out of the extruder, turned up the heat a little, held the barrel lightly in plyers, and unscrewed the PTFE without a problem, and then turned the heat off. I then used a precision flathead screwdriver to follow the threads, popping/chipping the plastic out as I followed I went. However, I don’t know to what extent the threads are still intact. Since the PLA oozed into the threads, I have to think they’re messed up to some extent.
As for the barrel, I used a drill bit with the unsharp end wrapped in a rubber band. I rotated the bit using the rubber band as a grip to drill out the plastic. It actually worked really well for clearing out the barrel right to where I can see the barrel entering the nozzle. The inside is reasonably clean, but I still can’t put a filament into it freely.
I also had to take a precision screwdriver and follow along the threads on the barrel to chip out plastic. This went reasonably quickly. Once I was done the nut was able to screw on and off freely.
Now I’m left with a slightly discolored PTFE and a mostly clean barrel. I’ve got a spare PTFE insulator, but I’m hoping this one is salvageable. It still has threads and the barrel will screw in nicely.
Rick and Spacexula have suggested I use a torch to heat up the nozzle and let the plastic burn/fall out. But, this is a trick for another day with proper safety equipment.
Oh, and before I forget, Spacexula suggested keeping a ruined PTFE barrier to slice into insulating washers. I’m hoping I might be able to re-use the PTFE insulator, but this is certainly my backup plan.
My adventure with PLA has ended in heartbreak. It wasn’t working very well so I switched back to ABS – which was fine for a few prints. Until I found it just wasn’t extruding and stripping the filament.
So, disassemble time. My filament looked like it was getting shoved into a jam and splitting apart like a banana – with the center making it down to the nozzle through a small aperture. I found I couldn’t remove the insulator – and upon looking closer found that a very small amount of PLA had oozed down and around the nut above the insulator/ washer. I removed the extruder assembly from the ‘bot, and the heater assembly from the extruder, heated it back up and slowly removed the PTFE insulator. I found the barrel was clogged with ABS as was the insulator.
I’ve managed to clean out most of the insulator, the nut, and the threads of the barrel using drill bits and precision screwdrivers.
I’m going back to ABS, I would rather deal with warp than the heartbreak of PLA ooze into the threads of my heater assembly.
After seeing the dramatic difference printing from the SD card made, I think I’ll try my hand at printing the replacement insulator retainer ring again. I think I’ll end up with a much better result on the small screw holes by doing this.
Sooo… if you break your acrylic (or ABS) insulator retainer ring, drop me a line.
Lots of non-robot stuff keeping me busy… but not too busy to print a replacement insulator retainer ring! I should really start a list of the first things you should print once you get a MakerBot. This should be way at the top, even above the Z-axis crank.
From what I gather from the MakerBot operators group, the 5mm acrylic insulator retainer ring that comes with the MakerBot kit will eventually fail. If this happens, the heater will basically pop off and melt into whatever you were building at the time.
Really, it’s all about choices, right? The extruder motor is super slow but super strong. Chances are it will eventually deform some part of your assembly. With this in mind, you can build your heater assembly with and without the nut. Depending upon which you do, different parts will be bearing the brunt of the force exerted by the extruder motor.
If you assemble the heater without the nut below the washer, the majority of the force will be applied by the motor to the filament and into the barrel and nozzle, eventually forcing the nozzle downwards, ruining the PTFE insulator barrier, stripping the PTFE barrier threads, pushing out the nozzle, and making a molten oozing mess of everything.
If instead you assemble the heater with the nut below the washer, the nut will hold the washer in place and the majority of the downwards force applied by the extruder motor will be placed on the insulator retainer ring. If the insulator barrier ring fails, it will crack or shatter dropping the heater into whatever you were building.
The good news about the second method is that its pretty easy to print up a replacement insulator retainer ring to keep handy!