Printable Sonic Screwdriver progress

STL sheet for printable sonic screwdriver

STL sheet for printable sonic screwdriver

Sketch of Screwdriver

Sketch of Screwdriver

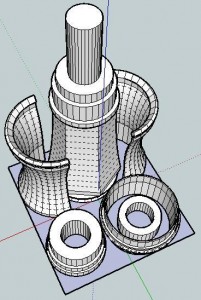
Off to the left is a picture of what the finished sonic screwdriver should look like.  Here’s a picture of the parts I’ve designed so far.  Assembled properly, these parts should be able to be assembled into the lower half of the sonic screwdriver.

I’ve arranged the parts so that they have a less than 60mm x 60mm footprint on the build platform.  I would really like it if the final product could be printed all on one build plate and assembled without tools or additional non-printed pieces.

After my recent design-print fail, I’m going back to the drawing board (slightly)1 wiser.  If nothing else, I like to think what I have so far is pretty neat. 2

  1. Make that very slightly. []
  2. Even if it doesn’t work at all. []

A MakerBot printed 3x2x1 Rubik’s Cube!

Lotu's print of the 3x2x1 Simplified Rubik's Cube

Lotu's print of the 3x2x1 Simplified Rubik's Cube

SWEET.  I’ve been so busy of late123 that I haven’t even been able to print several of the things I’ve uploaded. I’ve uploaded several cookie cutters, with another sitting on my hard drive and one more knocking about in my head keeping the cobwebs company.  I’ve also uploaded my variation on a simplified Rubik’s cube.

Well, someone printed it!  It looks AMAZING!  I wonder if it works properly?  I slapped the design together rather hastily after getting frustrated with my MakerBot failing to print TomZ’s 1x2x3 Rubik’s cube.4

I can’t wait to either get some feedback from Lotu (who printed it) or print up one of my own so I can improve on the design.  I’d really like to make a version that is 100% printed – with a snap joint in the middle rather than a nut/bolt system.  If I go down that route, I was thinking about incorporating what I learned from the fantastic Becco blocks connection system by r3becca.

If you print one of these, please answer the following questions:

  1. Which STL did you use?  The one with all 6 pieces or the one with 3?  Would you prefer printing the pieces one at a time?
  2. How well did they fit together?  Are they very snug?  Too loose?
  3. How well does the nut/bolt work?
  4. Did you have to adjust your Skeinforge settings at all?  Why?  How?
  5. Do you have giant hex wrenches like Lotu does?
  1. Mostly writing nonsense. []
  2. Which is particularly funny since my day job consists almost entirely of writing. []
  3. Which is even funnier when you consider that you can tell I’m doing a particularly good job when my writing is completely incomprehensible. []
  4. Did you catch how I swapped all the numbers around to differentiate my derivative?  I thought that was pretty clever… []

Hareware isn’t everything

With Charles Pax’s recent proof-of-concept of a motorized conveyor belt print platform, we’re going to need some software/firmware changes to make full use of these improvements:

  1. Queuing print tasks
  2. Removal/auto-wiping of the test extrusion
  3. Moving the print platform to the front/back/side of the MakerBot for ejecting the finished print
  4. Ejecting the printed part
  5. Returning the platform to 0,0,0 / center

From the video posted on Charles’ site, it looks like he’s managed #3 and #4 already.  The extrusion path around the print that we see in Nophead’s prints probably would work at #2.  I also seem to recall some (such as Zaggo?) have mounted a toothbrush head on the build platform for auto-wiping of the extruder head.

Returning the platform to 0,0,0 is an interesting proposition.  This would seem to work best once the opto-endstops are installed.  I’ve got my set of six fully assembled opto-endstops sitting in a box next to my MakerBot because I haven’t really needed them and they tend to get in the way of printing.  Although the opto-endstops have been removed from the standard MakerBot kits, I think we may now start to see them returning.

MakerBot Conveyor Belt!

Charles Pax has developed a working MakerBot motorized conveyor belt print bed.  (Is it heated?)  There’s a lot of reasons why this is a big deal:

  1. This is the fourth MakerBot “milestone.” We’ve reached milestone #1.  Milestone #2 (different threaded rods and internal electronics) and #3 (Gen 4 electronics) are noble, but not really transformative goals.
  2. Continuously cranking out parts is a way to turn a simple MakerBot into a portable factory – rather than a modest means of prototyping.
  3. Unattended printing is one of the criteria for the RepRap / Kartik M. Gada Humanitarian Innovation Prize.

Backing out the filament

I’ve found that backing out the filament after each print, while a pain, has been helpful in avoiding extruder jams.  Or, rather, I have found fewer extruder jams while doing this. 1

I suspect the reason this has helped is that it removes from the PTFE insulator any of the remaining plastic that might have been about to ooze near the barrel top.  Have you found that this helps you?

  1. Not to confuse coincidence, correlation and causation, but I have also found fewer extruder jams when wearing my underwear inside out… []

Have we reached the bottom already?

Having reached the bottom of a market can actually be a very good thing.  It means anyone who wants a set of RepRap parts can have them for as little as the market will bear.  Right now there are lots of options for someone who wants to get involved in building a RepRap/RepStrap.  You can get a MakerBot, RapMan, ShaperCube, Profound Devices, Isaac Mendel, or pick up a large selection of parts on eBay.

As an owner of a MakerBot, I’m far more likely to want to print up my own RepRap parts than buy them.  However, each of Spacexula‘s Mendel print sets would probably take me 2-3 hours of print time plus about 15 minutes of human intervention/monitoring.1  I would of course also print up parts for any friends/family who wanted parts. 2  I’d be willing to do this to create my own Mendel, but the idea of spending three weeks3 , say $30 in plastic4 , and about six broken up over that three weeks fiddling with stuff5 makes me wonder if there’s a better way to make $300.00.

Setting that aside, I wonder where the bottom of the RepRap parts market is heading?  Spacexula has suggested around $250 or so based upon the price for lasercut parts.  I suspect the price of printed parts will always be higher than the price for lasercut or molded parts – because of the time involved.  Lasercut parts can be cranked out as quickly  as a lasercan cut. 6  Molded parts can be churned out as quickly as the poured material can be dried.  Plus, no matter how nice lasercut/molded parts are – you still have a RepStrap, not a true RepRap.  Assuming identical quality, I’m probably always going to be more interested in printed parts over alternatives.

  1. Such as setting up, warming up, untangling plastic, checking, peeling off, etc. []
  2. At this point, this is purely theoretical/hypothetical since none of my family/friends are interested in their own RepRap.  Hmm…  Maybe I should talk about RepRap MORE??? []
  3. A little over one sheet a day []
  4. I haven’t weighed a sheet of Mendel parts, so this is pure conjecture. []
  5. Assuming no extruder clogs, blocks, PTFE bulging, oozing down the threads, and problem free printing… []
  6. How many phasers could a laser slice if a laser could slice phasers? []

The RepRap Prize

A commentator suggested that the RepRap Challenge prize is set up to avoid paying out.  This seems like a silly and vacuous charge to me.  The $20,000 and $80,000 prize payouts have firm award dates of 12/31/2012 and 12/31/2015, respectively.  If someone hasn’t achieved the specific milestones by those dates, by the terms of their declarations (and assuming they are good to their word), they’ll have to award those sums to whoever is closest.

In any case, here’s a summary of the list of the requirements for those interested.

Interim Personal Manufacturing prize of $20,000.00 to be awarded on 12/31/2012:

  1. Print at least three different materials, including one that is usefully electrically conductive.
  2. The ability to print electronic circuit boards.
  3. Print beds1 must be of a material which may be reused with minimal refurbishment for at least 20 print cycles.
  4. Maintain a total materials and parts cost under $200 and that 90% of the volume of the printer parts be printed.2
  5. Demonstrate a build volume of the printer above 300x300x100mm in order to insure that items daily utility can be printed.
  6. The capacity to print a full set of parts for a complete replica of itself within 10 days unattended save for clearing no more than one printer head jam.
  7. The ability to print autonomously without a PC attached.
  8. Uses no more than 60 watts of electrical power.

Grand Personal Manufacturing Prize of $80,000.00 to be awarded on 12/31/2015:

  1. That the cost of the material used for printing does not exceed $4/kilogram.
  2. The capacity to print a full set of parts for a complete replica of itself within 7 days, including the time for reloading, and clearing of printer head jams.3
  3. Maintain a total materials and parts cost under $200 and that 90% of the volume of the printer parts be printed.4
  4. Participating teams are expected to regularly publish and make available their technology on an ongoing basis. All technology developed by participating teams becomes open source under a GPL or BSD license. Therefore, the winning team will have to have published at least some of their innovations more than 12 months before the deadline.
  1. Print beds are flat surfaces onto which parts are printed. []
  2. Print beds are not necessarily a permanent part of the printer and are not figured into either the cost or the volume requirements of a printer. []
  3. According to the article it currently takes approximately 21 days with 90% of the time requiring human involvement. []
  4. Plastics such as HDPE and Polypropylene, of which millions of tons exist as waste matter, may be suitable candidates, and recycling of such waste material would be viewed favorably by the judging panel. []

MakerBot Cupcake CNC print resolution

Some people have asked me about the MakerBot’s print resolution.  Although this information can be found on the MakerBot wiki, there’s no harm in disseminating this data. 1  Before I get into some of the technical stuff, let me just say this – the print resolution is pretty freaking good for a $750 DIY robot and it will give a $15,000 commercial printer a run for it’s money.

As a printer that can create objects in three dimensions the normal two-dimensional printer resolution jargon of “DPI” or “dots per inch” doesn’t mean much.  The printing resolution for the X/Y axes is 0.085mm and the resolution for the Z axis is 3.125 microns.  Most of the time you’re going to have a Z axis resolution of about 1/3 of a millimeter.  If you print with layers much smaller than that it will take forever to print without a huge increase in quality.

Or, to put it another way…  if you were to hand me two objects one printed on a MakerBot and one printed on a commercial printer, I’m going to ask you why the heck one of them costs $14,000 more than the other.  I’ve printed some pretty intricate and detailed stuff on my MakerBot.  As I tune it I hope to improve it even more.

  1. If you haven’t poked around the website, I highly recommend it.  There’s a lot of information about the Cupcake CNC, RepRap, fused deposition modeling, robots, and all sorts of stuff. []