
I’ve been making some notes as I work on my vacuum former and the proposed workshop for this year’s Bay Area Maker Faire. Here’s some ideas and thoughts, in no particular order.12
- Workshop Proposal
- I’ve demonstrated my bucket vacuum former at my daughter’s school a few times – and it is always a huge hit. The vacuum formed result looks like so much more than the product of very cheap and accessible materials. Two years ago I put on a presentation at Maker Faire about how to build a vacuum former – and this year I want to try something even more ambitious. Here’s the slideshow from 2017.
-
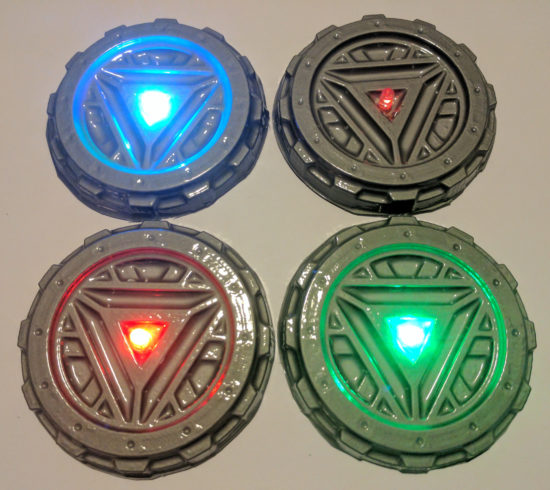
- I want to do an entire workshop on how to build and operate a vacuum former – and then let people try to vacuum form their own objects. One of my favorite things to vacuum form is an “Arc Reactor” and then augment it with an RGB flashing LED and a coin cell battery. However, I think people would also enjoy making goggles and phone cases. It takes about 30 seconds to heat up the plastic and just seconds to actually vacuum form a shape and let it cool down.
- Things I’ve Vacuum Formed
- Arc Reactor (plus RGB fast flashing LED and CR2032 battery)
- Steampunk goggles (plus elastic)
- Phone case (this actually works!)
- Candy / chocolate molds (one of the kids made a chocolate fidget spinner)
- Here are some more ideas
- New Developments
- Several months ago, just before Thanksgiving, our stovetop stopped working. Yeah. I know. Talk about timing, right? While we scrambled to get a new cooktop ordered, delivered, and installed, we also purchased an inexpensive hot plate from Amazon. I had originally used an old hand-me-down large toaster oven to heat up the plastic, but wondered … is there a better way? That toaster oven is huge and takes a long time to heat up. This weekend I was delighted to learn the hot plate heats up very quickly, gets hot enough to soften the plastic, and works as a fantastic and compact replacement for the toaster oven.
- There are a few caveats to using the hot plate.
- The heat was more localized, causing the center of the plastic to become thinner and saggier. When the plastic plates were heated in the toaster oven, they tended to heat more evenly. Perhaps if I tried a lower heat setting or held the plastic plate higher, this might be mitigated.
- It’s hard to get a sense of the plastic without actually watching it get soft and wobbly. This is especially true when the plate is inside the toaster oven – there’s only room enough for one or two people to see what’s going on. However, with the hot plate, there’s no enclosure3 to obscure an audience view.
- I was somewhat paranoid about letting the plastic droop down onto the heating element. I’m pretty sure it would smelled horrible, made a huge mess, been nearly impossible to clean, and made the hot plate unsuitable for any other purposes. I may try to locate a cheap hot plate from a second hand / thrift store / goodwill to take to Maker Faire. Though, now I’m also wondering if it might be possible to repurpose an old coffee maker, grill, griddle, or panini press, into the heater for this project. Maybe if I covered the heating element in aluminum foil first, that would protect the surface?
- The power switch of the vacuum head / bucket head is conveniently placed right on top for normal operation. For unusual operations such as this, where the vacuum is upside down, it is decidedly inconvenient. I used a power strip with a switch which made it much easier to operate the vacuum. I think I may invest in a dedicated foot switch extension cord for this project. It’s a very cheap upgrade that would make it a lot easier to do.
- There are a few caveats to using the hot plate.
- I also have a prior post discussing some additional ideas on how to improve this process.
- Several months ago, just before Thanksgiving, our stovetop stopped working. Yeah. I know. Talk about timing, right? While we scrambled to get a new cooktop ordered, delivered, and installed, we also purchased an inexpensive hot plate from Amazon. I had originally used an old hand-me-down large toaster oven to heat up the plastic, but wondered … is there a better way? That toaster oven is huge and takes a long time to heat up. This weekend I was delighted to learn the hot plate heats up very quickly, gets hot enough to soften the plastic, and works as a fantastic and compact replacement for the toaster oven.
- Accessories / Things to Bring to Maker Faire. There are SO many little parts to a project – forget any one little thing and you’re going to be making a last minute trip to the hardware store.4 Here’s a few lists of things I will need:
- Parts
- Bucket
- Vacuum head
- Hot plate
- Power strip or foot switch extension cord
- One or two wire coat hangers
- 6x Small to medium binder clips
- Wooden dowel (1x 6″ riser, 3x 8″ legs)
- 3D printed parts (1x plug, 2x riser caps, 3x leg holders, 3x feet)
- Hot glue
- Building Tools
- Drill (for drilling holes)
- Ruler and / or paper grid
- Chisels
- Hacksaw (cutting the wooden dowels)
- Hot glue gun
- Sharpie
- Presentation Tools
- Heat gun
- Scissors (cutting plastic plates)
- Old socks (DIY oven mitts)
- Materials
- Examples of plastic plates in various stages of the process
- Examples of items made, also in various stages of production
- Consumables
- Plastic plates
- Tape (clear packing tape works well)
- Fishing line
- Elastic cord
- Pens (metallic permanent markers)
- LED’s
- Batteries
- Maybe stickers to give away?
- Parts
- How to Make a Vacuum Former
- How to Use a Vacuum Former
- Vacuum Former – Things to Form
- Vacuum Former – Ideas to Improve Vacuum Former
- Maker Faire 2017 How to Make a Vacuum Former Presentation Slides
- Vacuum Forming an Arc Reactor
- Maker Faire Application: Vacuum Forming Workshop
- How to Make a Vacuum Former
- How to Use a Vacuum Former
- Vacuum Former – Things to Form
- Vacuum Former – Ideas to Improve Vacuum Former
- Maker Faire 2017 How to Make a Vacuum Former Presentation Slides
- Vacuum Forming an Arc Reactor
- Maker Faire Application: Vacuum Forming Workshop
- How to Make a Vacuum Former (2023)
- DIY Vacuum Formers
- Very Smol Vacuum Former
- As always, as much to inform you, dear reader, as to order my own thinking and jot things down before I forget them [↩]
- DOCUMENT!!! [↩]
- And, now that I think of it, it may be the enclosure which causes more even heating… [↩]
- Not that this is a bad thing. But, I’d rather have to go because I want to do go [↩]