
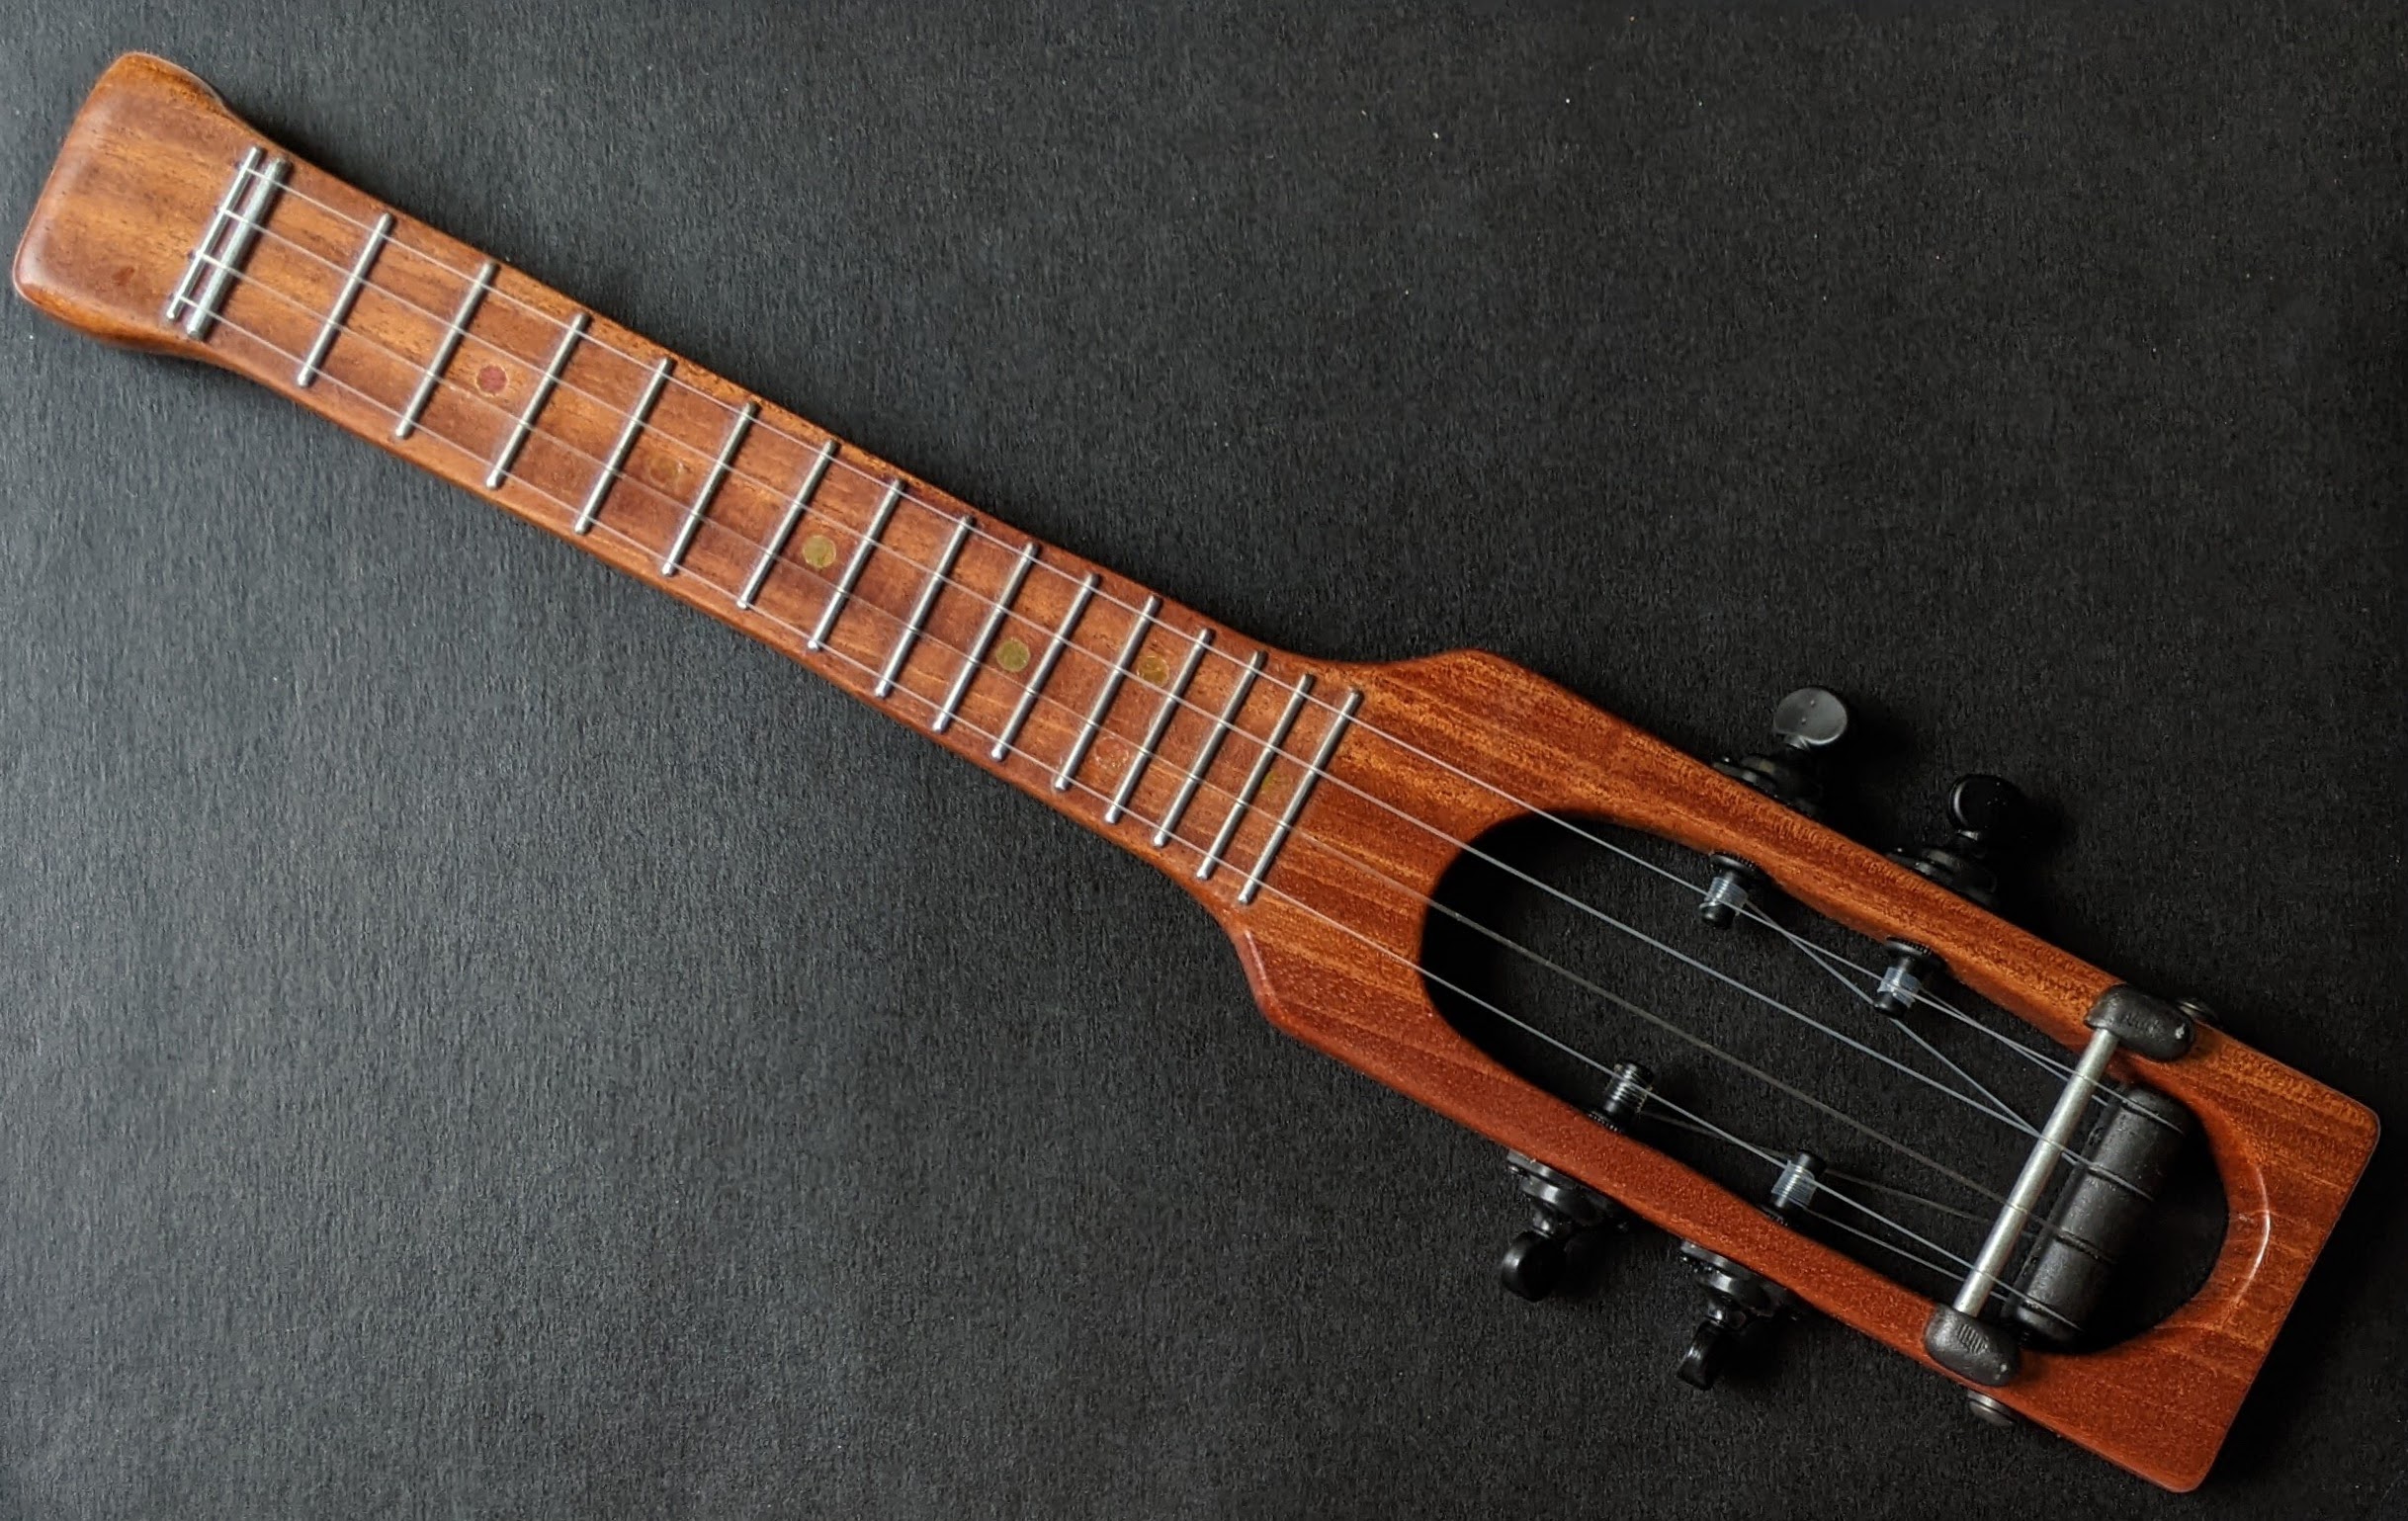
I’ve been playing my DIY travel soprano scale ukulele for about a while now and it’s been really great. If I lightly strum it, it’s quiet enough that someone a few feet away might not notice. If I really go for it, you could hear it across the room. If I put a board of some kind between the ukulele and myself, it sounds considerably richer and louder.1 I started compiling some additional thoughts after the first week:
- String Stress.
- The strings seemed to stretch a little as I played the ukulele over the course of the week. I had to slightly tighten the strings each day to keep it in tune. The first day there was a lot of variation – and by the end of the week it barely needed any adjustment at all.
- That said, the string tension has caused the strings to bite into the wood above the zero nut and seem to have caused a hairline crack in the turn around. I suspect after a week of being stretched and compressing the wood just a little, it’s not going to continue to bite away at the wood.
- Zero nut, string holes, string ties.
- As several other builders have noted, once the strings are tensioned, they start to bite into the wood. I tried to avoid this problem by using a hardwood, but it’s clear there is still some element of this on the ukulele. Some ideas:
- Placing an additional 3/32″ fret above the zero fret and a hair below the string holes would likely prevent the strings from “biting” into the wood. Of the various ideas that occurred to me, this is probably the flat out simplest, easiest, most immediately effective solution and involve the least amount of changes to the existing build.
- I’d toyed with the idea of drilling the holes out a little larger and inserting a thin plastic or metal tube which would serve as a smoother path for the string while also preventing this “biting” problem. This would be a very complicated fix for a simple problem and involve some variation of sourcing the tubes, drilling larger holes, cutting the tubes, and glue the tubes in place without obstruction. I’m not crazy about any of these steps – and more than that, I think it would be overkill and not have the right aesthetic for this project.
- My off-the-shelf ukulele has a slotted bridge, where the strings are tied into a knot, slid through a small opening, over the bridge, across the frets, the nut, and then the tuners. There’s no reason I couldn’t put a 3D printed slotted nut at the top of the ukulele. There are several possible benefits to doing this, with little downside:
- It would eliminate the need for drilling four holes in the top of the ukulele for the strings. Printing a 3D model could ensure exacting spacing for the strings. The plastic could be affixed with screws, bolts, or even fit over the end of the ukulele.
- Once the requirement for drilling small holes for the strings is removed, other interesting possibilities arise. When I installed the Graph Tech tuners, I found they were very slightly smaller than the holes I had drilled and reamed out for the chrome tuners I already had on hand. There’s no special need for the screws in the turn around to be #10-24’s. Perhaps they could be screws that match the same holes drilled for the tuners? If so, I would only need a single drill bit for the tuner and turn around holes. (Though, it would be hard to find sweet sweet black oxide hardware to match this diameter.
- As several other builders have noted, once the strings are tensioned, they start to bite into the wood. I tried to avoid this problem by using a hardwood, but it’s clear there is still some element of this on the ukulele. Some ideas:
- Turn Around.
- The slight crack in the turn around appears to be at just one end with the 1st / A string. This might be the paint cracking – or the plastic itself.
I can’t really tell unless I loosen the strings and then pull the turn around out. (Something I don’t want to do). I bet if I redesigned the part so the nut was placed a little farther in the model (so there was more plastic at the end of the turn around), printed with a higher infill, added more captive nuts, and/or increased the diameter of the bolts, this problem might be mitigated. That said, it’s a very small crack, likely only superficially cosmetic, and unlikely to cause the plastic to actually fracture.
- The slight crack in the turn around appears to be at just one end with the 1st / A string. This might be the paint cracking – or the plastic itself.
Having very nearly reached the “end” of this project… I can’t help but turn my mind to how it could be improved. If I succeeded in building a better model, I’d have two sweet ukuleles. If it was a horrible failure, I’d have gotten some fresh air, a little exercise, and still have one sweet ukulele.
- Potential Improvements / Process Changes In a New Version
- Saws.
- Japanese Pull Saw. Upon seeing my project, two friends recommended a Japanese pull saw. I think it would be an amazing tool – except that the way I have the “head” of the ukulele wider at the top, I don’t think it would work very well. I sketched out a design for a different kind of ukulele template that would be amenable to a several straight cuts. A saw like this might cost $20-40 and would save a considerable amount of time clearing the wood away from the fretboard. This would still leave a fair bit of work on the interior of the body. Chances are this saw would instantly justify it’s expense in the time savings on the fretboard alone.
- Scroll Saw. A cheap scroll saw can be picked up new for $100-$150. Without a big workbench, having the integrated table to go with the scroll saw would be a huge help. I’ve ballparked my time investment into this ukulele at around 100 hours. 2 A scroll saw could be used around the entirety of the ukulele, from along either side of the fretboard, chopping the top off the head, to cutting out the interior cleanly. I plan to do an in-depth post-mortem at some point detailing the time I spent on each aspect of the build, but I know I spent hours over weekends cutting the ukulele. I suspect even going very slowly with a scroll saw, I could cut the entire ukulele out in a single morning with much cleaner cuts than what I could accomplish.
- Jig saw. While I own a jigsaw, I didn’t use it in this project. I wanted to use as many handtools as possible and keep the entire process about my struggle in turning this plank of wood into an instrument.
- Drills.
- Drilling. Andrew suggested clamping a piece of sacrificial wood on the top and bottom of the board.
- Power Drill. Obviously, using a power drill makes drilling the holes for the tuners, turn around, and strings much easier. It was difficult to drill perfectly perpendicular. However, I have some ideas…
- Drill Press. A drill press would be fantastic, but too expensive for this project, too big to move or keep around. Maybe I know someone local who has one I could use? (The Sacramento lending library doesn’t loan drill presses)
- Drill Guide. Looking through Rockler’s website I found several drill guides that allow you to drill perfectly perpendicular to the surface. Now, this gave me an idea… for designing a 3D printed jig / drill guide to drill through a piece of the sacrificial wood on top of the side of the wood. I’ll come up with a sketch.
- Hand Drill. Annnnnd, if I’m already creating a 3D printed jig / drill guide, why not build it with an integrated hand drill? The drill I created is good enough in a pinch, but while researching 3D printed drills, I found this amazing pump drill which rotates in the same direction whether it is pumped up or down. What I like about these ideas is that it is entirely possible to cut, drill, and carve the ukulele using all hand tools. Admittedly, some tools I 3D printed, but hand tools nonetheless. I kinda like the idea of a specialized tool for drilling holes into a plank of wood for creating travel ukuleles.
- Zero Nut
- Reinforced Zero Nut. Just adding another 3/32″ cotter pin above the zero nut should be enough to keep the strings from biting into the wood. This is likely the easiest solution – and easiest one to retrofit into the ukulele I’ve built.
- “Slotted Nut.” I tied a knot in the strings before putting them through the string holes in the head and all but one of the string knots were pulled up into the wood. I expect this will be a real problem when I need to change out the strings. I think I could create a 3D printed piece which would act like a slotted bridge, but screwed or bolted into the wood above the zero nut. It would need to keep the string lower than the zero nut, but this seems like a solvable design issue.
- About a month after I started writing this
- Bridge. I’m happy with the bridge. However, I noticed in Daniel’s latest video he used a metal rod with two brackets on either end to place the bridge a precise distance from the nut. While I have no intention of making a pile of ukuleles, it would be nice to precisely place the bridge.
- Frets. Some of the frets were glued in at a slight angle which will have an impact on chords, but perhaps so much I could detect. If nothing else, some of the frets look very very slightly off.
- Turn Around.
- The turn around installed in my ukulele right now looks good – but has one minor flaw. Since it is plastic (sanded smooth) and painted, it is a fair bit “grippier” than a piece of anodized aluminum like the tattoo grips Daniel uses. Adjusting the tuners still affects the tension of the string – between the tuner and the turn around, but the string tends to bind over the turn around, meaning any tightening or loosening of the tuners doesn’t have an immediate change to the sound until the ukulele has been played a bit. This makes tuning take a bit longer.
- I’ve come up with a design I’ll get to in a little bit, below.
- Wood. I bought two pieces of wood when I started this project. One piece of mahogany and another piece of scrap hardwood. I thought I might start on the scrap hardwood, then progress to the inexpensive (~$10) mahogany. I just went ahead with the mahogany first at my wife’ suggestion. There are several other dark hardwoods I think would look really nice – and provide a stark contrast to the cotter pin frets. If I started again, I would get a piece of wenge, zebrawood, ironwood, or walnut – just based upon the look alone.
- Tuners. The Graph Tech Ratio tuners are low profile, inline, lightweight, and the most expensive single part of the ukulele at about $30 for a set. They’re also totally worth it. If I make another ukulele, I’ll buy these right at the start.
- Sound Board. When a thin rigid box or a large piece of honeycomb corrugated cardboard is placed between my chest and the ukulele, it sounds a lot louder and richer. However, it’s not easy to hold the ukulele properly as I do so. I have a few ideas about creating a ukulele body shaped “soundboard” the travel ukulele could be clipped / secured into.
- Saws.
- Changes Since I Started This Blog Post
- I started this blog post around August 28, 2022 and am coming back to it around October 10, 2022. In that time I made a few adjustments / changes to the ukulele. Most of these are detailed in this instagram post on September 12, 2022.
- Re-Designed Turn Around. The silver and black turn arounds had been accidentally printed at 20% infill and started to show stress fractures around the captive nuts. The captive nuts were also seated too close to the first and fourth strings, putting extra pressure where the plastic was the thinnest. I redesigned the turn around to put the captive nuts exactly between the first two and last two strings and reprinted it at 100% infill before filing/sanding/painting. Since the turn around is still one solid piece, there are still minor string binding issues when tuning.
- Re-Re-Designed Turn Around. I’ve now designed a new multi-part turn around which trades simplicity for several improvements.3 It is now comprised of a “core” which looks like a thinner version of the original turn around and four “rings” which slide over the turn around to allow each string to turn that one section by itself – allowing the tuning tension to be transferred immediately to the string. The reason for the grooves in the core is the interiors of the rings have little ridges which keep each ring from being pushed out of place. One side benefit of this system is the captive nuts are no longer visible, creating a cleaner look. I’ve printed, but not yet sanded and painted this version, but it looks to be the best one I’ve created so far.
- Larger Countersunk String Holes. In order to put the new turn around in place, I had to remove the strings. Pulling the strings out was a lot harder than I had anticipated. As I tuned and played the ukulele, the strings were wedged deeper into the string holes. I had to use thin pieces of wire and other bits of string to get them out. Once they had been removed, I used my DIY hand drill to widen the holes on the underside and made sure to tie additional knots in the string so they couldn’t get wedged in place.
- Fret Markers. And since I was removing the strings anyhow… I might as well install my DIY fret markers. The fret markers are small circular cut-outs of iridescent cellophane I cut out with a hole puncher. I put a sticky-note on the cellophane and a piece of paper on the other side, then punched. Doing so gave me perfect little circles. (Trying to punch out circles from cellophane without the sticky notes just tore or mangled the plastic). I sanded the fretboard between the frets until it was as smooth as I could manage. Then I used a glue stick on the fretboard where I wanted the fret marker and pressed it in place. Once it had dried, I then added a few coats of finishing oil to hopefully seal the fret marker in place and then wax over everything.
- Reinforced Zero Nut (“Negative One Fret”?) Before putting the strings back in and before I added the oil and wax, I also sanded the area above the zero fret and glued in an extra 3/32″ cotter pin just barely under the string holes. The result has been great. The strings can’t touch the wood at the edge of the string holes, so they can’t bite into the wood causing the ukulele to go out of tune over time. (I’m sure the strings will stretch a little, but at least I can remove one source of error).
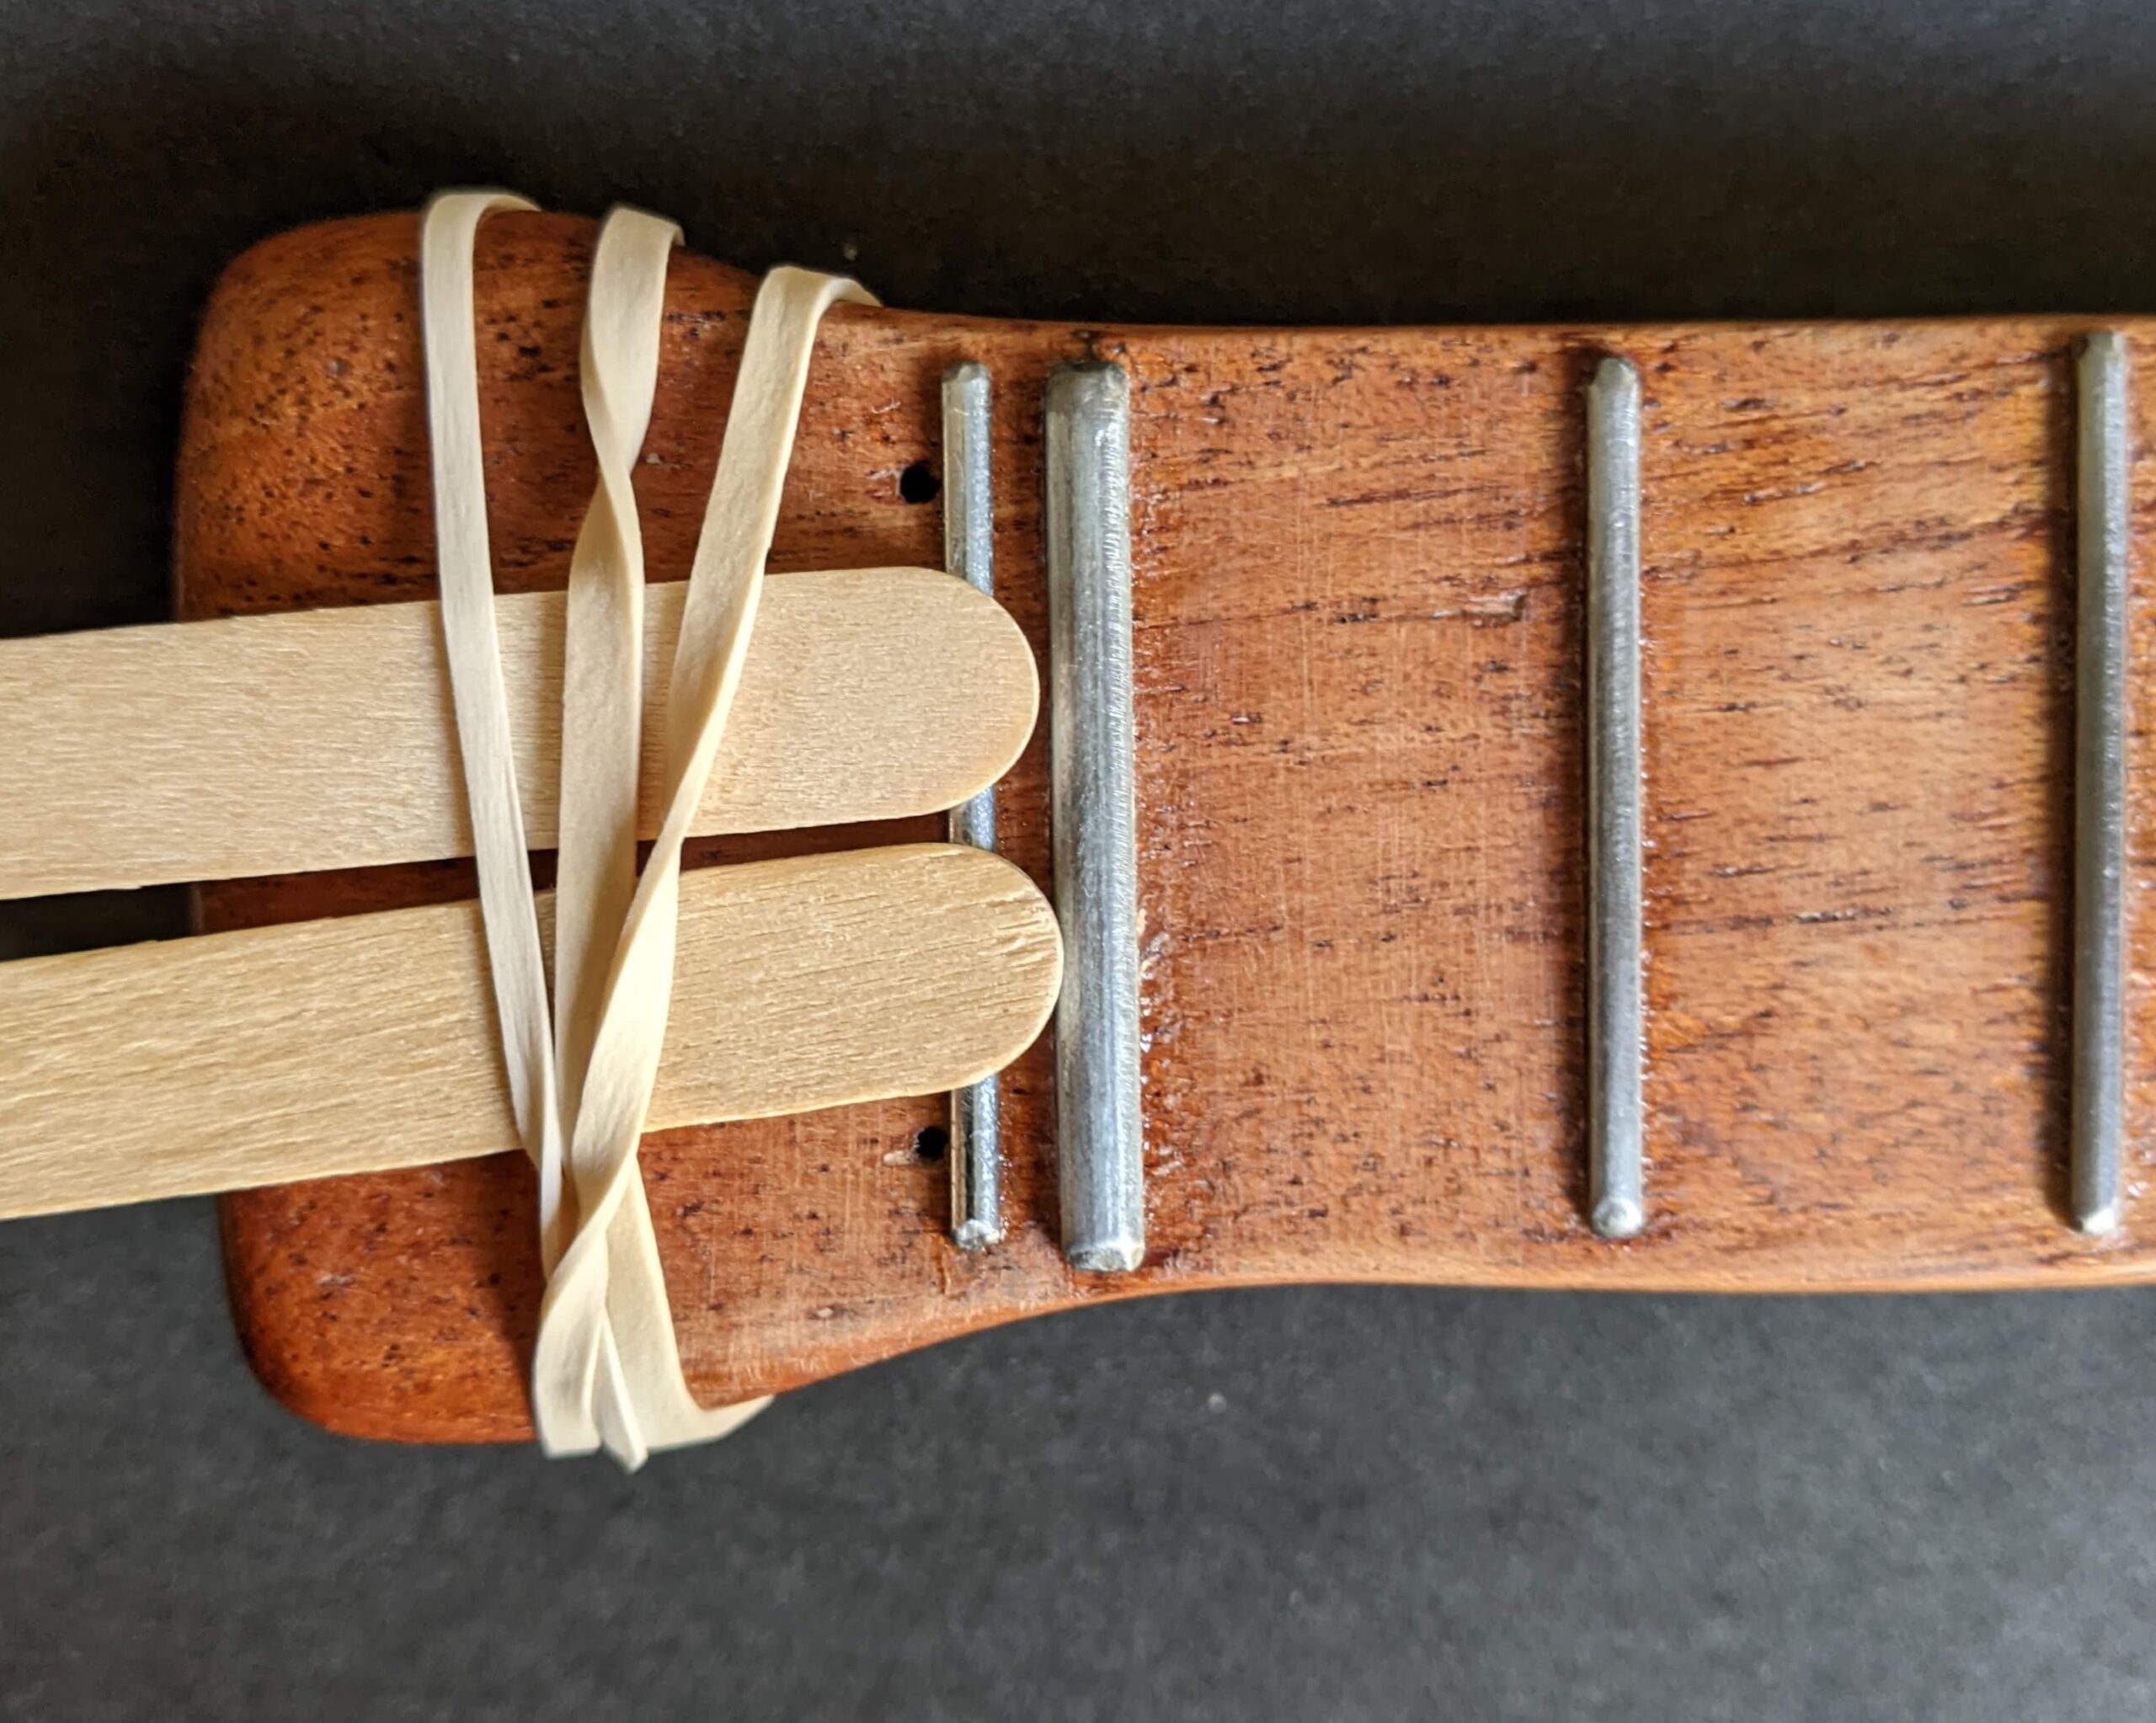
Gluing and holding zero fret reinforcement into place
There’s not a lot I’d do to update / upgrade / change this ukulele. I could get to finishing (sanding, painting, natch) and installing the newest turn around and strap buttons, making a strap, and possibly a carrying case. These are all lower priorities for me as I’m pretty much just enjoying playing it right now.
DIY Travel Soprano Ukulele- Learning Curves and Ukuleles
- Building a Travel Ukulele: Getting Started
- Building a Travel Ukulele: Cutting Stuff
- Building a Travel Ukulele: Cutting, Filing, Shaping
- Building a Travel Ukulele: Filing, sanding, filing, sanding, filing…
- Building a Travel Ukulele: Sanding.
- Building a Travel Ukulele: Test Fitting
- Building a Travel Ukulele: Preparation, Marking and Cutting Frets
- Building a Travel Ukulele: Shaping Frets, Sanding
- Building a Travel Ukulele: Building a Drill
- Building a Travel Ukulele: No Turning Back
- Building a Travel Ukulele: Sanding, sanding, and finishing
- Building a Travel Ukulele: Finishing, sanding, painting, etc
- Building a Travel Ukulele: So Much Experimentation, Bridges, Printing, and Sanding
- Building a Travel Ukulele: Plancratineering
- Building a Travel Ukulele: Swapping Hardware, Fret Experiments
- Building a Travel Ukulele: Bridge, Stringing It Up, and a Sound Test!
- Building a Travel Ukulele: Improvements
- Building a Travel Ukulele: Back to Basics
- DIY Soprano Scale Travel Ukulele
- Repairing My DIY Travel Uke
- See my last post for the decibel meter readings [↩]
- Maybe it’s more of a Fermi estimation [↩]
- See later posts regarding why this turns out to be a bad idea… [↩]