Review of DriveThruCards.com

TLDR:  The cards from DriveThruCards.com (DTC) arrived yesterday and I couldn’t be happier with the result.  Great customer service, product, and value.

This slideshow requires JavaScript.

  1. Shipping:  Great
    1. 3/19/2024:  I ordered 120 cards around 2 AM PST in California.
    2. 3/19/2024:  The DTC website was updated with the following statuses:  Pending Payment Approval, Paid For, Sent to printer, Confirmed.
    3. 3/24/2024:  I received a shipping confirmation email from DTC in Overland Park, Kansas with a USPS tracking number at about 4:32 PM PST.
    4. 03/25/2024:  The date on the “External Packing Slip” included with the box.
    5. 3/28/2024:  USPS sent me a notification the package arrived around 8:29 AM PST.
    6. This was basically exactly as long as my Reddit lurking had suggested (about 10 days) it would take.

      Order confirmation and status screen

      Order confirmation and status screen

  2. Packaging:  Great
    1. The cards arrived wrapped in a cellophane band, within packing paper, inside a small box (about 5″x5″x3.5″ cube).  This was perfectly fine for these cards.  They have options for tuck boxes and other containers, but I didn’t need or want these for this project.
  3. Card Quality:  Great
    1. Text and images were sharp, legible, and colors rich but slightly darker than what I saw on my computer screen.  By tinkering with Inkscape, I would guesstimate the final card was about 5-10% less bright than what I saw on my screen.  Without comparing the cards directly against a large bright monitor, I don’t think I would have noticed this difference.
    2. When I set the deck down on a flat surface and run my finger over the side of the stack of cards, there’s a very slight variation over a few cards.  It’s barely perceptible and probably totally fine for any kind of card usage or card game except a super precise cut for casino playing cards.
    3. When the cards are viewed edge-on in a stack, you can tell see a faint bit of the card’s edge color.  I grabbed some “Magic: the Gathering” cards and looked at a mix of black and white bordered cards and noticed that even the black border cards seem to look white-ish when viewed edge on.  The slight bit of color here doesn’t bother me at all and for most purposes would be totally irrelevant.
    4. The cards were 2.503″ or 63.57 mm wide and 3.506″ or 89.05 mm tall, or about 0.2% large.  Some variation is to be expected in any order and this miniscule variation would be completely unnoticeable except I used digital calipers to measure them.
    5. The cards, printed on DTC’s “premium stock,” advertised as 11.4 pt (0.0114″) were 0.0115″ or 0.29 mm thick.  Flicking the cards against a table, right next to an actual casino poker card, they felt identical.  (The casino card has a slightly raised texture, but the flex, bounce, and flick of the card stock felt identical).
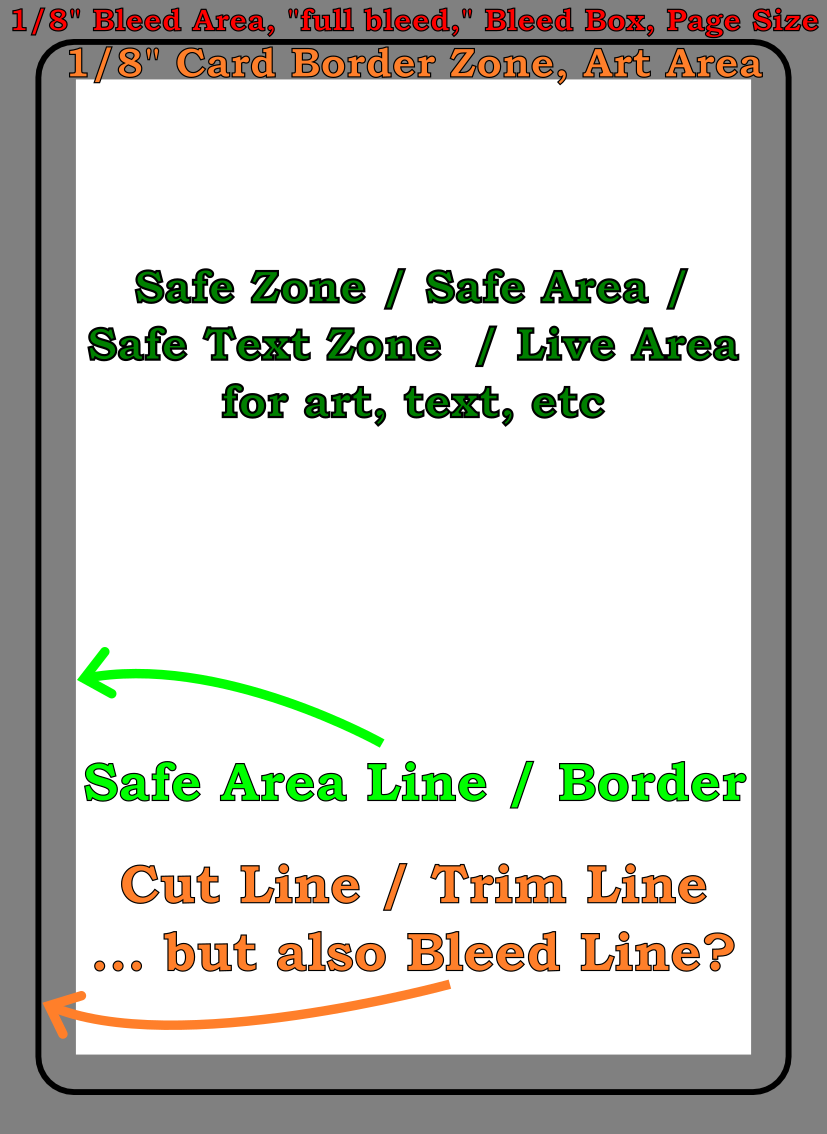
    6. Card Cut.  This is the one aspect that didn’t come out exactly as I had planned.  Ten of the cards I printed had borders, but they were visibly different widths at each end.  These cards were Premium U.S. Poker sized (2.5″ x 3.5″), the PDF itself was 2.75″ x 3.75″ (to account for the 1/8″ bleed area at each edge).  Unfortunately, I didn’t notice this until after I had used the cards a bit, so I don’t know whether top or the bottom was slightly thinner.  Since these cards are basically dividers, this isn’t a huge deal for me.  However, I’d prefer being able to get them back with an even border all the way around.

      This slideshow requires JavaScript.

  4. Customer Service:  I discussed the responsiveness of the DTC customer service team in the prior post.  They went out of their way to help me with my project – and it really smoothed things for me.

I simply could not be happier with these cards.  I will absolutely be trying them again.

Print On Demand Custom Cards
  1. Custom Cards with DriveThruCards.com
  2. Review of DriveThruCards.com

Custom Cards with DriveThruCards.com

I’ve been looking to get some playing sized cards for various purposes recently.  I’ve enjoyed making my own cards from blanks ordered off of Amazon, but for things that might get used a little more regularly, it would actually help to have these things pre-typed/printed.  And, as a long-time / returning enthusiast of a particular card card game, I was also looking to print up some proxy cards for casual play.  I don’t want counterfeit cards – just make some obviously unofficial stand-ins for real cards in casual play.

  1. Cost Breakdown
    1. If you do any kind of Googling about searching for a company to print up cards of various sizes, you’ll quickly end up at MakePlayingCards.com – or a company that has a website that looks nearly identical to MPC.  Getting a single deck of custom cards printed up through MPC is $26.15 for up to 108 cards (they offer incremental price breaks) plus $11.99 shipping (with tracking taking about 20 days) as the cheapest option, coming to $40.17 (including some tax).  This is roughly $0.37/card.
    2. Lurking in some Reddit forums, I found a few suggestions on different ways to create proxy Magic: the Gathering cards.  These forums renewed my interest in getting some cards printed up – and lead me to DriveThruCards.com.  I just placed an order for 120 cards,1 but I’ll describe the cost for 108 cards for an apples-to-apples comparison.  A single deck of custom cards printed through DTC is $12.42, plus $5.99 shipping (USPS Ground Advantage and anecdotal evidence from Reddit suggests ~10 days), plus  $1.00 in tax, comes to $19.41.  This is roughly $0.18/card.
  2. Benefits / Costs
    1. There’s no question the MPC website is cleaner and slicker, featuring drag and drop options, without a lot of technical jargon about printing, colors, etc.  They also seem to have many more options for card sizes, materials, and finishes.  They also have lots of templates in various formats to download and populate.  The obvious downsides are the length of shipping required and the cost, both estimated to be roughly twice that of DTC which is apparently in Overland, Kansas.
    2. The DTC website is… by their own admission, “challenging to learn.”  While I’m sure the interface permits a ton of customization, the dizzying array of options is daunting.  They have lots of guides on their website and knowledge base, as well as elsewhere, but it’s probably too much information.  I went with DTC for my first custom card order because I wanted to inexpensively try out some ideas and I figured that after the first order, I’d probably get the hang of their system.  However, one thing that really sets DTC apart is the responsiveness of their customer service.  I’d emailed them in the middle the day and middle of the night (aka goblin hours) and someone always back to me super fast.  Although DTC doesn’t have official PDF templates, Brian with DTC kindly whipped one up and emailed it to me which answered tons of my questions.
  3. Anatomy of a Printed Card
    1. Both MPC, DTC, and other print-on-demand (POD) websites have numerous descriptions, graphics, tutorials, and samples all using slightly different words, relating to the various sizes, printing zones, etc.  I found it incredibly confusing.  Now, I’m not certain I’ve gotten everything right, but here’s my best understanding…
      Annotated sample poker card

      Annotated sample poker card

      1. Cut Line / Trim Line / Bleed Line.
        1. The area described by the solid black line will be where the card is trimmed to the exact dimensions of the card.  The good thing about knowing what this line means is that if you know the final dimensions of your type of card, this is easy to look up and then design everything else around it.
        2. Importantly, you don’t want to include this line in your designs.  The purpose of the “safe” zone area is so the critical components of your design are certain to appear on the final product – even if it is perhaps slightly offcut.  The purpose of the “bleed” zone is to make sure a “full art” card doesn’t have bits of white or black at the edge if it is very slightly miscut.
      2. Safe Area Line / Border.  The important part to know here is that the distance from the “cut line” to the safe area is 1/8″ or 3.175 mm on all sides.  Thus, if you know the dimensions of the card you want, you just make sure your critical art and text don’t exceed this area.  All the area inside the safe area line is the “safe zone.”
      3. Bleed Box / Bleed Area / “Full Bleed” / Page Size.  As with the Safe Area Line, this is easy to figure out – it’s just 1/8″ or 3.175 mm outside the edges of the cut line.  This should be a rectangle.
  4. Software / Design Process
    1. I don’t have Adobe InDesign, Photoshop, Illustrator, or Affinity Publisher – and I wasn’t going to buy / subscribe to any of these just for this one project.  What I do have, however, is OpenSCAD and Inkscape.  Using OpenSCAD I started with a rectangle of the precise dimensions to match the exterior of the “US poker” card I wanted printed, then exported this to an SVG file.  I then did this for a rectangle of the “bleed box” size, safe line, and also the trim line.  I then imported all of these into Inkscape, layered them, and used them as guides while I designed my cards.  I made sure the critical areas were within the safe line, but made the safe line, trim line, etc all invisible.  Inkscape will allow you to export a file into a PDF file format which DTC accepts.  I created fronts and backs for cards, each exported as a separate PDF, then combined all of them using one of my favorite pieces of freeware, PDFTK.
  5. Potential Issues, Fixes
    1. Unembedded Fonts.  Apparently Inkscape did not embed all of the fonts used in the creation of the PDF.  When I tried to upload the PDF originally, DTC’s uploader balked at this and said I’d need to embed the fonts.  While I used a different PDF program (Foxit PDF is reasonably full featured and way less expensive than Adobe) to embed the fonts, I think I could have simply re-exported all the card faces as images instead of PDFs, then combined those into a new PDF which just had pictures (including pictures of the desired text).  It might have been possible to change the fonts as well to be more uniform, but given the number of cards I was creating, I didn’t want to do that.
    2. Currency.  I’m putting this here more for me than anyone else who might stop by.  At some point while using their website I accidentally did something which made all the prices and calculations appear in the Japanese Yen.  :/  I’d been through the account settings numerous times and even cleared my cookies and website cache trying to fix this problem.  After an embarrassingly long time, I gave up and emailed Brian to ask for help.  As so often happens to me… moments after hitting send I saw website footer had a drop down box to choose the currency and language.  Sorry Brian!

So, what’s next?  Well, after placing the order at roughly 2am PST on 3/19/2024, now it’s time to just wait and find out if the cards are going to get produced and arrive!  It’s now almost 6 pm PST, and their Order History page says “Sent to printer.”  Some Reddit posts suggest that it takes another 1-2 weeks to actually ship.

Print On Demand Custom Cards
  1. Custom Cards with DriveThruCards.com
  2. Review of DriveThruCards.com
  1. $20.86, if you’re being nosy []