I’ve always liked the idea of geodesic domes, but haven’t had the space, time, or ability to actually assemble one. On top of all that, I was having trouble coming up with an idea for struts that would be both sturdy and cheap enough to build a dome at a reasonable cost.
Until I went to the grocery store recently. The local supermarket had a clearance table with long bamboo skewers. I realized these could probably work really well as struts and they were extremely cheap to boot. I bought a few a the store to try out, but ultimately turned to Amazon for my bulk bamboo purchase.
Once I’ve got the skewers cut to size and the remaining connectors printed, I’ll be wrapping the entire structure in that stretchy plastic wrap used for protecting furniture when you are moving. 1 Then I’ll be putting some LED’s and possibly a laser inside to make it more interesting. :)
Lasers.
Default Series Title
We have two rolls left over from the last two times we moved… [↩]
3D printing can sometimes get a bad rap. At first people are excited by the possibilities, then after printing a few trinkets the novelty can really start to wear off. However, our 3D printers have become an absolutely critical part of our home repairs.
We have printed literally dozens and dozens of things in and around our home. As of the time I’m editing this post, we’re up to 82 things so far! The vast majority of these are completely bespoke custom creations, with a few things that are printed from Thingiverse or mashups with things from Thingiverse.
My proposed Maker Faire Bay Area 2018 Presentation submission is for a presentation that discusses:
Practical things everyone can 3D print for their own home
Repairs
Improvements
Other useful things
3D Printing with Family and Friends
Specifying a purpose (“Honey, can you make me something that…”)
Specifying dimensions and purpose (“I need something that will…”)
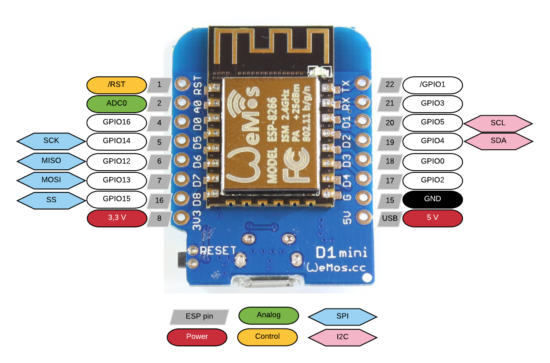
A friend of mine pointed me in the direction of some ESP32 board tutorials over at MsRaynsford.co.uk.1 You know it’s a fast moving area when a post that’s less than a month old already has a dead link. :) Rather than re-creating all the tutorials that are already out there, I’m going to just jot down my notes and links as a short of “quick start guide to quick start guides.”
This slideshow requires JavaScript.
ESP Boards
There’s several different “flavors” of ESP WiFi tech, however it seems as if they all break down into one of three different categories.
Bare ESP WiFi module. These require a bit of effort to make work since the bare module requires the pins to be broken out to be made useful.
ESP WiFi breakout boards. This type of board, which has 8 pins broken out, requires a programmer. Since these 8 pins are arranged in a 2×4 pattern, they can’t be used directly in a breadboard.
ESP WiFi development boards. These board seem to have lots of pins broken out and typically a USB connector. Since these boards have more features (voltage regulators, compatibility with other boards’ form factors, USB communication built-in), they’re going to be more expensive. There’s the Adafruit Huzzah, the Sparkfun ESP Thing, and then something called the ESP Wemos D1.
There are several different ESP modules and boards which have varying amounts of space from 512kb to 4MB and varying amounts of pins from 2 to 24 pins. These modules all tend to have different names (ESP-01, ESP-07, etc, etc) but are all known as ESP8266.
The ESP modules require 3.3v, so a 5.0v USB or other source will fry them. Plan accordingly. Some development boards have voltage regulators on them to adjust the power going to the module.
I’m ordering several boards off of Aliexpress. I’m getting a few Wemos D1 boards, since they’ll be easy to prototype with2 , and a few ESP-01 breakout boards and a single programmer to toss into a project. Then again, at <$3 a piece for the Wemos boards and <$2 a piece for the ESP breakouts, it doesn’t make a ton of sense to stretch to put the ESP-01’s into a project. My thinking is that most any project I build will only use a pin or two and not be too terribly complicated anyhow, so that once it’s been prototyped I can just burn it into the ESP-01’s and permanently install it into a project.
I’m not exactly sure which what WiFi enabled things I’d like to build yet. 3 Here are some ideas:
A pair of tap lights that are connected over the internet. I’d tap one before I left work, it would flash a color to let me know it sent a message, and the other one at home would light up to let my fam know I was on the way. I guess it’s similar in theory to this.
A button that will email or call my cell in 2-5 minutes from the time I press the button. Useful when I know someone who stepped into my office isn’t good at taking a hint. Or when I need to get off a conference call.
A button that can be used to log simple events. Might be useful at work in a variety of ways.
A button that will automatically start a print job on my WiFi enabled 3D printer.
Solder in headers, connect via USB, drop in breadboard, prototype away [↩]
Sometimes I will buy a few parts I know will be useful, spend some time tinkering with them, and then later build something when inspiration strikes. [↩]
Just seeing a post and pile of code about a project isn’t always that interesting. The nifty thing about this project is also one of the problems. They’re cosmetically identical – so you can only tell which one you’ve got by activating it. :)
I couldn’t be more pleased with the way this project came out. I basically took my daughter’s setup based off an Adafruit Circuit Playground, built a more specialized (and louder!) version into a breadboard using an Adafruit Trinket, and then ported the entire design into an ATTiny85. The only thing I would change about it would be to add a socket for the ATTiny to make it easier to modify down the line.
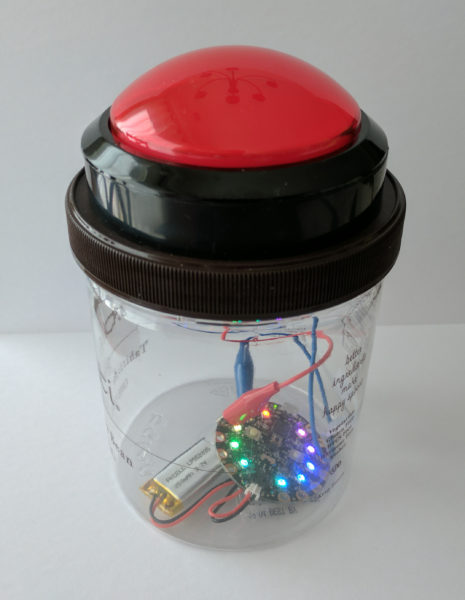
I’ve always liked the idea of the Staples Easy Button. Not so much a button that says “That was easy,” but the idea of having an enormous button on my desktop that would do… anything at all. Official “Staples Easy Buttons” used to sell for about $20 and are now only about $7. But, this is still a lot to pay for a big button that I’d want to gut anyhow. Recently I figured out a way to build a big useful button, very inexpensively.
This slideshow requires JavaScript.
The secret sauce is … a tap light! You can buy a pack of 4 big (10cm diameter) tap lights for under $4 and they’ll ship free as a “Prime add-on.” For less than $1 each, you get a three AA battery holder, toggle on/off switch, a bright LED, all neatly organized into a big plastic button. This button also has another “feature” which is missing from many other pricier options. The dome over the light is white – which means you can put any color LED or, as I did, an Adafruit Neopixel inside and the dome will change color accordingly!
This slideshow requires JavaScript.
Here are some pictures of the disassembled tap light so you can see if it would work for you. I had originally bought these so that I could put a light right next to my newest 3D printer.123
This slideshow requires JavaScript.
There’s actually quite a bit of room inside the tap light for a small project. I was able to pack a Neopixel, a small buzzer, an ATTiny85, and a rat’s nest of wires. I expect this project to take a lot of abuse at Maker Faire, so I applied a liberal amount of hot glue inside to hold the wires down and out of the path of the springs, switch, case, and the likely path of the button dome.
Once reassembled, there really isn’t any way to tell the button was hacked. It looks identical to three other tap lights. I just love that I was able to make use of the battery holder and existing switch inside the project. The 4.5V supplied by the batteries is perfect for powering my ATTiny85 and lone Neopixel. If you’ve got a junk drawer, you could probably build something very similar for about $2-3.4 As it is, I “splurged” by using $1 worth of Neopixel because I was being lazy and didn’t want to either wire up three sets of LED’s or track down three resistors to go with an RGB LED. Even so, this is an incredibly cost-effective project enclosure.
15 Second Timer-Buzzer
In case it’s of interest to you, this project is the newest iteration of our 15 Second Timer-Buzzer from my daughter’s 15 Second Drawings project for Maker Faire Bay Area 2017. The prior version used an Adafruit Circuit Playground, a 100mm Red Button, and a LiPo battery and probably cost around $40 or so. 5
All of the code is on Github. Basically, the buzzer flashes amber three times with a very short tone in between flashes, then turns green for 14 seconds, amber for one more second, and then turns red and buzzes angrily to let you know time is up. I had written most of the code to work on an ATTiny45… until the code ballooned to a whopping 4560 bytes and I had to switch to an ATTiny85.6 If I had to build this over again, I’d solder in an 8-pin DIP socket for the ATTiny rather than mutilating the chip and hot gluing it directly to the inside. ;)
Default Series Title
I have a power strip next to it, but it’s fully utilized, I only need a little bit of light sometimes, and I was getting tired of holding a flashlight on it at night [↩]
In my tradition of naming my 3D printers after characters from Futurama, my Monoprice Mini Delta is named “Roberto.” [↩]
I figure about $1 for an ATTiny85 and $1 for the button. Most people can find a way to scrounge an RGB LED or a few different LED’s, an old buzzer or piezoelectric disc, and some bits of wire [↩]
Her project was so much fun that when she invited me to team up and take the show on the road, I jumped at the chance. This year we’re bringing a new and improved timer/buzzer hacked together from a cheap tap-light and a pop-up table/booth.
We’re taking photos of the build process and will post them along with tutorials, parts lists, and source code for everything. Here’s everything you need to know to build a cheap timer-buzzer out of a tap light.