QMK: The Adventure Begins

Richard Feynman

Richard Feynman

Noted philosopher / physicist Richard Feynman has a now-famous method for quickly learning a topic.  It boils down to (a) pick topic (b) write everything you know (c) research to understand gaps (d) simplify.  While I’m not big on biographies, I found this graphic novel version extremely compelling.

I suspect most makers do something very similar to this, whether they realize it or not.  My own variation on this method is to create an outline of what I want to learn with each feature I want to include, do some preliminary internet research, add links to resources to the outline, read, drill down on topics, ask questions, LRR.1

Sometimes I’ll document stuff in a notebook, but when it’s something I know will take some time to learn and probably require code and other digital resources, I like to type them up in blog posts.  It feels therapeutic, getting all this stuff written down.  I think of it as closing mental browser tabs.  Also, by adding links into a post, I can actually close real browser tabs, which is a distinct side benefit.

Default Series Title
  1. Lather, rinse, repeat []

A Cornucopia Keyboard Options

Once I started looking, I found a lot of options for a custom keyboard.  In fact, I started seeing them everywhere.1 I found these offered as some combination of “media,” “macro,” “button,” “board,” “keypad,” and “keyboard.”  I’m offering this list in no particular order – other than how I noticed each one.

 "6 Key Macro Keypad" by @iHayri1

“6 Key Macro Keypad” by
@iHayri1

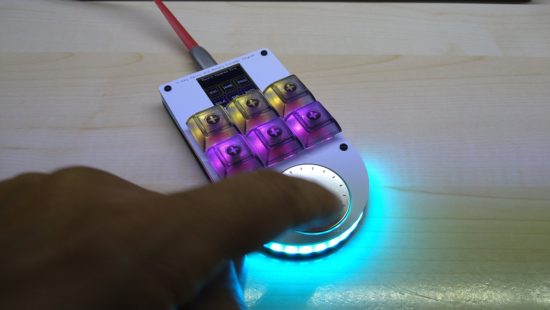
1. 6 Key Macro Keypad” by @iHayri1, ~$87

I found @iHayri1‘s keyboard in HackSpace magazine, issue #37, page 101.  If you don’t happen to have it lying around – no problem!  This magazine published by the Raspberry Pi Foundation gives away their digital version!  While on the pricier end of the keyboards, it’s got a lot of interesting features.  Six buttons, a media dial, an RGB LED under each key, a series of LED’s at the base of the keypad, and an LCD screen displaying each key’s current function.  I would have ordered this one, except it’s been out of stock for a little while.  :)

"NoodlePad" by @TheMadNoodle

“NoodlePad” by @TheMadNoodle

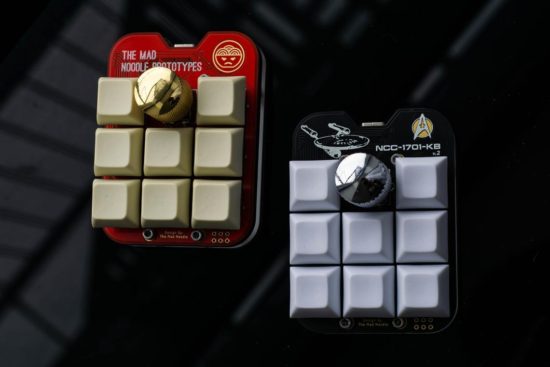
2. “NoodlePad” by @TheMadNoodle, ~$86

I found the NoodlePad by @TheMadNoodle on Etsy after searching for media keypads.  This is another beautifully designed board – eight buttons, knurled metal knob, mounted onto a shaped board and thick lasercut acrylic plate.  This was the first board I saw referencing “QMK” firmware.  This board is also offered in a “semi-assembled” state where the buyer supplies their own switches and keycaps.  If you’re going to fall down a rabbit hole on mechanical keyboards, the switches may be what get you.  The ordering options also offer “Cherry Red,” “Cherry Blue,” “Cherry Brown,” and “Cherry Black” switches.  At first I thought this referred only to the color of the switch underneath the keycap.  As it turns out, each color matches the little bit of plastic connecting into the keycap which in turn is associated with a different set of mechanical features for that particular kind of switch.  Maybe you want a key with more bounce, requires more force, or a more gentle touch.  That you can order your keypad with the exact keys you need says a lot about this maker and their product.

This slideshow requires JavaScript.

3. “BYO Keyboard” by @travis_the_makr, starting at $36

I happened to catch @travis_the_makr showing off a prototype “BYO Keyboard” on Adafruit’s Show and Tell.  I should probably feel a little bad for hassling Travis to sell me one of these board immediately after his appearance on the show.  Intended as both a way to get started with soldering and programming as well as an actually useful final project. I kinda love the project is powered by an Adafruit Itsy Bitsy M0 so you can use either Arduino or CircuitPython.  I note QMK firmware support is a stretch goal.  :)  Don’t let this bare bones DIY kit without LED’s, knobs, and displays fool you.  If, like me, you’re only now embarking on your mechanical keypad journey and don’t have a drawer full of Cherry MX switches and keycaps, this is an excellent and affordable starting point.  Suffice it to say, I immediately pledged the Kickstarter and am really looking forward to playing with this project.

BigKnob by Leafcutter Labs

BigKnob by Leafcutter Labs

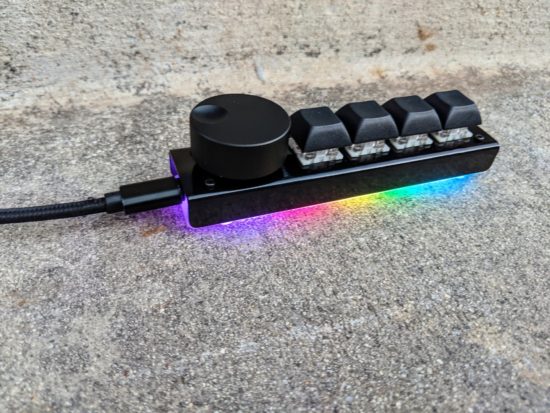
4. “BigKnob” by Leafcutter Labs, starting at $45

Of all the various keypads I’ve looked at, this was the very first one I ordered.  I opted for the version with the black steel case, wonderfully heavy metal knob, and asked the owner for some variation in the keycaps.  Craig shipped the keypad immediately and it arrived well packed in bubble wrap, only requiring that I pop in my choice of keycaps and apply the included sticky rubber feet.2 This keypad rocks four Cherry MX switches, a big hefty knurled metal knob, six RGB LED’s which glow through the lasercut acrylic base plate.  My configuration (with the metal case) was $62, including shipping.  While this is the only keypad I’ve actually used so far, it’s going to hard to top.

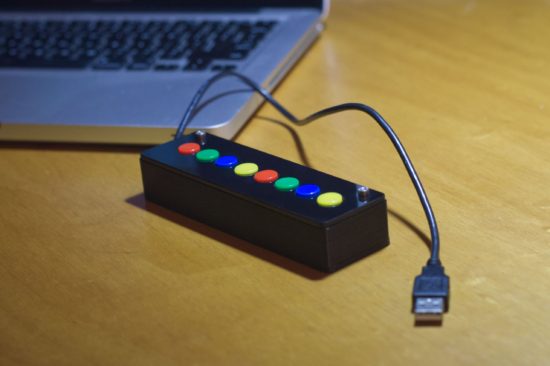
5. “8K Controller” by 2XLNetworks, starting at $32

Once I started tweeting about picking out some keypads, my buddy Pete told me about the “8K Controller” by 2XLNetworks.  This keypad has no LED’s, no metal knobs, no LCD displays – but it doesn’t need any of that.  It comes with a built-in USB cable, you can order it with pre-programmed with custom button assignments at no extra cost, reprogram it if you like, and it unlike a hipster clicky-clacky Cherry MX switch, it rocks arcade buttons.  If you need a bulletproof box that can stand up to repeated abuse at the hands of the public (perhaps for a photobooth, art project, school installation?), this is be the keyboard for you.

Default Series Title
  1. I’m reminded of the Baader–Meinhof phenomenon; after the first time you notice something, you notice it more everywhere []
  2. These are a great touch! []

Falling Down the Mechanical Keyboard Rabbit Hole

The Solace of Quantum (Mechanical Keyboards)

The Solace of Quantum (Mechanical Keyboards)

TLDR:  I’m going to try some mechanical keyboards to help me work from home and blog about my experiences.

I’m fortunate that I’ve been able to work from home this pandemic.  I’ve always made a special effort to make my work more “digital,” by scanning and organizing digital copies of important work documents.  In many ways working from home hasn’t required too many changes to my overall workflow.  My entire office and desk space shrunk to just a single laptop propped up on a plank of cardboard with some holes to help distribute heat.  I have to be more disciplined about creating digital notes, since I can’t cover my work space in post-its and illegible scraps of paper.  Two pairs of noise cancelling bluetooth headphones are are taking the place of four walls and a door to help me concentrate and communicate “I’m working” to the kids. 1  While I’ve gotten used to one medium sized laptop screen, in place of a dual monitor setup, the one thing that’s been extremely difficult is using a laptop keyboard instead of a full fledged keyboard.

Which brings me, dear reader, to the QMK or “quantum mechanical keyboards.”  The QMK is a keyboard firmware2 that allows you to create very customized keyboards and keyboard layouts.

A while back I wrote a Chrome extension to help me with some work related data entry tasks.  It works by intercepting some of the top row function keys, preventing their default actions, and replacing them with some macros.  This setup probably slashed the number of required clicks and keystrokes by 75%.  My fevered dream is for a custom keyboard which could cut this yet in half.

Now, if that keyboard also has some media controls and sweet RGB goodness, well, then, awesome.  Of course, this means I can’t just go order a keyboard off a shelf.  While there are plenty of neat custom and QMK keyboards, to really get the most out of a board, to get exactly what I need, I will need to roll up my sleeves and actually dive into the firmware itself.

Next up – which keyboards?!

Default Series Title
  1. Why two pairs?  I originally bought one for myself and one for my wife, but now I’m just using one while the other charges… []
  2. “Firmware” is nothing more than software built to run inside a piece of hardware []