New Year’s Ambitions!

Forward is the only way

Forward is the only way

At the beginning of the year I decided upon a few New Year’s Ambitions.1 I don’t like the idea of resolutions.2 Resolutions tend to be rule-driven.  And, the problem with a rule-driven resolution is that once it’s broken, your whole plan is shot.  An ambition, on the other hand, is a goal without a prescribed methodology for obtaining the goal.

Thus, New Year’s Ambitions.  Here is my list of things that, if I were looking back upon all of 2013, I would like to see as a list of accomplishments.

More on these in a little bit…

Default Series Title
  1. Photo courtesy of David []
  2. It’s not that I’m not resolute – I certainly can be.  I’m certain of it. []

Sailfish + Print-O-Matic = Wow

dutchmogul's Keep

dutchmogul’s Keep

Last night and tonight I have been tinkering with Flexo, my Thing-O-Matic, to install Jetty’s Sailfish firmware update.  The setup text is very helpful, but not particularly optimized for a Thing-O-Matic with a MK6 extruder.  I also found that I had to heavily modify the “start.gcode” and “end.gcode” to keep my bot from shaking itself to pieces. 1

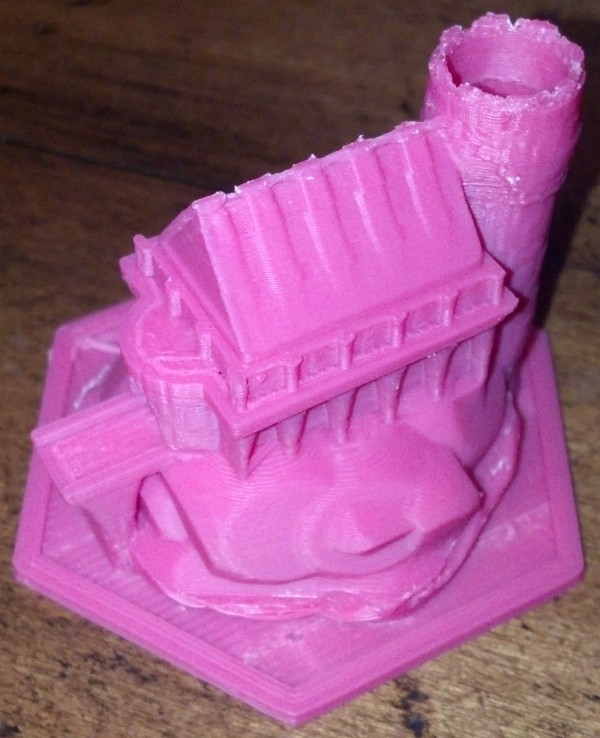
However, the results of combining Sailfish with ReplicatorG’s Print-O-Matic are impressive.  Dutchmogul’s Keep, pictured above, was printed with a layer height of 0.15mm, 10% infill, all with a stock 0.5mm nozzle.  That’s the very best resolution I’ve managed with my Thing-O-Matic, ever.  At 0.15mm thick layers, I have a difficult time seeing the layers if the model is more than 6 inches from my face and the ridges on the vertical parts is difficult to discern with a fingertip.

Now that I’ve finished that print I think I can push my ‘bot’s print resolution farther.  I’m willing to bet I can print down to 0.10mm layer height if I re-applied the Kapton tape and did a better job of leveling the print bed.  Also, one of the acknowledged challenges with 3mm filament based extruders is the pressure buildup that can lead to imprecise plastic deposits when dealing with non-contiguous parts. 2  Dialing in the Skeinforge “Retraction” or the Sailfish “Deprime” settings dialed in would really help with complex prints.

  1. The default “start.gcode” tried to home to the XY maximums and Z minimum – where there are no endstops.  The default “end.gcode” did the same thing for some reason.  I also had to modify the “start.gcode” so that the print head was better positioned for starting a print. []
  2. By this, I mean that when you’re printing two or more features that are not connected, say for example a table that is legs-side-up, an extruder will naturally ooze a little bit of plastic as it travels between legs, leaving a thin spider web like strand.  The “retraction” setting in Skeinforge is used to combat this, and does so fairly effectively in the case of a stepper based extruder.  That setting reverses the extruder motor quickly just after the print head leaves a leg and then quickly moves extra fast forward as it gets to the next leg, which prevents the spider web effect. []

First part prototyped!

I’ve just prototyped my first part for a client!  What fun!

He sent over some design files, we discussed some of the constraints of the MakerBot Cupcake CNC (overhang limits, printing resolution, ABS warpage, build sizes), went back and forth over several iterations of the design, and today I printed it up!

In getting ready to print his part I had tuned my ‘bot over the weekend.  The part has the absolute smoothest sides I’ve been able to print on anything to date with minimal stringing.  I’m really really proud of that print.  The resolution came out so well I want to reprint several prior prints – such as the TARDIS and dalek.

Anyone want a second hand TARDIS?

MakerBot Cupcake CNC print resolution

Some people have asked me about the MakerBot’s print resolution.  Although this information can be found on the MakerBot wiki, there’s no harm in disseminating this data. 1  Before I get into some of the technical stuff, let me just say this – the print resolution is pretty freaking good for a $750 DIY robot and it will give a $15,000 commercial printer a run for it’s money.

As a printer that can create objects in three dimensions the normal two-dimensional printer resolution jargon of “DPI” or “dots per inch” doesn’t mean much.  The printing resolution for the X/Y axes is 0.085mm and the resolution for the Z axis is 3.125 microns.  Most of the time you’re going to have a Z axis resolution of about 1/3 of a millimeter.  If you print with layers much smaller than that it will take forever to print without a huge increase in quality.

Or, to put it another way…  if you were to hand me two objects one printed on a MakerBot and one printed on a commercial printer, I’m going to ask you why the heck one of them costs $14,000 more than the other.  I’ve printed some pretty intricate and detailed stuff on my MakerBot.  As I tune it I hope to improve it even more.

  1. If you haven’t poked around the website, I highly recommend it.  There’s a lot of information about the Cupcake CNC, RepRap, fused deposition modeling, robots, and all sorts of stuff. []