MakerBot starter kit

A little while ago someone posted on the MakerBot Operators group that they were looking for printed pulleys.  Apparently he had managed to scavenge or hack together everything else.

This got me wondering – what printed parts would someone need to get a MakerBot rolling?  There’s the obvious printed pulleys.  If I had a friend who was putting one together, I’d probably want to give them a spare insulator retainer ring and Z axis pulley.  What else should be in a MakerBot starter/welcome kit?

Printing a MakerBot

I’ve already pontificated on the idea that if you’ve purchased a MakerBot Cupcake CNC Deluxe kit, you basically get a second MakerBot for half off.  (Spoiler: it’s because you can print a ton of the most expensive parts that go into building a new one).  I don’t know why, but the idea of replacing wooden parts on my ‘bot with printed parts just fascinates me. 1

So, let’s have a list of potentially (and actually!) printable parts:

  • Electronics spacers
  • 3 large pulleys, 1 small pulley
  • Y stage, the entire thing, as a single print
  • X stage, in three large prints (there would be no need for the end caps if the three pieces were designed properly)
  • Insulating retainer ring
  • Printruder
  • Dinos
  • X stage end caps
  • Z stage captive nut guides
  • Z axis rod bearing brackets

Having more printed components for the MakerBot would reduce a lot of work in it’s assembly.  There’s a lot of tiny fiddly bits in the X and Y stages that would become obsolete.

Heck, it might even be possible to replace some of the bolts with some kind of printable fastener system.

  1. Cue Johnny Cash singin’ One Piece At A Time []

C is for Catalyst

I purchased the MakerBot Deluxe Cupcake CNC kit – which came with plenty of tools and TONS of plastic.  The Deluxe kit came with things that you’ll need to operate your MakerBot such as the USB2TTL cable, power supply, and ethernet cables.

However, the wrenches and hex keys could be reused to build another ‘bot.  Parts printed up on a MakerBot could be used to print several very useful, and sometimes expensive, parts for another MakerBot.  The plastruder toolhead is $125.00 without the circuit board.  If you could print up the dinos, printstruder, idler wheel, and insulating retainer ring, you’re replacing all of the lasercut acrylic parts ($50.00 at MakerBot).  A persistent person could even replace all of the plastic spacers, wooden or plastic pulleys, the various wooden holders (Z rod caps, Z stage guides, X end rod caps), and probably even the  entire Y stage with printed parts. 1

Heck, if you had all of those parts you would basically just need a box in which to install them all.

Hmmm.  Anyone feel like designing a printable Y stage?

  1. In fairness, the Y stage would have to be printed up in several pieces due to size limitations. []

On second thought…

After seeing the dramatic difference printing from the SD card made, I think I’ll try my hand at printing the replacement insulator retainer ring again.  I think I’ll end up with a much better result on the small screw holes by doing this.

Sooo…  if you break your acrylic (or ABS) insulator retainer ring, drop me a line.

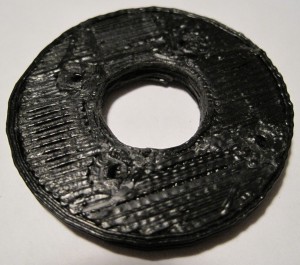
New print: MakerBot Insulator Retainer Ring

Insulator Retainer Ring

Insulator Retainer Ring

Lots of non-robot stuff keeping me busy…  but not too busy to print a replacement insulator retainer ring!  I should really start a list of the first things you should print once you get a MakerBot.  This should be way at the top, even above the Z-axis crank.

From what I gather from the MakerBot operators group, the 5mm acrylic insulator retainer ring that comes with the MakerBot kit will eventually fail.  If this happens, the heater will basically pop off and melt into whatever you were building at the time.

Really, it’s all about choices, right? The extruder motor is super slow but super strong.  Chances are it will eventually deform some part of your assembly.  With this in mind, you can build your heater assembly with and without the nut.  Depending upon which you do, different parts will be bearing the brunt of the force exerted by the extruder motor.

If you assemble the heater without the nut below the washer, the majority of the force will be applied by the motor to the filament and into the barrel and nozzle, eventually forcing the nozzle downwards, ruining the PTFE insulator barrier, stripping the PTFE barrier threads, pushing out the nozzle, and making a molten oozing mess of everything.

If instead you assemble the heater with the nut below the washer, the nut will hold the washer in place and the majority of the downwards force applied by the extruder motor will be placed on the insulator retainer ring.  If the insulator barrier ring fails, it will crack or shatter dropping the heater into whatever you were building.

The good news about the second method is that its pretty easy to print up a replacement insulator retainer ring to keep handy!