Ideas for Cupcake CNC upgrades

Sometimes when using the ReplicatorG control panel I accidentally hit Z- instead of Z+ to adjust the stage height.  As you might imagine, this causes problems.  At best, I end up with the Z stage out of whack.  At worst, the hot and extruding print head slams into the build platform or model and knocks the Z stage out of whack.

Two possible upgrades would be:

  1. A simple bubble level for the build platform and/or Z stage to make it easy to verify the surface is level.  I would imagine bubble levels are relatively cheap.
  2. A bracket that fits around the lower section of the Z axis rods, which would prevent the Z stage from descending below a particular level.  It could be as simple as a little plastic nub that is bolted to the inside of the ‘bot that prevents the stage from being lowered.  Four of them would probably work fine.  OR, you could put an extra nut on each Z axis below the nut that supports the Z stage.  Someone could then design a little plastic widget that would fit on top of that extra nut and have a prong that sticks up – preventing the Z axis from lowering further.

Things I learned while trying to unclog my extruder barrel

I learned a lot this morning!  And now you don’t have to learn, as they say, the hard way.

  1. Never ever ever use tiles. I thought I was being very clever with the tile idea.  Apparently leftover kitchen tiles can shatter and fly apart when you heat them.  Who knew?
  2. Instead, use a big piece of metal to hold the barrel. I ended up using a piece of metal I had laying around to hold the extruder barrel and weight it down with a rock.  This worked perfectly.
  3. Don’t tilt your blow torch too much. Probably an elementary thing for most people.  My torch kept going out when I tilted it too far – probably a safety feature.  This meant I had to change the set up so that the barrel was somewhat elevated so I could keep the torch mostly vertical.
  4. Keep a friend handy. This was one of my few ideas/preconceptions that actually worked out.  Thankfully I didn’t need him to use the fire extinguisher or garden hose, but I very well could have.
  5. Don’t leave a nut on the extruder barrel. At the last minute I decided to screw a nut part way on the barrel.  I figured I could prop the extruder barrel up in the washer, heat it, and not discolor the nut or washer.  This didn’t work out because I needed to apply more heat to the barrel to get the clog out.

Cracking a tough nut

Dave M. posted his process for removing a threaded barrel from his PTFE insulator, and it’s brilliant.  I was wondering how to do this since I may want to get my heater barrel out of the nozzle.  But, how to do it without having to some plyers, vice, or some other crushing instrument on the threads?!

  • Screw on one nut, a washer, and another nut.
  • Put the PTFE in a vice
  • Put a wrench on the nut below the washer
  • Muscles!

New print: MakerBot Insulator Retainer Ring

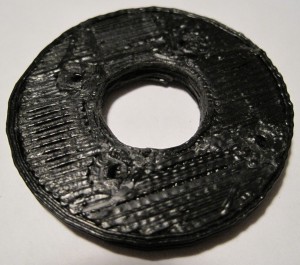
Insulator Retainer Ring

Insulator Retainer Ring

Lots of non-robot stuff keeping me busy…  but not too busy to print a replacement insulator retainer ring!  I should really start a list of the first things you should print once you get a MakerBot.  This should be way at the top, even above the Z-axis crank.

From what I gather from the MakerBot operators group, the 5mm acrylic insulator retainer ring that comes with the MakerBot kit will eventually fail.  If this happens, the heater will basically pop off and melt into whatever you were building at the time.

Really, it’s all about choices, right? The extruder motor is super slow but super strong.  Chances are it will eventually deform some part of your assembly.  With this in mind, you can build your heater assembly with and without the nut.  Depending upon which you do, different parts will be bearing the brunt of the force exerted by the extruder motor.

If you assemble the heater without the nut below the washer, the majority of the force will be applied by the motor to the filament and into the barrel and nozzle, eventually forcing the nozzle downwards, ruining the PTFE insulator barrier, stripping the PTFE barrier threads, pushing out the nozzle, and making a molten oozing mess of everything.

If instead you assemble the heater with the nut below the washer, the nut will hold the washer in place and the majority of the downwards force applied by the extruder motor will be placed on the insulator retainer ring.  If the insulator barrier ring fails, it will crack or shatter dropping the heater into whatever you were building.

The good news about the second method is that its pretty easy to print up a replacement insulator retainer ring to keep handy!

Pulley troubles

My MakerBot (Batch 9) uses printed pulleys.  I had attached them to my MakerBot with the bolt going down into the body with a nut underneath.  As far as I can tell, there’s only two ways to attach the printed pulleys to a ‘bot:

  1. Bolt going down into the ‘bot, nut underneath and inside, pulley with the tapered edge on the top.
  2. Bolt going up from underneath and inside the ‘bot, nut on top, pulley with the tapered edge on the bottom.
Printed pulleys, tapered end down

Printed pulleys, tapered end down

The problem with this orientation is that the pulley can slip down on the bolt.  When this happens it’s very easy for the belt to gradually ride up the tapered edge and then right off the pulley.  This ended up killing one of my test prints as the Z-stage started to descend to start the print.  Because of the way the “tapered end up” orientation of the pulley rides on the belt, I don’t think sanding away the taper would totally remove the problem.

Stopping for now

The body of the MakerBot is complete, rods in, X and Y stages in, pulleys and belts on, motors bolted on.  No opto-ends stops yet for obvious reasons.  The opto-endstops also require popsicle sticks.

On to the plastruder.  I put together the Weird Dino and the Tall Dino, but the idler pulley requires super glue.  I don’t happen to have any lying around, so I’ll need to go out to the hardware store.  But, this is as good a spot to stop as any.

I originally intended to document each step – but the directions on the MakerBot wiki are so good that there’s just no need.  So, the pictures you’re going to see are going to basically jump from a bunch of spraypainted wood giant chunks of the robot already bolted together.

The build process, much of what consists of fitting pieces together and using the MakerBot “t-slot” semi-captive nut method, is very intuitive, relatively easy, and extremely gratifying.  Sometimes its a little bit of effort to get that nut in the notch properly, but it was never that bad.