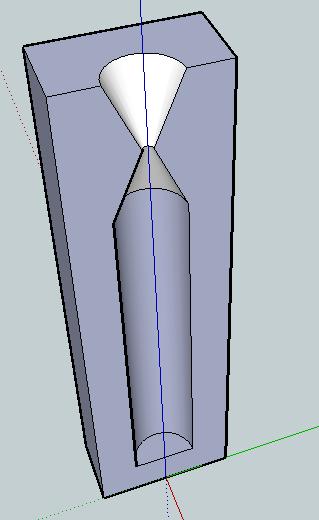
Thing idea: Crayon mold

Crayon Mold v0

Crayon Mold v0

Problem: Broken crayons, useless crayon bits, or crayon shavings.  Crayola has their own crayon making system – a cross between an easy-bake-oven and little molds.  However, I don’t think it is quite versatile enough.  Plus, why pay $20 for what could be accomplished easily for $0.20 worth of plastic parts?

Solution: A printed crayon mold!

Description: Crayons melt at about 128 – 147 degrees Fahrenheit, or up to about 66 degrees CelsiusABS won’t melt until around 88-125 degrees Celsius, so there’s a wide margin for melting the paraffin wax crayons without distorting the mold.1

I would want at least three different molds – the normal crayon size, the fat crayon size, and then a triangular non-rolling crayon size.  I’m picturing a two part mold for each, with the seam of the two parts running along the crayon lengthwise and a half funnel for pouring.

In addition to the half-mold, I’d also design a snug fitting square block for fitting the assembled mold into.  That way you could stand it up and pour crayon wax into it.

Another potential use for this would be to place the pieces of crayon inside the mold, close it up, then heat.  This would allow you to mend a broken crayon.

Usage: I can think of several different ways to use this mold.  Frankly, I’m not sure which is easiest/most advisable/least advisable.  There are easily several considerations:

  1. Assembly:
    1. The mold could be assembled with crayon inside to be melted and repaired.
    2. Crayon pieces could be melted and then poured into the assembled mold.
    3. Crayon pieces could be placed in the funnel at the top of the mold, the entire system heated and crayon allowed to melt down into the mold.
  2. Melting:
    1. Crayon could be melted in a test tube or similar container in the oven, microwave, hot water bath (such as on the stove) or perhaps even open flame and poured into the mold.
    2. Crayon could be melted while inside the mold by placing the mold in a heat source (oven, microwave, hot water bath).
    3. Crayon could be placed in the funnel and allowed to melt down into the mold with the application of a heat source (oven, microwave, hot water bath, open flame?, or sunlight plus magnifying lens!)
  3. Cooling:
    1. Allowing to naturally cool to ambient room temperature.
    2. Placing in fridge.
    3. Placing in freezer.
    4. Placing in cold water bath.

I’m not sure which method of heating and cooling are optimal.  Though I’d suspect it is preferable to apply the least amount of heat over the shortest period possible.

Variations: It would be interesting to create these molds in different shapes besides cylinders.  You could top each one with a geometric shape, the head (or tail!) of some kind of animal or character, or something else entirely.  You could mold crayons into spheres, blocks, chips, or little figurines.  While not particularly sturdy, you could even mold them into building blocks or components of some larger device.  A clever person could use some left over nichrome wire to build a heated metallic funnel.

  1. That said, my extruder isn’t pumping out plastic until it hits 200 degrees Celsius at least. []

Things I learned while trying to unclog my extruder barrel

I learned a lot this morning!  And now you don’t have to learn, as they say, the hard way.

  1. Never ever ever use tiles. I thought I was being very clever with the tile idea.  Apparently leftover kitchen tiles can shatter and fly apart when you heat them.  Who knew?
  2. Instead, use a big piece of metal to hold the barrel. I ended up using a piece of metal I had laying around to hold the extruder barrel and weight it down with a rock.  This worked perfectly.
  3. Don’t tilt your blow torch too much. Probably an elementary thing for most people.  My torch kept going out when I tilted it too far – probably a safety feature.  This meant I had to change the set up so that the barrel was somewhat elevated so I could keep the torch mostly vertical.
  4. Keep a friend handy. This was one of my few ideas/preconceptions that actually worked out.  Thankfully I didn’t need him to use the fire extinguisher or garden hose, but I very well could have.
  5. Don’t leave a nut on the extruder barrel. At the last minute I decided to screw a nut part way on the barrel.  I figured I could prop the extruder barrel up in the washer, heat it, and not discolor the nut or washer.  This didn’t work out because I needed to apply more heat to the barrel to get the clog out.

Plastic oozing into threads – is that the end of my insulator?

I don’t know, but I’m about to find out.

I’ve managed to clear out the PTFE insulator pretty well.  I pulled the entire heater out of the extruder, turned up the heat a little, held the barrel lightly in plyers, and unscrewed the PTFE without a problem, and then turned the heat off.  I then used a precision flathead screwdriver to follow the threads, popping/chipping the plastic out as I followed I went.  However, I don’t know to what extent the threads are still intact.  Since the PLA oozed into the threads, I have to think they’re messed up to some extent.

As for the barrel, I used a drill bit with the unsharp end wrapped in a rubber band.  I rotated the bit using the rubber band as a grip to drill out the plastic.  It actually worked really well for clearing out the barrel right to where I can see the barrel entering the nozzle.  The inside is reasonably clean, but I still can’t put a filament into it freely.

I also had to take a precision screwdriver and follow along the threads on the barrel to chip out plastic.  This went reasonably quickly.  Once I was done the nut was able to screw on and off freely.

Now I’m left with a slightly discolored PTFE and a mostly clean barrel.  I’ve got a spare PTFE insulator, but I’m hoping this one is salvageable.  It still has threads and the barrel will screw in nicely.

Rick and Spacexula have suggested I use a torch to heat up the nozzle and let the plastic burn/fall out.  But, this is a trick for another day with proper safety equipment.

Oh, and before I forget, Spacexula suggested keeping a ruined PTFE barrier to slice into insulating washers.  I’m hoping I might be able to re-use the PTFE insulator, but this is certainly my backup plan.