A totally imaginary interview

It’s been an interesting year for RepRap/MakerBot.  We’ve seen demand for parts and electronics increase.  The MakerBot crew reported that for certain components they’ve actually cleaned out every source in the world.  I’m not sure which component they’re referring to, but I suspect it’s the toothed extruder pulley.  I love the idea that MakerBot has created a product garnering such high demand the entire freaking planet ran out of parts.

Can you imagine giving an interview after such an announcement?

  • Reporter: Guys, this has been a great year for MakerBot.  What are your plans for next quarter?
  • MBI: Gosh, we’ve got so many ideas!  The community has been hugely supportive and their rate of contribution and development has helped us so much.  Right now we’re splitting our time between production and development.  Batch 12, consisting of  about 147 robots, is out the door.  Batch 13 has already started to ship as the parts come in.  We’ve come a long way since the 22 robots of Batch 1.
  • Reporter: Fantastic!  What are your plans for Batch 14?
  • MBI: Dang, we were hoping you wouldn’t ask that.  Zero.
  • Reporter: I’m sorry – zero robots?  Why did demand drop off so suddenly?
  • MBI: Quite the opposite – we’ve completely exhausted the entire world’s supply of aluminum toothed pulleys.  We’re hoping to have some custom made, but at this point we’re competing with the Japanese for aluminum.  Some people suggested we start melting down soda cans for the metal.
  • Reporter: <incredulous> You’re competing with the Japanese?
  • MBI: Not every Japanese person, but the automotive industry, sure.  For a while India looked to be a competitor, but with the strength of the rupee I’m just not expecting that much competition.  We’re far more concerned about the ability of Chinese to scale their production to meet demand.  Fortunately, we think we’ve found a toner cartridge factory willing to switch over to aluminum toothed pulleys.
  • Reporter: <even more incredulous> Wait, wait, wait…  You’re concerned about the ability of an economy of one billion people to scale production to meet the needs of a DIY robot kit start up???
  • MBI: Concerned is a strong word.  The Chinese ambassador has been leaving us messages about this issue.  When we finally got around to returning his calls he assured us they’re up to the task.  I’d say we’re cautiously optimistic.

MakerBot starter kit

A little while ago someone posted on the MakerBot Operators group that they were looking for printed pulleys.  Apparently he had managed to scavenge or hack together everything else.

This got me wondering – what printed parts would someone need to get a MakerBot rolling?  There’s the obvious printed pulleys.  If I had a friend who was putting one together, I’d probably want to give them a spare insulator retainer ring and Z axis pulley.  What else should be in a MakerBot starter/welcome kit?

Marco!

Polo!

I’m always curious to see where other MakerBotters are located.  Sure, I could always check out the RepRapMap1  However, sometimes I may want to know where just the MakerBot are.  Someone on the MakerBot Operator’s group was looking for some pulleys for his homebrew MakerBot – and was pleasantly surprised to find out there were so many semi-local MakerBotters.

This morning I created a collaborative open MakerBot Map.  Stick a pin in it and let everyone know where you are!

P.S. Party at your house.  We’ll be there at 6.

  1. Gotta love the alliteration []

Stopping for now

The body of the MakerBot is complete, rods in, X and Y stages in, pulleys and belts on, motors bolted on.  No opto-ends stops yet for obvious reasons.  The opto-endstops also require popsicle sticks.

On to the plastruder.  I put together the Weird Dino and the Tall Dino, but the idler pulley requires super glue.  I don’t happen to have any lying around, so I’ll need to go out to the hardware store.  But, this is as good a spot to stop as any.

I originally intended to document each step – but the directions on the MakerBot wiki are so good that there’s just no need.  So, the pictures you’re going to see are going to basically jump from a bunch of spraypainted wood giant chunks of the robot already bolted together.

The build process, much of what consists of fitting pieces together and using the MakerBot “t-slot” semi-captive nut method, is very intuitive, relatively easy, and extremely gratifying.  Sometimes its a little bit of effort to get that nut in the notch properly, but it was never that bad.

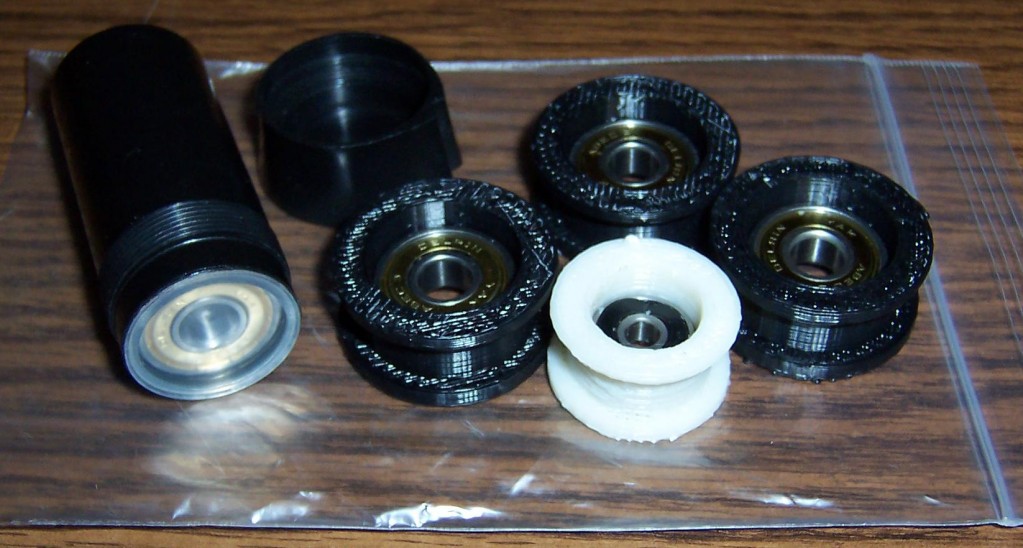
Printed Pulleys Assembled!

I’ve just take the first step to building my MakerBot!  Admittedly, two of the bearings were already in the printed pulleys, but that’s just not the point.  I’ve taken a material step towards building it!  Huzzah!

Printed pulleys assembled!

Printed pulleys assembled!

Oh, and I don’t think I was supposed to have a pack of 8 extra bearings.

No, no, I’m supposed to have these 8 bearings.  I suppose it would help if I read the directions.  (I’m just so used to grabbing things and tossing them together and expecting them to work.  I guess it’s a little more complicated than that when you’re building a robot, eh?)