EDC Bag Materials, Designs, Etc

I’ve been spending way too much time fiddling around thinking about a new every day carry bag, but not a lot of time actually doing anything about it.  I’ve got piles of notes, lots of links, sketches, and product photos.  Here’s a lot of them:

This slideshow requires JavaScript.

My notes and brainstorming are also rather extensive:

  1. Different Potential Uses
    1. Work (laptop, charger), day trips (water bottle), hiking (water bottle, clothing, snacks), running errands / tech / game nights / art
  2. EDC Items
    1. An EDC Bag should be able to accommodate things that I’d be likely to carry about 80% of the time.
    2. Mask, sanitizer, tissue, handkerchief, wipes, plastic baggie
    3. Cell phone, bluetooth pocket, charger pouch, sunglasses, pens, small pad of paper, ¼ A4, Kindle
    4. Keys on interior carabiner, ring whistle loop/loud whistle, lanyards
    5. Interior lining for wallet with RFID blocking, zip ties, carabiner (in pocket?) for keys
    6. On outside, hotel key, BART card
  3. Design Requirements / Goals
    1. When empty, it should be as flat as possible
    2. Wide straps for comfort if carrying something heavy, plus good for stowing a cell phone
    3. Pull rings, paracord top grip handle (also this guide), quick access pockets
    4. Bidirectional, so the main features can be worn over either shoulder
    5. Reduction of metal, heavy parts
    6. Outside straps which can be keep an umbrella, roll of material, or jacket
    7. Outside zippered pouch on the inside (against the body) to make it less likely to be pick pocketed, internal loops for clipping / hooking keys, rings, lanyards
    8. Reinforced corners, grommets
    9. Laptop pouch inside which is higher, area for charger to fall lower
    10. Pouches and pockets near the top
    11. How many pockets, pouches, zippered, velcro, etc?
  4. Materials
    1. Heavy nylon or similar
    2. Internal lining with fleece, ripstop nylon
    3. TPU (thermoplastic polyurethane) or PU (polyurethane) coatings
    4. Foam for padding
    5. Paracord for draw strings, grip wraps
    6. Zippers
Custom Every Day Carry Bag
  1. My Ultimate Bag
  2. Custom Every Day Carry (EDC) Bag
  3. Sewing Practice
  4. EDC Bag Materials, Designs, Etc

Sewing Practice

About two years ago I purchased a few kits from RipstopByTheRoll.com – their Zipper Pouch Kit and their $10 kit.  They were partially for sewing practice and brush off long dormant sewing skills, but mostly for learning some new skills.  (You see, I have zipper cowardice.)

I did do a little bit of sewing at the beginning of the pandemic. 1

In learning how to get started sewing (again) I had to make sense of my sewing machine, settings, and sewing basics:

  • Brother XM3700 overview, settings
    • I had no idea what I was doing or what the dials were supposed to do.  Clockwise from left to right, they are the string tension (should stay between 3-5), left-right movement (irrelevant to straight stitches and seemingly best between 2-3 for zig zags), stitch length (between 1-3), and then the stitch selection dial (sticking with 2 for straight stitch and 3 for zig zags)
    • Using the automatic needle threader which way more helpful than I expected it to be
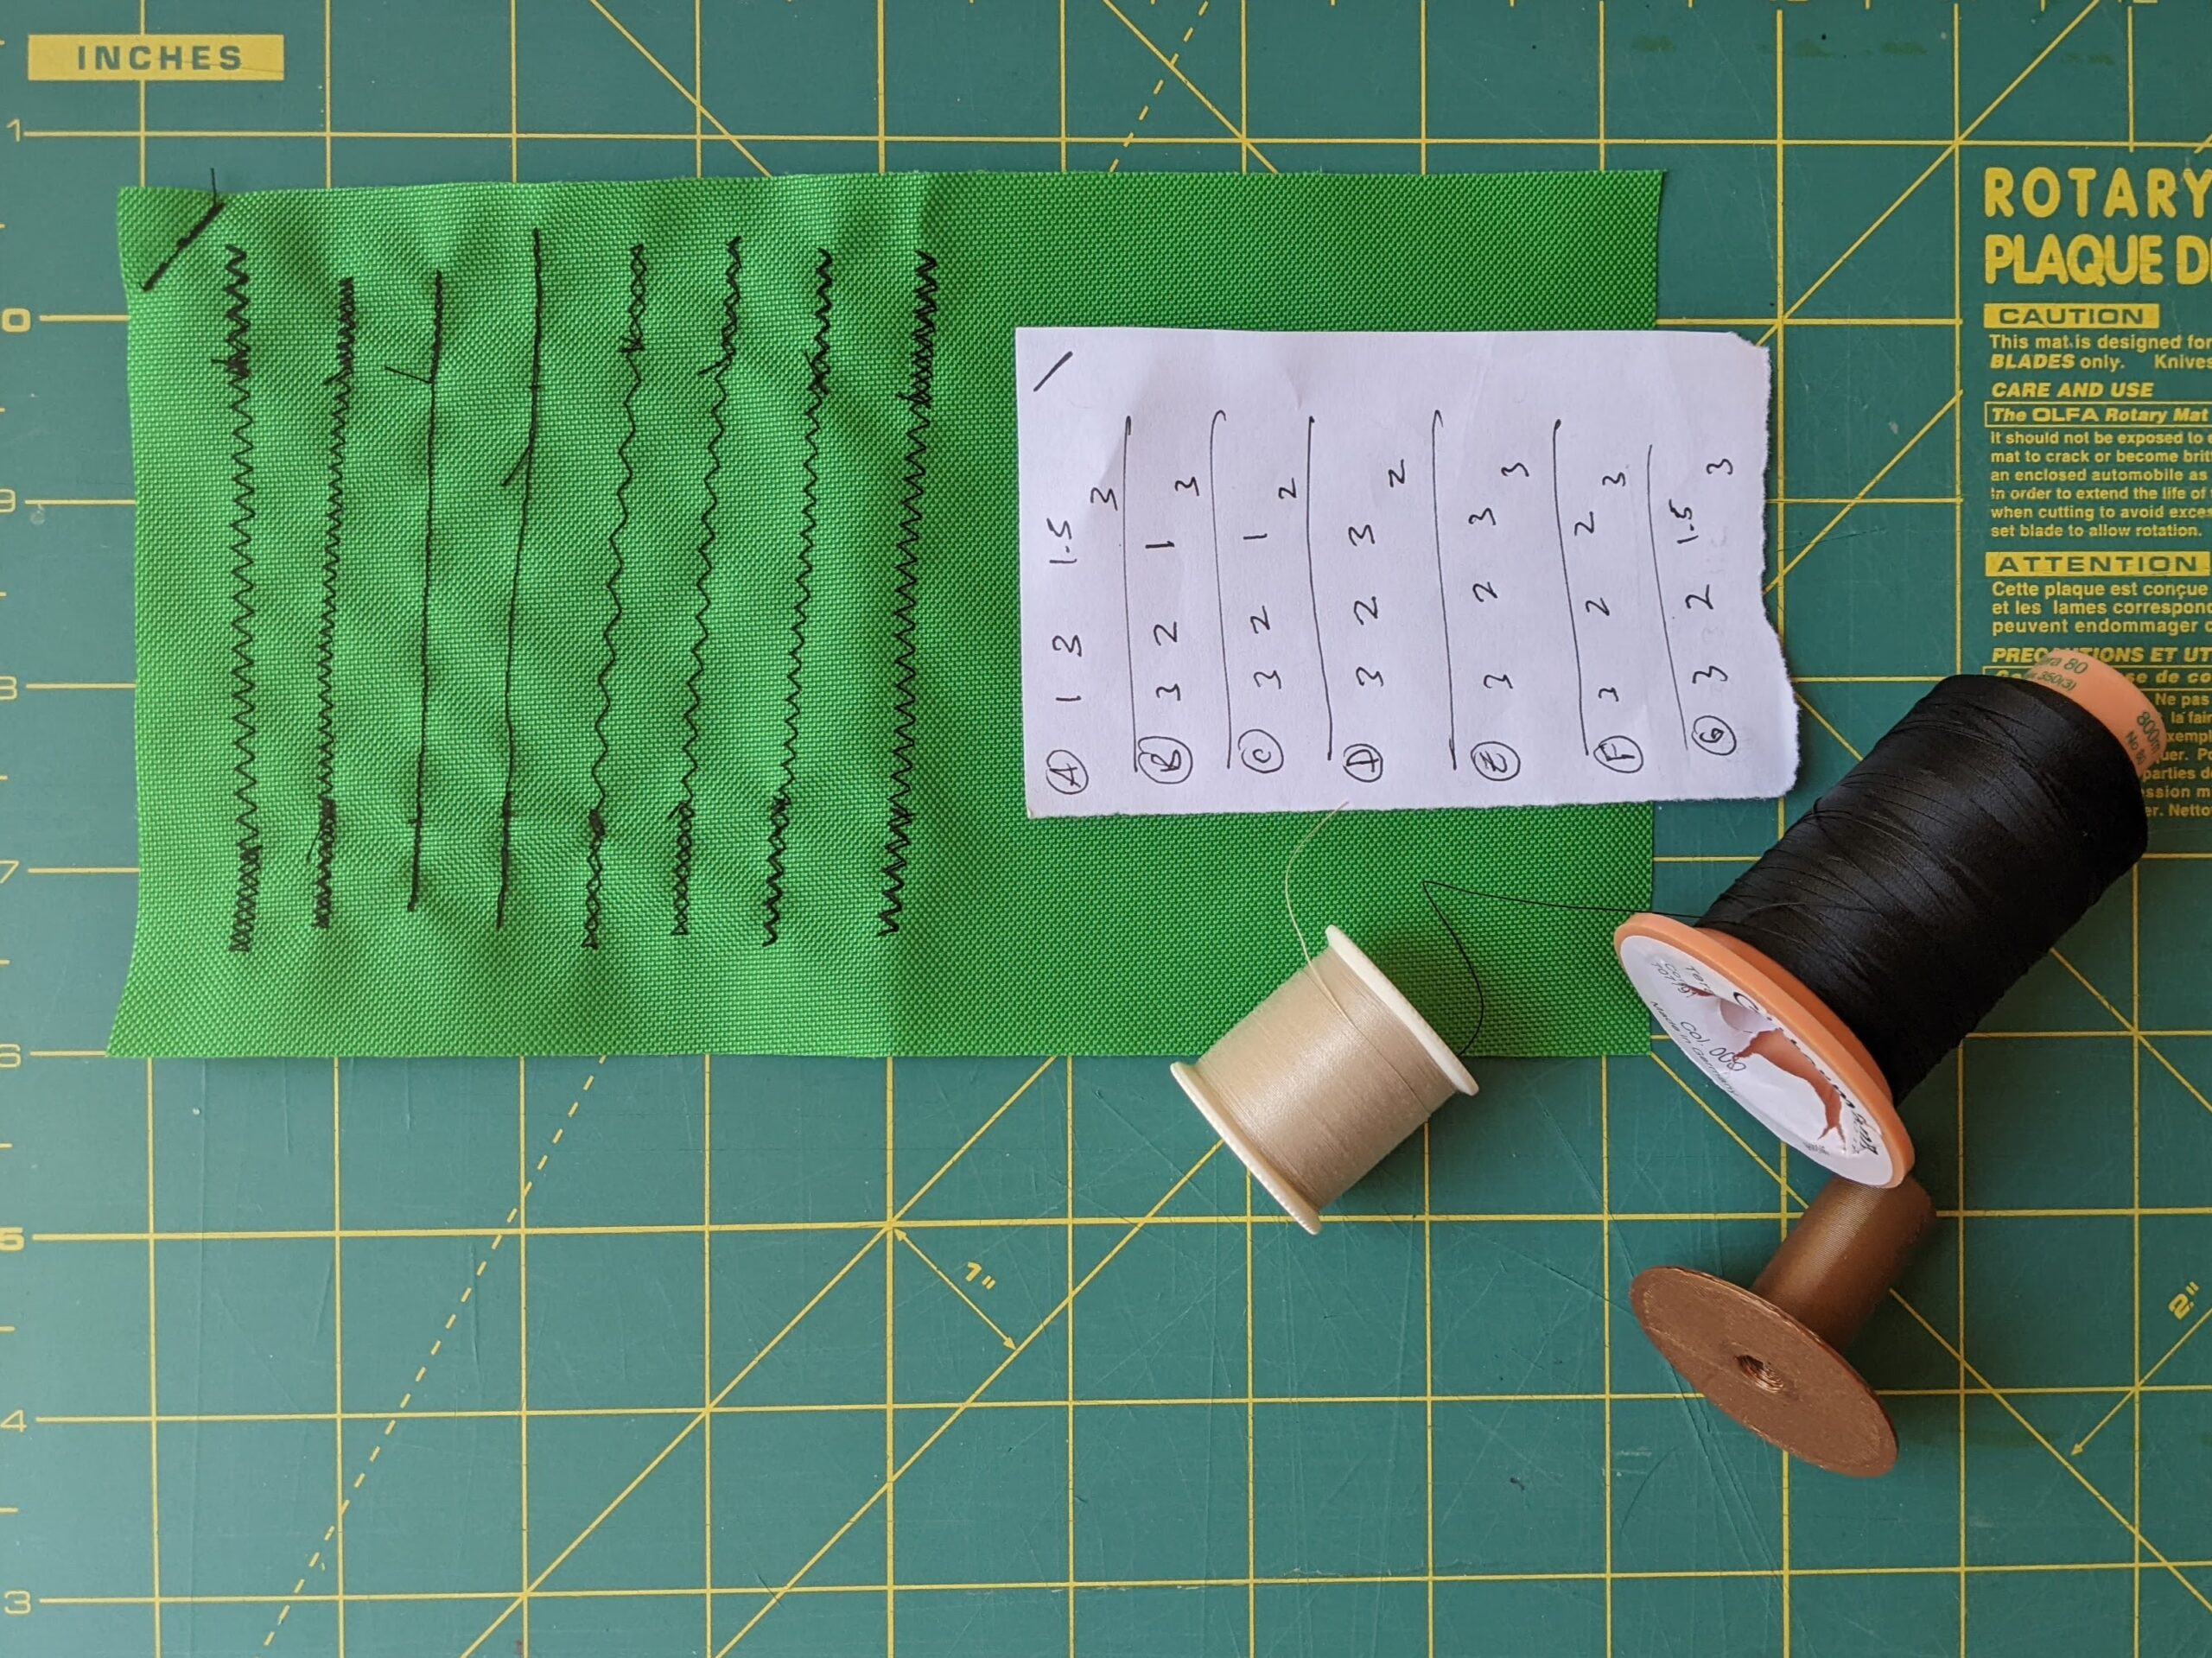
    • I created a “stitch sampler” where I noted the settings used for each stitch

      Annotated stitch sampler, with a stripe in one corner to orient the stitch setting guide

      Annotated stitch sampler, with a stripe in one corner to orient the stitch setting guide

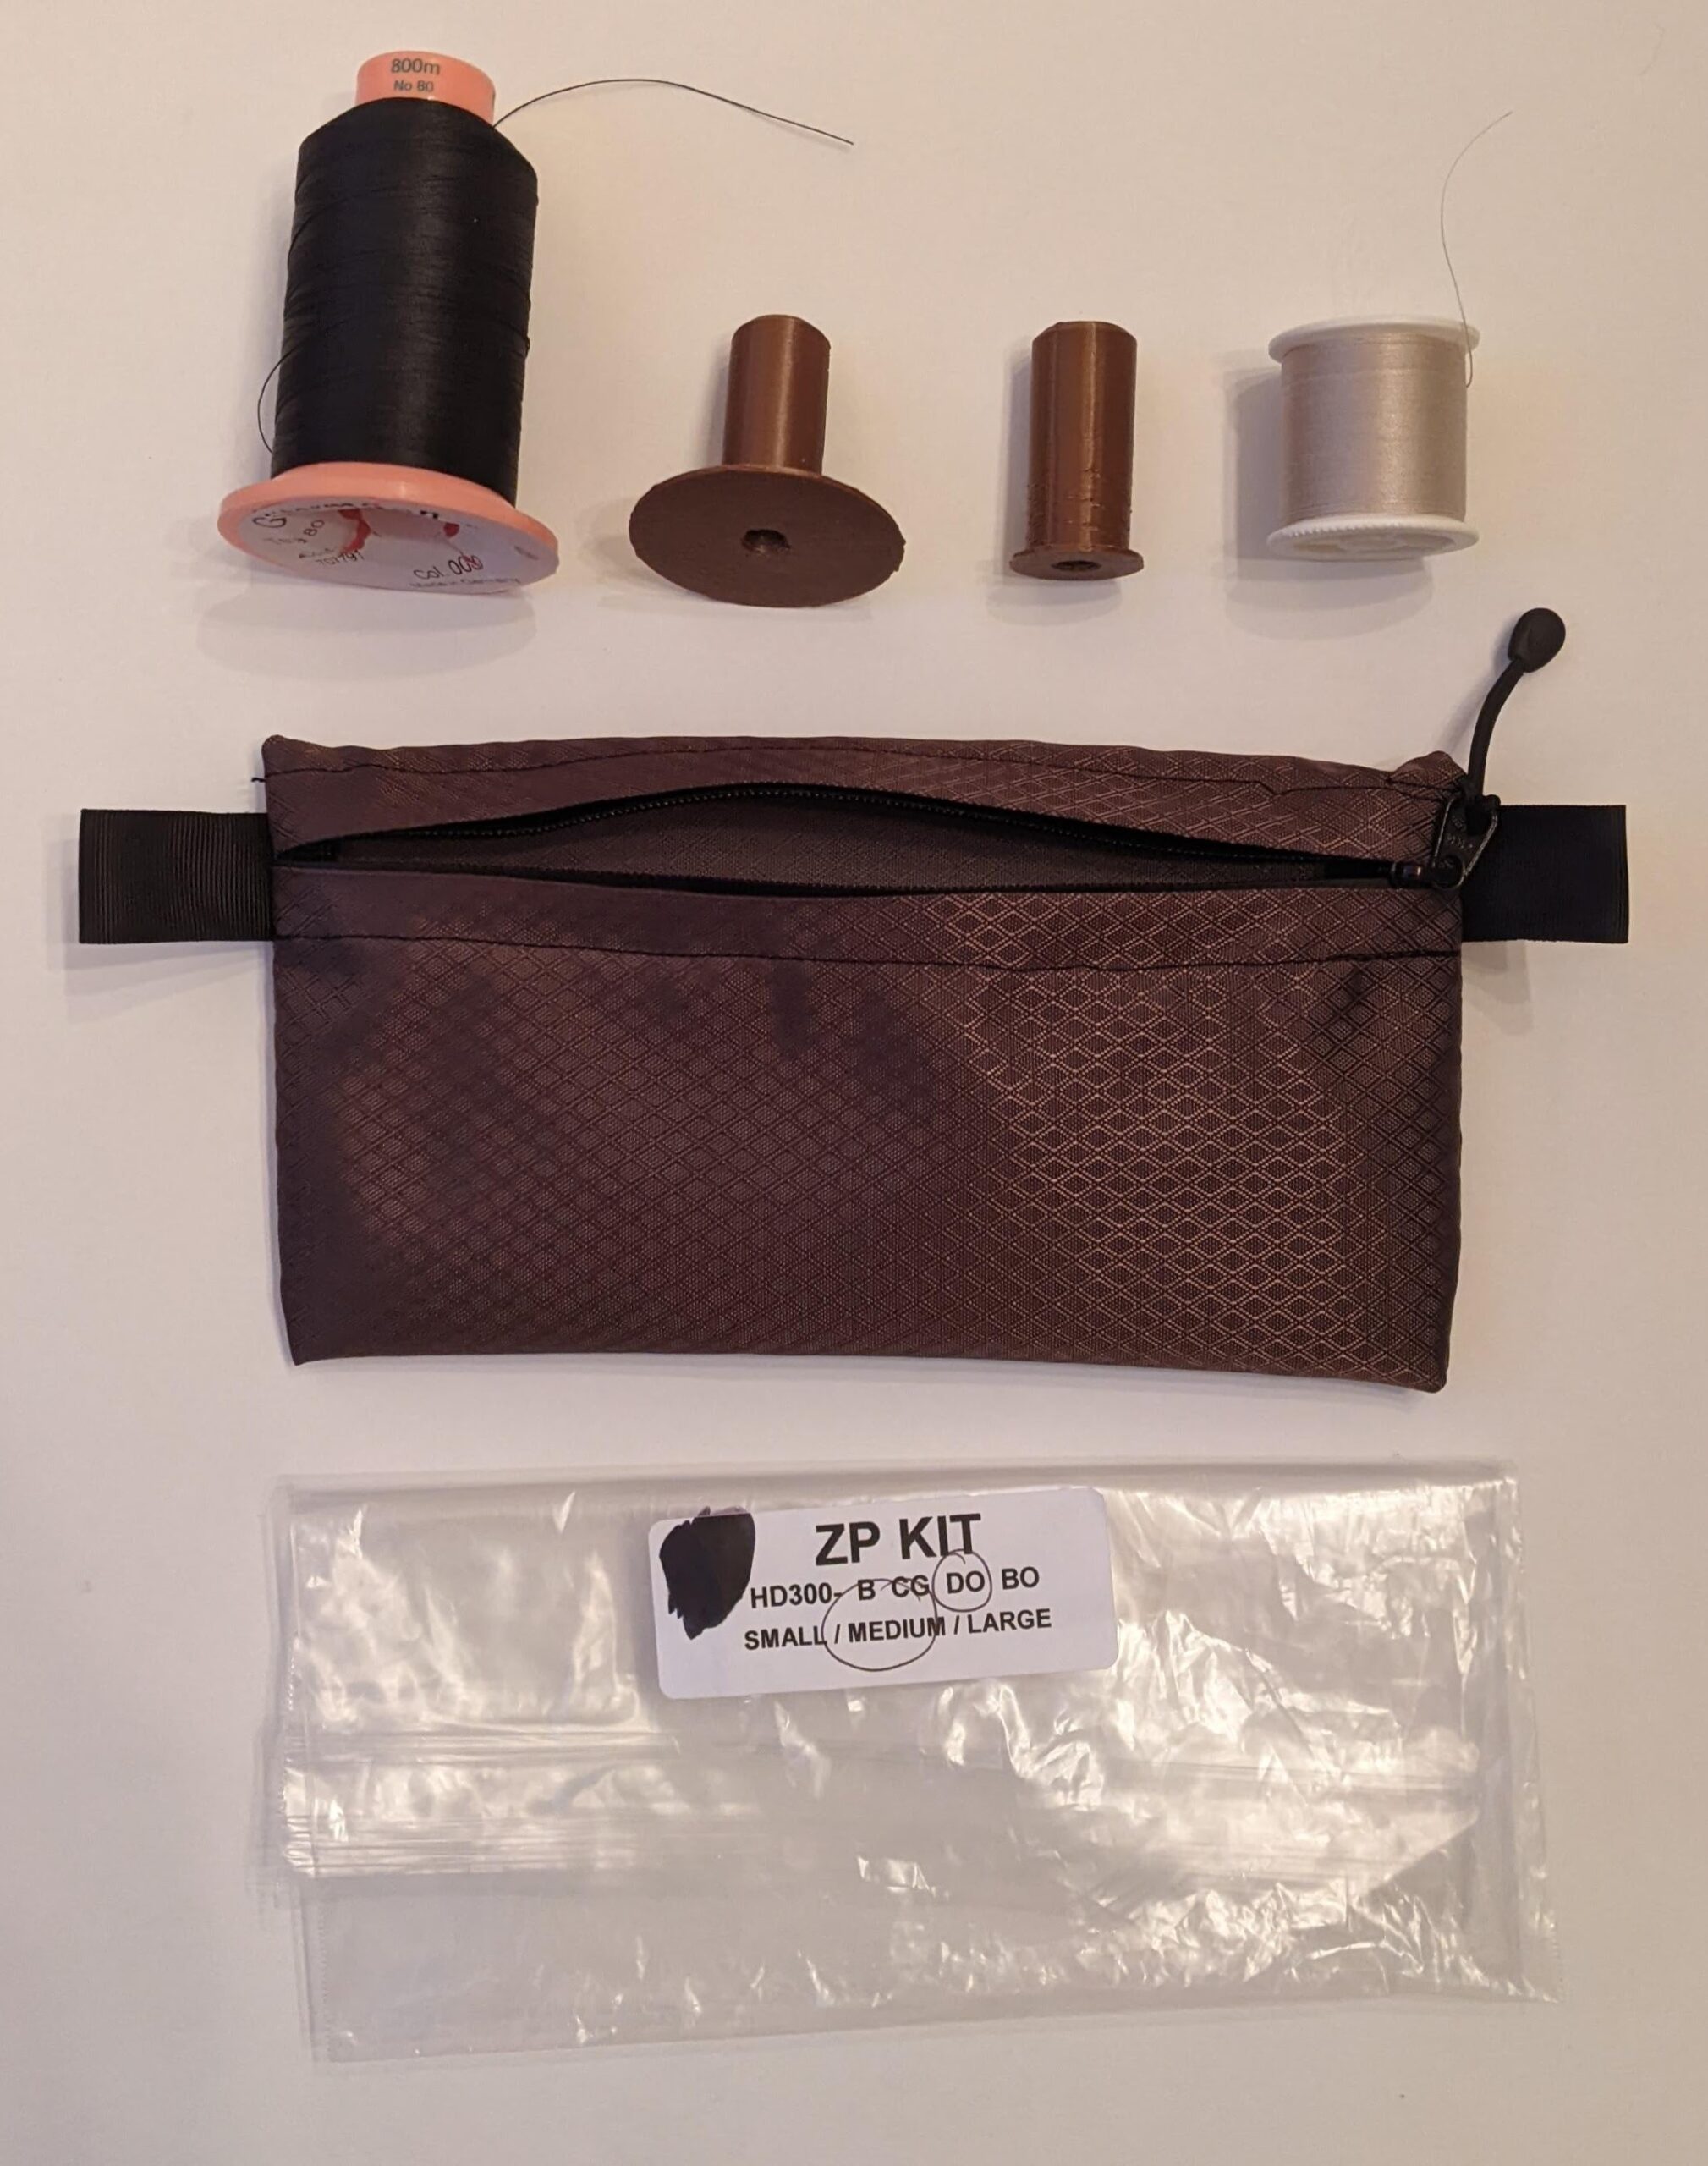
    • I quickly discovered that the large Gutermann’s thread spool I’d purchased had way too large a core to work with the spool holder on my sewing machine.  Thus, I created a plastic insert that helped keep it from wobbling, which meant it would sometimes bounce right off the spool holder.  It was a little wobbly, so I printed a second one which worked beautifully.

      RBTR zippered pouch, and spool adapters pictured

      RBTR zippered pouch, and spool adapters pictured

  • Zipper sewing foot
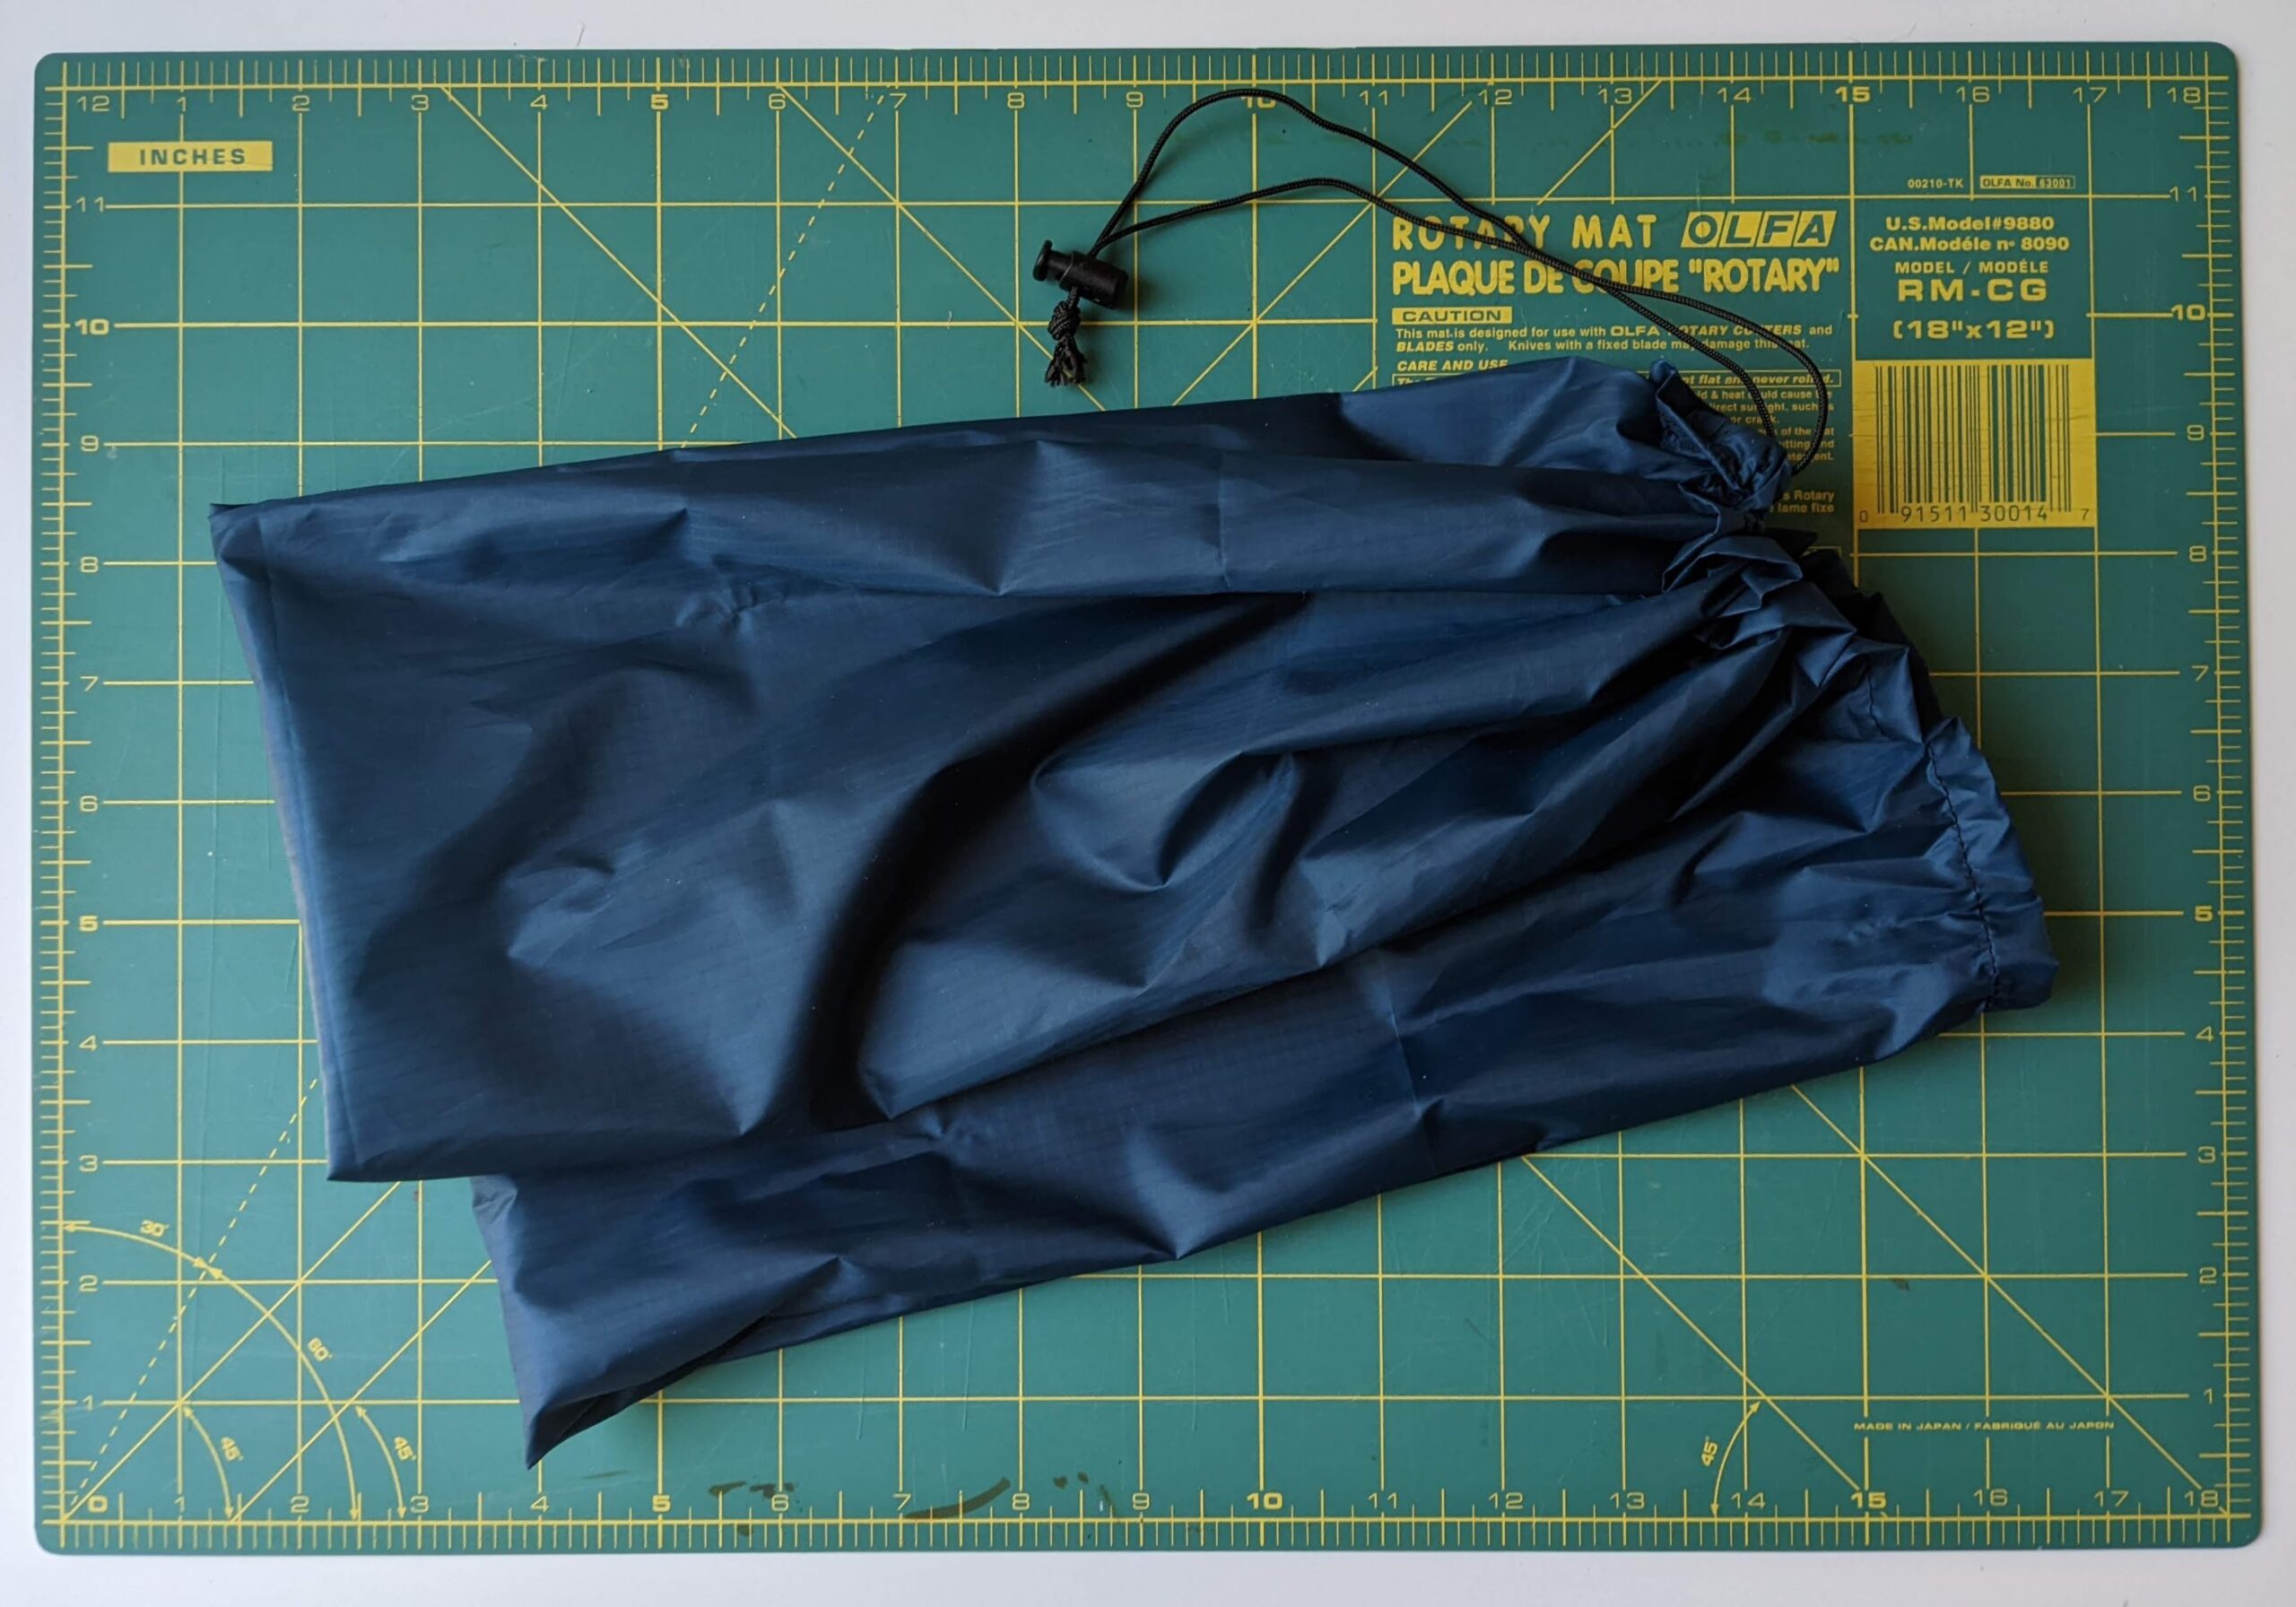
  • RBTR $10 “Stuff Sack” Kit

    RBTR Stuff Sack

    RBTR Stuff Sack

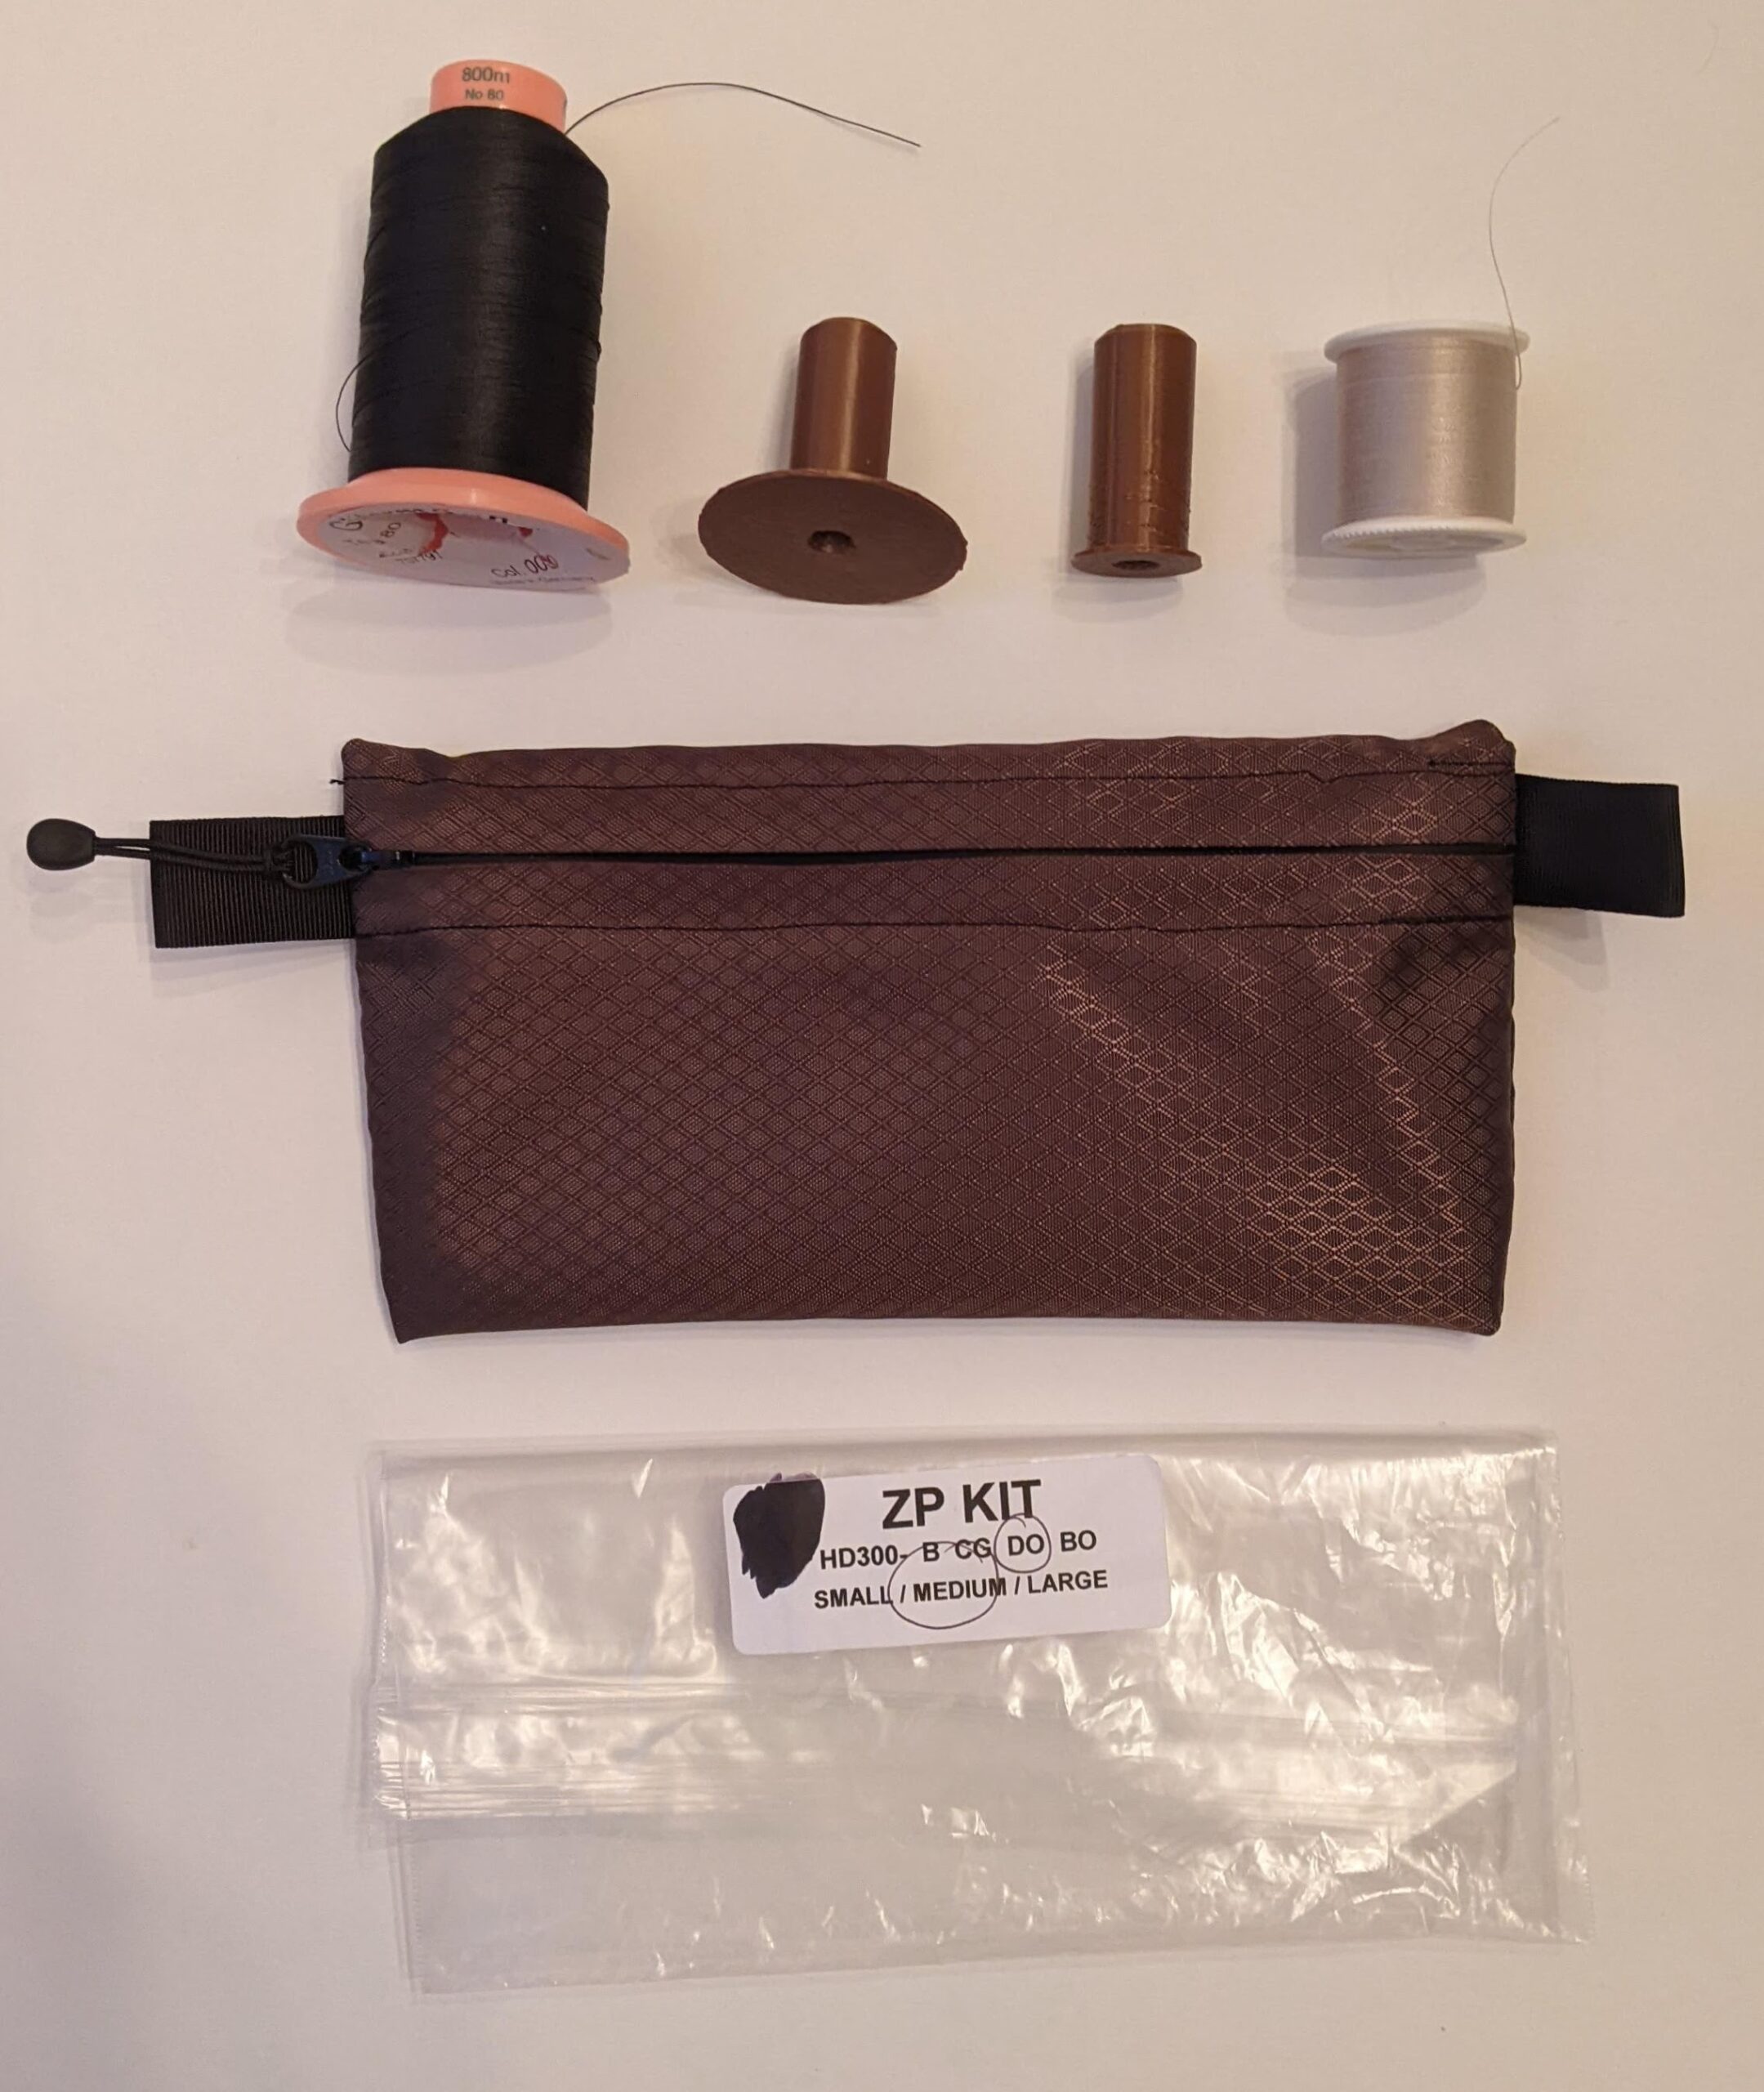
  • RBTR Zipper Pouch Kit

    RBTR Zipper Pouch kit, all zipped up

    RBTR Zipper Pouch kit, all zipped up

  • When it comes to the guides by RBTR, I really have no notes.  Their video guides are helpful, detailed, and very accessible.  I got over my zipper cowardice very quickly by just watching the video a few times, letting it play while I went slowly, and pausing to go over each step.  I’m hopeful I’ll be able to use the skills I’ve developed here to build a new EDC bag.
Custom Every Day Carry Bag
  1. My Ultimate Bag
  2. Custom Every Day Carry (EDC) Bag
  3. Sewing Practice
  4. EDC Bag Materials, Designs, Etc
  1. I sewed a mask for a friend of mine before realizing (re-realizing?) I’m not great at sewing and I could do more good helping people who were good at sewing make masks.  After learning about bias tape makers from @Raster and Hackaday, I printed and gave away perhaps 200 or so in the CA area []

Custom Every Day Carry (EDC) Bag

It’s been more than nine thirteen years since my last blog post regarding my every day carry bag.  Something must have happened between August of 2019 when I started this blog post and July of 2023, but for some reason, I just can’t seem to think of what could possibly happened to have derailed an idea.  Rather than putting this post off any longer, I’m just going to publish it largely as-is.

Perhaps it’s time for a progress report or update?

Back around about the summer of 1994 I wanted a bag to carry my stuff in. 12 I needed it to hold a binder, pens, pencils, and other assorted college student things.  Since this was my very first sewing project, I vastly over planned, prepared, and engineered everything.  I made a lot of mistakes, but nothing catastrophic.

1. LESSONS

  • Material.  It turns out that canvas was eventually scrapped in military uses because it doesn’t resist abrasion well and will rot and decompose if not stored carefully.  I also never treated mine to be waterproof with wax or some other substance.  A more modern and durable material is probably ballistic nylon or Cordura.  For a much more lightweight bag, a ripstop nylon, polyester, or polypropylene may work better.
  • Hardware.  I used 2-inch wide plastic buckles and clips on the bag as well as nylon webbing.3 These were the only sizes I could find back in 1994 at the local sewing / crafts store, so that’s what I bought.  In anticipation of making a new bag, I’ve already bought webbing made from seat belt material and plan to 3D print all new hardware.  I would probably add some loops of fabric or cord for attaching a small carabiner, lanyard, or keys.
  • Sewing.  I’m proud of this bag.  While there are a few rookie mistakes4 , it has held up incredibly well over the last 25 years.  I planned it out, drew everything out on large sheets of paper, transferred the designs to the canvas, cut everything leaving generous sewing allowances, and sewed it up with my mother’s already ancient sewing machine.  Next time, I’ll focus on x-box stitching on straps and better stitching practices.
  • Zippered Cowardice.  I admit my own cowardice as a beginner tailor in actively avoiding zippered pouches or pockets.  I’m not certain how important having zippered enclosures in a bag is, but it’s nice to have these.  Then again, I could probably just as easily have a velcro closed pouch that would serve just the same purposes and be less… clanky.
  • Flatness.  One of the things I appreciated most about the bag I made was that when it was empty/nearly empty, I could simply cinch up the strap and sling it across my back, where it would be basically hidden underneath a fleece vest I wear a lot.  This made it easy to take with me – or just ignore when not needed.  On a recent trip to an amusement park, I used one of those give-away schwag drawstring backpacks to similar effect.  When not in use, I just wore it underneath my vest.  When I needed it to care stuff for myself or family, I could tuck some small things inside it – or take it off and wear as intended.

2. BAG TYPES

  • Backpack.  A normal school-type backpack with two shoulder straps, large interior zippered area for books, binders, supplies, and a smaller outside zippered area for smaller supplies such as pencils, pens, etc.  There are usually a large number of interior pockets.
  • Laptop Backpack.  This type of backpack has an extra padded divider or compartment for protecting a laptop and a little extra space for carrying power cords and such.
  • Satchel.  A soft sided cross body single strap with a flap that folds over the front and can be buckled closed.
  • Courier/Messenger Bag.  A wide side slung bag with a wide strap suitable for carrying several stacks of large documents.   Usually has a large flap that folds over the front that buckles closed.
  • Laptop Bag.  Similar to a messenger back, but just wide enough to accommodate a laptop in a padded interior section, typically with a handle on top.
  • Tactical Backpack.  A backpack with a LOT of pockets, straps, buckles, harnesses, handles, etc.  Ranges from small to very large.
  • Fanny Pack.  I hate to admit the practicality of these bags because they’re so incredibly ugly.
  • Sling Messenger Bag.  “A bag with one strap that is designed to be carried on one shoulder.”  These tend to have a narrow and rounded triangular appearance, with a strap attaching to the left or right of the base.
  • Cortility Bag.  In episode #69 of the Cortex Podcast on 5/22/2018, CGP Grey talked about getting a small bag to carry a minimum amount of useful things since his everyday wear does not have enough storage.  Such things included his wallet, phone, headphones, earplugs, airpods case, a small camera, aspirin, etc.  This is my exact problem.  I want to be able to carry just a few more things with me.
  • Drawstring Backpack.  These are the kinds of bags that are basically drawstring bags where the loops of cinching cord are anchored at the bottom, so they can also serve as backpack straps.  They’re simple, easy to make, pack down super small, but they’re also… simple and don’t have a lot of room for many features.

3. STUFF

  • Stuff I Carry.  I’m not a survivalist, camping enthusiast, or have any special need for a bug-out bag.  Hopefully, I’ll never find myself in such a position that this bag will be what makes the difference.  With changes in life and lifestyle over the years, the things I need to carry has changed as well.
    • High School / College:  Books, notebooks, pens, pencils, playing cards
    • Grad School: Laptop plus books, notebooks, pens, pencils
    • Work Life: Sunglasses, bulky cell phone, laptop, small notebook/paper, pens, pencil, camera
    • Life Work:
      • Sunglasses, small cell phone, small notebook/paper, pens, pencil, small tools, sometimes a charger/portable battery and/or a laptop,
  • Bag Needs.  While pondering what I really need a bag for these days.  I’m no longer really very far from the things I need whether I’m at work, home, with the family, or just someplace near my car.  Now I’m of two minds on the topic.  Part of me wants something akin to a “tactical backpack” which is, depending upon your viewpoint, a glorified fanny pack worn across the back or a single strap side sling narrow backpack with lots of hooks, loops, straps, etc.  Part of me wants an unobtrusive and nearly invisible “drawstring backpack.”

I still use that old bag fairly regularly.

Annnnnd, that’s about where my blog post from 2019 left off…

Custom Every Day Carry Bag
  1. My Ultimate Bag
  2. Custom Every Day Carry (EDC) Bag
  3. Sewing Practice
  4. EDC Bag Materials, Designs, Etc
  1. Mind you, this was back in the mid-90’s when it wasn’t uncommon for someone to have a fanny pack []
  2. Looking back, I was going for more of a manly Indiana Jones satchel / bugout bag []
  3. The technical term for these nylon straps []
  4. having way more than 10 stitches per inch basically perforated the canvas underneath the webbing []

ChatGPT WordPress Plugins

This is kinda bananas.  Years ago I wrote a plugin to solve a problem I had.  I wanted a simple WordPress plugin where I could insert a shortcode into a blog post, specify a series title, and have it automatically search up all the other blog posts that used the same shortcode and series title, and then insert a nice looking list of blog posts in that series in chronological order.

It was one of my first plugins, still available on WordPress.org – just hidden since it hasn’t been updated in almost a decade.  It still works to this very day, if occasionally a little buggy.  After several WordPress versions, it no longer properly displays the series title, which is a real shame.

On a whim, I tried using ChatGPT to generate some plugins.

Here’s an example of my old plugin and the new ChatGPT written plugin (in this order):

Default Series Title

See how bad that was? It completely mangled the title.

Edit:  Since publishing this post, I realized that I would have to choose between

  1. Leaving the old defunct plugin in place just to make a point about how it didn’t stand the test of a decade’s worth of WordPress updates, but then also leaving broken series titles sprinkled through my back catalog of blog posts.
  2. Go back through nearly 10 years of blog posts12 to change them over to the new plugin shortcode.
  3. Disable the old plugin, but have the new plugin work with the old shortcode as well as it’s own new shortcode, at the cost of losing an example of how bad the old plugin performed.

I went with option 3.  Just take my word for it, it looked bad.

He makes a valid point

He makes a valid point

Now for the ChatGPT version:

Software Development with ChatGPT
  1. ChatGPT WordPress Plugins

It took me about an hour to whip up a working WordPress plugin with the same core functionality.  I would break down the time I spent as follows:

Time Spent Creating Series Plugin with ChatGPT

But, that’s not all!  You see, as I was writing this blog post, I realized it would be fun to include a pie chart to indicate the time I’d spent on this.  Unfortunately, the plugin I had written to do exactly this many years ago has apparently completely given up the ghost.  Thus, before I proceeded to this very sentence, I used ChatGPT to create a plugin for displaying custom pie charts!

Time Spent Creating Pie Chart Plugin with ChatGPT

Obviously, this plugin took a lot longer.  The first few versions were having all kinds of problems between the HTML Canvas code and trying to figure out how to make sure the javascript was not loading too early or too late.  In the end, I just asked it whether it was capable of even creating a pie chart – and it gave me a piece of workable javascript.  I told it to refactor the plugin using this same javascript, and then it was a matter of fine tuning the result.

If you don’t know anything about writing WordPress plugins, you could probably use ChatGPT to create a very simple plugin.  However, once it got slightly more complicated, it would likely require some troubleshooting to figure out what was happening.  In the series plugin it took me a while to root through the WordPress functions to figure out that apparently ChatGPT was trying to use a function in a way that simply did not work.  I explained to ChatGPT that that particular function could not operate in that way, explained how the data it was feeding into that function needed to be first modified, and then asked it to refactor the code.  From that point forward, it started to look a lot better.  There were some additional quirks – like putting more than one series title in a single post would only display one.  I suspect these problems of ChatGPT taking a shortcut to generate code, hardcoding certain variables and names, not considering that it might need to operate more than once on the page, may be difficult for it to anticipate and address.  Without some degree of WordPress development knowledge, I think a novice user armed only with ChatGPT would need to do a lot of refactoring, asking the program to generate the plugin all over from scratch many times, before arriving at a workable result.  Then again, a million monkeys at typewriters, right?

I think ChatGPT could be great for creating relatively simple plugins like a series plugin, a pie chart plugin, or even a table of contents plugin.  However, having seen how much time it cut out of the development process, I think it would be interesting to try developing an A/B testing plugin or more complicated plugin.

I think the next task to see if I can get it to generate QMK code for a keyboard, Arduino code, Raspberry Pi code, or a chrome extension.

I can already see some ways to improve both of the ChatGPT generated plugins used in this blog post.  My series plugin included two arrows at the bottom so the reader could navigate to the prior or next post in the series.  And I think it would be great if the chart plugin had a feature where I could specify the units, so the magnitude data would be included with the labels.  I may try getting it to shoehorn these updates later…

If you see these reflected in the charts above, I must have already done it.  :)

Software Development with LLMs
  1. Series Plugin Test for Illustrative Purposes Only
  2. ChatGPT WordPress Plugins
  3. Coding with an LLM Sidekick
  1. NGL, I can really be a lot some times. []
  2. Um, you’ve probably gathered that. []

Series Plugin Test for Illustrative Purposes Only

The only purpose for this post is to serve as a reference for a more interesting and useful post.

Software Development with LLMs
  1. Series Plugin Test for Illustrative Purposes Only
  2. ChatGPT WordPress Plugins
  3. Coding with an LLM Sidekick
Software Development with LLMs
  1. Series Plugin Test for Illustrative Purposes Only
  2. ChatGPT WordPress Plugins
  3. Coding with an LLM Sidekick
[custom_pdf_generator visitor_data=“John Doe”]


DIY Carved Eraser QR Code Stamp

After some modest success carving some neat designs into pink erasers, I tried making a QR code stamp.  It didn’t work well at all, with exactly just one impression working … sometimes.

The first attempt took a really long time and turned out terribly.  After a few days break, and some mental distance from the project, I returned with some new ideas and inspiration.

Here was my new approach and plan:

1. The Stamp

  1. Go Slow.  Proceeding slowly and methodically is always a good idea with sharp instruments.  I went fairly slowly the first time, but this time I would be even more methodical.
  2. Cutting.  Rather than using the carving blades for the QR code features, I switched to using a craft knife.  It was just too hard to cut precise lines with a V or U shaped blade, managing not just the direction and speed of the cut – but the depth as well – for both sides of the blade.  The craft blade let me focus on just one side at a time.  I used the blade to cut at about a 45 degree angle along one side, then other side.
  3. Don’t Cut Too Much.  I used calipers to measure the pixels cut into my first attempt as well as the stamped result.  I discovered \the stamp pixels were very slightly larger than their rubber counterparts.  This tells me it would be better to cut too little rubber – and cut more later if necessary.
  4. Removing Scraps.  Rather than sticking my big old fingers into the eraser or trying to pop it out with the blade, I used a pair of 3D printed tweezers to pluck them out.

2. The QR Code

  1. Optimize the QR Code.  There are several ways to optimize a QR code for eraser / stamp carving. 1.  I used as many of these methods as I could:
    1. “Pixel” Size.
      1. As you add more information into a QR code, the QR code generator will need to use more black and white units2 to encode the information.  After some tinkering it seems like the smallest QR code that can be generated is 441 total pixels, 21 wide by 21 tall.  The absolute largest QR code I could generate looks like one of those “magic eye” posters.  I didn’t even try to count how many pixels wide this thing was.  It’s 9,216 pixels, 96 wide by 96 tall.

        This slideshow requires JavaScript.

      2. I was having a hard time carving a stamp 21 pixels wide into a 24.5 mm3 wide eraser, so the idea of carving more than 21 lines into an eraser by hand seemed not feasible.  The very next step up from the 21×21 grid would be a 25×25 grid, so I knew I had to find a way to limit the data, find the best error correction, and find a way to cut these small pixels and thin features.
    2. Proper Error Correction.
      1. QR Codes have built in “error correction” that allows the user’s scanning device to scan information from a partially formed, damaged, or obscured code.  These settings range from L (low), M (medium), Q (quality), and H (high quality) able to error correct from up to 7%, 15%, 25%, and 30% damage respectively.  Lowering the error correction allows you to create a smaller QR Code, but it will also be less robust.
      2. I fiddled with these settings a lot to find the maximum amount of data I could put into a QR code while still retaining a maximum size of 21×21 pixels.  I was able to encode about 16 characters in a L, 13 characters in a M, 10 characters in a Q, 6 characters in a H.  The code stores numeral easier and requires more pixels to store letters and special characters.
      3. My first attempt used an error correction level of L, but was basically unusable as there must have been more than 7% distortion.  This time, I decided to try for a very high level of error correction with the Q setting for 25%.
    3. Reducing Data.  This is where I used some tricks you may, or may not, be able to replicate.
      1. URL Shortener.  A TinyURL link to my Instagram page requires 29 characters.  Looking above, this would immediately suggest a 21×21 pixel QR code would not be possible.
      2. Trimming a Link.  After some fiddling, I realized that as long as the data encoded looked like a URL (as in some characters separated by a “.”), the QR code scanner would interpret it as a link.  This means we can skip the “http://” and “https://”, saving 7-8 characters!  Unfortunately, this still doesn’t let me encode the shortest URL that TinyURL could give me which requires 20 characters after discarding the “http” stuff.
      3. Maybe Just a Domain?  Maybe you just wanted to point someone to your website and not a big long link, shortened with a URL shortener.  Let’s work the numbers backwards.  Most commonly used domains end with “.com”, “.org”, “.biz” – with 4 characters each.  Using the information above, this means we could use a domain name with up to 12 characters for an L encoded QR code, 9 for an M, 6 for a Q, and just 2 for an H.  While it would be easy to find a 12 character domain, you’re stuck with only a 7% margin for your error correction.  A domain with 6 to 9 characters for Q and M would allow for 25% and 15% error correction.  You can still find 6 character “.com” domain, but… they’re unlikely to be very memorable.  This isn’t necessarily a problem.  You might be able to find a good short domain with an unmemorable name, but forwards the user to your real website.  The problem, of course, is that no one is going to want to click on that link.
      4. How About a custom URL Shortener?  It’s still possible to purchase a short URL, but they’re pricey.  I happened to buy a good one several years ago and have hung on tightly to it.  I slapped a YOURLS install on it, and have been using it ever since.  Using my own URL shortener means I can keep the URL down to just 9 characters – including the TLD!

Okay, back to carving.  I grabbed my headphones, put on some music, and took it very slowly – a little under two hours.  Here’s some progress photos:

This slideshow requires JavaScript.

Here’s how it looked (with some additional shots to show the original design overlaid):

This slideshow requires JavaScript.

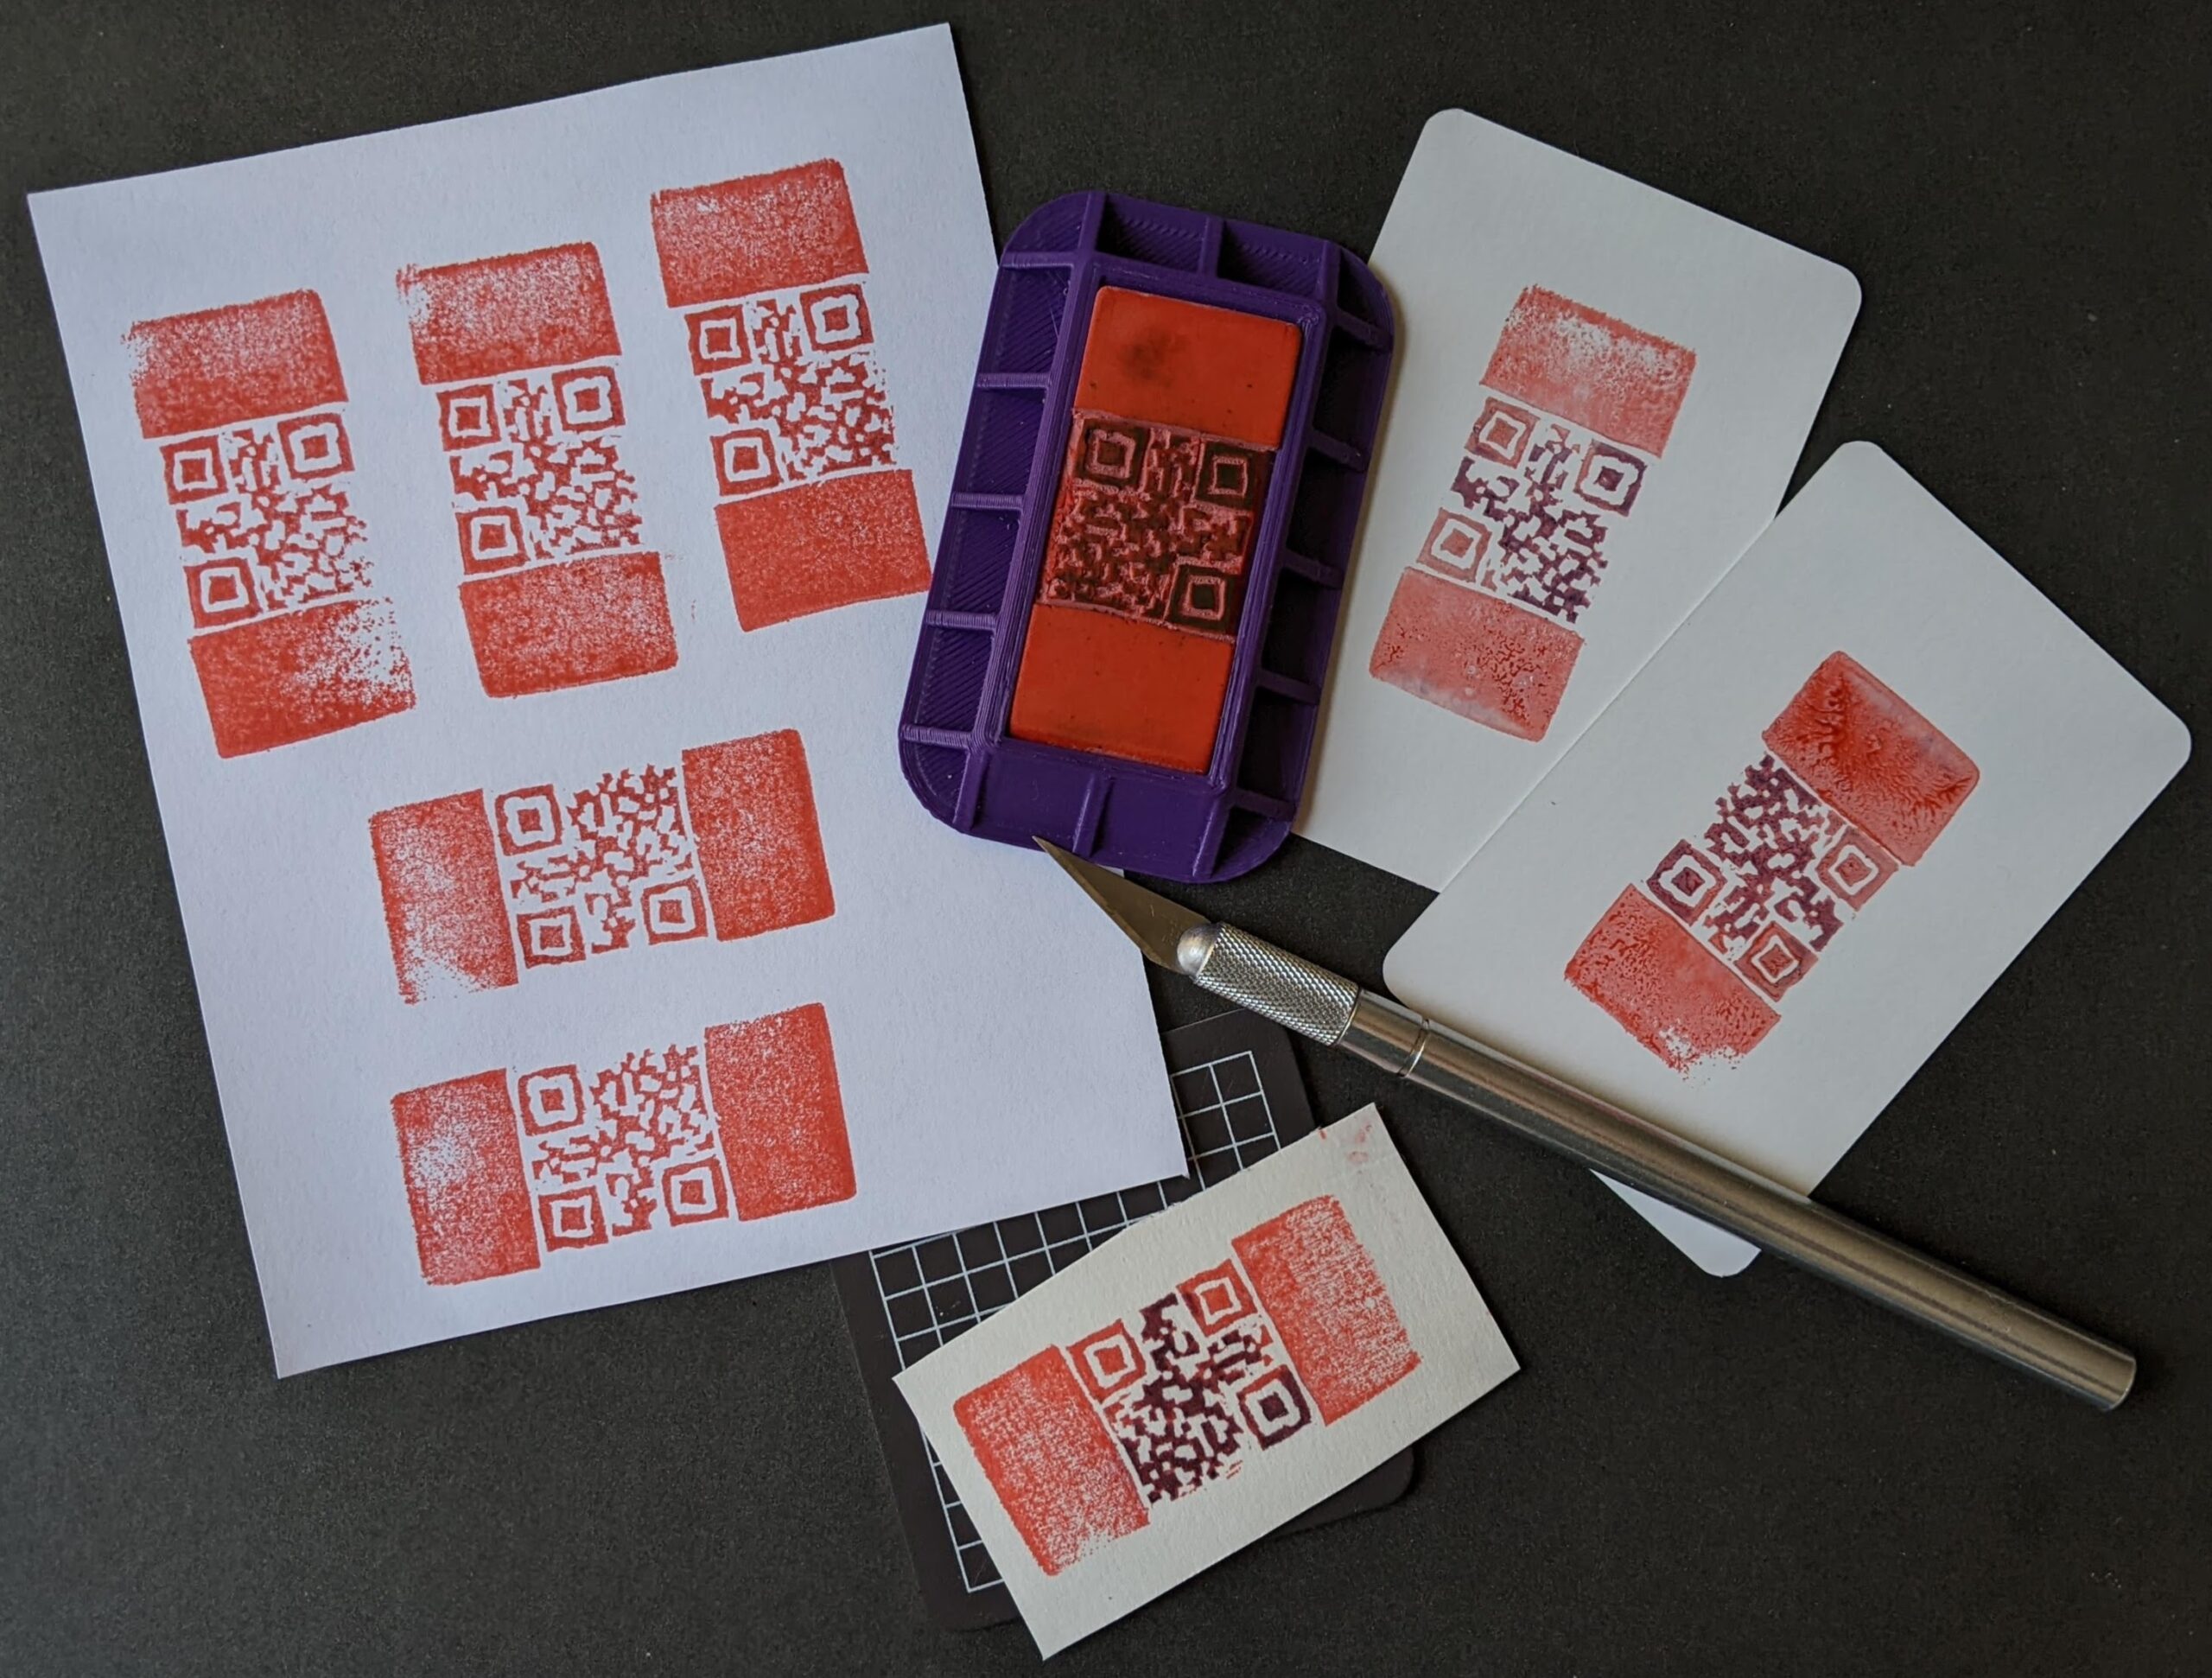
I stamped this design 9 times – and all 9 were more or less easily scannable.  The neat thing about this design is that it points to a URL shortener I own, so not only is it about as tiny as possible, but I can change the destination if I ever needed – without having to spend two hours recarving an eraser stamp!

Eraser Stamp Carving
  1. Carved Eraser Stamping
  2. Further Adventures in Eraser Carving
  3. DIY Carved Eraser QR Code Stamp
  1. I won’t get too much into the weeds on the actual method of generating QR codes, mostly because I haven’t studied the math in it, but I did find a great article which has a lot of good background info and explanations []
  2. I’ll call them “pixels” from this point forward []
  3. Just barely under an inch []

Further Adventures in Eraser Carving

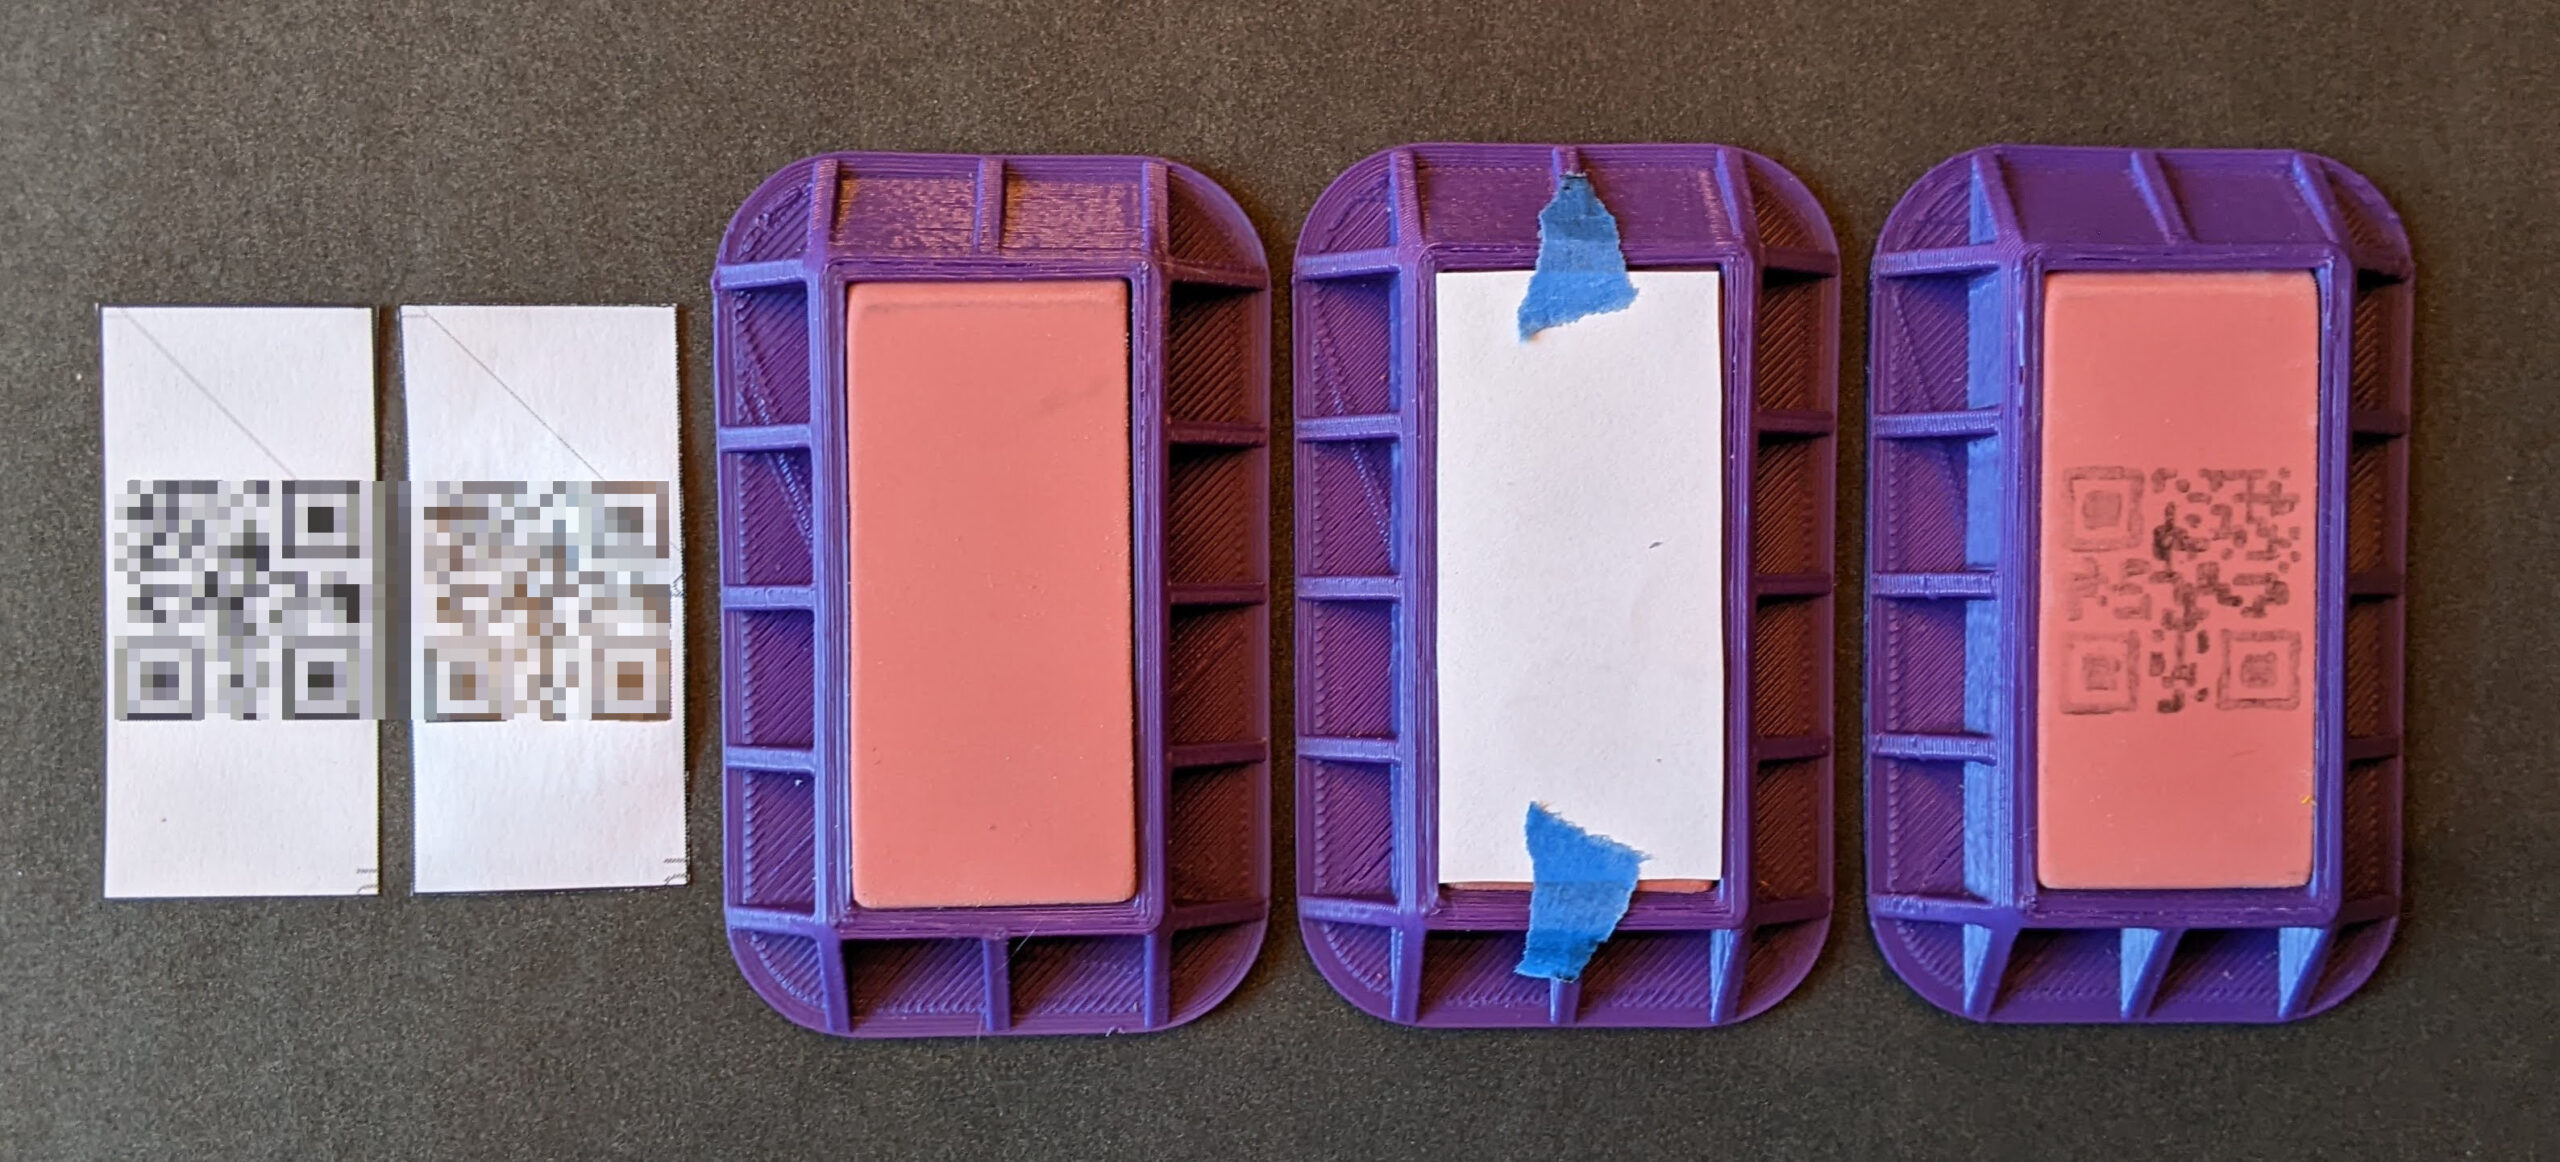
I thought it would be neat to try cutting a QR code stamp.  (Skip to the end to see the one time I was able to get the stamp to work)

Getting the pattern ready for carving

Getting the pattern ready for carving

The obvious problem is this would require an incredibly detailed and precise approach to carving.  To get the smallest QR code that can still contain a URL, it would be limited to 16 characters, the lowest error correction (7%) rate, and would still have 21×21 pixels (441 total).  After a little testing, I realized the code needs a little white space around the QR code to read properly.  This means 23×23 pixels all carved into a less than 1″ square area.  I know from the design of the eraser carving station that the eraser is 24.5 mm wide… so each pixel is roughly 1mm square.

I tried several things that definitely did not work well:

    • Printing the design in one of my templates, trimmed, colored in with a pencil, taped in place, then rubbed onto the eraser to transfer the design.
    • This didn’t really work very well since the pencil trace to rubbing process introduces a lot of error.  I tested this by trying to scan the reversed drawing on the eraser.  Didn’t work at all.
    • The 1mm wide pixels would have been a nightmare to cut with even the smallest carving blade, so I switched to my craft blade.  The blade is so sharp and incisions so thin, that many times it was difficult to see where or whether I had made a cut.  Once I switched from a vertical cut to a 45 degree angle, it seemed to get a little bit easier and cleaner.
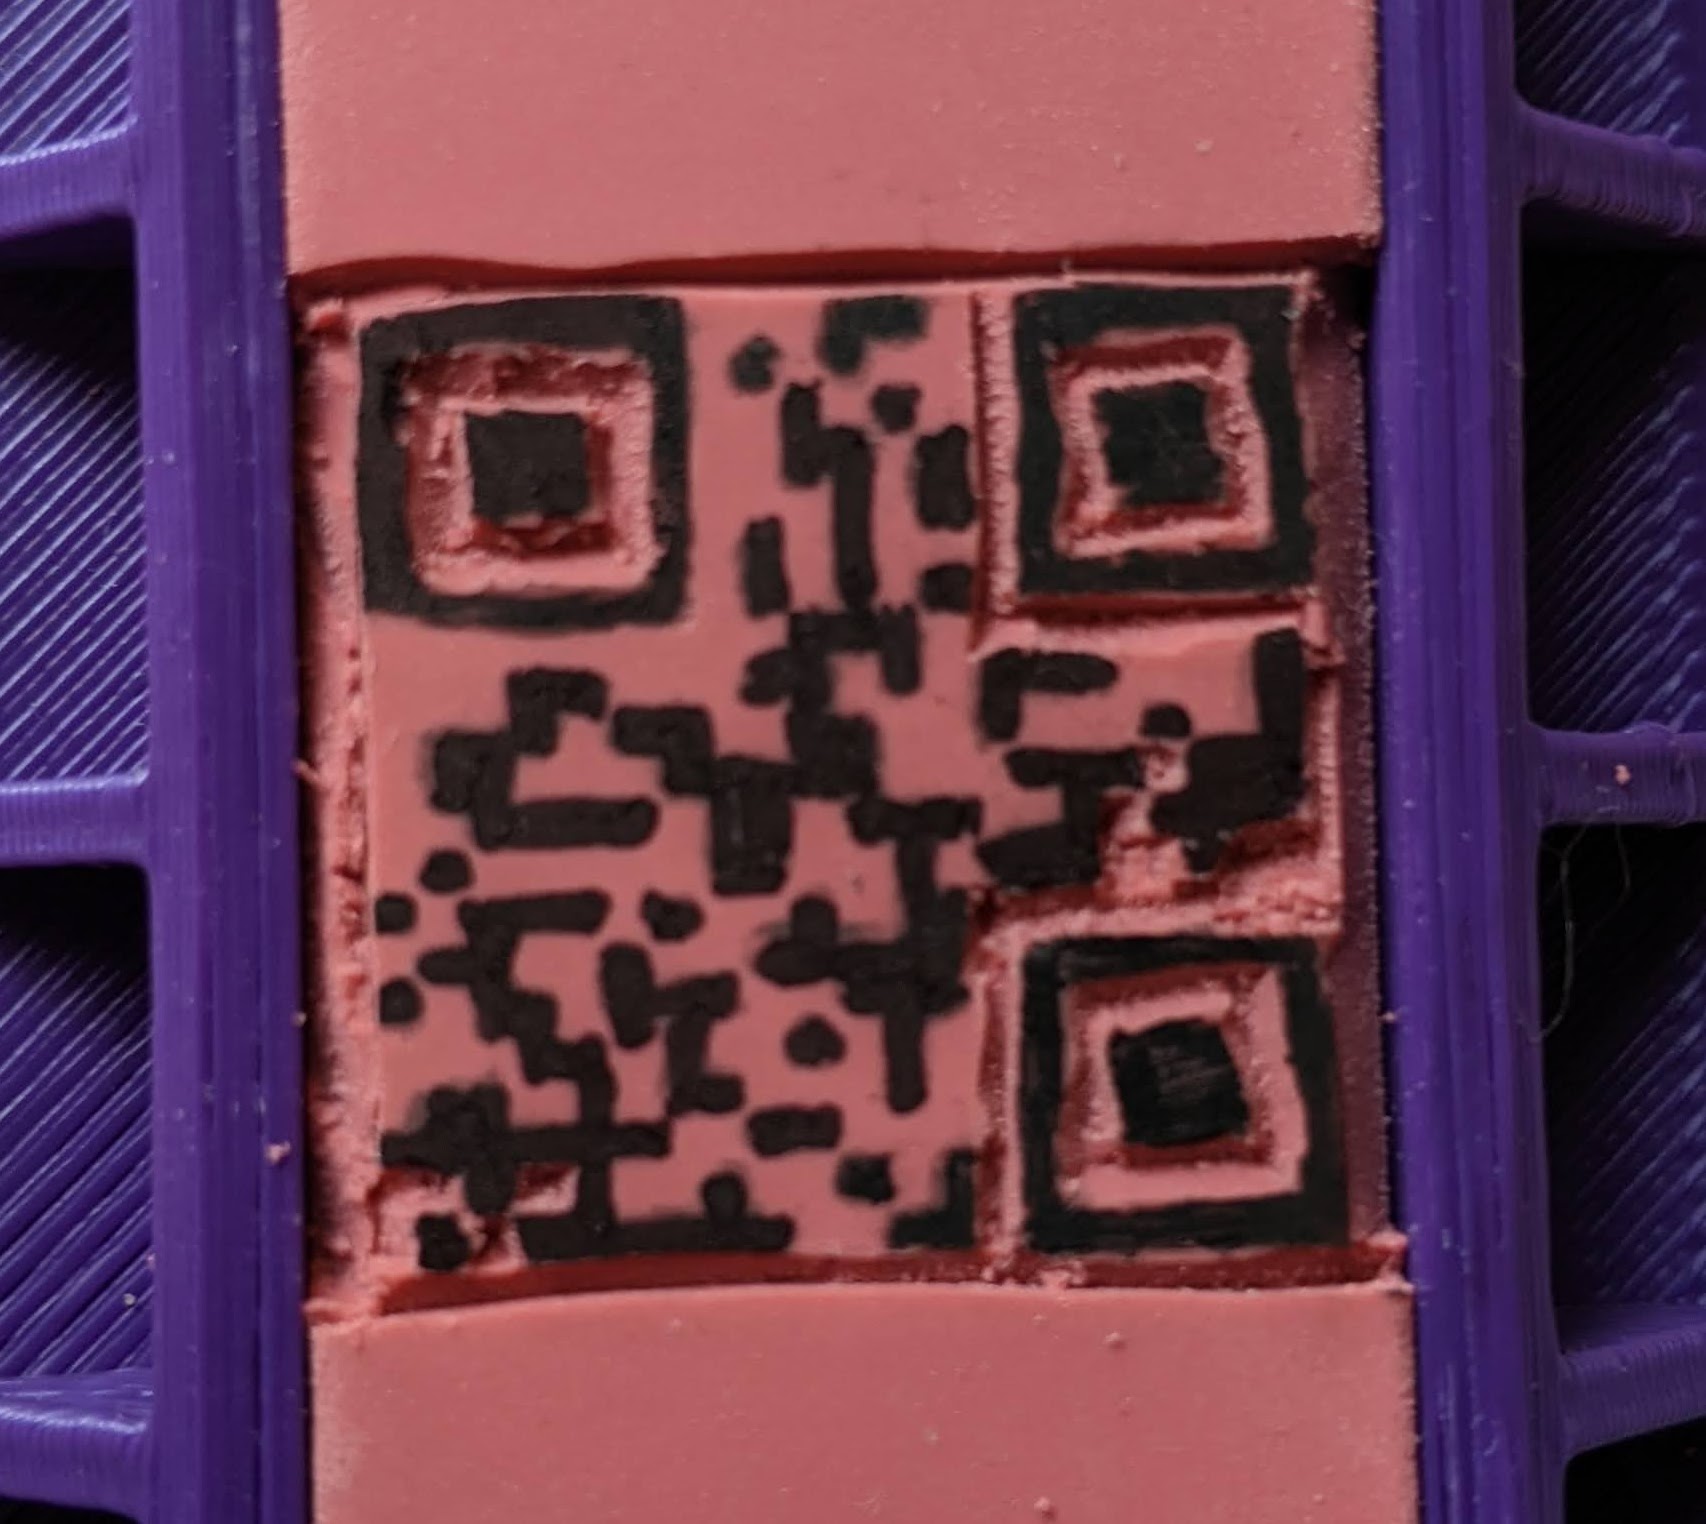
    • After I was about a quarter done I tried using a fine tip sharpie to color in the pixels.  After a lot of hassle, I could get this to scan, so I kept going.
    • The darkened pattern was still a bit messy and my cutting wasn’t significantly better.
    • I flipped the eraser over and tried a new tactic.  I taped a template to the eraser and tried to cut the design through the paper.  This didn’t work well because when I cut very small pixels out of the design, the paper quickly lost cohesion and then became useless.
    • Finally I pulled up a large picture of the QR code on my laptop and tried to keep to the design as best I could.  It wasn’t pretty – but I was done.

The results were less than stellar.  The leftover ink from the sharpie discolored the inkpad a little and got transferred onto the first few stamp impressions.  Out of a dozen different impressions, only one could be scanned by my phone.

Darkened with a sharpie, partially carved

Darkened with a sharpie, partially carved

If I tried this again (and, let’s be honest, I probably will) I would use the template / pencil transfer method just to place “landmarks” and then refer back to the large display on the laptop.

Stamp, stamp, stamp

Stamp, stamp, stamp

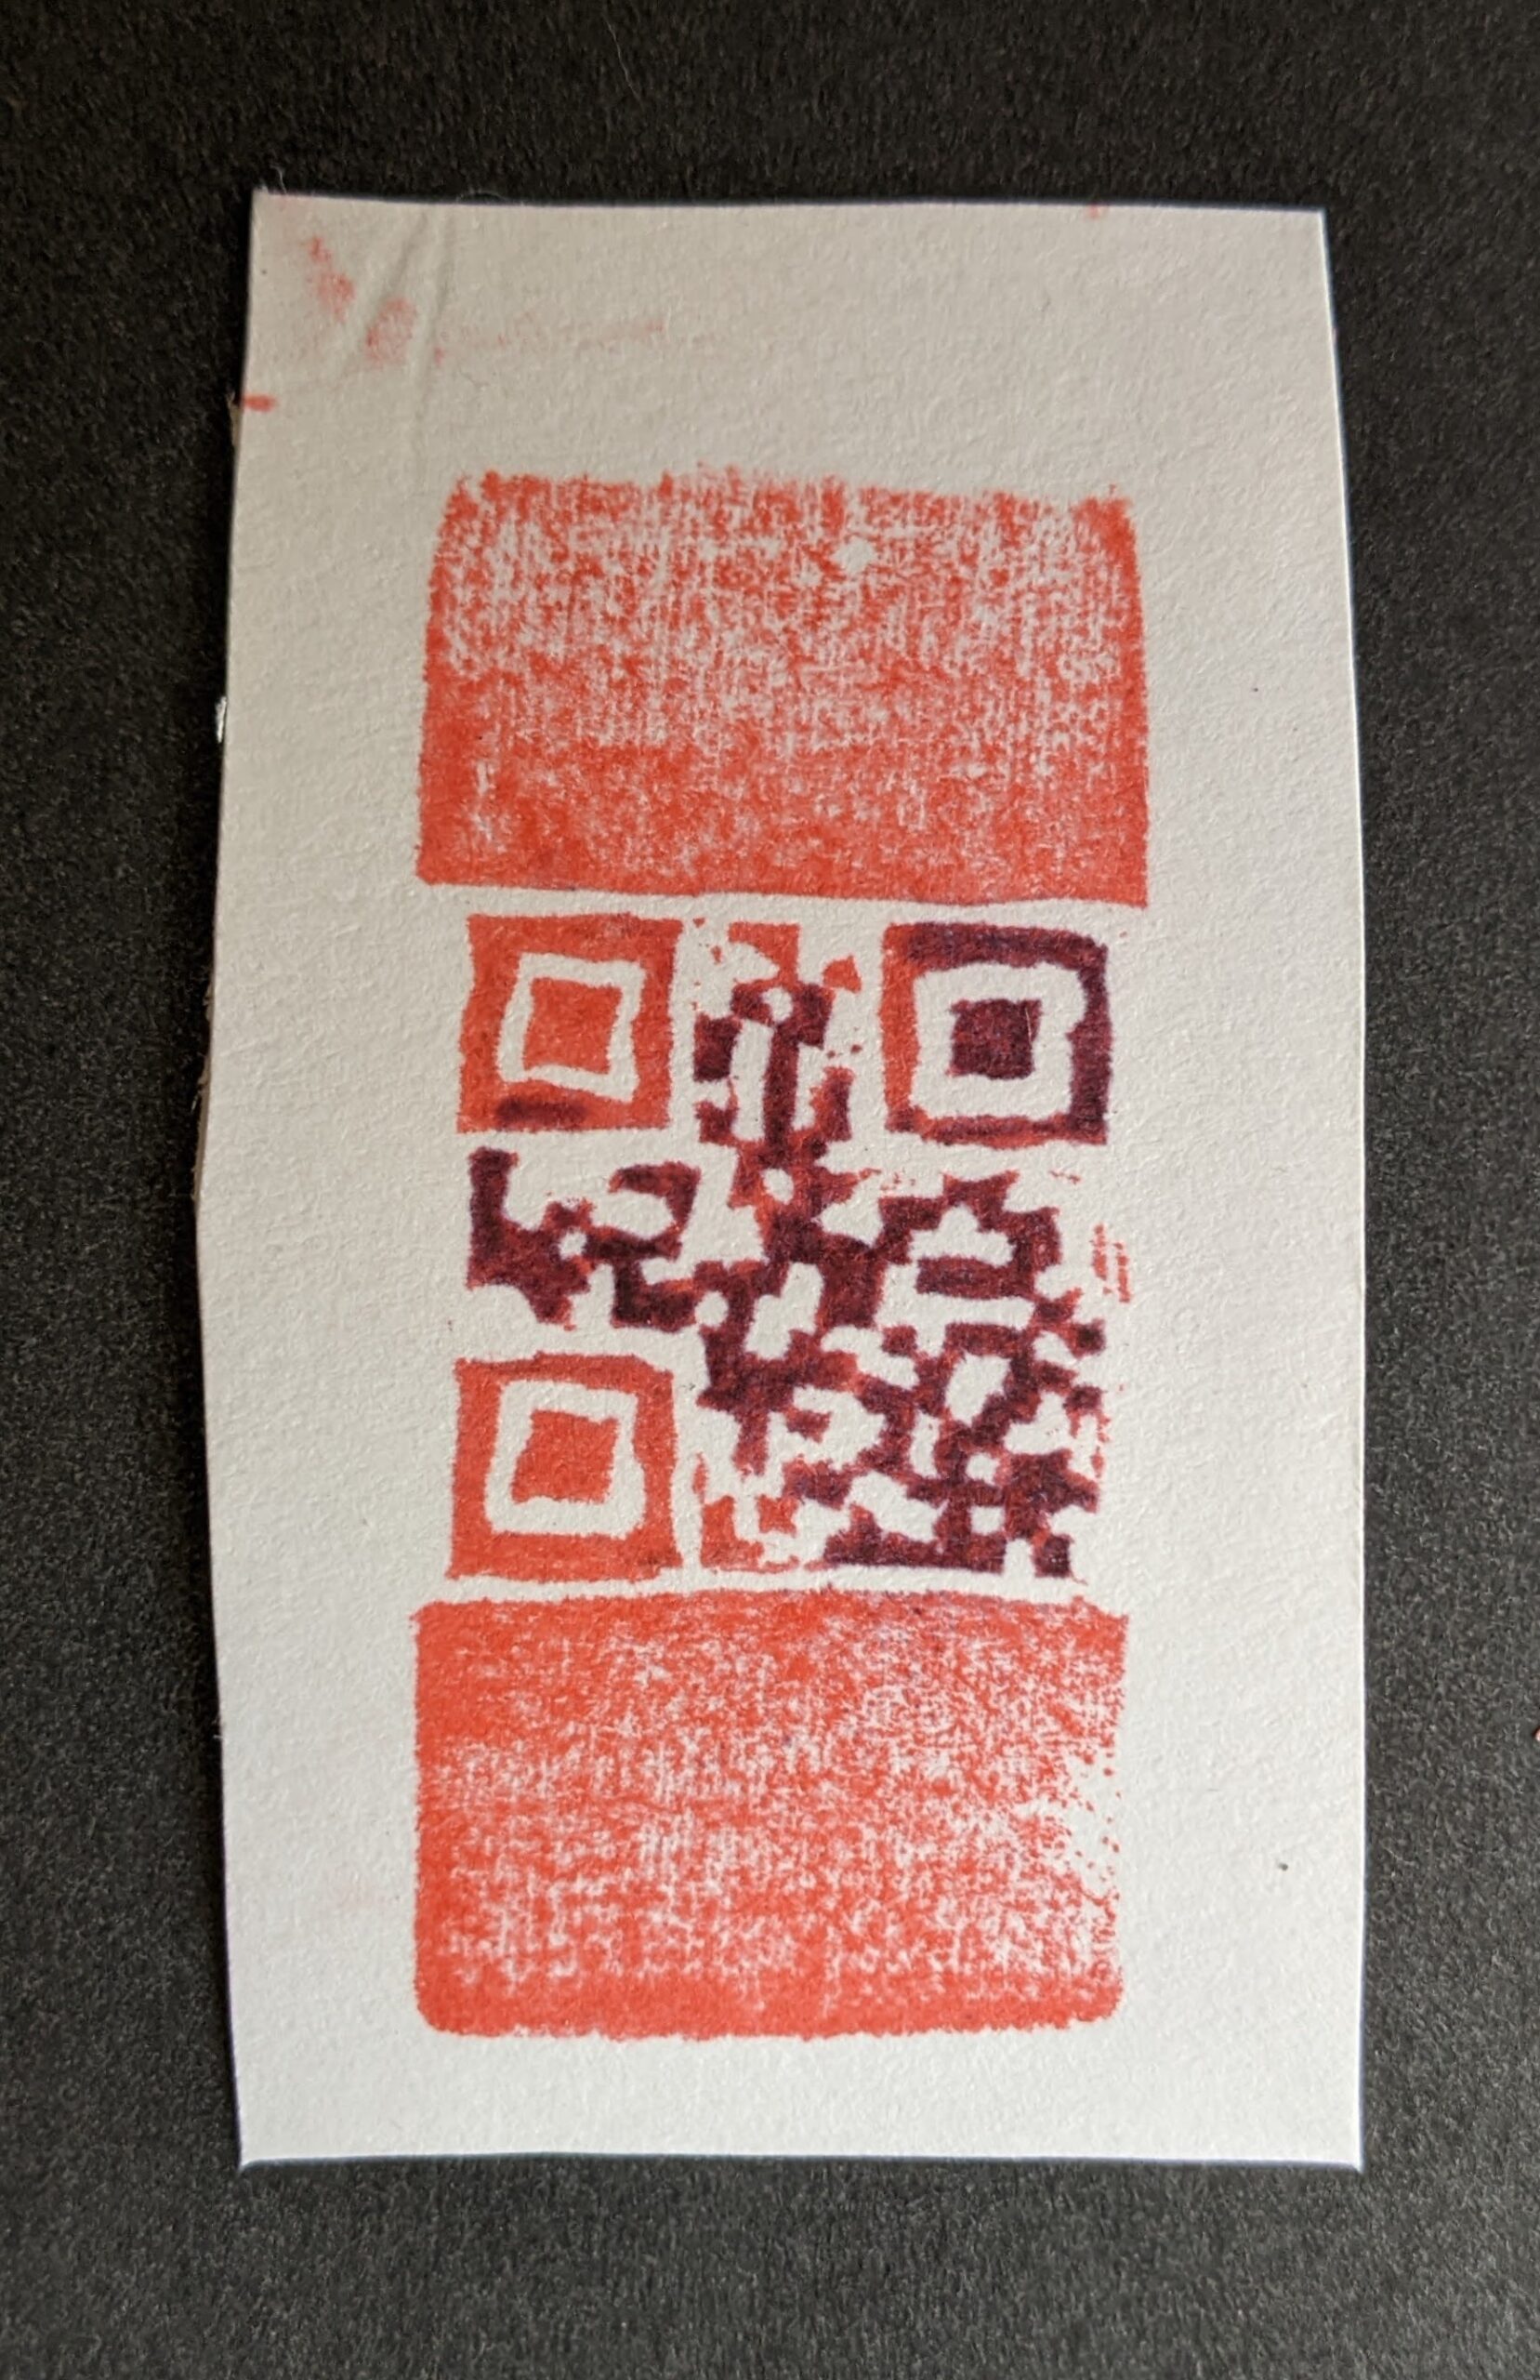
Lastly, I was able to get just one impression that could be scanned:

One single scannable stamp impression

One single scannable stamp impression

The reason the bit of paper is a little oddly shaped is that I had stamped onto a piece of scrap cardstock.  I’d stamped on other pieces of paper, cards, and even on that same piece of cardstock.  This was the one time it worked.

Eraser Stamp Carving
  1. Carved Eraser Stamping
  2. Further Adventures in Eraser Carving
  3. DIY Carved Eraser QR Code Stamp

Carved Eraser Stamping

I recently stumbled across the world of fantastically charming mini prints and carved erasers by Serena Rios McRae aka Cactus Clouds Art.  This short Instagram post provides an excellent overview of her process.

Serena’s artwork is evocative, accessible, and affordable.  I bought several of her prints the other day.  She also posts how-to’s on YouTube and provides plenty of links to her recommended supplies (Serena’s lists and affiliate links).

These looked like so much fun, I bought a pile of cheap pink erasers off Amazon, repurposed an old set of stamp carvers we had lying around (I had done some linoleum block printing back in high school and my wife had a small stamp making kit from years before), and gave it a shot.  The kids had a great time with this while I fretted about whether they were going to jab their fingers and how many bandaids I’d have to have handy.

After their first stamp, I hacked together a 3D printed holder.  Despite measuring the erasers carefully, it was too long and really, too big for what it needed to be.  Here you can see version 01 taped to a piece of mahogany wood left over from my ukulele project.

This slideshow requires JavaScript.

There were several problems with this first attempt.  The holder was a little too long, so the eraser would shift back and forth.  It was also much bigger than necessary.  I designed it with those large fins on the side to make it easy to tape down, but it really wasn’t necessary and just made rotating the eraser holder a little more unwieldy.  While my kids were carving things using this holder, I went to work printing a few accessories.

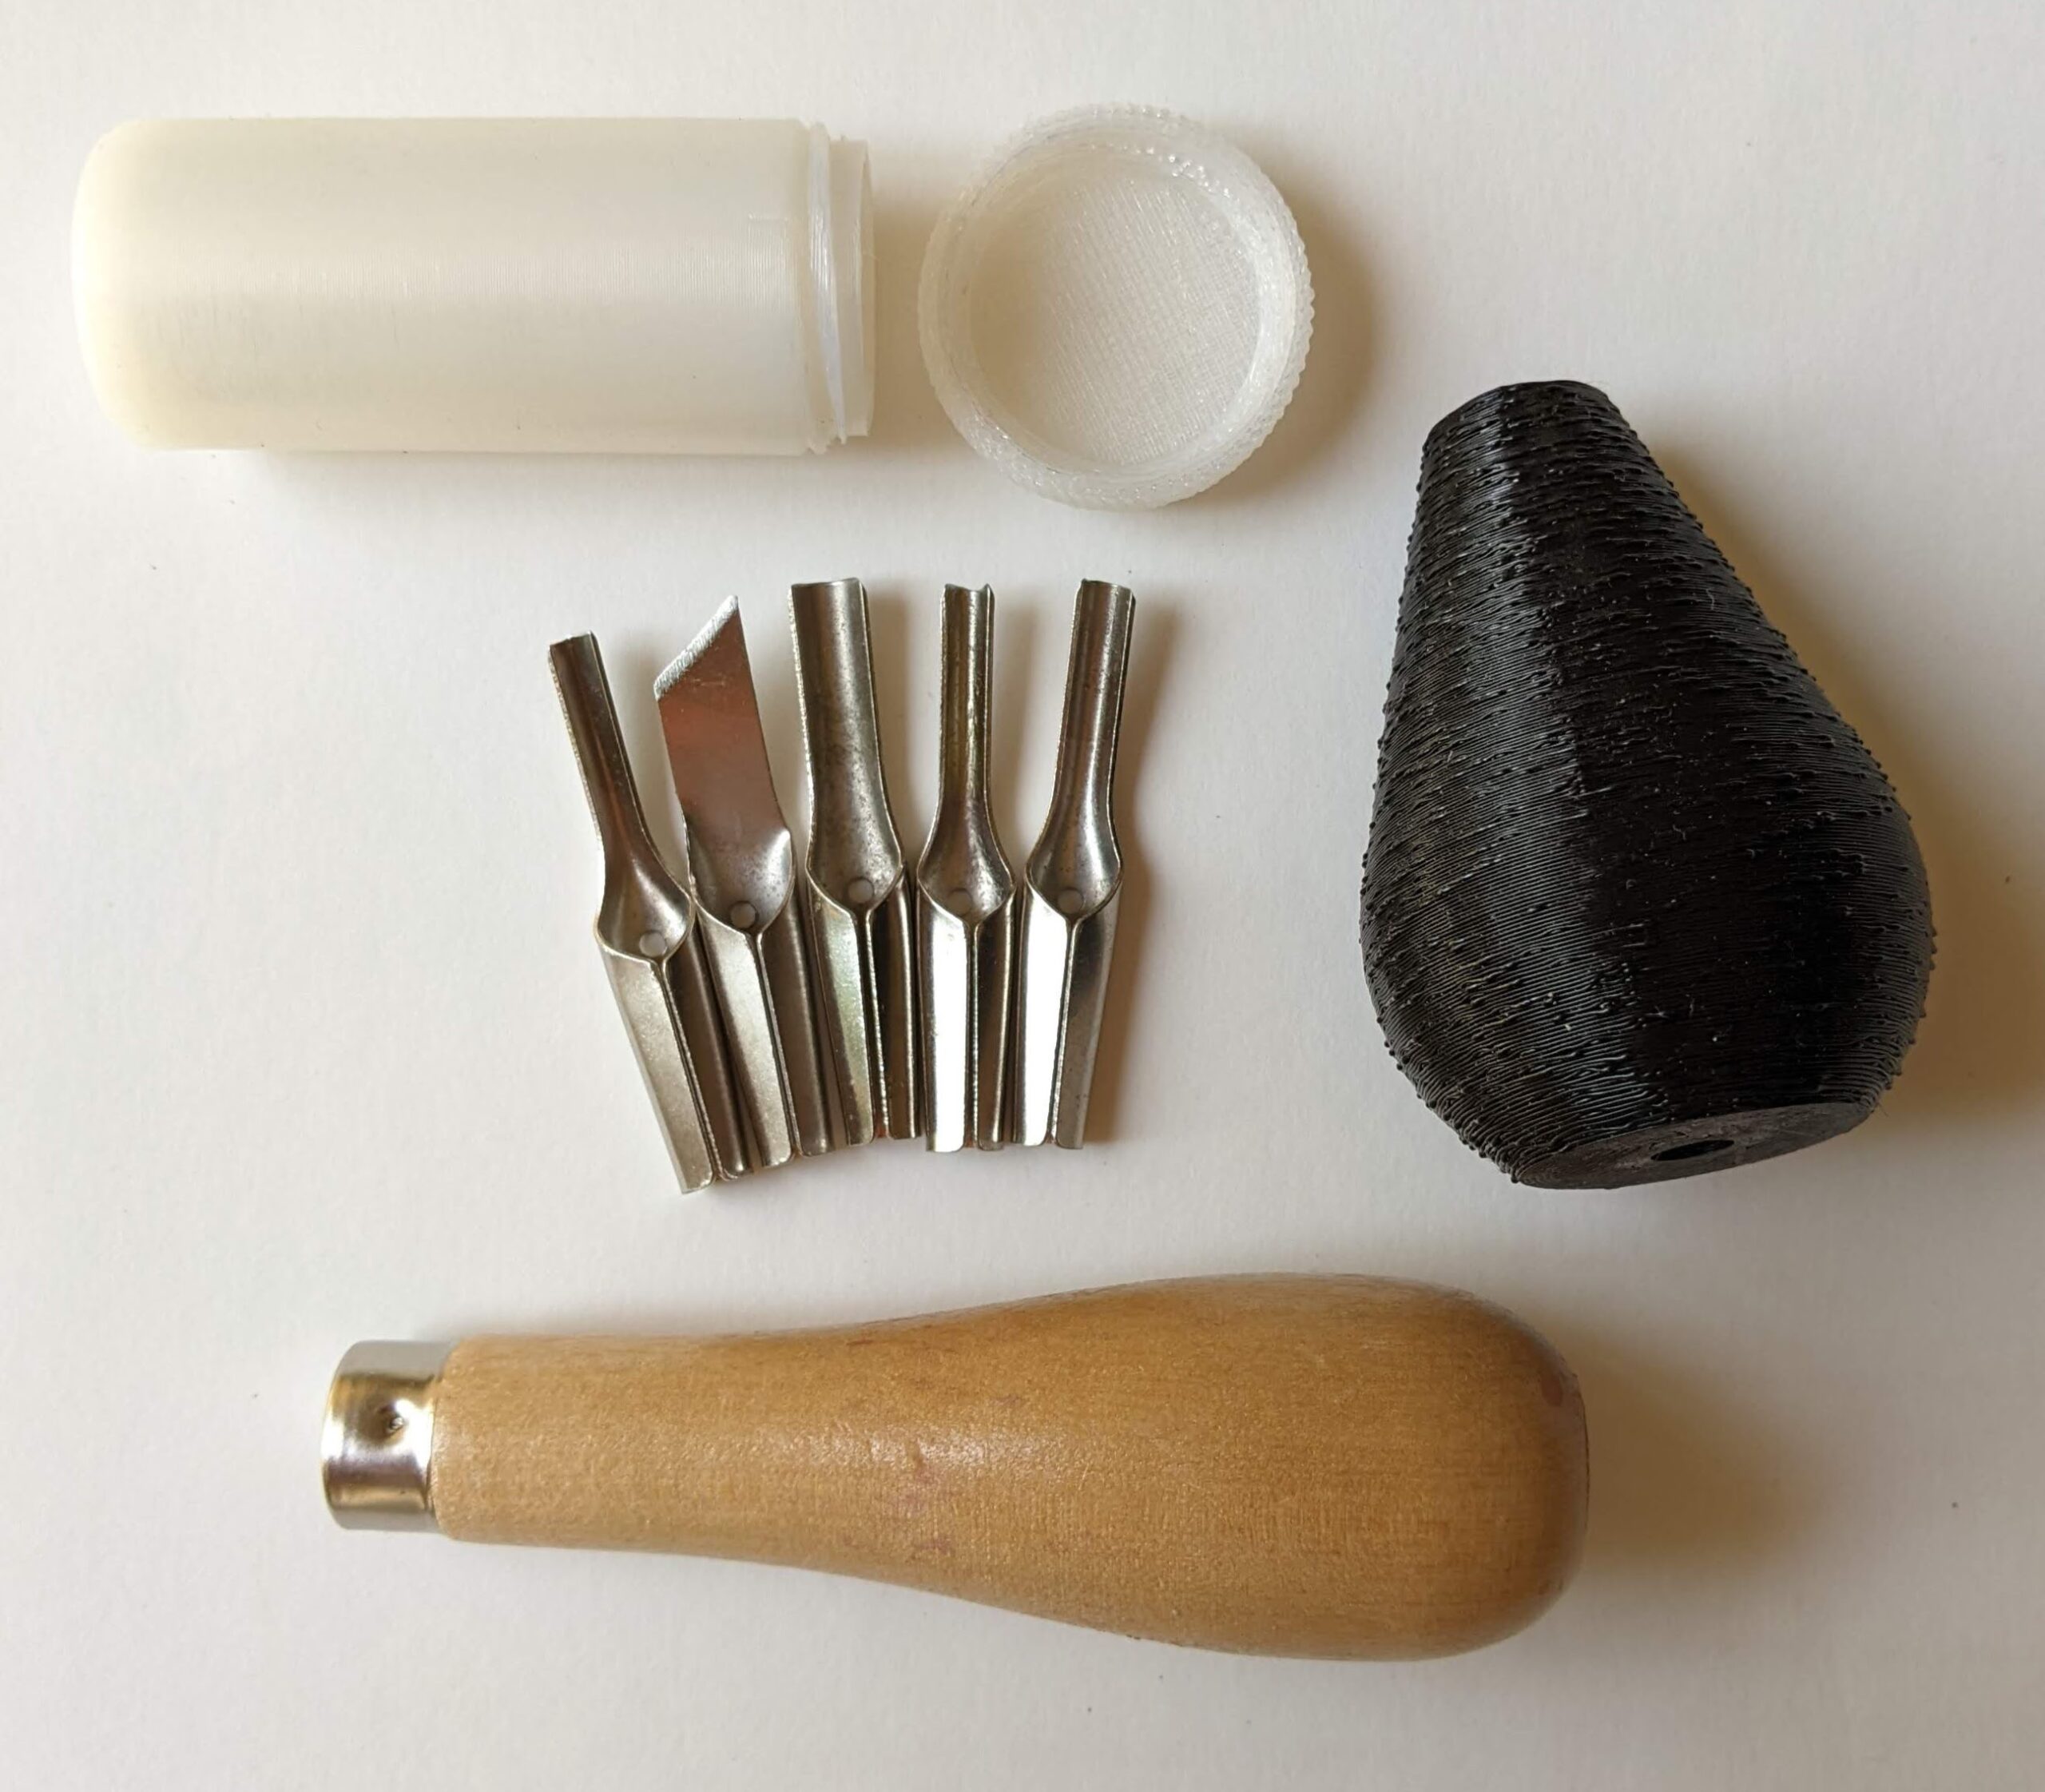
3D printed screw top blade container, extra blade handle

3D printed screw top blade container, extra blade handle

The blades came in a little plastic baggie, so I printed a bespoke screw top container for them so they can be stored securely.  I also printed another blade handle so that two people could carve stamps at the same time – one using the original wooden holder and the other using the printed holder.

The next version was more compact and had dimples on the edges which I hoped would make it easier to hold.  I also added some little ridges inside so the eraser wouldn’t fall through.  Here they are:

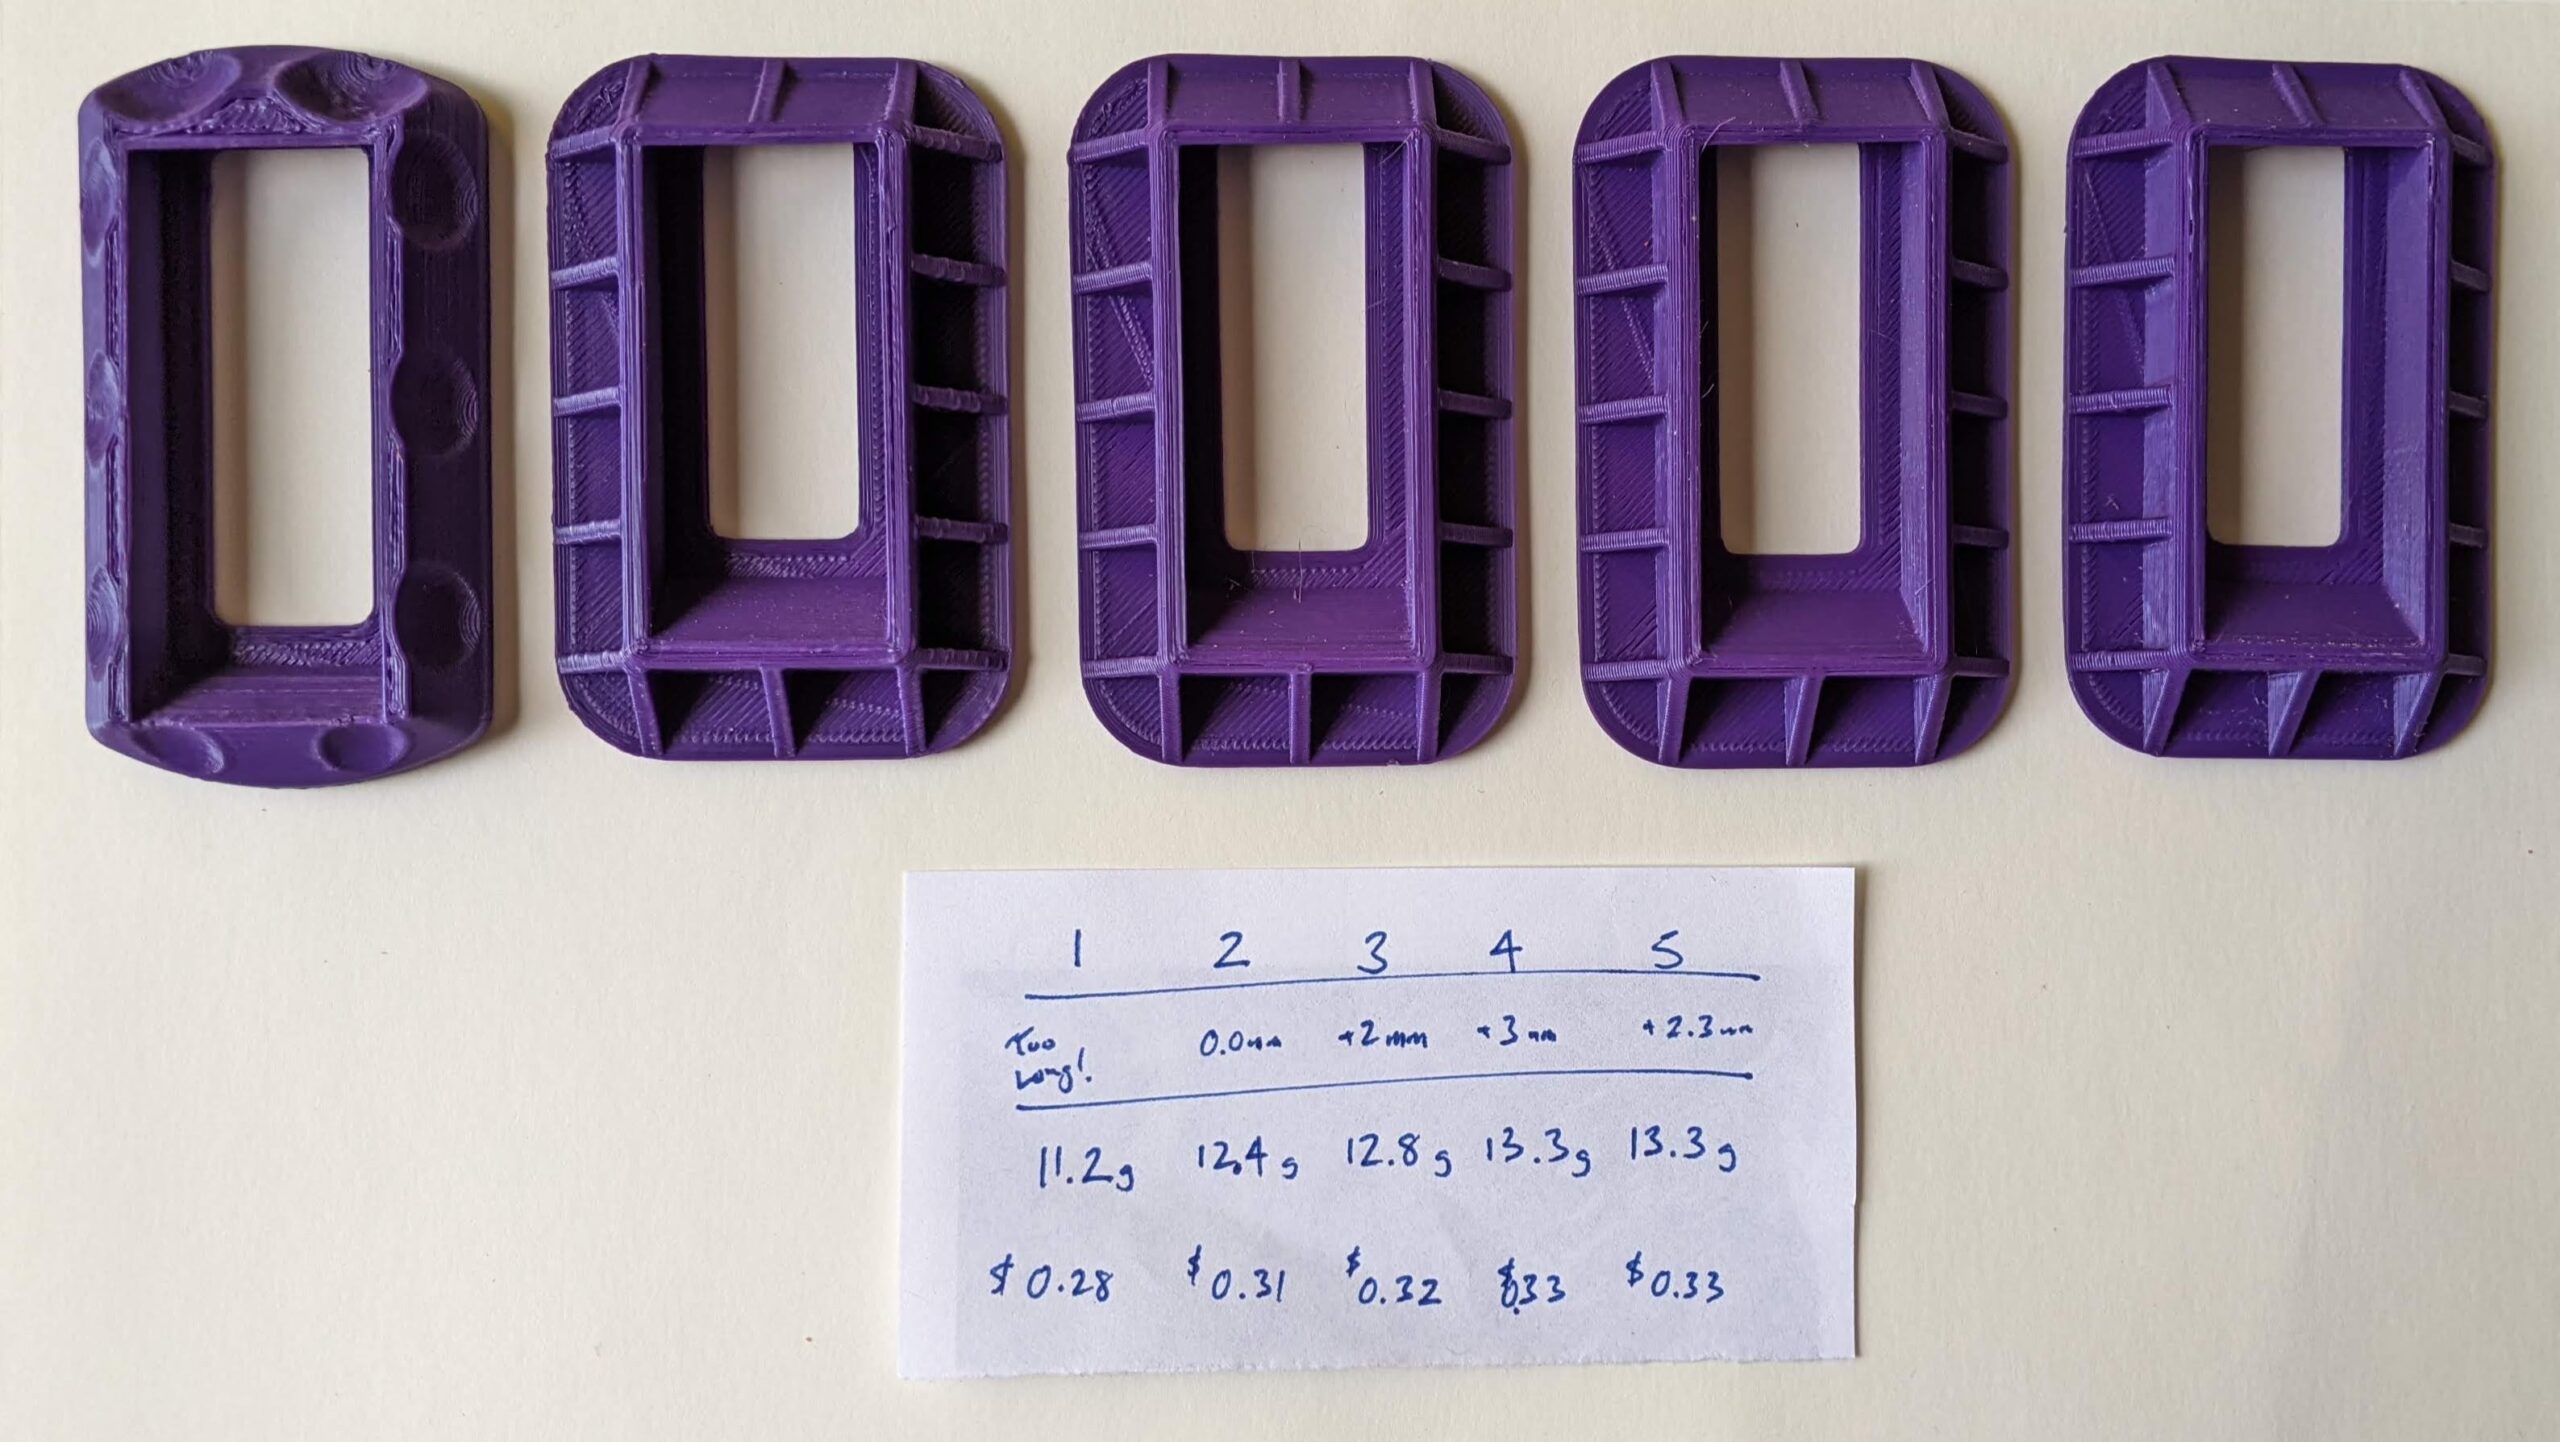
Eraser holders for carving, versions 1, 2, 3, 4, and 5

Eraser holders for carving, versions 1, 2, 3, 4, and 5

The dimples didn’t work.  They weren’t deep enough and my hand couldn’t really grip it very well to keep it from moving while I was carving.  The area for the eraser was a little too long.  Versions 2-5 involved tuning the length just right.  Each one takes about an hour to print and used about $0.30 of plastic.  The final result fit the erasers like a glove.  They nestle in the holder perfectly and are easy to poke out using the little hole.  Admittedly, they might only fit the specific cheap erasers I found.

Here’s my process:

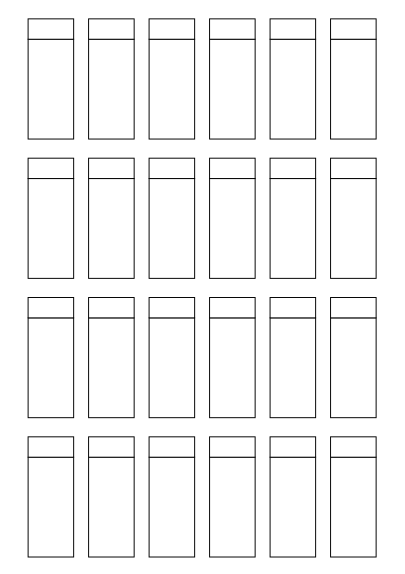
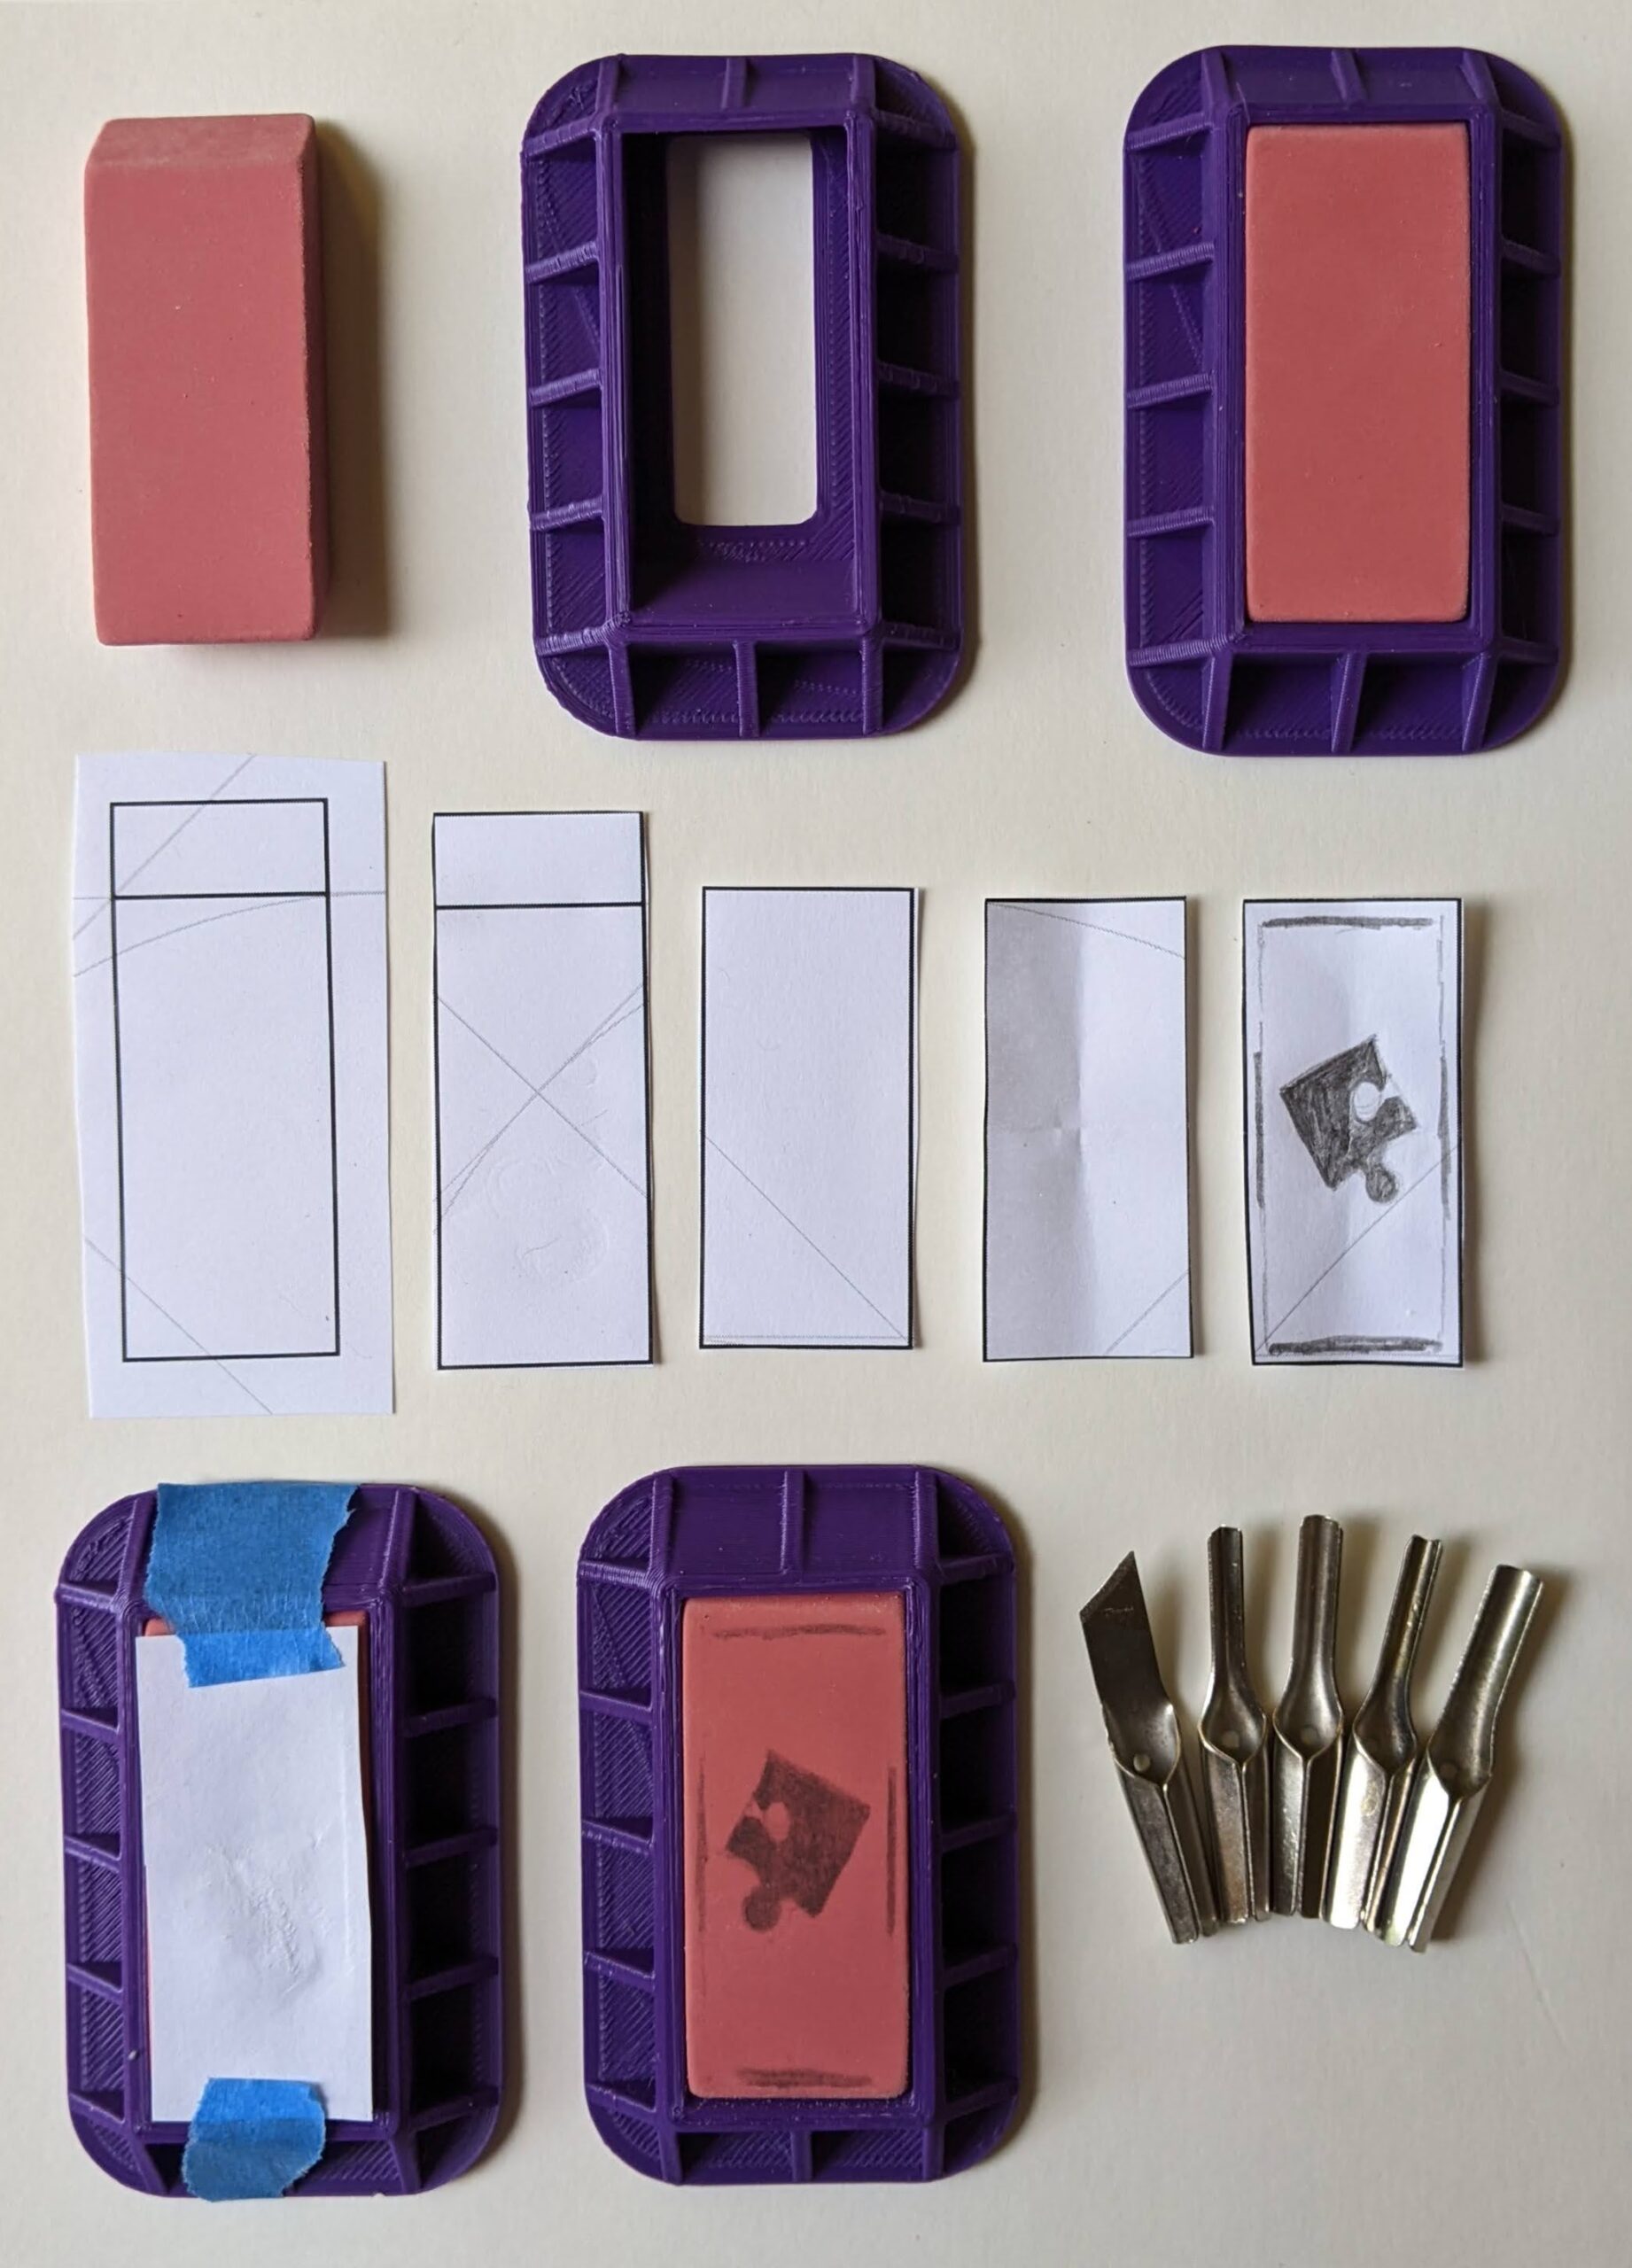
I created a page of eraser templates, which match the length and width of the large and small edges.  Of course, the long section matches the long side of the eraser – but the shorter section only matches the short side of the eraser if you tip it over.

Eraser templates

Eraser templates

I got to use several iterations of the eraser holder for this next section:

All the pieces, laid out nice and orderly

All the pieces, laid out nice and orderly

The process is pretty easy.  Put the eraser in the eraser holder – it should slip right in, drop in snugly, and lie flush with the top edge of the plastic holder.  After cutting out a paper strip, it’s trimmed to size, creased to locate the central point, and a pencil drawing (drawn as I’d like to see it printed).  This is taped upside down onto the eraser, rubbed along the back (a coin would work very well, but I just used one of the extra eraser holders), and the design is neatly transferred to the eraser.  The neat thing about this process is that I could design something in Inkscape, print it into the template, and color it in with the pencil for transferring to the eraser.

Lastly, let’s see the result!

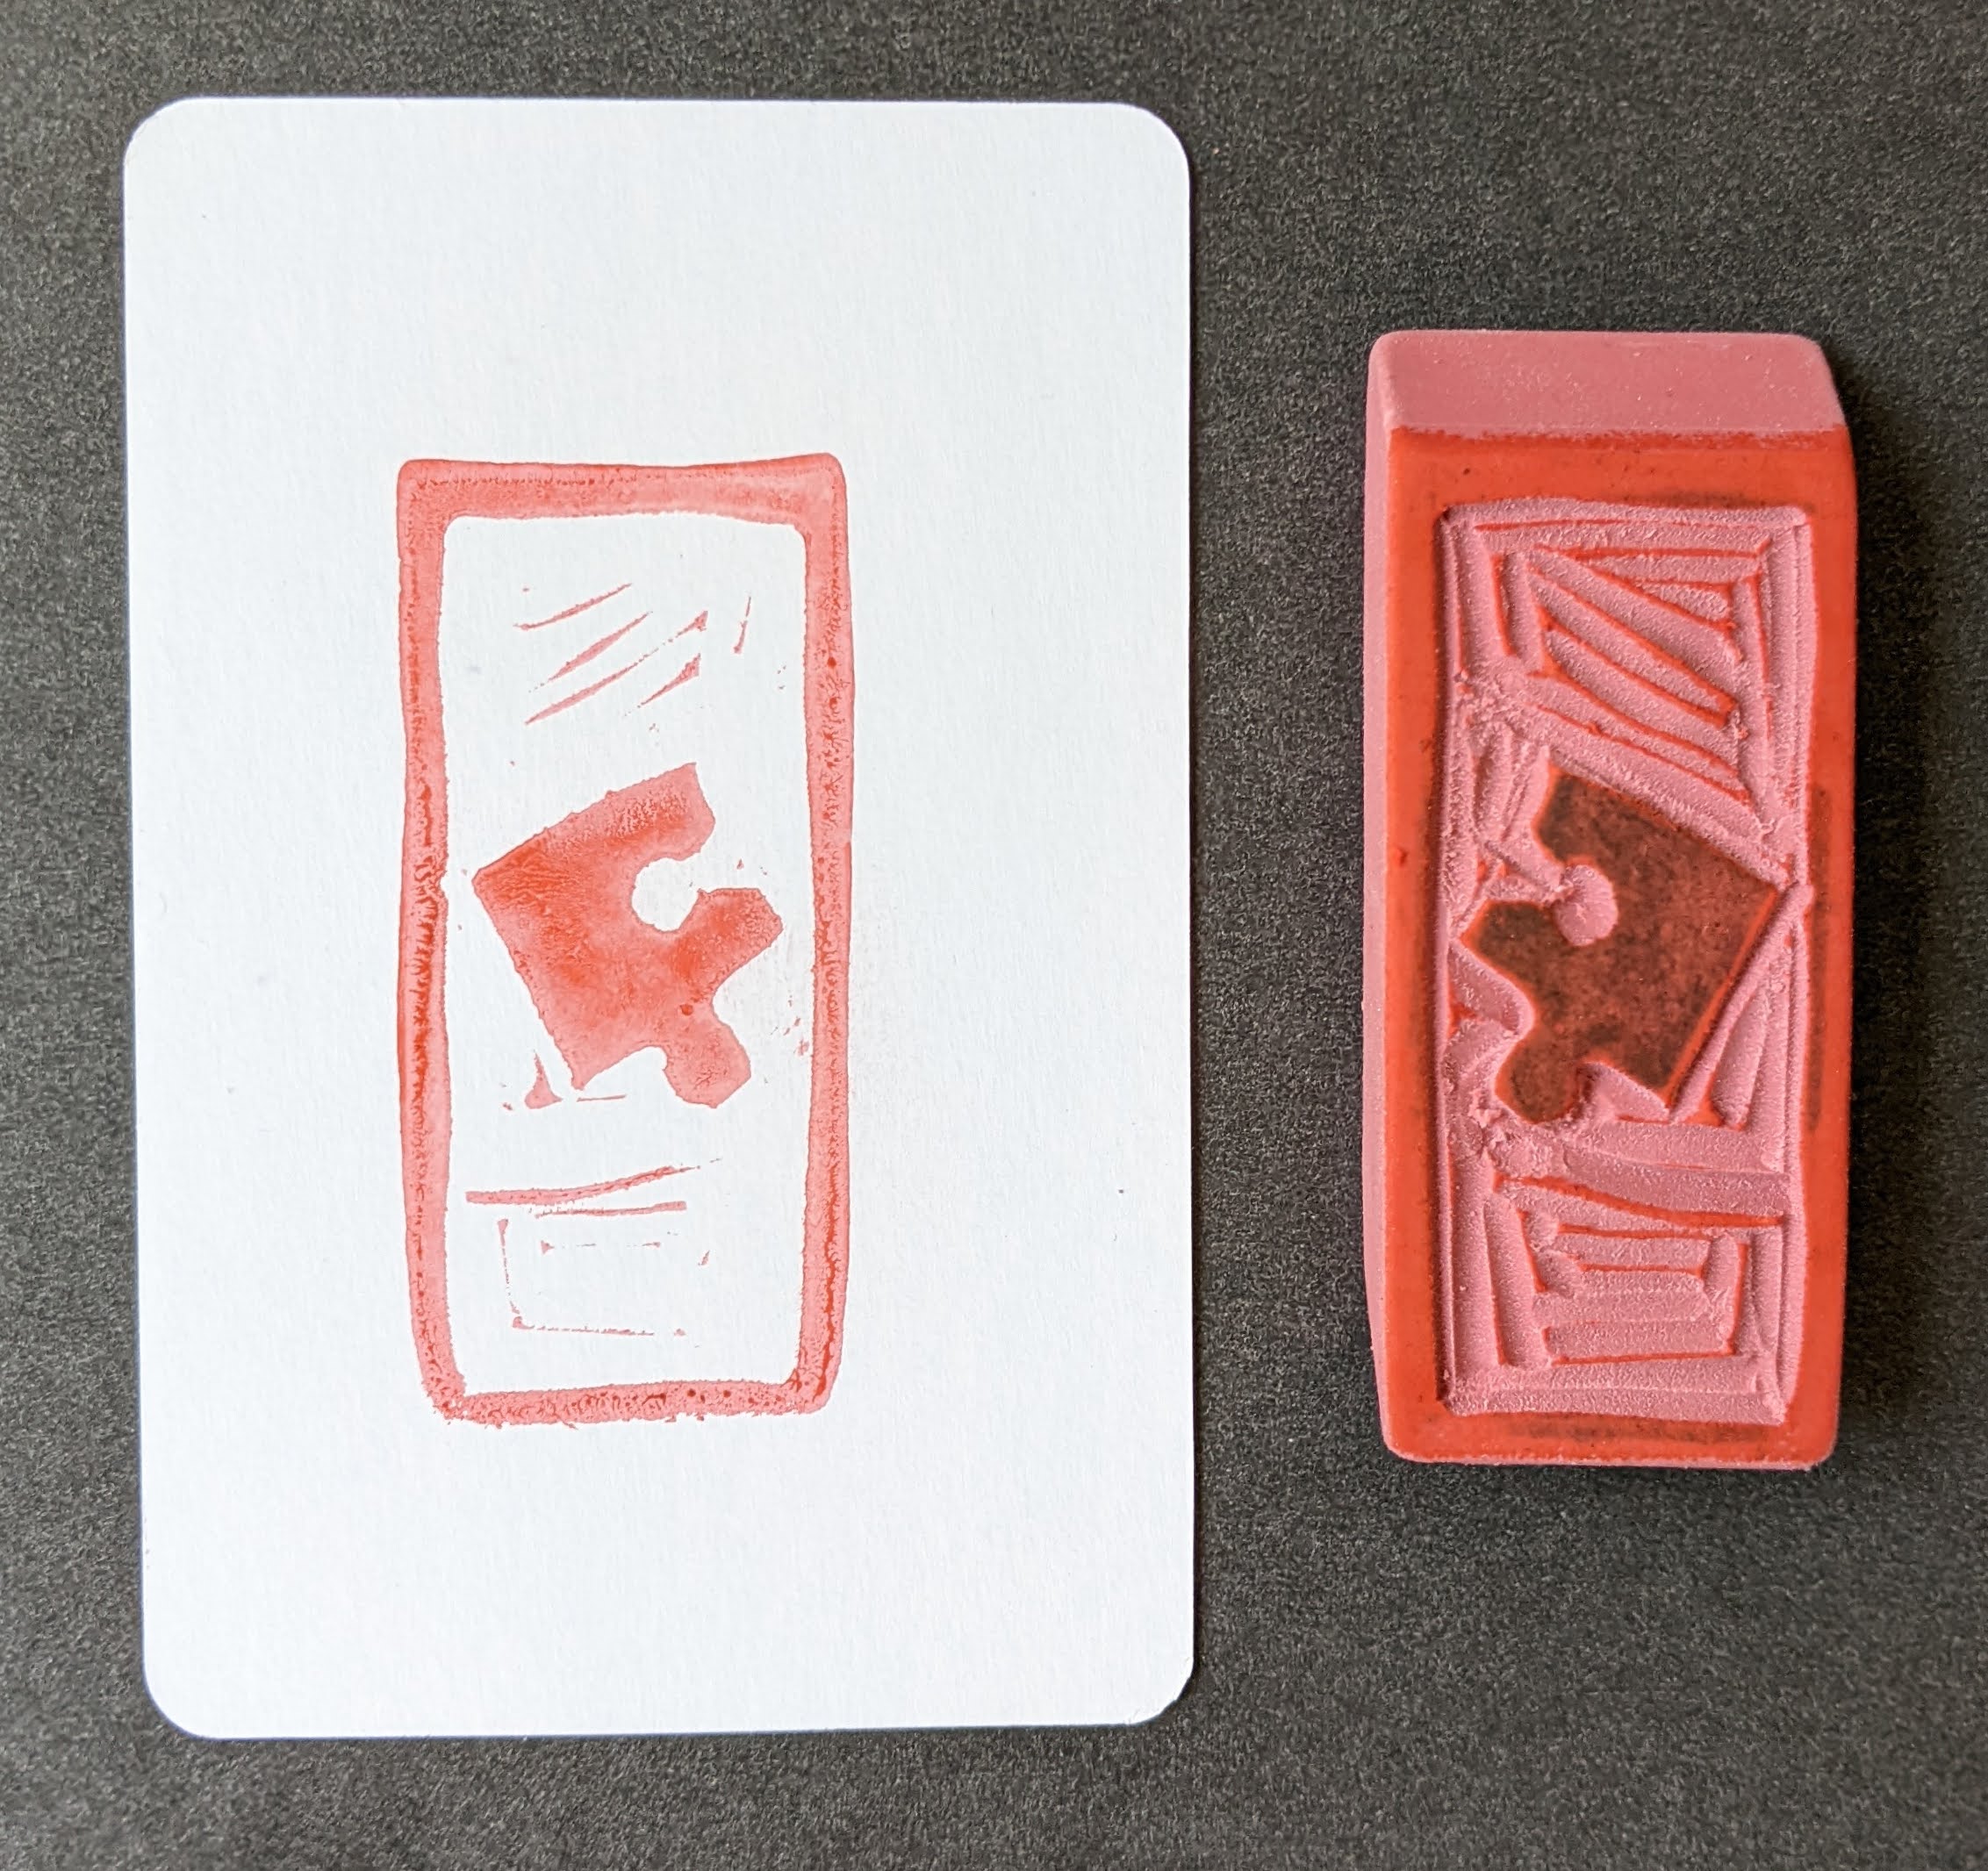
Eraser stamp!

Eraser stamp!

As you can see, the final stamped result matches the orientation of the little drawing.  I just wish I’d saved the little scrap of paper with the original drawing on it!  The eraser holder was a joy to use and the final result looks every bit as great as I was hoping.

If I keep making these, I’ll probably want to upgrade my setup to include Serena’s recommended stamp pad and sharpener (you’ll see them linked in Serena’s Amazon link above).  I’d like to design something to make easy to hold the eraser, center it, and make a clean even stamp, but don’t have a great idea for one yet.  I’ll keep pondering this and maybe whip something up this weekend.

Eraser Stamp Carving
  1. Carved Eraser Stamping
  2. Further Adventures in Eraser Carving
  3. DIY Carved Eraser QR Code Stamp
  1. I mean, I guess it’s version 1 – but I labeled all the purple ones starting with 1 so… []

DIY Soprano Scale Travel Ukulele

I recently entered my DIY soprano scale travel ukulele in the California State Fair and wanted to add a post giving an overview of the materials, design process, progress pictures, sound test and extra information:

1. Final Project Photos

This slideshow requires JavaScript.

2. Materials

  • African mahogany
  • stainless steel rod for the bridge, cotter pins cut and filed for the frets, various hardware (black oxide nuts, bolts, and washers), with fret markers hole punched from iridescent cellophane and laminated into the finish
  • strap hand stitched from seatbelt material, paracord, and upholstery thread
  • custom 3D designed, printed, and finished elements
  • standard ukulele tuners and soprano strings

3. Very fast photo montage with a sound test played on the ukulele

4. Build Process

I blogged my journey from June 5, 2022 when all I had was just a plank of wood and a dream through some updated 3D printed parts in 2023.  Fair warning – there’s … a lot.

  1. Learning Curves and Ukuleles
  2. Building a Travel Ukulele: Getting Started
  3. Building a Travel Ukulele: Cutting Stuff
  4. Building a Travel Ukulele: Cutting, Filing, Shaping
  5. Building a Travel Ukulele: Filing, sanding, filing, sanding, filing…
  6. Building a Travel Ukulele: Sanding.
  7. Building a Travel Ukulele: Test Fitting
  8. Building a Travel Ukulele: Preparation, Marking and Cutting Frets
  9. Building a Travel Ukulele: Shaping Frets, Sanding
  10. Building a Travel Ukulele: Building a Drill
  11. Building a Travel Ukulele: No Turning Back
  12. Building a Travel Ukulele: Sanding, sanding, and finishing
  13. Building a Travel Ukulele: Finishing, sanding, painting, etc
  14. Building a Travel Ukulele: So Much Experimentation, Bridges, Printing, and Sanding
  15. Building a Travel Ukulele: Plancratineering
  16. Building a Travel Ukulele: Swapping Hardware, Fret Experiments
  17. Building a Travel Ukulele: Bridge, Stringing It Up, and a Sound Test!
  18. Building a Travel Ukulele: Improvements
  19. Building a Travel Ukulele: Back to Basics

Thanks for reading!

Building a Travel Ukulele: Back to Basics

This slideshow requires JavaScript.

My experiment with a multi-piece turn around didn’t work.  The idea was for a multi-segment turn around where each string could be tightened and that portion of the turn around would be able to rotate as needed independent of the other pieces.  I simply did not account for the kinds of stresses the pieces would be under through normal use and string tension.  Each segment deformed, resulting in none of them being able to rotate and the slightly less rigid turn around bowing slightly under the pressure.  I couldn’t get a great picture of the deformed parts, but perhaps this will give some idea.

This slideshow requires JavaScript.

In the end, the best result for my ukulele has been a 3D printed turn around, finely sanded smooth, unadorned by paint, with a small amount of lubricant (I’ve used machine oil) over the metal bridge and across the turn around.  These simple elements have, hands down, beat the over engineered / over designed pieces above.  If they were printed out of a more rigid material, milled or turned from solid metal, created by using a system of washers, or made using a full length bolt, I’m sure it would have worked better.

The design of my turn around uses captive nuts in the plastic core, secured by bolts on either side.  This ends up being dramatically easier and cheaper than trying to source very long Chicago bolts and posts – but has a minor downside in that the two bolts don’t actually connect.  As long as the material between the two bolt ends is strong enough to withstand the continued forces of four strings under tension, there shouldn’t be a problem.  However, even printing the turn around with the best orientation for printing strength in PLA didn’t result in a part that could withstand these forces for a long time. 1  One of my ideas for this part involved using bolts that were possible slightly longer or of different lengths so they would both tighten slightly into the same captive nut, resulting in one “continuous” piece of metal for the turn around core, then using washers to ensure / assist in minor distance adjustments.

Here’s how it looks today:

This slideshow requires JavaScript.

I don’t plan on any more improvements for this particular ukulele.  I’ve deeply enjoyed playing it since it became “finished enough” to be playable in August of 2022.  That said, I’ve been thinking about how I would create another one.

  1. CNC Cut Wood.  I spent the vast majority of the time on this project just rough cutting the wood to size using a combination of hacksaw and coping saw blades.  I spent a ton more time shaving wood off the neck using rough files.  Starting with a piece of wood that was already the approximate dimensions and only needed finishing would feel like starting at the 90% mark.
  2. Different Wood.  I went with mahogany for a variety of reasons – but cost was one of the biggest and dumbest of these.  The difference between a plank of mahogany for $10 and the most expensive wood from Rockler at maybe $30 is a rounding error when the project took more than 100 hours of my time.  I’ve suggest that wenge, zebrawood, ironwood, or walnut would be my choice for another attempt.  Of these, I am leaning towards walnut for a deep brown, possibly gray finish.
  3. Strap Attachments.  The strap was not quite an afterthought.  I had always planned on using nylon webbing / seat belt material for the strap and had designed printed strap buttons for hooking the strap onto the ukulele, but in the end I just couldn’t bring myself to drill holes in the finished uke.  This was just as well since I had wanted to try using some paracord in a project for a while.  After using a flame to seal the ends of the paracord and webbing, the result was way too thick to use in my sewing machine and had to be hand stitched.  I’m not great at hand sewing, but it is functional.  Given the dark colors of the thread, paracord, and webbing, the haphazard stitching isn’t very noticeable.  If I really took my time with it I might be able to do a better job.  If it came to that I might want to use some silver or light gray thread to add a little pop.
  4. Acoustic Improvements.  I’ve noticed a dramatic change in the quality of the ukulele sound when I place a book, empty box, or large piece of rigid cardboard between the uke and myself while I’m playing it.  I’ve thought about how this could be incorporated into a new design by creating a system for bolting, attaching, or otherwise connecting a larger section to the ukulele.  Another incredibly interesting option is the plastic sheet used by TitchTheClown.  He used thumbtacks to secure a sheet of plastic from a soda bottle against the ukulele, then a heat gun to tighten it into something like a drum surface.
  5. Other prior improvements per a prior post.
Default Series Title
  1. I’d say it took about six months for the deformations to become noticeable []