
The last week has been more planning and preparing than actual progress. However, this wasn’t so bad. Cutting off chunks of wood, filing gouges into a plank, sanding areas smooth all feel like progress, but all the little steps along the way are important too.
Here’s what I worked on over the work-week:
- Ordered Oil and Wax. I ordered the BIrchwood Casey “Tru-Oil gun stock finish” and “Gun stock wax,” using the last little bit of my Instructables contest winnings.
- Raising the Grain / Sanding. My buddy Andrew suggested lightly wetting the wood, letting the grain swell slightly, and then sanding it back down. I watched a short video and read an article on the topic and gave it a shot. What do I have to lose besides $20 in wood and weeks of work?
- I used a lightly damp paper towel and moistened the surface of the wood. After a few minutes, the water had visibly soaked in and the surface had become very rough again. I used the 400 and 1500 grit sandpaper that evening and then again the following day. Some parts are still a little rough and will probably need to be lightly sanded just a little.
- I sanded the fretboard area so that it was mostly smooth, but not down to 1500 grit. I still wanted to leave some surface for the superglue to adhere the cotter pin / frets to.
- Cut the Cotter Pins. This is a perfect thing to do during hot weather.
- Reprinting the Template. This was another easy thing to knock out while staying inside.
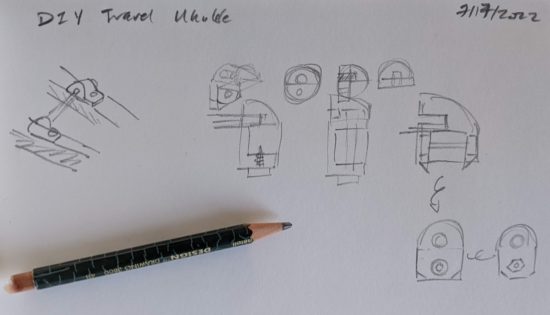
- Planned the Bridge Bracket. I came up with several designs. Some are basically standard bracket sketches (the far left one looks similar to the hardware store 3/16″ ground wire straps Daniel used in his basic hand tool ukulele) and others are more novel. I have a few designs still knocking around upstairs, so I don’t know which I’ll go with yet. As far as I can tell, the bracket doesn’t really have to support any weight or meaningful force, it’s really just there to keep the bridge positioned correctly while the force of the strings on the turn around should keep it down and in place.
I also made some actual progress this weekend. Some explanations and photos:
-
Printing the Template
- Since I don’t want anything out of scale or misaligned, I double and triple checked my printed pattern / template against a ruler. I’m happy to share the template, but please keep in mind at the time I’m writing this and sharing the document, I’ve never made a working ukulele. If you’re fine with that, here’s the template.
- As you’ll recall, the template features a ruler on each side of the pattern, as well as a gray box 100mm long on either half.
- When printing, be sure it is printing at 100% unless you discover your pattern is over/under sized, in which case, you can measure against the 100mm box to easily arrive at the percentage for scaling.
- I also made sure to overlap the two sheets as much as the print dialog would allow, which was 2 inches. I figured this would give me more spots to orient and align the sheets of paper as well as more surface area for gluing.
-
Aligning and Gluing the Template
- I removed excess paper from the sides of the two sheets of paper. Nothing fancy here, I just created a hard crease and tore the paper.
- One of the two sheets needed to be trimmed slightly, so the sheets could be overlapped without any gaps. Once this was done, I also used a pencil to lightly draw on the top sheet approximately where the two sheets overlapped – so that I would know where to best punch holes.
- Modern “shrinky dinks” come with these super handy small hole punchers. Since we did several of these projects with the kids, we’ve got a bunch of them left over. I keep one with my craft supplies and another with my office supplies. There were plenty of times when I’d be at a remote meeting (pre-pandemic) and want to add a sheet of paper to file or binder and these saved me from having to use the folder prongs or binder rings to puncture-rip the paper. 1
- To create more “registration” holes towards the middle of the design, I folded the pattern, then punched again.
- I wanted to glue the pattern together, but the print is on the front. To keep the sheets from shifting, I cut up the sticky part of a post-it note, and used these to lightly affix the sheets together. Once aligned and lightly stuck, I flipped the paper over, used a gluestick, and pressed it flat.
- I then used a very small (and handy!) cutting mat and my trusty exacto knife to cut out marks for the fret markers.
-
Aligning template to the board
- The problem with using paper is that it’s not translucent, so you can’t really tell whether you’re aligning things properly. To get around this problem, I used a toothpick to punch holes where the strings go into the neck past the zero fret, using some closed cell foam underneath.
- Using some needle nose pliers, I cut and bent two small “L” shaped pieces of a small paperclip that could be dropped through the holes in the paper into the string holes in the plank.
- I trimmed some of the paper and used some blue masking tape to hold the pattern steady. I didn’t want those little paperclips having to be responsible for the entire sheet of paper not shifting.
-
Marking locations for zero fret, frets, fret markers, and bridge
- There were several steps along the way I slightly dreaded. The first time drilling into the plank of wood, the first time I took the coping saw to the plank, cutting the round rod to size, reprinting the pattern and getting it right again, and possibly above all else putting down the lines for the fret markers. Two people who followed Daniel’s designs reported their ukuleles didn’t sound quite right and attributed this to the fret placement. It would be a real shame to put this amount of time into a project only to have it sound terrible. I’ve made every effort I can to get these fret lines as precise as I can.
-
Cutting and labeling zero fret, frets
- The first cotter pin I clipped ended up with both pieces flying around the room. In an effort not to repeat the same mistake, I cut the rest of the cotter pins inside a fleece cap. Although both pieces continued to be ejected from either side of the wirecutter jaws, they didn’t go anywhere and did no damage to the cap.
- The frets get progressively wider as they travel down the neck to the bridge. With some really hot weather and less-than-ideal air quality due fires, I was pretty sure I wouldn’t be filing down the cotter pins today, so I wanted to make sure to label them as I went. A quick fine tip sharpie mark to the topside of the cotter pin let me know where to clip it and some Roman numerals to the underside to keep them straight made sure I could easily pick up where I left off later. As the picture captions below suggest, I used Roman rather than Arabic numerals because it’s a lot easier to write little lines and crosses on a small bit of metal than it is to write a 3 or 8.
- With the cotter pins clipped, I 3d printed a 15mm diameter 45mm tall screw top container to hold them. It took $0.14 of plastic and 30 minutes to print. Yes, it is ridiculously custom and niche, but once this project is done I will undoubtedly reuse it for some other purpose.
- I suspect some of the cotter pins might have gotten slightly bent in the cutting process, so I’ll need to remember to bend them flat before I glue them down.
What’s left?
- Using a metal file and then sandpaper to round, taper, shape, and soften the sharp edges on the cotter pins.
- Making sure the cotter pins have not been bent out of shape – and bending them back as necessary.
- Gluing down the cotter pins.
- Sanding the fretboard smooth.
- Wood finish and wet sand, dry, wood finish again.
- Wax.
- Design / print / install bracket holding bridge in place.
- Install tuners (possibly with some 3D printed washers).
- Sand, possibly paint, and install the turn around.
- Add strings…
- Play?!!?!?
- Learning Curves and Ukuleles
- Building a Travel Ukulele: Getting Started
- Building a Travel Ukulele: Cutting Stuff
- Building a Travel Ukulele: Cutting, Filing, Shaping
- Building a Travel Ukulele: Filing, sanding, filing, sanding, filing…
- Building a Travel Ukulele: Sanding.
- Building a Travel Ukulele: Test Fitting
- Building a Travel Ukulele: Preparation, Marking and Cutting Frets
- Building a Travel Ukulele: Shaping Frets, Sanding
- Building a Travel Ukulele: Building a Drill
- Building a Travel Ukulele: No Turning Back
- Building a Travel Ukulele: Sanding, sanding, and finishing
- Building a Travel Ukulele: Finishing, sanding, painting, etc
- Building a Travel Ukulele: So Much Experimentation, Bridges, Printing, and Sanding
- Building a Travel Ukulele: Plancratineering
- Building a Travel Ukulele: Swapping Hardware, Fret Experiments
- Building a Travel Ukulele: Bridge, Stringing It Up, and a Sound Test!
- Building a Travel Ukulele: Improvements
- Building a Travel Ukulele: Back to Basics
- DIY Soprano Scale Travel Ukulele
- Repairing My DIY Travel Uke
- I suppose the same effect could be achieved with a non-shrinky-dink hole punch, scissors, or knife, but, I mean… why? [↩]
For alignment between pages, have grey diagonal lines in the background.
Matthias’ program might be useful too. There’s a link for the eval version under system requirements.
https://www.woodgears.ca/bigprint/
A
Forgot to add that he’s also built a ukulele…. https://woodgears.ca/ukulele/
A