
I’ve been lightly working on the ukulele before work in the mornings over the last week and today (Saturday). I feel like the finish line is finally in sight. So much so that I watched a video on how to string a ukulele. My plan is to replace the strings on my regular uke and put the old ones into this DIY travel ukulele. I’ve never replaced these strings on my ukulele and a close inspection of the strings reveals they are visibly worn under the first four frets or so.
Anyhow, before I turn to build progress…
- Wood Finishing.
- I did put a fourth coat of finishing oil, sanded with 1500 grit, dried, buffed with a paper shopping bag, and added two coats of wax. I was curious how much finishing oil and wax I used. Since I didn’t measure the oil before I started, I’ll extrapolate from the weight of the wax.
- Before using the wax, the bottle weighed 3.235 oz. Thus, I used about 0.096 oz of wax1 and approximately 0.173 oz of oil. This suggests a pair of these bottles should last someone for a little more than 17 similar travel ukuleles.
- Paint Tests.
- I have been thinking about fret markers and how I want these to look. I thought it might look nice to have them in the silver spray paint, but the wood has four coats of finishing oil and several coats of wax.
- Thus, I pulled out a trust pieces of scrap wood, sanded it with 120, 150, 400, and 1500 grit sandpaper, (finishing oil + 1500 grit sandpaper) x 4 times, then two coats of wax. I did this in 95 or so degree weather, so each coat dried very fast as I rubbed / sanded each one in. A true test would have been to let it dry for hours, but this was just to get a sense of whether it was feasible to spray paint sand finished wood.
- After I had “finished” this small bit of scrap wood, I sanded all those layers and hard work off of part of it. I used a hole puncher to cut small circular holes in some blue tape, put a piece down over the finished area and another over the finished + sanded area.
- This was spray painted silver, dried, and the tape peeled off. This is a very small sample and sample size, but the blue tape over the finished and unsanded area seemed to bleed into the grain while the blue tape of over the finished and sanded area didn’t bleed at all.
- Bridge Bracket.
- I need a way to install the bridge. Ideally, I would have a little metal bracket like Dan’s models. Then again, I have a 3D printer, which means the solutions to all my problems can usually be solved with PLA. I designed a very small bracket and test fit it over the steel rod.
- It occurred to me that I’m not really sure what “color scheme” I want. I have lots of colors of plastic, a few colors of spray paint, and lots of other color paints. Time to experiment!
- I thought back to a quote I think about sometimes when I’m 3D printing things. “First rule in government spending: why build one when you can have two at twice the price?” S.R. Hadden from the movie adaptation of Carl Sagan’s Contact. If I’m already running my 3D printer, why not print a few extras and try out all the permutations?
- I generally like to measure 3D printed things in grams, since it makes it easy to convert to kilograms, and estimate the cost to produce parts. Unfortunately, I had left the digital scale in “oz” mode. Running the numbers, the brackets are 1.05 g per pair (about $0.03) and the turn around was 5.61 g (about $0.14). The weight and price estimates don’t include minor support structures, the plastic skirt to prime the extrusion, electricity, or amortized cost of the robot but these probably wouldn’t add more than a penny or two to each part.
- I wasn’t sure whether the silver and black paints would stick well or cover up the imperfections in in the parts, so I printed four sets of the brackets. I would sand two sets, then spray paint one of each type with silver and one of each type with black.
- I set out the bridge brackets on some scrap cardboard on top of looped blue tape and hit it with some spray paint.
- It will surprise no one, but the sanded parts look a lot better. Based upon the time stamps on the photographs, I would estimate it took an hour to sand the little plastic parts. One side effect of sanding parts this small is that I frequently had to hold them in my fingers as I sanded them and my right index finger is a little bit raw. I think if I only sanded the small parts with my finest sandpaper, this might not have happened. By the time I was done, I was already leading towards the black hardware.
- Assembled.
- Some photographs of the final hardware options – the silver/black bridge brackets and silver/black turn arounds.
- A teeny tiny issue…
- I designed the bridge bracket without actually having screws to go into them. I took the measurements from the screws for the tuners. This means I need to use one of those screws or find two more small screws of about the same size. This is not as easy as it sounds. Unless…
- Swapping Hardware / Cosmetic Issues
- Nuts and Bolts. The bolts and nuts I have are fine. Shiny inexpensive metal, they proved the concept for my turn around, but aren’t exactly what I want. As I took the assembly photos, I couldn’t help but think back to my search for black oxide parts. I can find some black oxide imperial hardware that is inexpensive through BoltDepot.com, but the bolts are only up to 1.0 inches instead of the 1.25 inches I’m using. This isn’t a huge problem since the plastic turn around is almost certainly far stronger than it needs to be. I can even get black oxide nuts to go with them. The wood screws for holding the bridge in place is a little trickier, but they have these too. The total price tag for several duplicates of these parts is well under $5 with another $5 for shipping. On the other hand, I could go with McMaster-Carr and get the exact size, shape, color, and head for these parts, including the nuts, but it would cost about $30 plus an unknown shipping amount.
- Bridge.
- When steel is really heated up, it can get a bluish tint to it. The bare metal bridge is “okay” but doesn’t wow me. I’m tempted to play with this before I install it. For a minute I was also tempted to get some “Super Blue” to turn the steel rod black. :) This is a ridiculously frivolous expense for a very slight cosmetic change. I can’t justify a $14 expense to change the color of the metal bridge. Chances are I could just sand and spray paint the stainless steel rod with the black spray paint for the same net effect for no additional cost. Of course, this would also mean hacking a test piece off the nearly 33 inches of zinc plated rod I still have and then testing it with some flames and/or spray paint, but this isn’t so bad.
- Then again, I could also try out styrene rods (but it looks like they’re all white) or carbon fiber rods (tend to be pricy).
- As I’m thinking about this another design for the bridge bracket popped into my mind. It has the bonus of not putting extra visible holes into the wood, not affixing the bridge in an obvious way into the wood, and would make it easy to swap out bridges or even bridge diameters if I felt like it later on. The only “downside” is that it would require a larger hole drilled into the thin wood of the sides of the ukulele. A sketch:
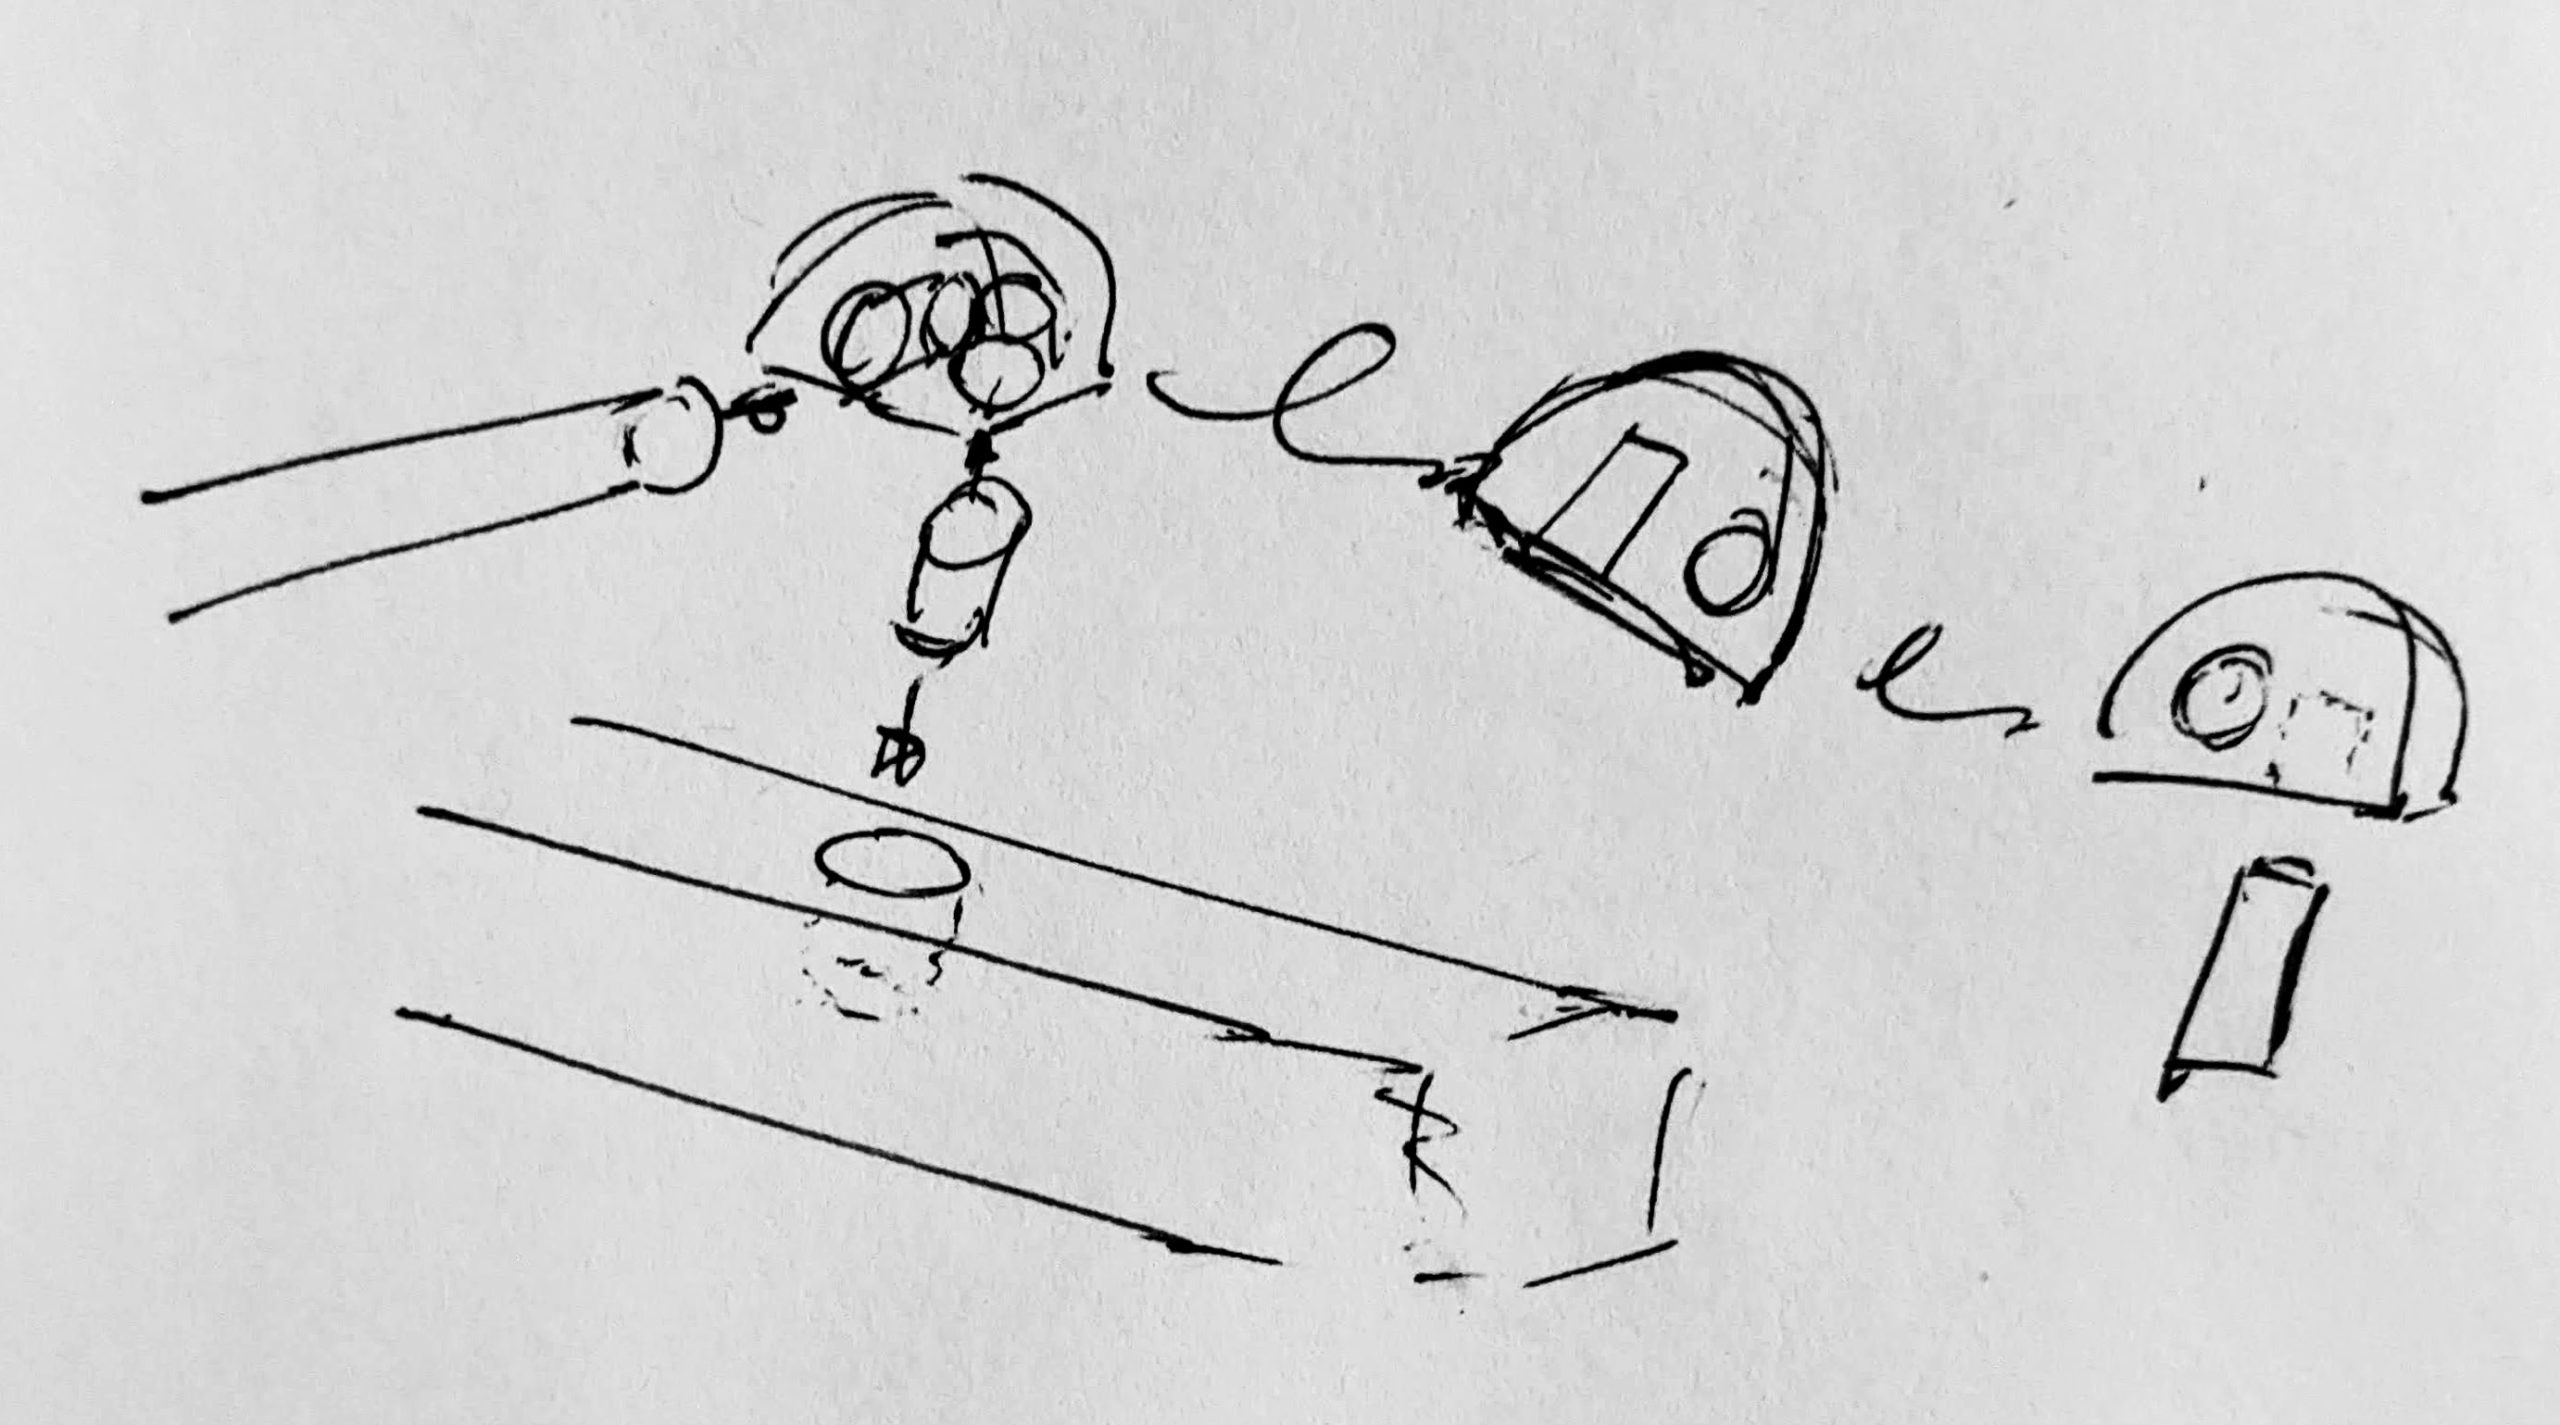
What’s really on the back of the Declaration of Independence - With this design, the strings would keep the bridge pressed down, which would keep the bridge brackets pressed down, but since they are pressed down, the brackets can’t slide off. If I ever wanted to swap out the bridge, I would just need to loosen the strings, lift one bracket off it’s peg, and then remove and replace the bridge. I don’t see any reason why the vertical peg I drew above couldn’t be part of the design of the bracket too. There are a few minor problems with this plan:
- I would have to take my drill to the ukulele again… after I’ve spent so much time sanding, sanding, oiling, sanding, sanding, sanding, oiling, sanding, sanding, buffing, sanding, sanding, sanding, sanding, sanding, sanding, oiling, sanding, oiling, sanding, sanding, waxing, buffing, and waxing.
- I would have to redesign, print, sand2 , and paint the new brackets. This doesn’t really bother me so much.
- Tuners. There’s an event coming up and this time and I put new tuners on my list. This feels wasteful to me since I have literally never used the $7 tuners I got off Amazon (you see them in every photograph of the assembled ukulele). At ~$33 the GraphTech tuners are small, lightweight, wouldn’t protrude below the ukulele body, flat black, and even used by Daniel Hulbert himself. This feels like a bit of a splurge – but one that’s worthwhile. Normally I don’t want anything for my birthday except to spend time with loved ones, but this year it’s one of two things I’ve put on my list.3
Okay! What’s up next?
- Redesign the bridge brackets. Print, sand, paint.
- Drill holes in the wood (shudder) for the new bridge brackets.
- Drop in the bridge and bridge brackets.
- Stings
- Play my ukulele one last time, sore fingers permitting.
- Remove and replace the strings with the new ones I have ready to go.
- Put the old strings into my travel ukulele!
By gum, I might well have this finalized tomorrow!!!
DIY Travel Soprano Ukulele- Learning Curves and Ukuleles
- Building a Travel Ukulele: Getting Started
- Building a Travel Ukulele: Cutting Stuff
- Building a Travel Ukulele: Cutting, Filing, Shaping
- Building a Travel Ukulele: Filing, sanding, filing, sanding, filing…
- Building a Travel Ukulele: Sanding.
- Building a Travel Ukulele: Test Fitting
- Building a Travel Ukulele: Preparation, Marking and Cutting Frets
- Building a Travel Ukulele: Shaping Frets, Sanding
- Building a Travel Ukulele: Building a Drill
- Building a Travel Ukulele: No Turning Back
- Building a Travel Ukulele: Sanding, sanding, and finishing
- Building a Travel Ukulele: Finishing, sanding, painting, etc
- Building a Travel Ukulele: So Much Experimentation, Bridges, Printing, and Sanding
- Building a Travel Ukulele: Plancratineering
- Building a Travel Ukulele: Swapping Hardware, Fret Experiments
- Building a Travel Ukulele: Bridge, Stringing It Up, and a Sound Test!
- Building a Travel Ukulele: Improvements
- Building a Travel Ukulele: Back to Basics
- DIY Soprano Scale Travel Ukulele
- Repairing My DIY Travel Uke