
It’s a word I just made up from “planning,” “procrastinating,” and “engineering.”
I suppose it’s also a form of mid-project optimization. As I get closer to the finish line of this project, other ways to improve or embellish pop into my mind and won’t leave me alone until I sketch, model, research, build, and/or blog them.
- Hardware.
- Initially I bought the cheapest hardware possible, stainless steel or zinc plated stainless steel. However, without a big jump in price, I could “upgrade” to using black oxide coated stainless steel for a more uniform and understated look.
- To start this project, I went with two #10-24 stainless steel machine screws and two matching nuts was only $0.52 and came with free shipping from Home Depot.1
- “Upgrading” to black oxide screws through BoltDepot.com is more expensive, but still an inexpensive addition. The cost of two #10-24 black oxide coated machine screws and matching nuts is $0.64. I could even swap in chrome plated machine screws and matching nuts, for $6.68, which would look pretty cool. Their shipping cost is basically $5 for small packages such as this.
- I suppose if I was somehow swamped with demand for custom 3D printed turn arounds, bridge brackets, strap buttons, and hardware, I might try bulk-ordering from BoltDepot.com or McMaster-Carr for a discount and then putting together kits. I do not anticipate this happening any time soon. :)
- Strap Buttons.
- I don’t have a strap to go with my ukulele, but I’d either make or buy one if it was really working out. Strap buttons are relatively cheap as an off-the-shelf item ranging from $5 – $15 depending on how fancy they are. However, I’ve made an effort to keep everything as “DIY” as possible. Once done, I think the only off-the-shelf instrument items will have been the strings and tuners.
- All the strap buttons I’ve seen appear to be very similar. They’re just little tapered cylinders with a hole for a screw to go into the wood. These would be very easy to design, print, sand, and paint to look really nice. And, best of all, there are tons of websites which show cross sections and dimensions of many different variations for these buttons.2 The only real decision, of course, is what color. Black, nickel, or chrome seem to be my knee-jerk preferences.
- I looked at these various options, considered the size of my project, constraints of 3D printing design, and came up with a model that I felt would look really nice once it was sanded, sanded, sanded, sanded, sanded, and painted, sanded, and painted. 3 Each button costs about $0.03 worth of plastic to print, using about 1.1 grams of plastic. That’s a pretty good deal if you completely discount my time. :) Something I did not realized until after I had waited 7 minutes for a high polygon version of this design to render was that once I printed and quadruple sanded the printed button, it wouldn’t matter how detailed the model was. After that, I dropped the facets by a lot and had renders done in about 15 seconds.
- The ones I’ve printed seem to look nice. I’ve printed 5 in all. I figure I’ll sand4 two of them, paint them, and see how they look. If they’re anything like the turn around, I’ll be very happy with them. Two extras are in case I don’t like the look of the black strap buttons and want to see what it looks like with some silver spray paint. The last one is in case I find a way to really screw up one of the others. Worst case scenario, I give away or sell these, I suppose.
- Strap.
- There are a bazillion ukulele straps out there. I just added one to my wish-list, the “Hug Strap” by Melissa Nannen for use with my regular ukulele.
- However, for this ridiculously DIY and handcrafted project, I’d want even the strap I use with the 3D printed buttons to be a DIY item as well. I have a sewing machine, heavy duty thread, thick nylon seatbelt material in black and dark gray, and several different thicknesses of black and gray ballistic nylon like you’d see in camping gear or a heavy duty backpack. I’m pretty sure I could whip something up.
- Turn Around.
- I’ve now made several different turn arounds. There were two or three iterations just to get the width and sizing properly calibrated. Then I made a silver one, followed quickly by a black one.
- Then I remembered I had thought of a few ways to make a fully round one. The fully round one would have a slight seam that would probably disappear once it had been sanded and painted, but half of it would have to be printed with support structures, possibly making it a little rougher to begin with. Though, there are several design tricks to minimize these issues. It could be designed with a larger and a smaller side or perhaps with two identical halves that fit together.
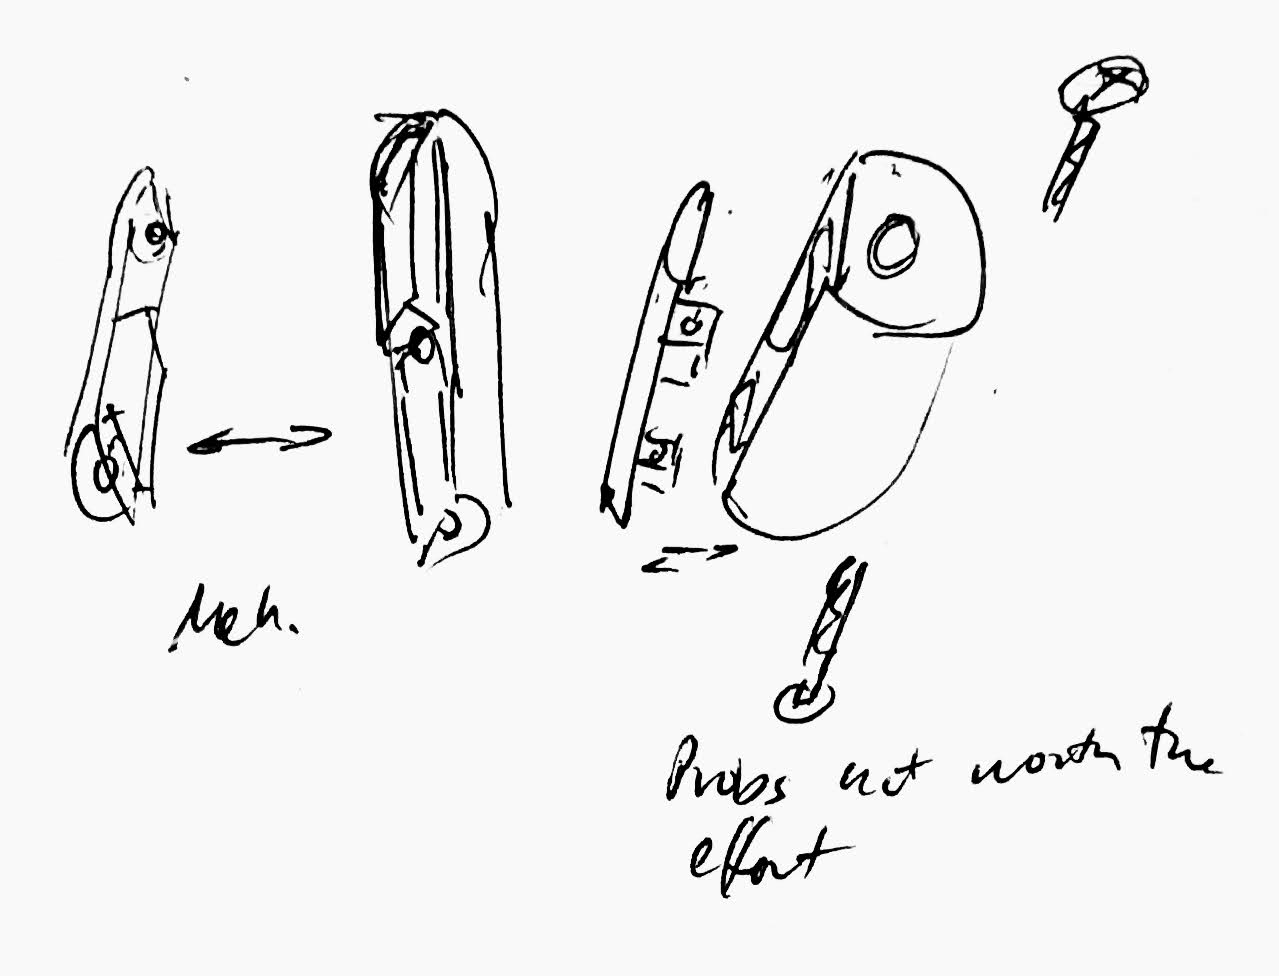
Two sketches of ideas for 3D printed two-part turn arounds - Now, turn arounds with beveled edges and grooves at 45 degree angles could be printed on their ends, but these introduce several potential problems.
- Printing on the end makes it harder (though not impossible) to include captive nuts. You could create slots for the nuts to be dropped into – or pause the print and drop nuts into the model as it’s being printed, permanently embedding the nuts into the model. This could actually work really well, now that I think about it. Of course, cleaning the threads for the nuts if they get plastic in them or other debris would be difficult, but it might be worth the one-time extra design / printing effort.
- Printing on the end changes the direction of the 3D printed layers. A print tends to be slightly stronger and be less likely to “delaminate” when forces are applied along the “grain” rather than against the layers. Simply put, over tightening a turn around that was printed “laying down” is less lightly to cause a problem than a turn around printed on one side.
- What I like about the current turn around is (a) it’s already done and (b) I kinda like how you can just barely see the captive nuts inside. This doesn’t actually detract from the look for me. What I like about the idea of a “fully round” turn around is that it may look “cleaner” and more “professional.” I realize the ship sailed on the “professional” look the moment I took the coping saw to wood. The two legs of the body aren’t even, the interior cutout is obviously not symmetrical. That’s not to say it looks bad – it just looks… unique.
- Fret Markers. I have not given up on fret markers. I watched an interesting video showing how someone laid out the correct spots, tested the materials, and inserted their fret markers. I gave some thought to how I would add my own. It occurred to me I could use 3D printed markers printed on double axis diffraction grating in a technique pioneered by David Shorey. I think some “raw” silver PLA embedded with diffraction grating patterns would look really nice.
- String Winder. I printed a String Winder from Printables, but the winder was too small for the tuners on my ukulele or the ones I have test-fit into the project wood so far. I designed a new one in OpenSCAD, printed it and put it to use. I designed another as a “bonus” feature for my recent Instructables entry in the “Make a Tool” contest.
Lastly, as I get ready to turn in for the night, I realized I got a lot of little things on or for the ukulele done this weekend – but still haven’t finished designing my ideas for the new bridge bracket. I don’t really mind. I feel like I’m still making progress, still moving the project forward, albeit slowly. Again, I’m not really in a rush here – I’m enjoying the process immensely.
DIY Travel Soprano Ukulele- Learning Curves and Ukuleles
- Building a Travel Ukulele: Getting Started
- Building a Travel Ukulele: Cutting Stuff
- Building a Travel Ukulele: Cutting, Filing, Shaping
- Building a Travel Ukulele: Filing, sanding, filing, sanding, filing…
- Building a Travel Ukulele: Sanding.
- Building a Travel Ukulele: Test Fitting
- Building a Travel Ukulele: Preparation, Marking and Cutting Frets
- Building a Travel Ukulele: Shaping Frets, Sanding
- Building a Travel Ukulele: Building a Drill
- Building a Travel Ukulele: No Turning Back
- Building a Travel Ukulele: Sanding, sanding, and finishing
- Building a Travel Ukulele: Finishing, sanding, painting, etc
- Building a Travel Ukulele: So Much Experimentation, Bridges, Printing, and Sanding
- Building a Travel Ukulele: Plancratineering
- Building a Travel Ukulele: Swapping Hardware, Fret Experiments
- Building a Travel Ukulele: Bridge, Stringing It Up, and a Sound Test!
- Building a Travel Ukulele: Improvements
- Building a Travel Ukulele: Back to Basics
- DIY Soprano Scale Travel Ukulele
- Repairing My DIY Travel Uke
- Actually, the pack of 5 screws and 5 nuts was $1.28 [↩]
- There are lots of options on AliExpress, Amazon, and Walmart, but they don’t need the SEO juice just for me to show you a few examples [↩]
- Why do I keep putting my sandpaper away, knowing full damn well I’m probably going to need it again really soon? [↩]
- Etc [↩]