I just had OpenSCAD die on me. It’s probably my fault for running a version from 2024 – but it’s been super stable and … why mess with a thing that works? Fortunately, OpenSCAD replied to my toot saying “@makerblock Check the “Backup Path” folder, e.g. on Linux that is at $HOME/.local/share/OpenSCAD/backups/”
However, having a program crash isn’t always that bad. Yes, it’s a hassle. But, I often find that the new version ends up being built / recreated in a fraction of the time and and more streamlined. In this case, I was working on a revision of my stamp eraser carving grips. The code for new version ended up cleaner and the final model was better looking as well.
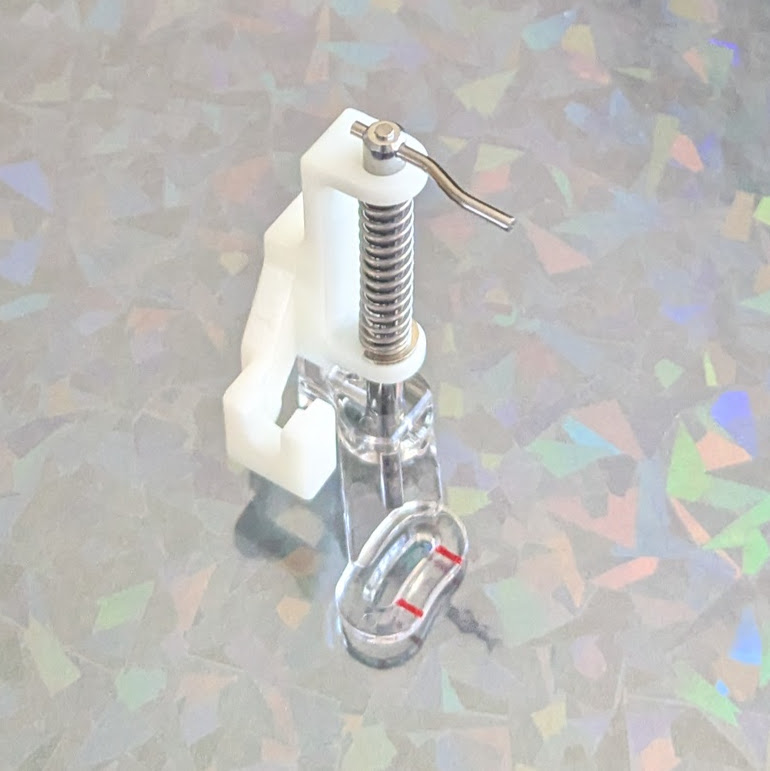
Brother Free Motion Presser / Quilting Foot SA129Apparently I already have one! This is technically the third Brother sewing machine I’ve owned. My first was my Mom’s hand-me-down, which worked for years, then stopped working and was too expensive to fix. :( The second one was also a Brother, that one was fairly inexpensive, but strangely enough some of the rubber wheels inside literally melted into goo. I 3D printed a new one of these wheels, but ended up making everything worse and… once again it was too expensive to repair. I donated both to Goodwill a long time ago in the hopes someone more capable will find and fix them.
In any case, one or more of these sewing machines came with the above free motion foot! On the Brother website it’s listed as the SA129 for $60 and doesn’t indicate it’s compatible with my Brother XM3700. The Brother part elsewhere for only $40 and does indicate it’s compatible with my machine. 1 You can find this exact part available for sale on ebay for under $15, which seems like a pretty great deal. Edit: Ugh, it looks like Amazon has Temu knockoffs for as little as $6, shipped overnight?!2
This little device reminds me of Paul Nosa‘s work with a drawings using a solar powered sewing machine. We’ve seen him at Maker Faire several times – and it’s always a treat to watch him in action. I’m not positive he’s using a free motion / quilting foot for his machine – but it makes sense that’s what he was doing.
The good news is that I don’t have to find this part or wait for it to be shipped. The “bad” news is that I no longer have any excuse for not making something with it!
And, I mean, why wouldn’t it be, really? I can’t imagine Brother would make this one sewing machine not compatible for some reason. That’d be just mean. [↩]
It’s such a simple part, that one of these would work. I’m just torn by my severe dislike for Bezos/Amazon [↩]
I’ve seen a few small vacuum formers, most notably the peanut butter jarvacuum former and some small ones over on Kickstarter, but this one by odemir_atelier seems particularly small, cute, and well put together. It’s basically an attachment for a vacuum hose/handled vacuum and a frame for a sheet of plastic. Apply heat with a heat gun, then lower the plastic on the vacuum box. They’re using a sheet of 3mm plywood with holes cut into it for heat resistance. Since heat is applied while the plastic is placed on the box, it makes sense that this sheet is not made of a material that softens under heat.1
This slideshow requires JavaScript.
The maker has an interesting “drop down” style small vacuum former on Printables, which is likely to reduce errors, but one of these vacuum attachment ones. It seems reasonably easy to produce. It’s basically a box, a tube out the side, and a platform where you can place a holey 3mm board. If I wasn’t trying to be fancy, I imagine I could knock out this design in a few minutes of OpenSCAD work.
Well. I just can’t help myself.
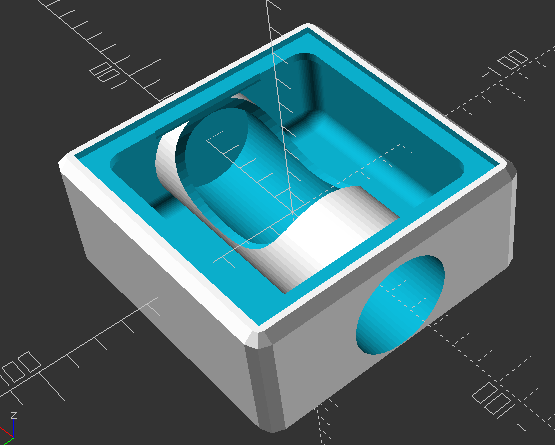
Vacuum former box adapter
The box puts the adapter inside the box, so it’s not sticking out, has some supports underneath the lip supporting the cutout for the plywood plate. Sure, this would still need a way to hold the plastic sheet, but that’s less interesting so I didn’t make it. :)
You might wonder why I’m including screenshots rather than embedding the video… I basically don’t count on users not deleting their content and don’t trust any online platform that they will still be here in the future. [↩]
While I haven’t done extensive testing on these, I have some experience with 3D printing pens. Overall, I’d recommend against them for use in a makerspace with a limited budget. They’re generally inexpensive, but have such limited utility and reliability, I don’t think they’re worth the shelf or budget space.
I’ve used a 3Doodler 3D printing pen at a makerspace and I bought a cheapie one off Amazon. I though the 3Doodler was okay, but found it too slow and manual to make anything very interesting to me. 1
Given the speed, lack of precision, need for a steady hand, market packed with cheap knockoffs, there aren’t a lot of these tools I’d ever use. The highest personal use for one of these low speed, low volume 3D printer pens I could think of would be repairs of 3D prints. For a school or makerspace, these would be interesting, but even the best ones would probably be more novelty than any kind of real tool.
The one exception would be Tim Keller’sStruder which I’ve seen and used. It essentially uses a full sized extruder and hot end and has the kind of flowrate you’d expect from a 3D printer, except that it is hand held. The artists who’ve used his Struder have made some pretty cool things.
Whether you make an entire systems as complicated as Adam Savage’s huge setup or as simple as something made from a peanut butter jar, the theory and operation is essentially the same:
Build an enclosure that can pull a vacuum
Put a bunch of holes in a side of that enclosure
Warm a sheet of plastic until it begins to soften
Turn on the vacuum and lower the warmed plastic over an object for the vacuum to pull the plastic around the object
In recent years there have been several Kickstarters for vacuum formers. At a few Maker Faires in the past I’ve gotten to see several of them up close. Don’t get me wrong – those professionally built models are great, but I probably won’t ever buy one. They’re probably great for consistent temperatures, going quickly and precisely from heat to vacuum, much bigger than my own DIY setup, and probably has some kind of safety testing.
That said, this is one of those “Pareto Principle” type tools. I can get way more than 80% of what I need way less than 20% of the cost. The bucket vacuum former costs probably $50 worth of materials plus a cheap heat source versus $500 – $5,000 for a more professional setup.
As I’m building up the “checklist” page for building a makerspace, I keep remembering additional things that should be added or expanded on. I ‘d prefer not editing the original blog posts and just adding a new one to address anything I’ve missed.
Honestly, I’m not even sure how I forgot some of these items – except that I was jumping around a lot as I was writing that initial blog post. How could I forgotten to add a soldering iron?! No matter. We’re fixing that.
It’s fine to start with a basic pen soldering iron, just know that you will almost certain dump it as soon as you get your soldering station. You can get a basic soldering iron at a hardware store, big box retailer, or your favorite DIY electronics company. However, you have to manage the cord while using it – otherwise the weight of the cord will want to pull it off the table / bench / work surface even if you have a iron stand. My hack to deal with this was to tape the cord to the table, so the weight was borne by the tape and not pulling at the hot iron next to me. If you are going to get a pen style soldering iron, get a good one where you know you can get replacement soldering iron tips. It was hard to find replacement tips for the crappy soldering irons I had.
If you’ve got just a few things to solder, these are actually fine and will work for many years. Even the fancy pen soldering irons that have temperature readouts on them take a while to heat up, lose their heat fast, and the ones I’ve had tended to have an inconsistent temperatures. That said, you can get a lot of soldering done if you go slow, are patient, take care of your soldering iron tips, and just accept some of your soldering will need to be redone.
Soldering iron station. $75+
I’ve bought probably three crappy to okay soldering pens over the last 20+ years and if I had just bought a single soldering station, I’d probably be ahead. However, the price, replacement costs, and ease of use aren’t the only considerations. I’ve never really had a big work space to have a soldering iron station set up until very recently, and if space is a premium for you too, just stick with the soldering irons. However, if you’ve got the space, these are great. Weller soldering irons are supposed to be the gold standard and having used them, I can see why. They heated quickly, transferred heat to the solder quickly, and were just easier to use all around.
Soldering supplies
These all pretty basic and all make sense. You’ll probably want extra soldering tips. You’ll definitely need lead-free solder and flux. You could get along without flush cutters and helping hands, but they’re extremely useful and will make your life easier.
Multimeter. $20
I bought a basic one from the hardware store years ago and it’s still going strong. I feed it a new 9v battery every few years and it’s fine. I can test continuity, voltage, resistance, and that’s about all I do.
Decibel meter. $20
I wanted to test out some 3D printed whistle designs, so I printed a bunch of different designs, and picked up an inexpensive decibel meter. I don’t use it very often at all, but it’s come in useful tons of times.
Temperature gun. $20
I think I originally bought the temperature gun to get a sense of well our HVAC system was working. But, it’s also fun to just use in a variety of circumstances. How hot is it outside? How hot am I? Or, heck, you can even use it as a laser pointer!
Lathe / CNC Lathe
Lathes are incredibly useful tools – if you know what they are and how to use them. I only have a general sense of what they can do – and have never used one. However, if I was building out an ultimate makerspace, I’d probably get one for the shop. After taking a class on how to use one safely, of course. They basically operate by holding something in a large chuck and then spinning it so that you can scrape at it to make a useful shape. If you’re not sure what this is – it’s exactly how you’d imagine a round chair or table leg is formed. A metal lathe could make screws, custom cylindrical parts, and tools to make more things.
The first time I even heard about a lathe was a long time ago in high school as a friend was telling me about his depression era grandfather who wouldn’t go to the hardware store for small parts – when he could find a small nail, put it in a lathe, drill it out, and make a small metal tube for some repair purpose. I didn’t really think about them much until I saw Cathal Garvey’s 3D printable microlathe on early Thingiverse back in 2010. That lead me down the path of learning about the Gingery lathe, how it was part of a toolpath to build a whole metal workshop starting from basically nothing. 1
Since I mentioned it above, a CNC lathe is a late that is connected to a CNC so that you can program it rather than manual operation.
Plastic injection molding
There’s a lot to say about plastic injection molding and I’m probably not the right person to say it. Usually injection molding generally requires some amount of CNC milling to create the mold or a CNC’ed metal frame / holder for a 3D printed mold.23 I don’t know that an injection molding device is right for a makerspace, because these can be expensive, big, require heat, plastic scraps or pellets, CNC’ed molds, and are only really better than a 3D printed object if you need a lot of a particular small item. I don’t think I’ll be getting any of these any time soon, but if you had a makerspace and some grants for equipment, I could investing in a smaller model.
If you’re not following The Crafsman Steady Craftin, you’re missing out. He makes amazing things, shows people how to make amazing things, and the videos are funny and entertaining. [↩]
I woke up this morning and all of a sudden my mind was flooded with more ideas for things that I use / reuse for making tools and supplies. Most of these tools don’t require any kind of high end products and would work just as well with whatever you can get from a thrift store, garage sale, or donation.
A heat gun is useful for applying shrink tubing on electronic connections, taking whisps of plastic off a 3D print, and a million other very small uses.1
Iron
A basic clothes iron can be extremely useful for fusing thin disposable plastic bags into plastic “fabric” and applying heat transfer vinyl. Even though I only use our iron for making purposes with a sheet of parchment paper between, it’s probably best to get an inexpensive and/or used iron to only use for this purpose.
Hot plate
A hot plate is an inexpensive, portable heat source that is extremely useful for warming small batches of things and for a mobile vacuum forming setup. At home, I’ll use an old toaster oven, but when taking the project on the go, a hot plate works super well.
Toaster oven
I’ve seen people use toaster ovens2 to perform flow soldering for small components with surface mount electronics. Also, it can be easier than using a hot plate, providing more even heat, when doing vacuum forming. I’m pretty sure you could also use it to melt plastic scraps into plastic sheets and crayon scraps into bigger crayons.
Panini Press
This hadn’t even occurred to me, but I saw an Instagram video about a couple guys who were melting plastic scraps with a panini press to jumpstart their business making things. Their process was basically… apply heat source to plastic bits from bottle caps, melt them into sheets, cut with a cookie cutter or knife, shape with woodworking tools, profits. I imagine that it would be very helpful to have a big press or custom press jig to make these sheets.
Microwave
I don’t have a particular use in mind, but I imagine that if you had an old microwave in a makerspace, you’ll quickly find a use for it.
Shredding / Mixing
Blender
Again, a used, thrifted, garage sale, or donated model is likely to be as good as any. You could use this to shred paper and water for paper mache pulp or thin plastic pieces to be melted into useable parts.
Spice or coffee grinder
Just as with the blender, but perhaps for smaller items. I would probably go for a blender first, but I imagine a small grinder could be very handy too.
Paper shredder
A regular office shredder could do double duty as a piece of standard office equipment as well as a pre-shredder for a blender based paper mache system – or as a source of paper to be used in paper mache.
Mixing attachment for drill
For about $15-20 you can pick up a mixing attachment for a drill. I don’t I’d get a ton of use out of this tool, but I imagine a $15 investment could save hours of work mixing white glue, water, and paper pulp into piles of paper mache.
Label Maker
I bought a thermal sticker label maker a while back and I love it. You can find these for as little as $10 to $20. The labels come in a variety of colors and shapes and features (transparent, shimmery, etc). I use it for spice labels, labelling boxes of arts and crat supplies, little to-do lists, and even proxy cards for Magic: the Gathering.
Personal Protection Equipment
Making things typically involves creating some kind of dust, materials that off-gas, create VOC’s, and caustic chemicals. If I were building out a makerspace today, besides the normal fans and such, I’d probably build up a cheap Corsi-Rosenthal air scrubber.
Masks, respirators, exhausts, fans, air scrubbers
Gloves for sharp things, gloves for hot things
Fire extinguisher, fire blanket, eye wash system/station
When I originally saw the ChompSaw, I had no idea how the thing worked and assumed it was some kind of custom made invention. It wasn’t until much later I learned it was basically a drill + a sheet metal nibbler + plastic box. A maker named Alejandro Leguizamo entered something called the “Builder Box” for the Rocklin Maker Faire in 2025. The description was “Experience the Builder Box! The Builder Box is a power drill accessory which cuts various materials, like cardboard, fabric, and plastic, in a safe manner, perfect for young makers. Test prototypes, share your thoughts, and be part of its evolution.” but I wasn’t sure what it was or how it worked since the only picture was a kind of a logo. I reached out to the maker and it turned out that he couldn’t make it to the event that year, but he explained the project was, as suggested above, a drill + sheet metal nibbler + a box. Suddenly, the logo made sense!
Builder Box Logo
Once I knew what I was looking at, it instantly became easier to find more resources. I found piles of nibblers / sheet metal nibblers for sale online for ~$30-40, several pictures and an unlisted video from ChompShop, and twoInstructables,3 One of the instructables indicated you could use a foot peddle to act as a variable speed controller for the drill. While an interesting idea, I’m not certain the additional incremental benefit is worth the complexity. The ChopmSaw is able to operate at a single speed, so why not this? While an on/off toggle switch is obviously helpful, I’m not going to go out of my way to add this for my own simple prototype/home use. The unlisted maintenance video shows the ChompSaw’s disassembly showing a motor, a nibbler end, bits of wire and such, in a plastic housing, with a fan and tray for catching the cardboard bits – exactly as one would expect.
This slideshow requires JavaScript.
Before I go on, a word about their work station. I got to see one of these at Woodland’s Square One makerspace and thought it was fantastic. It’s cheap, lightweight, sturdy, and attractive. I’m not sure where someone would get the cardboard for these tables, but ChompShop has a guide on building the workstation and an accompanying video. While I would love to have the plans to be able to make one, it’s child sized, would need to be scaled for adult use, and at that point, I really might as well design my own.
I’m reminded of a a guy who invented a simple and attractive business card that turned into a cell phone stand. He went on to create a cardboard furniture / homegoods design studio called “Out of the Box.”4 Like many other people, we accumulate a lot of cardboard. It sure would be great to have plans to draw out designs on cardboard, chop them up with a drill + nibbler, and then fold into furniture.
My understanding of the Gingery lathe is that as you build the device, the portions you’ve built help you build the next pieces. How cool would it be to pick up a nibbler and cheap drill, slap them together, start slicing up parts to make simple mount, then use that to keep building up into a workstation, then desk, then cardboard workshop?
In any case, given the entire project could be basically put together with:
Cheap drill (Harbor Freight has some for less than $20)
Nibbler attachment ($30-$40 at the hardware store or online)
3D printed part to clamp drill in place
Box of some kind
Zip ties to hold drill and clamp in place and hold the drill trigger down or at a certain speed
Extension cord or power strip to turn the drill on and off
Now, I could put my regular corded drill into this, but for an extra $20 I could also have a small dedicated cardboard cutting worktable which seems like a fair investment to me.
Unfortunately, the Maker Faire website regularly wipes out maker entry pages, so I can’t easily link back to the 2023 entry as I would much prefer. [↩]
It’s unclear whether this is the per unit cost from their Chinese factories, to just build a unit, or actual landed cost. I’m guessing landed from their manufacturer. [↩]
Those instructables posted about 9 years ago and 3 years ago, respectively. [↩]
Though, possibly renamed to Creative Cardboard Company now? [↩]
Is there a word for the feeling when you place an online order and the moment you hit “Purchase” you realize there was something else you wanted and now it’s too late? No? Um… me neither.
Since publishing a large blog post about my wishlist / shopping list for building a makerspace two days ago I’ve got two new things to add to the list. I wonder how best to maintain this list. While a wiki would be the best for maintaining evolving content, the tone of my posts tend to be a mix of useful things and nonsense and I’d have to heavily edit / format the content. Maybe one day I’ll get organized and create a page on this site that’s something of a shopping list with links back to the rambling posts.
While I don’t have a ton of uses for a hot foam cutter… but I did purchase some nichrome wire two years ago specifically to make one of these for … reasons I no longer recall. I made the purchase some time in October 2024, so it couldn’t have have been for Maker Faire and likely not for Halloween…
A little extra research brought me back down a rabbit hole to rediscover why I started thinking about hot wire foam cutting.
At Maker Faire 2023 I was excited to see Robert van de Walle’s “composite structures with low VOC materials” 2023 Maker Faire project. The project showed off how he would avoid the use of fiberglass and resins in favor of laminated paper using glue over an insulation foam structure.
Anyhow, I think I was researching these things after Maker Faire because of how miserable it was to cut sheets of foam with a craft knife which then lead to soooo much sanding. I figured in the future I could design something that would let me create almost a small hot wire cutter to consistently and easily cut shapes and beveled edges into foam.
This post has been a long time coming. My kiddo and I made Fallout inspired combat armor out of Harbor Freight floor mats. We’ve now brought these to Maker Faire 2024 and 2025. They’re only $13 for about 16 square feet of 1/2 inch thick sheets of material which was enough for a front and back panel plus enough to do it all again.
I’ll update the photos below with pictures of the finished1 armor. However, below is what it looked like part way through the construction process. We added some 3D printed parts to allow the front and back “plates” to be kept together with some seat belt looking nylon webbing.
This slideshow requires JavaScript.
The very short version of the build guide, for our first simple builds with these mats, would be:
Make patterns on paper or cardboard
Trace and/or cut out of foam using a utility / craft knife you don’t care about because the foam will dull the knife quickly
Bevel/shape/sand as needed
Using gloves, apply a thin layer of contact cement to one piece of foam and the other piece where it’s supposed to go. Let it dry. Then, carefully place one piece upon the other – because the moment the two pieces are joined the contact cement will bond instantly making adjustments2 impossible.
Bevel/shape/sand/paint as needed
If making weathered armor / metallic features, consider using a silver pen or paint to dry brush on the silver color
I tend to take pictures as I build things out of an ambition to turn them into a blog post at some point. So, hopefully these pictures give a sense of how the build went:
This slideshow requires JavaScript.
These were easy enough to create as the entire design was basically just bit flat planks of material. Making more complicated / curved features would probably best be done by using a heat gun to soften and shape or cutting the curved features into flat panels with “darts” / wedges cut out so that when they’re glued together and the form built up, it will take on a curved shape.
The tutorial videos from Robert van de Walle and Evil Ted Smith are absolutely worth watching. The short version would be that when copying another form, you could cover it with aluminum foil, that in duck tape, draw in lines for what could be fairly flat sections, including registration marks, cut the duck tape into flattened sections with “darts” as necessary, trace onto and cut out from foam, heat-shape as necessary, apply and allow contact cement to dry, assemble. Some stills from ETS’s videos might be helpful:
This slideshow requires JavaScript.
These stills won’t do the full videos justice, so you should go watch those. Robert’s point with his short 3 minute video was basically that these materials are incredibly inexpensive, able to build up huge shapes quickly, and look great. I’d agree on all counts.