
I’ve always loved working / building with cardboard because it is easy to work, basically ubiquitous and free, and as flexible or durable as you need. Each of the following videos are ones that I return to over and over again because they’re interesting ways to build from cardboard.
Category: Things I Learned
Things I learned, usually the hard way, so you don’t have to!
Building a Cardboard Cutter Table With Cardboard
I hadn’t heard of a cardboard table saw before seeing the Chomp Saw at Maker Faire and Kickstarter several years ago. 1 During their run on Shark Tank they disclosed it took $73.81 to make each one.2
When I originally saw the ChompSaw, I had no idea how the thing worked and assumed it was some kind of custom made invention. It wasn’t until much later I learned it was basically a drill + a sheet metal nibbler + plastic box. A maker named Alejandro Leguizamo entered something called the “Builder Box” for the Rocklin Maker Faire in 2025. The description was “Experience the Builder Box! The Builder Box is a power drill accessory which cuts various materials, like cardboard, fabric, and plastic, in a safe manner, perfect for young makers. Test prototypes, share your thoughts, and be part of its evolution.” but I wasn’t sure what it was or how it worked since the only picture was a kind of a logo. I reached out to the maker and it turned out that he couldn’t make it to the event that year, but he explained the project was, as suggested above, a drill + sheet metal nibbler + a box. Suddenly, the logo made sense!
Once I knew what I was looking at, it instantly became easier to find more resources. I found piles of nibblers / sheet metal nibblers for sale online for ~$30-40, several pictures and an unlisted video from ChompShop, and two Instructables,3 One of the instructables indicated you could use a foot peddle to act as a variable speed controller for the drill. While an interesting idea, I’m not certain the additional incremental benefit is worth the complexity. The ChopmSaw is able to operate at a single speed, so why not this? While an on/off toggle switch is obviously helpful, I’m not going to go out of my way to add this for my own simple prototype/home use. The unlisted maintenance video shows the ChompSaw’s disassembly showing a motor, a nibbler end, bits of wire and such, in a plastic housing, with a fan and tray for catching the cardboard bits – exactly as one would expect.
Before I go on, a word about their work station. I got to see one of these at Woodland’s Square One makerspace and thought it was fantastic. It’s cheap, lightweight, sturdy, and attractive. I’m not sure where someone would get the cardboard for these tables, but ChompShop has a guide on building the workstation and an accompanying video. While I would love to have the plans to be able to make one, it’s child sized, would need to be scaled for adult use, and at that point, I really might as well design my own.
I’m reminded of a a guy who invented a simple and attractive business card that turned into a cell phone stand. He went on to create a cardboard furniture / homegoods design studio called “Out of the Box.”4 Like many other people, we accumulate a lot of cardboard. It sure would be great to have plans to draw out designs on cardboard, chop them up with a drill + nibbler, and then fold into furniture.
My understanding of the Gingery lathe is that as you build the device, the portions you’ve built help you build the next pieces. How cool would it be to pick up a nibbler and cheap drill, slap them together, start slicing up parts to make simple mount, then use that to keep building up into a workstation, then desk, then cardboard workshop?
In any case, given the entire project could be basically put together with:
- Cheap drill (Harbor Freight has some for less than $20)
- Nibbler attachment ($30-$40 at the hardware store or online)
- 3D printed part to clamp drill in place
- Box of some kind
- Zip ties to hold drill and clamp in place and hold the drill trigger down or at a certain speed
- Extension cord or power strip to turn the drill on and off
Now, I could put my regular corded drill into this, but for an extra $20 I could also have a small dedicated cardboard cutting worktable which seems like a fair investment to me.
Making a Makerspace- Tool Recommendations for Making a Makerspace
- Makerspace: Just a few more things for the shopping list
- Building a Cardboard Cutter Table With Cardboard
- Makerspace Addenda – Homegoods edition
- More Maker Tools
- 3D Printer Pens for Makerspaces
- Unfortunately, the Maker Faire website regularly wipes out maker entry pages, so I can’t easily link back to the 2023 entry as I would much prefer. [↩]
- It’s unclear whether this is the per unit cost from their Chinese factories, to just build a unit, or actual landed cost. I’m guessing landed from their manufacturer. [↩]
- Those instructables posted about 9 years ago and 3 years ago, respectively. [↩]
- Though, possibly renamed to Creative Cardboard Company now? [↩]
Makerspace: Just a few more things for the shopping list
Is there a word for the feeling when you place an online order and the moment you hit “Purchase” you realize there was something else you wanted and now it’s too late? No? Um… me neither.
Since publishing a large blog post about my wishlist / shopping list for building a makerspace two days ago I’ve got two new things to add to the list. I wonder how best to maintain this list. While a wiki would be the best for maintaining evolving content, the tone of my posts tend to be a mix of useful things and nonsense and I’d have to heavily edit / format the content. Maybe one day I’ll get organized and create a page on this site that’s something of a shopping list with links back to the rambling posts.
-
Low Rider CNC.
- My buddy Andrew suggested the Low Rider CNC belongs on this list. I haven’t done a deep dive on this yet, but just checking out the main documentation pages, it looks amazing. While a full table sized CNC can run $7-10k, this Low Rider CNC appears to be community supported, open source, and designed for people to build themselves for ~$100 in hardware and electronic parts, plus 3 kilos of 3D printed parts, zip ties, conduit/rails, router, table, and wood. An affiliate appears to sell partially assembled and fully built options from $900 – $1,500, which appears to include shipping.
-
Hot Foam Cutter.
- I was reminded these existed after seeing this Mastodon post from Concretedog about his 4D CNC hot foam cutter. However, it’s possible to build a hot foam cutter with little more than some nichrome wire, a battery, and some random stuff.
- While I don’t have a ton of uses for a hot foam cutter… but I did purchase some nichrome wire two years ago specifically to make one of these for … reasons I no longer recall. I made the purchase some time in October 2024, so it couldn’t have have been for Maker Faire and likely not for Halloween…
- A little extra research brought me back down a rabbit hole to rediscover why I started thinking about hot wire foam cutting.
- At Maker Faire 2023 I was excited to see Robert van de Walle’s “composite structures with low VOC materials” 2023 Maker Faire project. The project showed off how he would avoid the use of fiberglass and resins in favor of laminated paper using glue over an insulation foam structure.
- Robert also has an interesting tutorial about using Harbor Freight floor mats for making inexpensive, lightweight, and flexible structures using contact cement instead of expensive pink insulation boards. Robert’s video was in turn inspired by Evil Ted Smith‘s video demonstrating how to copy forms into inexpensive foam mats by covering the object in aluminum foil, that in duck tape, taking the coverings off, cutting them into flat shapes with “darts” for alignment and to allow the formation of curves, cutting these out of foam, heat forming, applying contact cement, then reassembling. Both of these videos had previously sent me down a rabbit hole of looking into making “poor man’s fiberglass” to make a foamie using cloth and wood glue over a lightweight structure. And, more recently Nighthawkinlight’s videos about making strong lightweight structures with what amounted to lumber made from cardboard, covered in a water proofing coating. I remember watching a video about biomimicry and how the how the toucan’s beak can be both strong and lightweight because it is essentially a lightweight, nearly hollow, sparse structure wrapped in a tight hard shell of keratin.
- Anyhow, I think I was researching these things after Maker Faire because of how miserable it was to cut sheets of foam with a craft knife which then lead to soooo much sanding. I figured in the future I could design something that would let me create almost a small hot wire cutter to consistently and easily cut shapes and beveled edges into foam.
Sometimes I want to add an update only to discover that I never published a blog post about a thing I wanted to link back to. I guess it’s time to dust off my pictures from 2024 leading up to Maker Faire to share information about how we made my kiddo’s Fallout inspired combat armor from Harbor Freight floor mats.
With the magic of time travel, I’ve now created that post and can now link to it. :) Share and enjoy.
Making a MakerspaceMaking Cosplay Armor from Foam Mats
This post has been a long time coming. My kiddo and I made Fallout inspired combat armor out of Harbor Freight floor mats. We’ve now brought these to Maker Faire 2024 and 2025. They’re only $13 for about 16 square feet of 1/2 inch thick sheets of material which was enough for a front and back panel plus enough to do it all again.
I’ll update the photos below with pictures of the finished1 armor. However, below is what it looked like part way through the construction process. We added some 3D printed parts to allow the front and back “plates” to be kept together with some seat belt looking nylon webbing.
The very short version of the build guide, for our first simple builds with these mats, would be:
- Make patterns on paper or cardboard
- Trace and/or cut out of foam using a utility / craft knife you don’t care about because the foam will dull the knife quickly
- Bevel/shape/sand as needed
- Using gloves, apply a thin layer of contact cement to one piece of foam and the other piece where it’s supposed to go. Let it dry. Then, carefully place one piece upon the other – because the moment the two pieces are joined the contact cement will bond instantly making adjustments2 impossible.
- Bevel/shape/sand/paint as needed
- If making weathered armor / metallic features, consider using a silver pen or paint to dry brush on the silver color
I tend to take pictures as I build things out of an ambition to turn them into a blog post at some point. So, hopefully these pictures give a sense of how the build went:
These were easy enough to create as the entire design was basically just bit flat planks of material. Making more complicated / curved features would probably best be done by using a heat gun to soften and shape or cutting the curved features into flat panels with “darts” / wedges cut out so that when they’re glued together and the form built up, it will take on a curved shape.
The tutorial videos from Robert van de Walle and Evil Ted Smith are absolutely worth watching. The short version would be that when copying another form, you could cover it with aluminum foil, that in duck tape, draw in lines for what could be fairly flat sections, including registration marks, cut the duck tape into flattened sections with “darts” as necessary, trace onto and cut out from foam, heat-shape as necessary, apply and allow contact cement to dry, assemble. Some stills from ETS’s videos might be helpful:
These stills won’t do the full videos justice, so you should go watch those. Robert’s point with his short 3 minute video was basically that these materials are incredibly inexpensive, able to build up huge shapes quickly, and look great. I’d agree on all counts.
OpenSCAD Shadow Boxes, Shadow Casting
A friend recently requested some less LLM-centric content. I’ve often said this blog is largely a lab notebook for various ideas or build log. It’s also merely a subset of the stuff swirling around in my brain than a dedication to any one topic. In any case, this post is dedicated to Pete.
I saw the above 3D printed box on Instagram. It looks like a wanted poster from the show “One Piece” of a character named Roronoa Zoro who carries three swords. The box contains a small post in the very center which seems very out of place – until the lights are dimmed and the light under the tip of the post is activated, revealing the light is blocked by the irregular edges of the box and casts a shadow of the silhouette of a figure holding three swords.
I’ve seen other implementations of this stereographic projection technique, but this was easily the coolest. The disparity between the size and shape of the box and shadow was almost startling.
My mind went wild with ideas upon seeing this box. One of the first ideas I had related to some fan-made movie posters by Kevin Collert many years ago.1 Imagine a small projector / box of arbitrary shape that could project that kind of silhouette behind you?
Yeah, a Tony Stark cosplay is neat… but what if you had an inconspicuous stereographic projector on your back that threw up a huge Iron Man shadow behind you!?
This could be extended in any number of ways. A Luke Skywalker cosplay that casts a Darth Vader shadow, Bruce Banner with a Hulk, etc, etc. But, also, what about a shadow of a familiar? A little dragon perched behind you. Or two thugs standing to your side like evil shadow henchmen? Or a crowd of zombies? The neat part about the box / lamp shown on Instagram was that the box didn’t look like it would display that kind shadow of a shadow. It just looked like a box with weird edges to it.
But, how did they do it?

I’m terrible at Blender. I’ve watched tutorials, tried to use it, but I just can’t wrap my feeble mind around it. My one string is the ability to make things in OpenSCAD. There are plenty of others who can make incredible things in it, but I’m no slouch. The code may not be pretty, but, well, as they say…

I started with a few assumptions.
- The light source has to be a single point. If there were multiple LED’s or filaments, it would create fuzzy / duplicate shadow edges. This should be possible with a single bright LED.
- The shadow is basically a cone. The edge of the shadow everywhere must be essentially some sort of a distorted cone, with the center point being the single point of light and the edges of the silhouette being the edge of the cone.
- The top edge of the box must be where the cone intersects with the box. If we decide how far off the wall the point of light is and we know where we want the shadow to be and where the shadow edges are, we should be able to intersect the shadow-cone with a thin walled box.
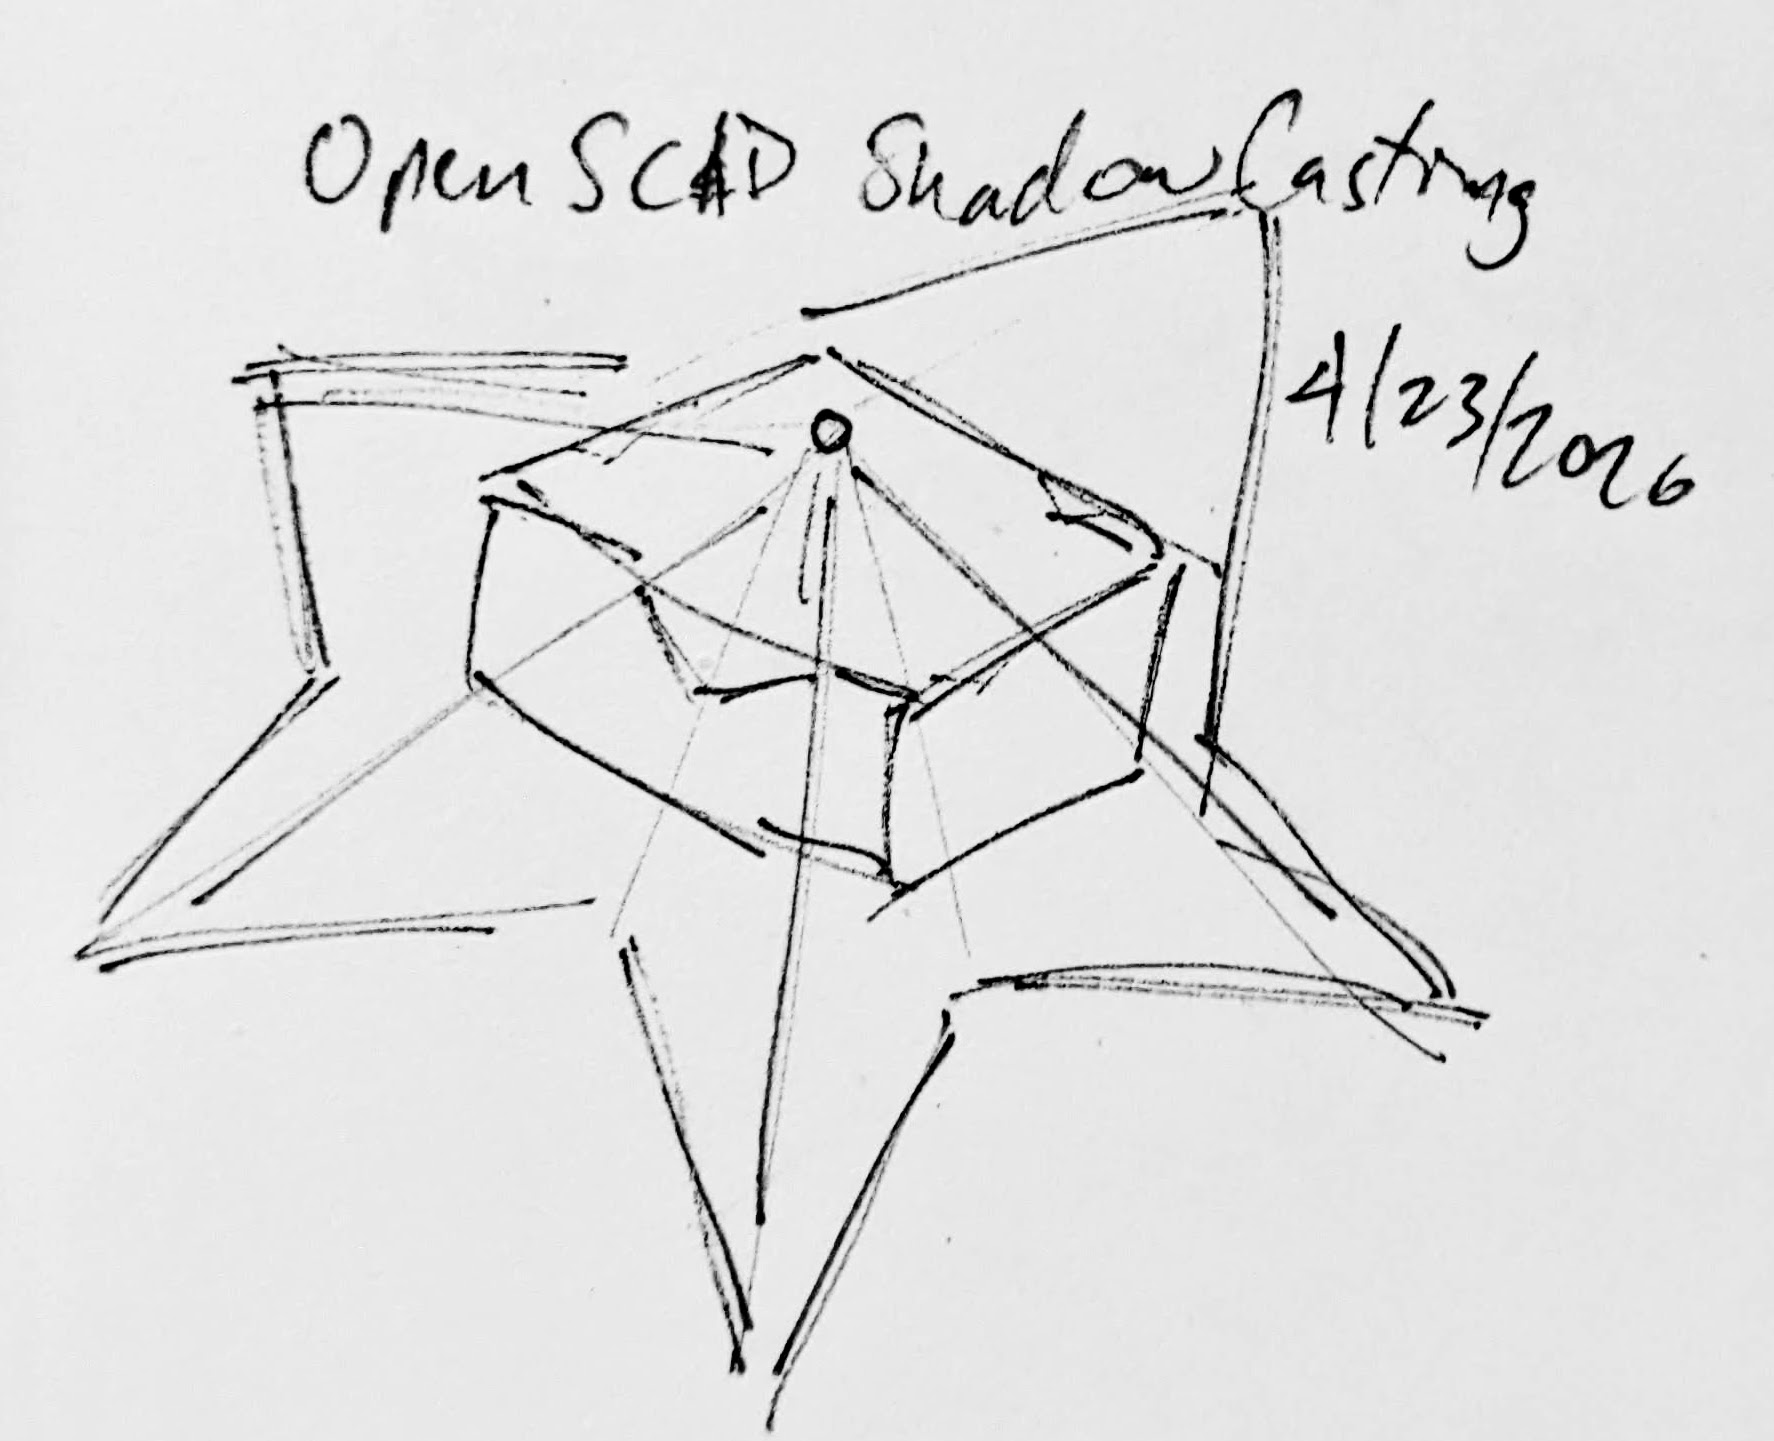
Creating the box itself shouldn’t be that big a deal. It’s an easy few lines of OpenSCAD. Creating the arbitrary “cone” was initially a much harder problem. Now, if the design I was trying to create was very simple or entirely convex, I could just use the OpenSCAD hull function around an SVG of the desired shadow and a very small sphere for the point of light. Since a simple shape would be uninteresting, I knew that hull wasn’t going to work. For a while I tried really hard to build a python program that would work by creating a polyhedron built out of the large SVG in the desired location and a very small SVG at the light point – and stitching the sides together programmatically. If you’ve ever worked with the OpenSCAD polyhedron functions, you know what a pain it is. If you don’t define the faces in a certain order or order the faces properly, you’ll end up with flipped faces and a pile of useless triangles. Even when the faces were properly built, the result ended up being difficult for OpenSCAD to render since it involved so many points converging on so few points and weird little overlaps. It was a mess.

You mean, all I have to do is RFTM? Apparently the linear_extrude function has a parameter called “scale” where you can define how small something should get as it is extruded. This is literally exactly what I needed.
I needed the shadow on the wall to be extruded off the wall as high as the point of light, but scaled down to that same point of light. But, would this work??? I haven’t printed it yet, but I believe it should.
From there, the next question is… does this OpenSCAD back-of-the-napkin sketch really work? Again, I’m not sure – I haven’t printed this for a few different reasons. If this design were printed “as is”, there would be a ton of overhangs and support material. I believe when you look at some of the pictures of the lamp lit up from the side, you can see the infill patterns on the sides. I can’t tell from these videos – but I suspect the easiest way to 3D print this box would be to do so in big flat panels. At the point you’re just trying to turn filament into 2D panels, why even bother printing it when you could lasercut it in a fraction of the time?
Let’s look at a few stills of the lamp.
Now, for my quick mockup I just used a simple square shape – but you can definitely see the same features as in the lamp in the video stills. The head, the crossed sword tips at the left, the jagged edges on the bottom right, the floating sword on the right.
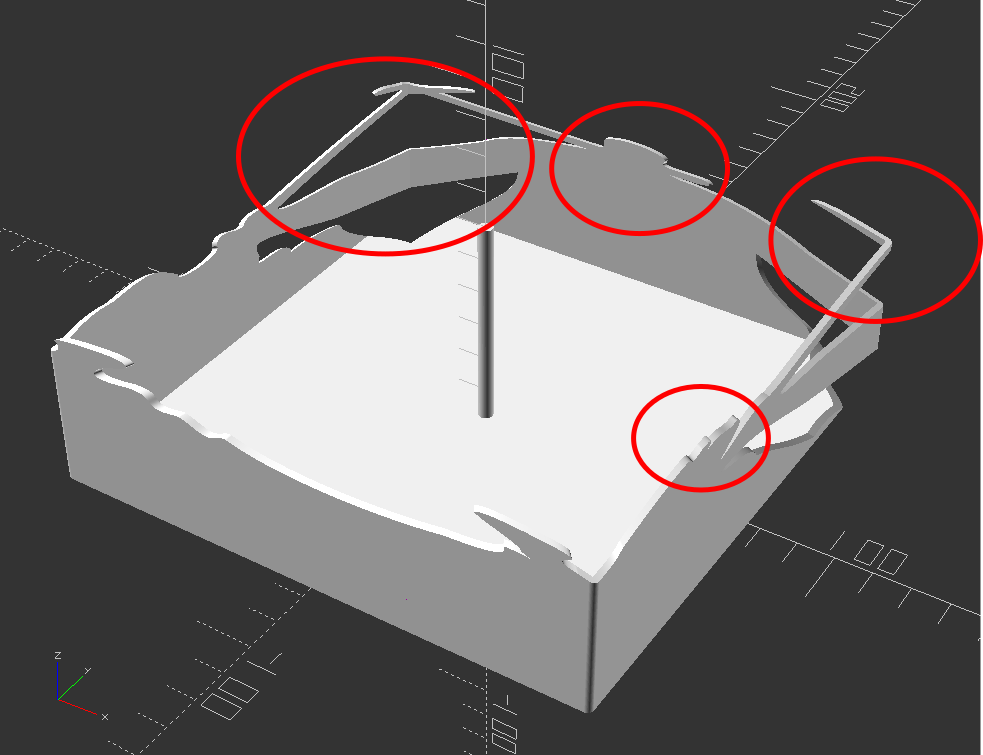
Given that the theory feels intuitive and sound and that my quick mockup proof of concept seems to have the same structural features as the lamp in the video… this seems like it would work.
If this quick mockup works, then why restrict ourselves to simple boxes? For a mass produced thing you just want to stamp out, a simple box just makes sense. You could lasercut the panels, slap them together, and churn them out all day long. But, the thing that you use to block the light and form the shadow could be any arbitrary shape. It could be a triangle, star, or something far more complex. Here’s another quick sketch:
Obviously, this would be a support structure nightmare. But, for a one-off project and a cool enough idea, I think it could definitely work!
- His work has been stolen and slapped on so many dropshipped things that it was very difficult to find the original artist! [↩]
Not Team AI
Look, I hate AI slop as much as the next person. My kiddo has been taking a college class where they’ve been delving to the ideas swirling around AI/LLM’s and from what I gather, the class is nearly incomprehensible. Just like my toaster, oven, toaster oven, fridge, and dryer don’t need wifi – neither does every damn thing need a thick coating of AI slop all over it.

I’ve been thinking about AI as a variation on the “super soldier serum” administered to Steve Rogers. Given to a good man, he can be better. Given to the Red Skull, well, he gets worse. Instead of only making things better, it seems to simply magnify the attributes of a thing.
I guess I’m struggling with the idea of whether it’s hypocritical of me to use AI for things when so often it just makes things worse. 1 And, I admit it is fairly self-serving to liken my uses to that of Steve Rogers and assign derogatory attributes to other uses.
Maybe it’s that I’m using AI/LLM’s to add micro improvements to my own life, rather than pushing it on others? After trying to work with free AI’s on some projects, I decided to pay $20 for a month of premium Claude Pro access. While using the free ones, I discovered:
- Claude’s free chat would lock a conversation after a certain context length if you uploaded any documents
- Gemini would time-gate a conversation by not letting you use it after a certain amount in a given period
- ChatGPT would time-gate a conversation if you uploaded anything, but would merely drop to a lower power model if you didn’t upload content and instead just worked through the chat interface
Overall, ChatGPT was more useful as long as I didn’t upload anything, and I could “make do” with the lower tier models. I’d paid for the premium tier of ChatGPT for a few months about two years ago and quickly became disillusioned with it. I found that it would start to chase it’s own tail, forgetting the thread of a conversation and project, randomly refactoring stable code, hallucinating functions, variables, and the names of functions and variables. It was more work to keep it on the rails than it was to simply just work on my project. I ended up largely shelving several projects as a result. I’d tried unsuccessfully to hire someone, I didn’t have the time to work on them by myself, and sure as hell didn’t have the bandwidth to baby sit2 an LLM.
However, working with various LLMs recently gave me a glimmer of hope. Perhaps they could be useful after all? Pouring over documentation, searching for answers, and consulting Reddit and StackOverflow were options, but they all had their special problems. In any case, these days all of these options (except documentation)3 were getting more difficult to use as people started abandoning public forums in favor of just asking an AI.
So, what have I been working on? Well, I signed up for Claude Pro on 02/09/2026 and in the just over three weeks since then:
- WordPress Plugin.
- An overhaul of a website’s registration system. I had been using a now-defunct WordPress plugin on a different website which was basically crumbling to pieces as WordPress and the world moved on. My needs were simple – so a few days of tinkering with Claude Pro got me something that … just worked for my purposes. It eliminated all spam robot signups in a way that nothing I’d tried before had been able to manage. There were a lot of moving pieces to this plugin, and there was certainly some growing pains, but it worked very well, very quickly. I have built plugins for WordPress before and could well do so again even without an AI, but the speed of the model to build all the trivial or tedious stuff is by definition super-human. Since the site’s ability to turn visitors into users into (hopefully) a few dollars is dependent upon the ease of registering, this one single change easily justified the $20 cost of using Pro. That $20 accelerated this from a project I’ve been putting off for literal years because I knew how long it would take me alone, to … solved in a few days.
- Python Assistant Script.
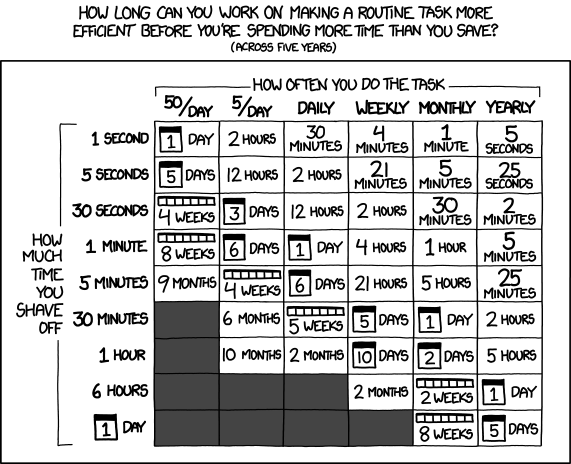
- As a friend was quick to remind me, I’m very late to the voice activated computer assistant / smart home party. I’d been working on a version of this with three free frontier LLM models, but it was too much, spread across too many platforms to be really cohesive or stay undamaged by converting parts among through these resources. Progress on this project has been slower than building a single WordPress plugin, but it has definitely been boosted. I regularly have to join online meetings where the information to join is sprinkled like breadcrumbs across multiple disparate pages on a given website, sometimes requiring a pseudo-registration process to reach. Doing all these things manually is a real headache when I haven’t had my morning coffee. And, let’s be honest, it’s way more fun to throw hours at a problem figuring out how to solve a problem than it is to actually face one’s problems. I would estimate that this feature will save me about 15 minutes once a week. Using the above XKCD logic, I’m time/energy/effort-positive if I could built this feature in less than 5 days. I probably got it working in a few hours. At the same time, I’ve been “bolting on” new features – a scheduler, time queries, weather queries, media control over my computer, with more features on the way.4
- A YouTube Management Chrome Plugin.
- I have this unfortunate habit of keeping too many tabs open. While this is bad enough, keeping a lot of YouTube tabs open will have a huge impact on system memory very quickly. I didn’t have the time at the moment to watch the videos, didn’t want to lose these videos, and didn’t want to go through the hassle of adding them to playlists. Instead, apparently I had enough time to build a Chrome plugin that would go through all of my tabs, bookmark each one to a special bookmark sub-folder, sort them into sub-folders, and then close those tabs. I don’t know that this will ever “save” me time, but it certainly is helping my system work better and keep my tab monster from getting too far out of control. However, I think I’m going to extend this plugin to be a little more practical. I think it could work for more than just YouTube videos to mass-close tabs, bookmarking them so they’re not lost, then sorting them into sub-folders.
- Email Entries for Work.
- My day job requires entry of data into a web portal. It’s a good content management system, but not great for data entry. It’s designed for humans to insert data, slowly, one entry at a time. The UI requires a couple of duplicate keystrokes and/or mouse clicks. While I deeply dislike having to do something stupid even once. I absolutely loathe having to do something stupid twice. It’s basically my kryptonite. Rather than enter emails into this system, which I fucking hate, I wrote a Python script to pull data from Outlook into a CSV, export the email data into an HTML file which reviews each email and suggests an entry code for each one, and once that data’s been cleaned/formatted, which I upload into a script that I wrote to work with my employer’s website, then begin the process of uploading each one. Since the data entry website has all kinds of dynamic elements and animated features, I can’t simply populate fields – I have to give each one time to load. Instead of just uploading an Excel/CSV sheet, I have to wait for each entry to play it’s little animations, time the data to populate, and then click each one manually to enter because the animations sometimes don’t work well. However, it’s a million times less painful than having to type all this bullshit in myself.
- Don’t worry, I don’t upload any of my email or data into any LLM. All the logic which pulls data out of my Outlook and builds things out of it runs on my local machine.
I never could have built so much, so fast, without the help of a frontier AI. None of the local LLM’s I’ve tried got even close and none of the free-level AI’s could maintain coherence long enough to help.
Claude Pro isn’t without it’s problems – I still had to monitor the code closely, keep it from forgetting certain key features, and deciding to completely refactor the code. At the $20 level, I can choose among several different models that are supposedly different levels of quality and consume higher amounts of tokens, and I’m limited to a certain amount of compute within a 4 hour window and limited to a certain amount each week. Even so, I’ve had more than enough compute for the tasks I’ve been doing. While these things have been super helpful to me… none of them are cutting edge research or huge trade secrets. In the chat interface you can switch language models, but doing so requires your conversation restart in a new conversation entirely. In Claude Code you can switch the models, but I feel like the LLM lost the thread a little when I did this.
I am a frugal man and tried to do this with free LLM access, but the benefit of more capable, more coherent models, with increased ability to share an entire code base (with the help of Claude Code + Github) for $20 has been an unbeatable deal. I’ve got a few ideas for some additional projects that could benefit from keeping the subscription going and will probably give it another month. I don’t know that I’d need year-round access though.
Software Development with LLMs- Series Plugin Test for Illustrative Purposes Only
- ChatGPT WordPress Plugins
- Coding with an LLM Sidekick
- Python Practice with an LLM
- Not Team AI
- Never Stop Breaking Up
- Weakness
- “Do I contradict myself? Very well then I contradict myself, I am large, I contain multitudes.” – Walt Whitman [↩]
- And, let’s be real – train [↩]
- RTFM, I guess [↩]
- Screenshots, giving me a daily briefing, etc [↩]
Keychron Keyboard Bluetooth Won’t Work
From dipping my toes in the mechanical keyboard subreddit, it seems some people look down on Keychron keyboards. It was pricier than other mechanical bluetooth keyboards, but I like being able to reassign keys, I like having nifty RGB lights, and it seemed to have very good reviews. Sure, perhaps an artisanal, grass fed, locally sourced, single origin, free range, ethically sourced mechanical keyboard would be better or cheaper… but this keyboard arrived quickly, looks good, worked immediately out of the box for a price I was willing to pay.
Anyhow, if you’re here, it’s because something went wrong.
- Symptoms:
- At first my Keychron K10 Pro keyboard stopped being able to use the shift keys to write capital letters or symbols using the number keys. Doing a factory reset on the keyboard worked, so I had to re-assign the special keys (screenshot, RGB changes, media keys) again. Unfortunately, now the keyboard wouldn’t work over bluetooth.
- What I tried:
- I tried pretty much every combination of starting/restarting the board, flipping between USB/cable and BT, re-flashing and updating the keyboard firmware, then the keyboard bluetooth firmware, turning the PC bluetooth on and off, restarting the computer several times, and reassigning the keys using the launcher.
- What worked:
- One of the various trouble shooting pages suggested that I try FN + J + Z to factory reset the keyboard. Other suggested FN + 1 or FN + 2 or FN + 3. After a little while I thought – wait a second… why don’t I try FN + 2 or FN + 3? In doing so, I saw the bluetooth name for the keyboard pop up on the computer! I guess for some reason the keyboard is only recognized by FN + 2 or FN + 3. I don’t know why this worked really, but I’m happy that the keyboard is back.
I hope this helps someone else (or perhaps… future me!)
Tap Light Focus Timer System
I’ve been procrastineering on a “sticky note timer” which would incorporate an e-ink display, be portable, updatable via WiFi, show me what I should be working on, and flash lights at me to give me a sense of movement / time passing / and urgency. Sometimes I use the word “procrastineering” to refer to when I start to spiral on a project and end up in analysis paralysis. But, I think it is more appropriately used when I’m doing a deep dive on a project when I really have something much more important / urgent I should be working on.
A long time ago I added a few components to an off the shelf dollar store tap light and turned it into a game buzzer. While the sticky note timer project was marinating / incubating1 in the back of my brain, I realized that maybe I don’t need or even want something that high-tech. Maybe what I need is something dead simple? As cool as the sticky note timer project is – and it really is neat – there’s a lot of pieces to the puzzle and a fair bit of maintenance that goes along with it once its finished. You have to connect to it, upload a list, set up timers, etc.
I finally decided on something not so easily adjustable, but still flexible in it’s simplicity. Rather than making the setup (adding / updating / uploading lists to a timer) something I have to do in order to start the timer, what if I made it part of the timing?
First, let’s look at what the setup. A dollar store tap light which includes a lot of handy parts – a battery holder, a push button switch, several springs, and a simple and at attractive enclosure.
On the far left is a basic off the shelf dollar store tap light. Next to it are two others I had previously modified to work as game / timer buzzers. 2 The last picture is the wiring diagram, except that I wired the ATTiny chip to the positive wire coming from the button switch. Whenever I hit the button, it will toggle the circuit on and off.
Using some parts from my electronics bin3, I cobbled together a prototype on a breadboard that would do the following when the button was hit:
- Turn orange for 1 minute and beep 3 times in the last 3 seconds
- Beep once more and turn green for 12 minutes, then fade from yellow through orange over the last 3 minutes
- Flash red and beep three times after 15 minutes had lapsed (12 minutes of green and 3 minutes of color fading)
- Turn off, go to a low power mode, and then wake up long enough to flash blue every 8 seconds
- After 5 minutes, it would flash green and beep twice
- Then keep doing this 8 second blue flash and green light plus beep every 5 minutes
You’re probably wondering – what’s with all these timers and lights and beeps? Here’s how I use them:
- Place and slap the button to get going
- I put my phone on my desk and the timer right on top of my phone. It’s a big 4″ diameter timer and covers the phone pretty well. I can’t pick up my phone without seeing this timer ticking down. This is a huge difference between a phone app and a physical thing standing between me and my phone. There are some web browser based apps – but these don’t really work for me. Either I have to keep that window open and on top or … I’ll forget it exists. This timer is right there, front and center, on my desk and lit up no matter where my desktop might take me.
- Plus, it’s actually a little therapeutic to slap the tap light. Pushbutton switches like this are built to take a bit of abuse and the physical action of hitting the light is a lot of fun.
- Orange for 1 minute
- This is the replacement for the “maintain / update a list.” Instead of having to fuss with a list, I’ve dumped myself directly into work. I’m suddenly racing the clock for 60 seconds to write all the things I want to try and accomplish in the next 15 minutes. Maybe it’s a few emails, make some phone calls, or write / edit a document. After 57 seconds, the buzzer will beep three times to let me know that the 15 minute timer is about to start.
- Or, if you already have a particular task to work on, you could use this time to follow a process like Steven Kotler’s suggestions on tactical transitions to a a flow state4. His three step process is:
- Anchor your body
- Practice box breathing.5 You could box breathe 3 times in one minute and have a few second left over to psych yourself up.
- Focus your mind
- Write down one clear goal.
- Trigger your ritual
- Recite a mantra, perform a gesture, start a “work” playlist
- Anchor your body
- Green for 15 minutes
- It’s go time! Whatever I wrote down, now I’m in a race to work on those things – and those things only. I can’t let new emails, calls, etc, distract me – that buzzer is going off in 15 minutes. As the timer closes in on 15 minutes, with just 3 minutes to go, it turns yellow and fades to orange. If I look up / down and see this, I know I’m in the home stretch and I’ve got to start moving fast to wrap things up.
- Red alert!
- Once the 15 minutes is up the light flashes red and beeps to let me know I’m off the hook. Now, if I’ve already hit peak productivity, I could keep going. If I got sidetracked, it’s an alert for me to restart the timer and get back to it.
- Blue flashes, 5 minute green flash and beeps
- These blue flashes happen once every 8 seconds6 just to keep the timer present in my vision so it doesn’t just appear into the mess on my desk.
- If I finished out the 15 minute block of work time and I don’t stop the timer, the 5 minute timer is my reminder to return to my desk, reset the timer, and get going again.
- If I ended up working past my 15 minute block of work time, the 5 minute beeps still give me a sense of how much time has passed.7
- Importantly – if I get distracted by a sidequest, one of the beeps every 5 minutes is bound to catch my attention and remind me I’m supposed to restart the timer and get back to work.
So… does it work? For me, yes! Here’s why:
- The hardest part of getting started is getting started. My tendency is to want to collect all the stuff I’d need, get real comfy, make a list, look up some documents, etc. This system short circuits all that. I just need to be able to slap the big button sitting on top of my phone. If I can manage that, I get 60 seconds to collect myself and then it’s time to rock and roll. That’s enough time to take some deep breaths, start a playlist, or just sit quietly before I get started.
- It covers up my biggest distraction. Unlike an app on the phone or my desktop computer, I can literally cover up my phone with this big damn button. I won’t see any notifications and if I want to pick up my phone, I have to actually look at and ouch the button – which is itself a reminder to get back to work.
- It plays into a sense of play, urgency, and my own overdeveloped sense of competitiveness. I enjoy hitting the timer to turn it on – and I want to beat that 15 minute timer.
- The 5 minute timer acts like a built in break timer. If I can get through 15 minutes of work, I can goof off, write a blog post, and without doing anything else that 5 minute timer can bring me back.
- It includes a “failsafe” to bring me back to the timer if I get distracted by a sidequest. If I miss the 15 minute timer, there’s another 5 minute timer around the corner. Even between timers, there’s an intermittent flash of blue light to grab my attention.
The only meaningful “downside” to this timer button for me is there’s no pause button. However, this isn’t exactly bad. It helps me really hone in on what’s important and what’s interesting. If a family member asks me for something or a call comes in, I just need to weigh the benefit of addressing the intrusion against having to restart the timer. And realistically, if I pause the timer, I’m going to need some time to drop back into “flow” anyhow.
Sticky Note Timer- Ah, just what I need! A new project!
- Sticky Note Timer, parts arrived!
- Seeed Studio XIAO ESP32C3 and a small sticky note display
- Brainstorming More E-Ink Stuff
- Smol Fonts for E-Ink Displays
- Tap Light Focus Timer System
- Fermenting? Festering? [↩]
- The older ones would flash orange a few times to alert you the game was going to start, turn green, fade from yellow to red, then flash red and buzz after 15 seconds. [↩]
- I used an ATTiny45 because I had one, but it’s not much more expensive to use an Adafruit Trinket, a buzzer, a RGB/neopixel LED, and some wire. In a subsequent version, I also used a small prototyping board like the Adafruit Perma Proto Boards [↩]
- It’s the second slide [↩]
- TLDR: Breathe in slowly through the nose for 4 seconds, hold for 4 seconds, breathe out slowly through the mouth for 4 seconds, hold for 4 seconds, repeat [↩]
- Because that’s the longest the little microchip can do between “deep sleep” to conserve battery life [↩]
- I may adjust the program so the first five minutes is 1 beep, second five minutes is two beeps, etc [↩]
Prusa Lack Stack, LED Lighting, CircuitPython Tweaks
Much like those recipes on the internet where the author tells you their life story or inspiration, I’ve got a lot to share before I get to the punchline of this blog post (a bunch of CircuitPython tweaks). Edit: On second thought:
- Keep the lines of code <250
- Try using mpy-cross.exe to compress the *.py to a *.mpy file
This is a bit of a winding road, so buckle up.
Admission time – I bought a Prusa1 about three years ago, but never powered it on until about a month ago. It was just classic analysis paralysis / procrastineering. I wanted to set up the Prusa Lack enclosure – but most of the parts couldn’t be printed on my MonoPrice Mini Delta, which meant I had to set up the Prusa first and find a place to set it up. But, I also wanted to install the Pi Zero W upgrade so I could connect to it wirelessly – but there was a Pi shortage and it was hard to find the little headers too. Plus, that also meant printing a new plate to go over where the Pi Zero was installed, a plate that I could only print on the Prusa, but I didn’t have a place to set it up…
ANYHOW, we’ve since moved, I set up the Prusa (without the Pi Zero installed yet), printed a Prusa Lack stack connector to house/organize my printers. Unlike the official version, I didn’t have to drill any pilot holes or screw anything into the legs of the Lack tables.
Once the Lack tables were put together, I set about putting in some addressable LEDs off Amazon. I found a strip that had the voltage (5V for USB power), density (60 LED’s per meter), and the length (5 meters) I wanted at a pretty good price <$14, shipped. I did find one LED with a badly soldered SMD component which caused a problem, but I cut the strip to either side of the it, then soldered it back together. Faster and less wasteful than a return at the cost of a single pixel and bit of solder.
The Lack stack is three tables tall, keeps extra filament under the bottom of the first table, my trusty Brother laser printer on top of the first table, my trusty Monoprice Mini Delta (Roberto) on top of the second table, and the Prusa (as yet unnamed Futurama robot reference… Crushinator?) on top. Since I don’t need to illuminate the laser printer, I didn’t run any LED’s above it. I did run a bunch of LED’s around the bottom of the third printer… this is difficult to explain, so I should just show a picture.
When Adafruit launched their QtPy board about four years ago, I picked up several of them. I found CircuitPython was a million times easier for me to code than Adafruit, not least of which because it meant I didn’t have to compile, upload, then run – I could just hit “save” in Mu and see whether the code worked. I also started buying their 2MB flash chips solder onto the backs of the QtPy’s to a ton of extra space. Whenever I put a QtPy into a project, I would just buy another one (or two) to replace them. There’s one in my Cloud-E robot and my wife’s octopus robot. Now, there’s one powering the LED’s in my Lack Stack too.
I soldered headers and the 2MB chip into one of the QtPy’s, which now basically lives in a breadboard so I can experiment with it before I commit those changes to a final project. After I got some decent code to animate the 300 or so pixels, I soldered an LED connector directly into a brand new QtPy and uploaded the code – and it worked!
Or, so I thought. The code ran – which is good. But, it ran slowly, really slowly – which was bad. The extra flash memory shouldn’t have impacted the little MCU’s processor or the onboard RAM – just given it more space to store files. The only other difference I could think of was that the QtPy + SOIC chip required a different bootloader from the stock QtPy bootloader to recognize the chip. I tried flashing the alternate “Haxpress” bootloader to the new QtPy, but that didn’t help either. Having exhausted my limited abilities, I turned to the Adafruit discord.
I’ll save you from my blind thrashing about and cut to the chase:
- Two very kind people, Neradoc and anecdata, figured out the reason the unmodified QtPy was running slower was because the QtPy + 2MB chip running Haxpress “puts the CIRCUITPY drive onto the flash chip, freeing a lot of space in the internal flash to put more things.”
- This bit of code shows how to test how quickly the QtPy was able to update the LED strip.
- from supervisor import ticks_ms
- t0 = ticks_ms()
- pixels.fill(0xFF0000)
- t1 = ticks_ms()
- print(t1 – t0, “ms”)
- It turns out the stock QtPy needed 192ms to update 300 LED’s. This doesn’t seem like a lot, until you realize that’s 1/5th of a second, or 5 frames a second. For animation to appear fluid, you need at least 24 frames per second. If you watched a cartoon at 5 frames per second, it would look incredibly choppy.
- The Haxpress QtPy with the 2MB chip could update 300 LED’s at just 2ms or 500 frames per second. This was more than enough for an incredibly fluid looking animation.
- Solution 1: Just solder in my last 2MB chip. Adafruit has been out of these chips for several months now. My guess is they’re going to come out with a new version of the QtPy which has a lot more space on board.
- Even so, I’ve got several QtPy’s and they could all use the speed/space boost. I’m not great at reading/interpreting a component’s data sheet, but using the one on Adafruit, it looks like these on Digikey would be a good match.
- This bit of code shows how to test how quickly the QtPy was able to update the LED strip.
- The second item was a kept running into a “memory allocation” error while writing animations for these LED’s. This seemed pretty strange since just adding a single very innocuous line of code could send the QtPy into “memory allocation” errors.
- Then I remembered that there’s a limit of about 250 lines of code. Just removing vestigial code and removing some comments helped tremendously.
- The next thing that I could do would be to compress some of the animations from python (*.py) code into *.mpy files which use less memory. I found a copy of the necessary compression/compiler program on my computer (mpy-cross.exe), but it appeared to be out of date. I didn’t save the location where I found the file, so I had to search for it all over again. Only after giving up and moving on to search for “how many lines of code for circuitpython on a microcontroller” did I find the location again by accident.. Adafruit, of course. :)
- I’m pretty confident I will need to find the link to the latest mpy-cross.exe again in the future. On that day, when I google for a solution I’ve already solved, I hope this post is the first result. :)
The animations for the Lack table are coming along. I’ve got a nice “pulse” going, a rainbow pattern, color chases, color wipes, and a “matrix rain” / sparkle effect that mostly works.

I started this blog post roughly 7 months ago2 by the time I finally hit publish. After all that fuss, ended up switching from CircuitPython (which I find easy to read, write, maintain, update) to Arduino because it was able to hold more code and run more animations. Besides the pulse animations, rainbow patterns, color chases, color wipes, and a matrix rain, it’s also got this halo animation, some Nyan cat inspired chases, and plays the animations at a lower brightness for 12 hours a day (which is intended to be less harsh at night). I could probably add a light sensor, but I don’t really want to take everything apart to add one component.
OpenSCAD Render Times
Thanks to @raster, I’m going to do a side-by-side taste test of several different flavors of OpenSCAD.1 To give each one a similar test, I’m trying out my D-Pad design from … uh, earlier this morning.2
| Version | Release | F5 Preview | F6 Render | Notes |
| 2021.01 | Stable | 09:50.220 | 2.302 | Best place to start |
| 2024.01.13 | Current | 04:37.763 | 0.948 | I’ve been running this one for a while |
| 2025.04.04 | Latest | 04:36.593 | 0.483 | Latest snapshot |
Obviously, the good folks working on OpenSCAD have dramatically improved preview/render times over the last four years. The speed boost in using a later snapshot is pretty significant if you’re doing any kind of complex designs. They must be using some kind of cache system to make the render times so fast.
The speed differential between 2024.01.13 and the latest snapshot is so slight, I’m not going to switch things up unless I bump into a design that struggles with rendering some complex feature.
#OpenSCADClub- OpenSCAD 3D Printed Spring
- OpenSCADClub Week 2: Directional Pad
- OpenSCAD Render Times
- One Simple Trick Can Save You 30 Minutes…
- OpenSCAD Club Cookies