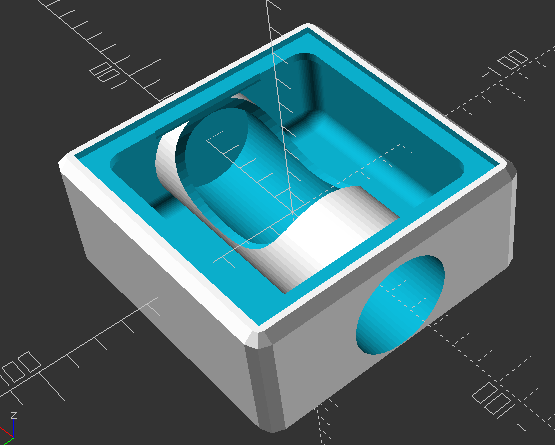
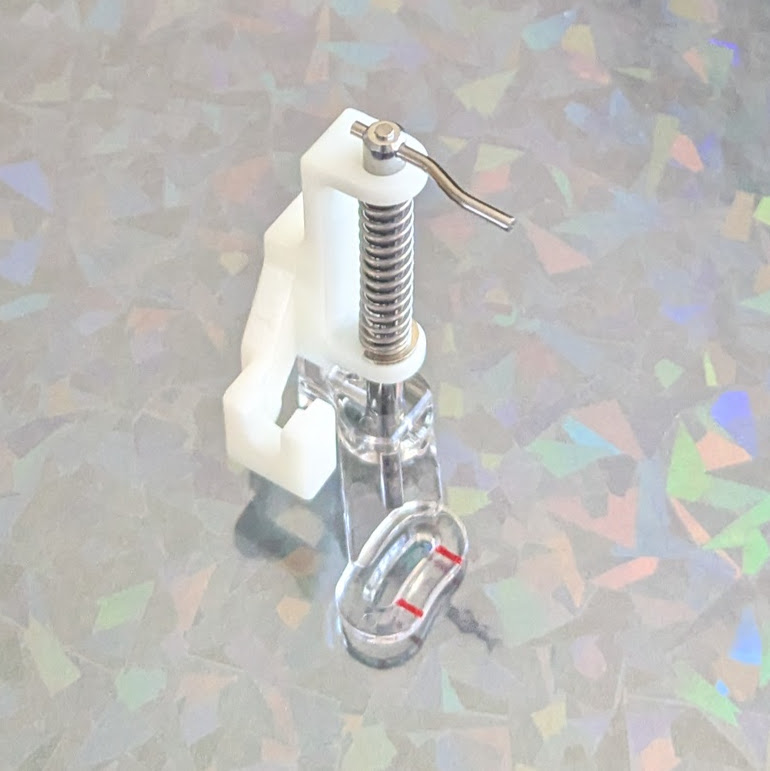
Sticker Printer

I recently purchased a small thermal label / sticker printer after seeing what amazing things @Alpenglow was doing at Teardown 2025.  I quickly picked picked one up and posted a few notes.  The bluetooth connection was a little finicky, but Android app worked well enough.  I was able to print over USB without a lot of fuss, which was great.  I was surprised that I could do so much image manipulation within the app itself.

First few test prints

I was shocked at the speed and quality of these little prints.  One of the reasons I wanted to get this little sticker printer was to add QR codes to my notebooks.  I had experimented with using my laser printer to print on packing tape, masking tape, and scotch tape.  I probably have the pictures to match these experiments somewhere, but the methodology was print some rectangles for text on a sheet of printer paper, layer packing tape over those sections, put pieces of packing, masking, and scotch tape over the areas where I was going to print.  The packing tape became a melted mess, the masking tape held the design – but smudged quickly and easily, and surprisingly the design on the scotch tape held up.  Still it was a pretty big hassle and could easily gum up my sturdy Brother printed with melted plastic.

Where was I?  A sticker printer!!!  Okay, when I am working on a project, whether that’s fleshing it out on scratch paper, putting it in a notebook, or putting together a big blog post, I sometimes wish the transition between an analog page and a digital resource (image, download, link, etc) was a lot easier.

The sticker printer I purchased came with stickers that are about 1.5″ tall by 2.75″ wide.  I think this would be enough for me to create multiple QR codes with pre-defined links to be printed at once, then store them on a sheet tucked into a notebook flap.  When I need to “embed” a link, peel the sticker, apply to page, then update my YOURLS installation so the short URL points where I need it to go.  Here’s a mockup:

Sketch idea for multiple small QR codes on stickers for a “smart” notebook

I’ll play with the idea more tomorrow…

Thermal Sticker Printer
  1. QR Codes and Avatars
  2. Sticker Printer
  3. Thermal QR Code Sticker Success!

DIY Lightsaber Thoughts

My mind, perhaps in order to avoid having to think about things like responsibilities and work, keeps returning to this project.  Some thoughts:

  1. My buddy Andrew pointed out the design of a telescoping boom as a way to build a lightsaber.  At a glance, it appears to use a series of pulleys to evenly telescope a boom in or out.  However, the downside would likely be either the need for large pulleys or lots of revolutions for each of the pulleys.

    Telescoping boom design
  2. The original “TwistSaber” had three designs – TwistSaber 1 (597mm blade), TwistSaber 2 (785mm blade), and TwistSaber Dual (two 597mm blades).  The original Kickstarter video suggests that a TwistSaber 1 or Dual set of blades can be printed with a 3D printer capable of 250 mm in the vertical axis while a TwistSaber 2 required a 300 mm vertical axis.  With any of these designs, it appears the visible blade is comprised of three segments.  However, in order for those parts to extend beyond the hilt, I would imagine there are really four segments.
    TwistSaber base

    In the above image, we can see the three blade segments – and the “base” which, based upon my recollection from the assembly videos, drops into and connects to the handle.1 If each segment for the TwistSaber 1 / Dual is using the max build height of 250 mm and the overall length is 597 for three visible segments, we get2  to extension would dictate the relative sizes of the planetary gears along with the slope of the “screw thread” for the blade sections.  I note the design only uses one or two screw threads when it could use three or five or however many.There is probably a sweet spot between enough threads to keep the blade in aligned, but not so many that the extra friction causes the blade to bind. 3

  3. My thinking about the height of the blade isn’t just belly button gazing.  If we know the height of the blade and the amount of desired rotation for the blade to extension, we should be able to define and calculate the slope of the screw threads and sizes of the parts of the planetary gear.
    Components of a planetary gear

    If we want a half turn of the base to cause a full extension of the blade, then half the rotation of the planetary gear should cause sufficient revolutions of the sun gear to result in the full extension of one blade segment.  We could probably make a flat sketch of this by estimating the diameter of the ring gear, determining what half that circumference would be, making reasonable choices for the planetary and sun gear, then making reasonable choices for the blade length.

    TwistSaber Gears
  4. There are a lot of interesting elements to the TwistSaber assembly build videos – the designer clearly put a lot of thought into the design.  There are special ways in which the blades slide and lock in against each other, ways in which the planetary gears snap together and hold each other in place, and even a way for the top most internal telescoping / spinning core to connect to the blade tip.  Once all this is done, there are special ways for the grip to be connected using a series of rings.  I imagine that some of this complexity is due to using purely 3D printed parts with zero fasteners.  I can appreciate this since I try to avoid fasteners as well.
  5. One interesting thing I note about the design is that there appear to be holes in the bases of all of the hilts.  I wonder if this is a need to prevent the entire device from being hindered by air flow and suction given the tight blade tolerances.  Given the intricate design elements, clear thought that went into each part and how the whole assembly goes together, I would love to purchase the STL files and wish they were still available for sale.

More thinking and sketches later!

DIY Lightsaber Build
  1. TwistSabers
  2. DIY Lightsaber Thoughts
  3. Wait, haven’t I worked on this before?!
  4. Considering the design elements of a DIY light saber
  5. More Musings on Lightsabers, Mechanical Components
  6. Slow Progress…
  7. Capstan Drives as alternatives to Planetary Gears?
  1. Sadly, I think some of the videos have been made unavailable…  I wonder what they were?!!? []
  2. 250 * 3)-597)/3 = ~ 51 mm of “overlap” for each segment, probably divided equally between the top and bottom portions.
  3. The twist of the base is an interesting aspect to me.  The desired amount of twist ((One video suggests it is a half twist []
  4. The assembly videos recommend copious grease for the tight fitting threads []

TwistSabers

I stumbled across the “TwistSaber” probably six to nine months too late.  Their original Kickstarter was for the STL or printed parts to build one, then they accepted payments through their website for a short time, and now they have a new Kickstarter where only the exterior shells are available as digital files.

I wish I could find the source, but I remember a guy who had designed and showed off videos of his own quick extending and retracting lightsaber many years ago.  That design appeared fairly chunky and didn’t extend far enough to look very impressive.  If I find the source later on, I’ll look forward to adding it here.

Unlike the 3DPrintingWorld‘s fantastic extending light saber1 models, the Twistsaber uses a combination of an interior telescoping screwthread system and a telescoping nontwisting blade, articulated by a small set of planetary gears in the base to extend and retract the blades quickly.  The effect is pretty cool.

This slideshow requires JavaScript.

There was some scuttlebutt about a “real” Star Wars light saber that was going to be used at the Disney theme parks, which appeared to use dual tape measure slides to extend and retract.  However, the mechanism inside the TwistSaber by inventor Thomas Kloucek appears to be easier to implement, no weird parts to source, while still being a bit fiddly to assemble.  The design appears to be intricate and makes heavy use of snap fit parts with close tolerances.

This is exactly the kind of project I would love to print and assemble, but hate to buy as a finished product.  As a product, it would just sit on a shelf.  As a 3D printed project, it would be a thing I built, a story to with it.

This slideshow requires JavaScript.

Anyhow, I wanted to jot down some ideas, links to the various sources, and images I found for future reflection.  The basic idea, internal increasingly large telescoping spiral and external increasingly small telescoping blade plus planetary gear mechanism might be easy to understand, but as with so many things the implementation is where most of the time would be spent.

DIY Lightsaber Build
  1. TwistSabers
  2. DIY Lightsaber Thoughts
  3. Wait, haven’t I worked on this before?!
  4. Considering the design elements of a DIY light saber
  5. More Musings on Lightsabers, Mechanical Components
  6. Slow Progress…
  7. Capstan Drives as alternatives to Planetary Gears?
  1. and other cutting instrument []

OtherCutter Epilog

I published a long-dormant draft post about the OtherCutter very nearly a full decade after starting it.  At the same time I published it, I also filed a FOIA request for DARPA information related to this project – since it was literally a DARPA project.1 I knew it was a longshot, but the FOIA response came back saying they found no responsive records.  I provided copious evidence and links to DARPA’s own sites, so I have to imagine that I’m either never going to get a real response with the information I was interested in … or I’d have to file an appeal, roll up my sleeves, and really start digging for this information.

The amount of time and effort involved in fighting a bureaucracy would be considerable and it is not the sort of thing I would enjoy.  If I really wanted a cardboard CNC, I could probably build one and enjoy the experiment-build-fail cycle.

OtherLabs OtherCutter
  1. Where is the Othercutter? [Draft 06/08/2015]
  2. OtherCutter Epilog
  1. See voluminous links in prior post []

Calibre, Kindle 4 Non Touch

I’ve been using this new-to-me Kindle 4 Non Touchscreen for about a week or so now.  The page advance button on the right side is a little sensitive, causing the book to sometimes advance two pages about 25% of the time.  However, the battery life is still fantastic – and I discovered that I can use Calibre on my desktop as a “book server” and pull books off of it whenever I want.  That’s pretty damn neat.

I’ve gotten over the lack of organization caused by the Calibre DRM adjustments to books.  I’m generally only reading one book at a time and so the only “pain” I have is when switching between books.

The custom screensavers are still a source of great joy.  I’ll probably add a few more.  I’m still willing to give Duokan a try, but the incentive to do so is quickly fading when the Kindle is working so well as is.

Kindle 4 Non Touch Customization
  1. Futzing With An Old Kindle
  2. Jailbreaking a Kindle 4 Non Touch (2012), Take 2
  3. SSH into a Kindle 4 from 2012
  4. Calibre, Kindle 4 Non Touch

SSH into a Kindle 4 from 2012

Now that I’ve gotten the Kindle looking and working just how I like it, I suppose it’s time to get ready to mess it all up.  As before, I’m going to mention where I got started on this process, but then link to the specific post/page/file where I ended up.

  1. USB Network Hack
    1. The last time I tried to implement this hack, I started at the MobileRead wiki on this page.  Not only did it not work for me, but I ended up preventing the Kindle from connecting to my PC over USB.  Let’s see if we can avoid that this time.
    2. I’ll use the “Packages targeting Kindle 2/Dx/DXG/3/4” from NiLuJe’s 10/18/2013 post, updated 01/03/2025, specifically the “kindle-usbnetwork-0.57.N-r18979.tar.xz” file.
    3. Following the instructions in the “README_FIRST.txt” file, drop the “Update_usbnetwork_0.57.N_k4_install.bin” into the root, then as with most of the steps thus far, safely eject the Kindle, Menu Button -> Settings -> Menu Button -> Update Your Kindle, confirm, and wait patiently.
    4. I just can’t seem to get this to work. I’ll update it later if I can.  In the meantime, I’m going to forge ahead with a series of suggestions from Redditor /user/SpartanHeavy/ on the /r/Kindle subreddit.  They suggest continuing the toolchain after the jailbreak to the Mobile Kindlet Kit, the KUAL, the DevCerts update, and then the KOReader.  If this works, I think it will enable me to add functionality that will do an end run around the Calibre UI causing all books to appear on the main screen.  Let’s find out!
  2. MobileRead Kindlet Kit
    1. Download “kindle-mkk-20141129-r18833.tar.xz” from the same mega-post from NiLuJe, extract “Update_mkk-20141129-k4-ALL_install.bin”, save to the root of the Kindle, safely eject the Kindle, Menu Button -> Settings -> Menu Button -> Update Your Kindle, confirm, and wait patiently.
  3. KUAL
    1. Download “KUAL-v2.7.37-gfcb45b5-20250419.tar.xz” from the mega-post, extract “KUAL-KDK-1.0.azw2”, save to the “/documents/” folder on the Kindle.  (Note: This is not KUAL (coplate) or KUAL+)
  4. Install DevCerts Update
    1. Download “DevCerts-20250419-KeyStore.zip” from this post by NiLuJe, extract “Update_mkk-20250419-k4-ALL_keystore-install.bin”, save to the root of the Kindle, safely eject the Kindle, Menu Button -> Settings -> Menu Button -> Update Your Kindle, confirm, and wait patiently.
    2. Note:  I noticed before I restarted the Kindle there’s something called “dev KUAL and it lists the author as “ixtab NiLuJe twobob stepk”. 1
  5. Install KOReader
    1. Download KOReader from this Github repository, specifically this file “koreader-kindle-v2025.04.zip“.  Unzip all of the contents into the root directory of the Kindle.

So, after all that, I don’t see that the “USBnetwork” or “USBnet” are in any way working on this device.  That’s okay.  I haven’t killed it, I can still ready my books updated via Kindle/Amazon/Libby and I can read the books I’ve archived via Calibre, and I have the cool new screensavers.  The KOReader should theoretically permit me to view Wikipedia, but when everyone pretty much has a phone that can access the web easier, who would want to read a wikipedia entry on a much slower device?

As it turns out, I’m just not going to be able to use USBnetwork, even if I could get it working, to have the Kindle OS treat Calibre books in the same hide-when-in-a-collection as native Amazon formatted books.  There are some super hacky work arounds involving scripts and such that would permit me to do this, but then hiding a book from the main screen would make it unavailable elsewhere, which kinda defeats the purpose.

I may give Duokan a try later.  The major relevant benefits of Duokan appear to be easy organization of books into folders and possibly longer battery life.  Any amount of battery life in excess of a day’s worth of reading is likely to be more than sufficient for me.  However, I kinda dislike the clutter and disorganization of the native Kindle OS treatment of Calibre books.  One drawback to Duokan is that it can’t download books through the Amazon ecosystem, so I’d need to re-boot into Kindle OS any time I wanted to check out a new library book.  This may be enough to get me to add this dual-booting operating system to the Kindle.

Lastly, the number of additional resources and sites that I went through to even get as far as I have above has been dizzying.  There was a CNet2 article about screensaver hacks, but none of the images work and it’s not a lot easier to follow.  I also stumbled across the blog of someone named “Yifan Lu” who I suspect was a contributor to many of the various NiLuJe updates.  If I ever get far enough with the SSH nonsense I was chasing, I also found a site with a Javascript tool to figure out the Kindle’s default root password.  The secret appears to be the password is the word “fiona” plus the MD5 hash of the all caps serial number for the Kindle.

Kindle 4 Non Touch Customization
  1. Futzing With An Old Kindle
  2. Jailbreaking a Kindle 4 Non Touch (2012), Take 2
  3. SSH into a Kindle 4 from 2012
  4. Calibre, Kindle 4 Non Touch
  1. Man, I hope I’m not screwing up my system. []
  2. Remember CNet?!? []

Jailbreaking a Kindle 4 Non Touch (2012), Take 2

When last we saw our intrepid hero, he was running a factory reset on his new-ish Kindle 4 Non Touch (Black) circa 2012. 1  He’d managed to jailbreak it and then install some new screensavers, before going for broke to install SSH and turning off the Kindle’s ability to appear as a drive on Windows, preventing all future side-loaded content.

It’s taken me a bit of fiddling, but I’ve now gotten the the Kindle to where it is working “as intended.”  After the factory reset and arduously reentering my ridiculously long WiFi and Amazon passwords, I couldn’t deliver the books that had been registered with this account to this device.  The books that I still had checked out simply wouldn’t deliver.  I figured maybe they were stuck in the intertubes and I should send a few more after it.  When I tried to deliver the books through the Libby App, my Amazon page pulled up in the mobile browser as expected, but when I clicked the button in Amazon to deliver the book, the page simply said, “Sorry, we couldn’t find that page.”  I was stuck with books I had previously checked out through Libby in my Amazon account which I couldn’t deliver to this device – and was unable to check out additional books to appear in my Amazon account.2 Ah, I found another way in which this error can occur – when you try to download a graphic novel to your ancient Kindle 4, get the “Sorry, we couldn’t find that page” error making you think your Libby app is borked, only to copy/paste the link into a PC browser and discovery it’s really because “We could find a registered device to read this title” and you realize the problem is you don’t own any Kindle devices that can read comics.

I took the browser back to the page with the button to send the delivery, copied the URL, and entered it into my desktop browser – which provided a much more informative error message.  The desktop Amazon page said there were no devices registered to my account!  I went and changed the name of my device in the Amazon “Digital Content” page and then made sure to make it my “default” device was this same one.  Having the Kindle check for new updated content wasn’t working, so I restarted it and checked again.  This time the books started to appear.  Yay!  I now have a basic as-intended Amazon experience!

But that’s not good enough.  I want …

Skeletor would never steer us wrong

Let’s try jailbreaking it again.  What could possibly go wrong this time?!

  1. Confirm Firmware
    1. I’m already running the latest 4.1.4 firmware, so I should be ready to proceed.  You can see the firmware version at the bottom of the screen under Menu Button -> Settings.
  2. Identify The Kindle
    1. I didn’t need to do this, since I had previously identified my Kindle.  The easiest way to ID your Kindle3
    2. Wait for the Kindle to boot into diagnostics mode.  (I saw the screen take on a broken / static appearance for just a second.  Don’t freak out.)
    3. Select “D) Exit, Reboot or Disable Diags” and then “R) Reboot System”.  In order to “Q) To continue”, you’ll need to click to the left on the directional pad.
    4. Be patient while the jailbreak does it’s thing.
  • Jailbroken
    1. After going through all of this, Kindle eventually reappeared as a drive on Windows.  I safely ejected it once more.  I saw the screen go blank, then the main page come up showing all content missing.  After a moment, even though I’m still disconnected from WiFi, the content returned with “You are Jailbroken” appearing as the topmost “book.”  The entire contents of this document is the statement “It is safe to delete this document.”
    2. The wiki suggests jailbreaking allows minor things like getting custom screensavers and fonts, but that the “more fun stuff” requires gaining SSH access to the device.
    3. This is where your intrepid hero ran afoul last time…  let’s see what happens next!
    4. I’m trying to keep this guide-of-guides as organized as possible.
  • Custom Screen Savers
    1. The thread for screen saver hacks starts here, in the wiki.  But, really, you’ll want this file (kindle-ss-0.47.N-r18980.tar.xz) from the forum post by NiLuJe above.
    2. Upload the “Update_ss_0.47.N_k4_install.bin” file to the root directory of the Kindle.
    3. Menu Button -> Settings -> Menu Button -> Update Your Kindle.  Confirm.  Wait for it to restart.
    4. Once it’s booted up again, navigate to “/linkss/screensavers/” and upload additional images.  To make my own screensavers, I downloaded artwork I like, rotated them 90 degrees, scaled them down to 600 px wide x 800 px tall, reduced the DPI to 72, and saved as a PNG file.  Easy, right!?

      This slideshow requires JavaScript.

    5. I chose to add blank files named “random” and “shuffle” in the /linkss” directory so that the screensavers I uploaded will cycle through.  A blank “reboot” file, followed by a reboot, is apparently necessary in order to change and update screensavers.  So, safely eject, Menu Button -> Settings -> Menu Button -> Restart.
  • I’ve reached the point where my Kindle was at the end of the day yesterday.  A fully functional Kindle 4, but with custom screensavers.  I’m not gonna lie, these magnificent pieces of art look amazing even scaled down and on a black and white screen.  Now that I’ve gone through everything a second time, I think I may try pushing my luck and going for the SSH installation again.  I mean, what’s the worst that could happen!?

    Kindle 4 Non Touch Customization
    1. Futzing With An Old Kindle
    2. Jailbreaking a Kindle 4 Non Touch (2012), Take 2
    3. SSH into a Kindle 4 from 2012
    4. Calibre, Kindle 4 Non Touch
    1. Listed as “NoTouch” sometimes, but that just sounds too weird for me to use except in instances where I want my notes to match what appears on various guides… []
    2. I’m skipping past all the uninstall, restoring Libby nonsense that went on in between these other steps… []
    3. But, really, I’m speaking to my future self when I have to do this a third time… in which case “my Kindle”…) is to read the serial number off the back or from Menu Button -> Settings -> Tab page to “Device Info” and it should be listed as “Serial Number” whatever.
    4. Look up the serial number against this MobileRead wiki list to find the Model Name and Nicknames for the Kindle.  In my case, I have a serial number starting with either “B023, 9023”, a Model Name of “Kindle NoTouch Black (2012)” with a Nickname of “K4” or “K4B.”
  • Jailbreak
    1. This is the part of the process that I found to get extra confusing.  There is so much interplay between the MobileRead forums and their wiki and the files you download, that I was frequently get caught in a loop referring from one page to another to a file and back again.  For future reference I’ll link where the loop starts – but then link directly or as close to directly to the necessary file as possible.
    2. The loop starts here under “How to install the Jailbreak Hack.”  It ends at this MobileRead forum post by NiLuJe from 09/15/2012 and a link to “kindle-k4-jailbreak-1.8.N.zip  It ends at this MobileRead forum post by NiLuJe from 10/18/2013 last updated on 01/03/2025 and a link to “kindle-k4-jailbreak-1.8.N-r18977.tar.xz
      1. You may be wondering, “MakerBlock!  What the heck?!  What happened here?!”  The answer is that while stuck in the loop that absolutely lead to that first forum post, looking for further information later on lead me to an updated version of this file.  While all you have to do is read what is happening here, I need to uninstall the 2015 jailbreak so I can install the latest r18977 version.  I’ll resume in two restarts.  I am fairly confident this is where I screwed up last time.  I didn’t see this latest version of the jailbreak firmware.
    3. Download the file, open the ZIP, and read the “README” file nestled within.
    4. The README directs:
      1. Connect the Kindle via data USB cable to a PC
      2. Copy the following to the “root” drive of the Kindle
        1. data.tar.gz
        2. ENABLE_DIAGS
        3. diagnostic_logs “folder”
      3. Safely eject the Kindle from the PC
      4. Menu Button -> Settings -> Menu Button -> Restart ((If you don’t see “Restart” something probably went wrong []
  • Repairing My DIY Travel Uke

    If you’re just catching up, check out the list of posts below for the full build log plus a short clip of me playing the ukulele.

    I’ve gotten a lot of use out of my travel ukulele, but it’s need a little TLC now and then.  Most recently, I found myself in that classic DIY scenario…

    But, what if more?

    It started when I looked down at my uke months ago to discovery one of the frets I had superglued in place had come out!  Fortunately, I found it nearby and found I could temporarily push it back into the channel that was formed by the hardened glue.  Of course, it could still slip right back out – which is what happened in the first place.  I went to the age-old tactic of “just living with it” for the time being.  I’d slide the fret in, play for however long, slide it out and kept it somewhere safe.

    As this was clearly not a long term fix, I finally removed the pin, loosened and removed the strings from the tuning pegs, wrapped them back behind the neck, cleared an area, superglued it back in place, and “clamped” it down using rubber bands and popsicle sticks.  Don’t laugh.  It worked the first time on all the frets and only failed on 1/15 of them after two years.

    This, of course, is where the problems began.  I discovered the Graph Tech Ratio Tuners I had installed, which looked great, had developed cracks near where the screws held them in place on two tuners.  This crack essentially caused the insides of the gears to become misaligned to the point they wouldn’t turn.  A third tuner didn’t have any visible defects – but it would only had about 180 degrees of tuning range – nowhere near enough to wind strings, let alone fine tune the strings.  Now, seeing as how these plastic geared tuners failed after two years when all I did was unwind them once to fix the missing fret, I wasn’t going to get another set of the same thing.

    These tuning pegs are a mess

    Now, I still had the tuners I’d bought at the recommendation of my buddy and makerextraordinaire, Matt Stultz.  After all, the original holes I’d drilled in my uke were designed for these anyhow.  I had only gone with the Graph Tech’s due to the color and low-profile setup, so that the tuners wouldn’t rise above the strumming area.  After getting these out – I discovered the rubber grips for the tuners had taken on an almost… sticky / gooey quality.  I measured them up and 3D printed some slightly smaller ones that had a kinda cool “torpedo” look to them.

    Finally, a good 3D printed knob

    In case someone is reading this blog post WAY in the future, about six months ago a post went viral on the 3D printing sub-reddit due to some random woman’s white hot rage at seeing someone having repaired their stove knob with a 3D printed replacement.

    ANYHOW, I printed a few test versions of these tuning knobs and replaced the wider sticker versions with sleek non-sticky 3D printed versions.  Once these were installed12 I started to restring the uke and discovered one of the 3D printed bridge holders was cracked.  The turn around was also cracked, but still working well enough.

    Now the uke has these new / original tuners I’d purchased and the turning of their little metal gears brings me joy.  They don’t stick out to the side too much and, installed at an angle, they don’t rise very much above the playing area.

    Ukulele after the repair

    Now I just need to learn to play it!  I’m just kidding – I can play it, I just need to practice more often.  :)

    DIY Travel Soprano Ukulele
    1. Learning Curves and Ukuleles
    2. Building a Travel Ukulele: Getting Started
    3. Building a Travel Ukulele: Cutting Stuff
    4. Building a Travel Ukulele: Cutting, Filing, Shaping
    5. Building a Travel Ukulele: Filing, sanding, filing, sanding, filing…
    6. Building a Travel Ukulele: Sanding.
    7. Building a Travel Ukulele: Test Fitting
    8. Building a Travel Ukulele: Preparation, Marking and Cutting Frets
    9. Building a Travel Ukulele: Shaping Frets, Sanding
    10. Building a Travel Ukulele: Building a Drill
    11. Building a Travel Ukulele: No Turning Back
    12. Building a Travel Ukulele: Sanding, sanding, and finishing
    13. Building a Travel Ukulele: Finishing, sanding, painting, etc
    14. Building a Travel Ukulele: So Much Experimentation, Bridges, Printing, and Sanding
    15. Building a Travel Ukulele: Plancratineering
    16. Building a Travel Ukulele: Swapping Hardware, Fret Experiments
    17. Building a Travel Ukulele: Bridge, Stringing It Up, and a Sound Test!
    18. Building a Travel Ukulele: Improvements
    19. Building a Travel Ukulele: Back to Basics
    20. DIY Soprano Scale Travel Ukulele
    21. Repairing My DIY Travel Uke
    1. Installed again?  Re-installed?  I test fit and installed them originally and then pulled them out in favor of the Graph Tech’s, so I perhaps they weren’t actually installed originally? []
    2. I digress. []

    Futzing With An Old Kindle

    The Kindle was an incredible device for 2012.  E-ink display, 2-4GB of storage, wifi, ability to download thousands of books, purchase and borrow new books wirelessly, play games, and battery that could last for weeks.  We bought one new back then, but it’s tied to my wife’s account and I don’t want to lose access to the books on it or accidentally brick it.  $30 and a week later, I have another Kindle 4 Non-Touch shipped to my door courtesy of an eBay seller.

    Obviously, DRM’s upside for content owners is protecting themselves from IP theft.  The downside for everyone else is being treated like a criminal.  I just want to read the books I legitimately have access to on any device I own without a whole bunch of rigamarole, authentications, and nonsense.

    Fortunately this Kindle is so old mature that many of the content and firmware problems that might have once existed and somewhat solved.  Using Calibre, I can remove the DRM off the books I have on our original Kindle and drop them onto this NTM1 Kindle.  If I go so far as to jailbreak this Kindle, I can install new screensavers which would be a super cool upgrade.  I followed the various slightly-new-hostile guides through the MobileRead forums and wiki, and even successfully jailbroke the Kindle, installed new cool screensavers, and brought over books through Calibre.  The one downside was2 big enough that I kept pushing.

    So true…

    That one downside was that while books on a stock Kindle appear on the main screen where you can page through them all, you can also add them to custom “Collections” where once they’ve been assigned to one, they’ll disappear from view on the main screen where they are now only visible in the one or more Collections to which they’ve been assigned.  It essentially operates much as a “tagging” system.  Well, after bringing over the books via Calibre, apparently the process removes something from the metadata for the books that permits the Kindle device to flag them for non-displaying on the main screen.  The result is that while books can still be assigned to collections, they’ll also still clutter up the main screen.  Obviously, I there’s no way I can deal with this, so I decided to explore other options.

    Once you’ve got your Kindle jailbroken, you can start to do things like SSH into it, change some core settings, and otherwise just tinker around changing things and ripping stuff out.  While I didn’t brick this device, I did get it to the point where it would neither enter a debug mode nor permit me to access it over USB to sideload books via Calibre.  I don’t trust the Amazon email delivery system well enough to want to send de-DRM’ed books to the address Amazon so graciously assigned the Kindle, so that option is out.

    This has lead me to a factory reset, fresh Kindle, and the need to enter my ridiculously long WiFi network password and Amazon account password back into the Kindle via the 5 key directional pad.

    Wish me luck.

    Kindle 4 Non Touch Customization
    1. Futzing With An Old Kindle
    2. Jailbreaking a Kindle 4 Non Touch (2012), Take 2
    3. SSH into a Kindle 4 from 2012
    4. Calibre, Kindle 4 Non Touch
    1. New to me []
    2. Cue ominous foreshadowing []

    Python Practice with an LLM

    I’ve been tinkering with Python more recently.  When used on a MCU1 or a PC, it’s such a nice experience being able to write some code, run it without having to compile, see what happens, and adjust as necessary.  Now, since I’m a newb at this, I’m getting help from… *shudder* LLM’s.2 Now, in the past I’d turn to Googling, looking at reliable and friendly forums such as Adafruit and Arduino, but I’d invariably need to check out Stack Overflow as well.3

    As you might imagine, Stack Overflow was something of a victim of it’s own success.  It’s content was good enough to train the LLM’s of the world – and those LLM’s can parrot / offer all the insights gleaned from Stack Overflow without the caustic haughty  condescending replies typical of the comment sections on Stack Overflow / SlashDot / HackADay.  Thus, it’s no small wonder the following graphic was circulating on Reddit:

    Stack Overflow vs Time

    Where was I?  Oh, yeah…  I was using some LLM’s to help with Python.  I don’t have any fancy GPU’s, BitCoin mining rigs, etc, so I’m just using my non-gaming PC’s modest 16 GB VRAM to run the smaller local LLM’s.  I can run things up to about 8B parameters, like the various Llama flavors, at 8 bit quantization with reasonable speed.  I’ve found for my system that Qwen3 4B to be fast, thoughtful, and helpful.

    I’ve realized this blog post is woefully low on actual Python related content.  Here’s some things for future-me to remember:

    • pip list
      • Will give me all the names of all packages installed
    • pip install requests Pillow reportlab PyPDF2
      • Will install multiple packages, one after another
    Python Programming Practice
    1. Python Practice with an LLM
    Software Development with LLMs
    1. Series Plugin Test for Illustrative Purposes Only
    2. ChatGPT WordPress Plugins
    3. Coding with an LLM Sidekick
    4. Python Practice with an LLM
    5. Not Team AI
    6. Never Stop Breaking Up
    7. Weakness
    1. Microcontroller unit []
    2. Large language models such as []
    3. I bought their April Fool’s joke keyboard turned real product and once I’d remapped the keys, got significant use out of it for a long time.  Between the construction, packaging, and accessories, at $30 this is still a total no-brainer if you need a small extra keyboard dedicated to some specific tasks. []