I’ve been using this new-to-me Kindle 4 Non Touchscreen for about a week or so now. The page advance button on the right side is a little sensitive, causing the book to sometimes advance two pages about 25% of the time. However, the battery life is still fantastic – and I discovered that I can use Calibre on my desktop as a “book server” and pull books off of it whenever I want. That’s pretty damn neat.
I’ve gotten over the lack of organization caused by the Calibre DRM adjustments to books. I’m generally only reading one book at a time and so the only “pain” I have is when switching between books.
The custom screensavers are still a source of great joy. I’ll probably add a few more. I’m still willing to give Duokan a try, but the incentive to do so is quickly fading when the Kindle is working so well as is.
Now that I’ve gotten the Kindle looking and working just how I like it, I suppose it’s time to get ready to mess it all up. As before, I’m going to mention where I got started on this process, but then link to the specific post/page/file where I ended up.
USB Network Hack
The last time I tried to implement this hack, I started at the MobileRead wiki on this page. Not only did it not work for me, but I ended up preventing the Kindle from connecting to my PC over USB. Let’s see if we can avoid that this time.
Following the instructions in the “README_FIRST.txt” file, drop the “Update_usbnetwork_0.57.N_k4_install.bin” into the root, then as with most of the steps thus far, safely eject the Kindle, Menu Button -> Settings -> Menu Button -> Update Your Kindle, confirm, and wait patiently.
I just can’t seem to get this to work. I’ll update it later if I can. In the meantime, I’m going to forge ahead with a series of suggestions from Redditor /user/SpartanHeavy/ on the /r/Kindle subreddit. They suggest continuing the toolchain after the jailbreak to the Mobile Kindlet Kit, the KUAL, the DevCerts update, and then the KOReader. If this works, I think it will enable me to add functionality that will do an end run around the Calibre UI causing all books to appear on the main screen. Let’s find out!
MobileRead Kindlet Kit
Download “kindle-mkk-20141129-r18833.tar.xz” from the same mega-post from NiLuJe, extract “Update_mkk-20141129-k4-ALL_install.bin”, save to the root of the Kindle, safely eject the Kindle, Menu Button -> Settings -> Menu Button -> Update Your Kindle, confirm, and wait patiently.
KUAL
Download “KUAL-v2.7.37-gfcb45b5-20250419.tar.xz” from the mega-post, extract “KUAL-KDK-1.0.azw2”, save to the “/documents/” folder on the Kindle. (Note: This is not KUAL (coplate) or KUAL+)
Install DevCerts Update
Download “DevCerts-20250419-KeyStore.zip” from this post by NiLuJe, extract “Update_mkk-20250419-k4-ALL_keystore-install.bin”, save to the root of the Kindle, safely eject the Kindle, Menu Button -> Settings -> Menu Button -> Update Your Kindle, confirm, and wait patiently.
Note: I noticed before I restarted the Kindle there’s something called “dev KUAL and it lists the author as “ixtab NiLuJe twobob stepk”. 1
So, after all that, I don’t see that the “USBnetwork” or “USBnet” are in any way working on this device. That’s okay. I haven’t killed it, I can still ready my books updated via Kindle/Amazon/Libby and I can read the books I’ve archived via Calibre, and I have the cool new screensavers. The KOReader should theoretically permit me to view Wikipedia, but when everyone pretty much has a phone that can access the web easier, who would want to read a wikipedia entry on a much slower device?
As it turns out, I’m just not going to be able to use USBnetwork, even if I could get it working, to have the Kindle OS treat Calibre books in the same hide-when-in-a-collection as native Amazon formatted books. There are some super hacky work arounds involving scripts and such that would permit me to do this, but then hiding a book from the main screen would make it unavailable elsewhere, which kinda defeats the purpose.
I may give Duokan a try later. The major relevant benefits of Duokan appear to be easy organization of books into folders and possibly longer battery life. Any amount of battery life in excess of a day’s worth of reading is likely to be more than sufficient for me. However, I kinda dislike the clutter and disorganization of the native Kindle OS treatment of Calibre books. One drawback to Duokan is that it can’t download books through the Amazon ecosystem, so I’d need to re-boot into Kindle OS any time I wanted to check out a new library book. This may be enough to get me to add this dual-booting operating system to the Kindle.
Lastly, the number of additional resources and sites that I went through to even get as far as I have above has been dizzying. There was a CNet2article about screensaver hacks, but none of the images work and it’s not a lot easier to follow. I also stumbled across the blog of someone named “Yifan Lu” who I suspect was a contributor to many of the various NiLuJe updates. If I ever get far enough with the SSH nonsense I was chasing, I also found a site with a Javascript tool to figure out the Kindle’s default root password. The secret appears to be the password is the word “fiona” plus the MD5 hash of the all caps serial number for the Kindle.
When last we saw our intrepid hero, he was running a factory reset on his new-ish Kindle 4 Non Touch (Black) circa 2012. 1 He’d managed to jailbreak it and then install some new screensavers, before going for broke to install SSH and turning off the Kindle’s ability to appear as a drive on Windows, preventing all future side-loaded content.
It’s taken me a bit of fiddling, but I’ve now gotten the the Kindle to where it is working “as intended.” After the factory reset and arduously reentering my ridiculously long WiFi and Amazon passwords, I couldn’t deliver the books that had been registered with this account to this device. The books that I still had checked out simply wouldn’t deliver. I figured maybe they were stuck in the intertubes and I should send a few more after it. When I tried to deliver the books through the Libby App, my Amazon page pulled up in the mobile browser as expected, but when I clicked the button in Amazon to deliver the book, the page simply said, “Sorry, we couldn’t find that page.” I was stuck with books I had previously checked out through Libby in my Amazon account which I couldn’t deliver to this device – and was unable to check out additional books to appear in my Amazon account.2 Ah, I found another way in which this error can occur – when you try to download a graphic novel to your ancient Kindle 4, get the “Sorry, we couldn’t find that page” error making you think your Libby app is borked, only to copy/paste the link into a PC browser and discovery it’s really because “We could find a registered device to read this title” and you realize the problem is you don’t own any Kindle devices that can read comics.
I took the browser back to the page with the button to send the delivery, copied the URL, and entered it into my desktop browser – which provided a much more informative error message. The desktop Amazon page said there were no devices registered to my account! I went and changed the name of my device in the Amazon “Digital Content” page and then made sure to make it my “default” device was this same one. Having the Kindle check for new updated content wasn’t working, so I restarted it and checked again. This time the books started to appear. Yay! I now have a basic as-intended Amazon experience!
But that’s not good enough. I want …
Skeletor would never steer us wrong
Let’s try jailbreaking it again. What could possibly go wrong this time?!
Confirm Firmware
I’m already running the latest 4.1.4 firmware, so I should be ready to proceed. You can see the firmware version at the bottom of the screen under Menu Button -> Settings.
Identify The Kindle
I didn’t need to do this, since I had previously identified my Kindle. The easiest way to ID your Kindle3
Wait for the Kindle to boot into diagnostics mode. (I saw the screen take on a broken / static appearance for just a second. Don’t freak out.)
Select “D) Exit, Reboot or Disable Diags” and then “R) Reboot System”. In order to “Q) To continue”, you’ll need to click to the left on the directional pad.
Be patient while the jailbreak does it’s thing.
Jailbroken
After going through all of this, Kindle eventually reappeared as a drive on Windows. I safely ejected it once more. I saw the screen go blank, then the main page come up showing all content missing. After a moment, even though I’m still disconnected from WiFi, the content returned with “You are Jailbroken” appearing as the topmost “book.” The entire contents of this document is the statement “It is safe to delete this document.”
The wiki suggests jailbreaking allows minor things like getting custom screensavers and fonts, but that the “more fun stuff” requires gaining SSH access to the device.
This is where your intrepid hero ran afoul last time… let’s see what happens next!
I’m trying to keep this guide-of-guides as organized as possible.
Upload the “Update_ss_0.47.N_k4_install.bin” file to the root directory of the Kindle.
Menu Button -> Settings -> Menu Button -> Update Your Kindle. Confirm. Wait for it to restart.
Once it’s booted up again, navigate to “/linkss/screensavers/” and upload additional images. To make my own screensavers, I downloaded artwork I like, rotated them 90 degrees, scaled them down to 600 px wide x 800 px tall, reduced the DPI to 72, and saved as a PNG file. Easy, right!?
This slideshow requires JavaScript.
I chose to add blank files named “random” and “shuffle” in the /linkss” directory so that the screensavers I uploaded will cycle through. A blank “reboot” file, followed by a reboot, is apparently necessary in order to change and update screensavers. So, safely eject, Menu Button -> Settings -> Menu Button -> Restart.
I’ve reached the point where my Kindle was at the end of the day yesterday. A fully functional Kindle 4, but with custom screensavers. I’m not gonna lie, these magnificent pieces of art look amazing even scaled down and on a black and white screen. Now that I’ve gone through everything a second time, I think I may try pushing my luck and going for the SSH installation again. I mean, what’s the worst that could happen!?
Listed as “NoTouch” sometimes, but that just sounds too weird for me to use except in instances where I want my notes to match what appears on various guides… [↩]
I’m skipping past all the uninstall, restoring Libby nonsense that went on in between these other steps… [↩]
But, really, I’m speaking to my future self when I have to do this a third time… in which case “my Kindle”…) is to read the serial number off the back or from Menu Button -> Settings -> Tab page to “Device Info” and it should be listed as “Serial Number” whatever.
Look up the serial number against this MobileRead wiki list to find the Model Name and Nicknames for the Kindle. In my case, I have a serial number starting with either “B023, 9023”, a Model Name of “Kindle NoTouch Black (2012)” with a Nickname of “K4” or “K4B.”
Jailbreak
This is the part of the process that I found to get extra confusing. There is so much interplay between the MobileRead forums and their wiki and the files you download, that I was frequently get caught in a loop referring from one page to another to a file and back again. For future reference I’ll link where the loop starts – but then link directly or as close to directly to the necessary file as possible.
You may be wondering, “MakerBlock! What the heck?! What happened here?!” The answer is that while stuck in the loop that absolutely lead to that first forum post, looking for further information later on lead me to an updated version of this file. While all you have to do is read what is happening here, I need to uninstall the 2015 jailbreak so I can install the latest r18977 version. I’ll resume in two restarts. I am fairly confident this is where I screwed up last time. I didn’t see this latest version of the jailbreak firmware.
Download the file, open the ZIP, and read the “README” file nestled within.
The README directs:
Connect the Kindle via data USB cable to a PC
Copy the following to the “root” drive of the Kindle
data.tar.gz
ENABLE_DIAGS
diagnostic_logs “folder”
Safely eject the Kindle from the PC
Menu Button -> Settings -> Menu Button -> Restart ((If you don’t see “Restart” something probably went wrong [↩]
I’ve gotten a lot of use out of my travel ukulele, but it’s need a little TLC now and then. Most recently, I found myself in that classic DIY scenario…
But, what if more?
It started when I looked down at my uke months ago to discovery one of the frets I had superglued in place had come out! Fortunately, I found it nearby and found I could temporarily push it back into the channel that was formed by the hardened glue. Of course, it could still slip right back out – which is what happened in the first place. I went to the age-old tactic of “just living with it” for the time being. I’d slide the fret in, play for however long, slide it out and kept it somewhere safe.
As this was clearly not a long term fix, I finally removed the pin, loosened and removed the strings from the tuning pegs, wrapped them back behind the neck, cleared an area, superglued it back in place, and “clamped” it down using rubber bands and popsicle sticks. Don’t laugh. It worked the first time on all the frets and only failed on 1/15 of them after two years.
This, of course, is where the problems began. I discovered the Graph Tech Ratio Tuners I had installed, which looked great, had developed cracks near where the screws held them in place on two tuners. This crack essentially caused the insides of the gears to become misaligned to the point they wouldn’t turn. A third tuner didn’t have any visible defects – but it would only had about 180 degrees of tuning range – nowhere near enough to wind strings, let alone fine tune the strings. Now, seeing as how these plastic geared tuners failed after two years when all I did was unwind them once to fix the missing fret, I wasn’t going to get another set of the same thing.
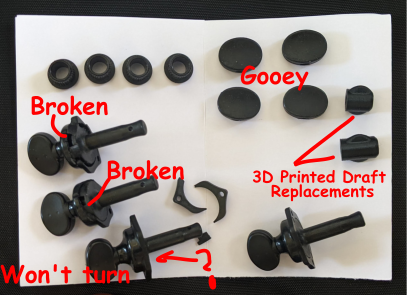
These tuning pegs are a mess
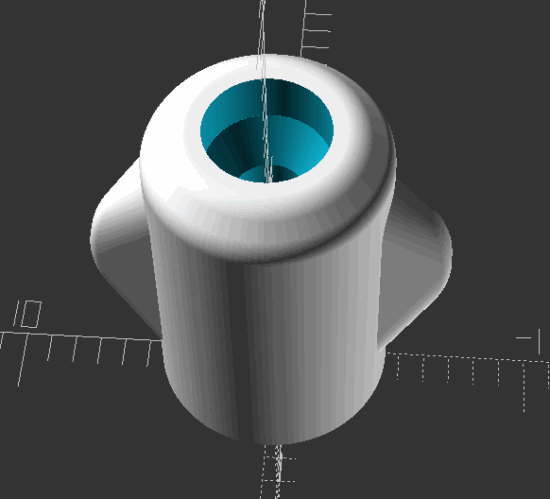
Now, I still had the tuners I’d bought at the recommendation of my buddy and maker–extraordinaire, Matt Stultz. After all, the original holes I’d drilled in my uke were designed for these anyhow. I had only gone with the Graph Tech’s due to the color and low-profile setup, so that the tuners wouldn’t rise above the strumming area. After getting these out – I discovered the rubber grips for the tuners had taken on an almost… sticky / gooey quality. I measured them up and 3D printed some slightly smaller ones that had a kinda cool “torpedo” look to them.
ANYHOW, I printed a few test versions of these tuning knobs and replaced the wider sticker versions with sleek non-sticky 3D printed versions. Once these were installed12 I started to restring the uke and discovered one of the 3D printed bridge holders was cracked. The turn around was also cracked, but still working well enough.
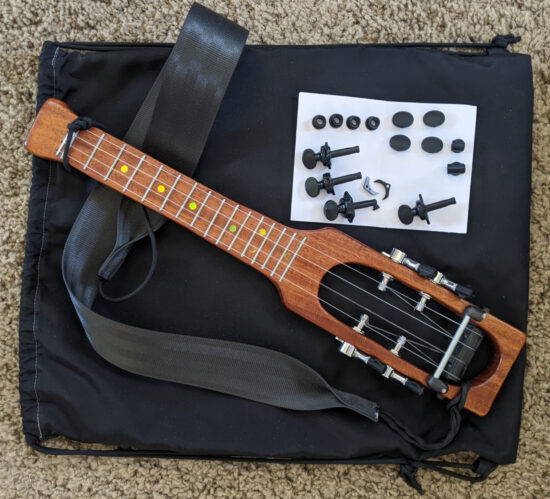
Now the uke has these new / original tuners I’d purchased and the turning of their little metal gears brings me joy. They don’t stick out to the side too much and, installed at an angle, they don’t rise very much above the playing area.
Ukulele after the repair
Now I just need to learn to play it! I’m just kidding – I can play it, I just need to practice more often. :)
Installed again? Re-installed? I test fit and installed them originally and then pulled them out in favor of the Graph Tech’s, so I perhaps they weren’t actually installed originally? [↩]
The Kindle was an incredible device for 2012. E-ink display, 2-4GB of storage, wifi, ability to download thousands of books, purchase and borrow new books wirelessly, play games, and battery that could last for weeks. We bought one new back then, but it’s tied to my wife’s account and I don’t want to lose access to the books on it or accidentally brick it. $30 and a week later, I have another Kindle 4 Non-Touch shipped to my door courtesy of an eBay seller.
Obviously, DRM’s upside for content owners is protecting themselves from IP theft. The downside for everyone else is being treated like a criminal. I just want to read the books I legitimately have access to on any device I own without a whole bunch of rigamarole, authentications, and nonsense.
Fortunately this Kindle is so old mature that many of the content and firmware problems that might have once existed and somewhat solved. Using Calibre, I can remove the DRM off the books I have on our original Kindle and drop them onto this NTM1 Kindle. If I go so far as to jailbreak this Kindle, I can install new screensavers which would be a super cool upgrade. I followed the various slightly-new-hostile guides through the MobileRead forums and wiki, and even successfully jailbroke the Kindle, installed new cool screensavers, and brought over books through Calibre. The one downside was2 big enough that I kept pushing.
So true…
That one downside was that while books on a stock Kindle appear on the main screen where you can page through them all, you can also add them to custom “Collections” where once they’ve been assigned to one, they’ll disappear from view on the main screen where they are now only visible in the one or more Collections to which they’ve been assigned. It essentially operates much as a “tagging” system. Well, after bringing over the books via Calibre, apparently the process removes something from the metadata for the books that permits the Kindle device to flag them for non-displaying on the main screen. The result is that while books can still be assigned to collections, they’ll also still clutter up the main screen. Obviously, I there’s no way I can deal with this, so I decided to explore other options.
Once you’ve got your Kindle jailbroken, you can start to do things like SSH into it, change some core settings, and otherwise just tinker around changing things and ripping stuff out. While I didn’t brick this device, I did get it to the point where it would neither enter a debug mode nor permit me to access it over USB to sideload books via Calibre. I don’t trust the Amazon email delivery system well enough to want to send de-DRM’ed books to the address Amazon so graciously assigned the Kindle, so that option is out.
This has lead me to a factory reset, fresh Kindle, and the need to enter my ridiculously long WiFi network password and Amazon account password back into the Kindle via the 5 key directional pad.
I’ve been tinkering with Python more recently. When used on a MCU1 or a PC, it’s such a nice experience being able to write some code, run it without having to compile, see what happens, and adjust as necessary. Now, since I’m a newb at this, I’m getting help from… *shudder* LLM’s.2 Now, in the past I’d turn to Googling, looking at reliable and friendly forums such as Adafruit and Arduino, but I’d invariably need to check out Stack Overflow as well.3
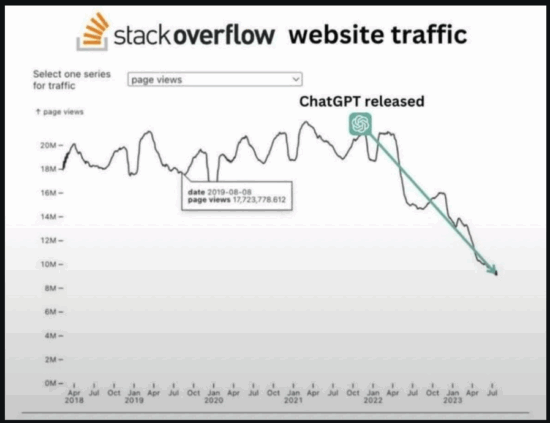
As you might imagine, Stack Overflow was something of a victim of it’s own success. It’s content was good enough to train the LLM’s of the world – and those LLM’s can parrot / offer all the insights gleaned from Stack Overflow without the caustic haughty condescending replies typical of the comment sections on Stack Overflow / SlashDot / HackADay. Thus, it’s no small wonder the following graphic was circulating on Reddit:
Stack Overflow vs Time
Where was I? Oh, yeah… I was using some LLM’s to help with Python. I don’t have any fancy GPU’s, BitCoin mining rigs, etc, so I’m just using my non-gaming PC’s modest 16 GB VRAM to run the smaller local LLM’s. I can run things up to about 8B parameters, like the various Llama flavors, at 8 bit quantization with reasonable speed. I’ve found for my system that Qwen3 4B to be fast, thoughtful, and helpful.
I’ve realized this blog post is woefully low on actual Python related content. Here’s some things for future-me to remember:
pip list
Will give me all the names of all packages installed
I’m not really big on social media, especially Facebook. While I used Twitter for a long time, I pretty much abandoned it after their re-brand. For a variety of reasons, mostly privacy related, I actively avoid associating my online moniker with my real name or photographs of myself. Plus, I can be a lot more candid here where a comment won’t have to be associated with my work persona. 1 Anyhow, instead of using my real name and birthday, I fed Facebook the above photograph and use a totally different birthday and other information. Later on, I used a very small version of this photograph as my “avatar,” but that changed when Bre drew a super cool secret agent looking version of my avatar for use on the MakerBot blog.
Anyhow, I was thinking about the “evolution” of my online avatar recently and some other projects when I remembered I’d seen some cool instances of people distorting a QR code in such a way that it appeared to be an image of something – but the contrasting light and dark patterns would be interpreted as a QR code. I found a website (QRBTF) that will automate most of the process for you.
This isn’t the first time I’ve played with QR codes. One of the first was waaaay back in the day. Thingiverse has over 7 million “things” uploaded to the site as of right now. But, Thing #5000 was this gem by yours truly.
Where was I?
MakerBlock’s Avatar QR Code of MakerBlock’s Blog
The process is … fiddly, even with lots of nice dials and buttons to adjust the image. I don’t think I’ll keep this as the last version of this QR / avatar. There needs to be either way higher error correction, larger QR code, or lower resolution, or higher contrast or… something to make scanning the image more reliable.
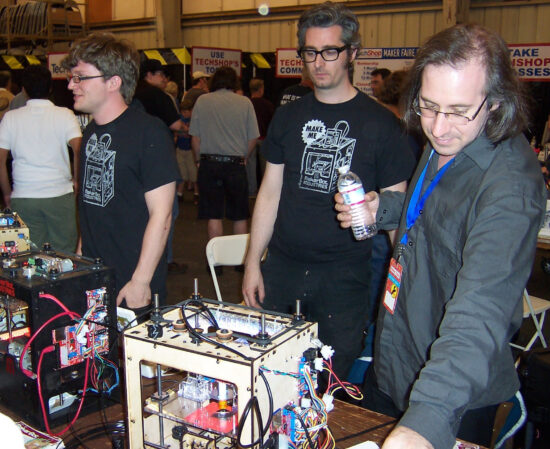
Anyhow, the reason why I’m even messing with this at all is so that when our projects are (hopefully!!!) accepted to Maker Faire, I can put this on my “maker badge” as a way for people who know me by my pseudonym / avatar to recognize me and for everyone else to be able to scan it and check out my website with more information about our projects.
Here’s another variation with some modifications:
This latest version required some post-processing:
Trial and error to position the original image and then see how it looked when turned into a QR code. Obviously, this also involved tinkering with the brightness and contrast settings. I kept the error correction at maximum throughout.
I downloaded the image in SVG format which was kinda messy. Every black or white pixel was a separate element. I laid a rounded corner set of squares over the four alignment blocks, obscuring the sharp corners usually associated with QR codes. Then, I duplicated the central figure, and in the copy above I deleted the four alignment blocks and the figured, then made all the black speckled pixels slightly larger – to make it easier to read at small sizes.
Centered the QR code on the white background, then rotated it 45 degrees for a diamond shape.
This version scans much more reliably and faster than any prior version. I’m fairly happy with this result and will allow myself to fall down the rabbit hole of my next project… Or prior project. Projects.0
While my work-name and work-face are the same as my real name and real face, that’s just the professional responsible adult I pretend to be in order to pay the bills. [↩]
I recently saw an Instagram post from someone I follow who makes cardboard furniture in India. His story of building cardboard furniture while in college during COVID, building hand sanitizer dispensers out of cardboard, licensing this, and then pivoting to creating a business around making cardboard furniture is pretty cool. One part of the story is how this guy’s designs started getting ripped off by others who saw it was an inexpensive and easy to produce product. Even with patent protections, ideas get ripped off all the time. Anyhow, this IG post was about how he had invented a business card which opens into a phone stand and apparently rejected an offer for the equivalent of $1M to sell his patent.
When they won’t license the design or sell the business card itself, I’m not at all sure why it was patented at all.1 They apparently got 10,000 produced, gave most away, and turning down offers to buy individual cards.
This slideshow requires JavaScript.
Sometimes when I see something interesting, I think about how it’s constructed and how I could build one using my own resources. Just a quick glimpse at the video reveals pretty much everything one would need to build one. A quick mockup in Inkscape and I had a version printed out on copier paper. It was slightly flimsy, but it works just fine. If I did this again out of cardstock, 300GSM paper, or even thin cardboard, I bet it would even better.
This slideshow requires JavaScript.
It’s a neat little tool – and I think I will make a few more for personal use. Mine has a rounded front “nub” rather than the angled one in the video. I could see adding an RFID tag/sticker, QR code for info, and other minor functional augments to be more useful to me. I think there’s even a few ways to improve my design a little.
I tried looking up the patent, but couldn’t find it anywhere [↩]
Posts are so much more interesting with pictures, don’t you think?
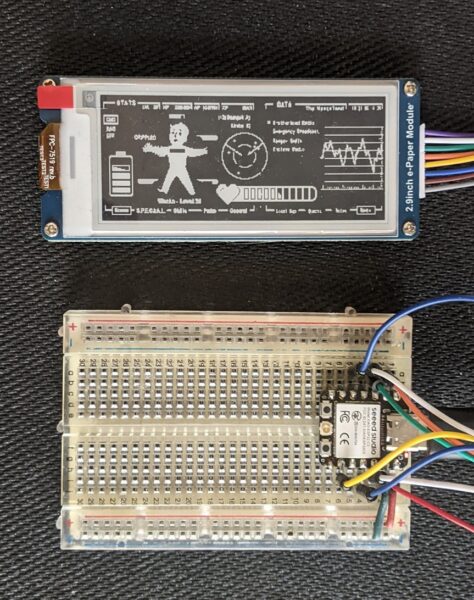
I’ve been playing with different screen designs for my e-ink display. After initially going with some “to do” style items, I quickly pivoted to playing with some more interesting screens while I was working out the best way to update the display with new content from lists. This wasn’t a totally worthless chase, however. Fiddling with various ideas and tests about updating the display and coming up with different images lead me to chase down good looking fonts (Futuravariants and Roboto being attractive and friendly fonts) and fonts that look good at very small scale (UNSCII, Tom Thumb, TinyFont for TinyGo displays, and Terminus). Adafruit has a great toolchain for converting a font from an PC recognizable font to a BDF format font which is much smaller and can fit into a microcontroller.1 It involves2 using FontForge to remove unused glyphs, restrict the font to a specific bitmap size, exporting the font, then using an online tool to convert it to a BDF format.
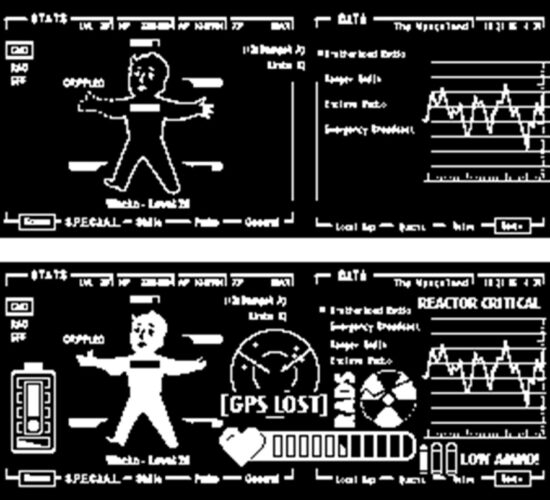
For extra visual interest, here’s the first Fallout themed screen I uploaded and the latest:
Things are not looking up, my dude
The main screen was inspired by the work of CrowTeeRobot on the RPF. I took a few screens, jammed them together, added and deleted a bunch of stuff. After all that, there was still a fair bit of negative space, so I kept adding in more things. A low battery indicator, life point indicator, a GPS lost / map indicator, an increasingly worrying radiation counter, and a “low ammo” indicator. If these end up getting installed into a PIP-Boy, I’ll probably try to add a green transparency over it to give a more retro feel.
For working with an e-ink display to go into a PIP-Boy, it really only needs to cycle through a set number of screens. This could just be done by having the MCU just play new screens every few minutes (keeping in mind the Adafruit guides recommend updates be no more frequently than every 3 minutes) or having it be slightly interactive and update the screen way less often (say every 10 minutes) but can be set to a new screen manually by pressing an associated button. However, this just requires building a few static screens, saving them as BMP files, tossing them in, and letting the MCU detect button presses, capacitive touches, or some other kind of input. There wouldn’t be any kind of need for a text overlay. That said, while I was playing with the screen, I discovered that some of the graphic text I had included was surprisingly readable at very small scale. This lead me back to my main project…
For my note / reminder / task purposes, I’m still toying with how the workflow would go. Since I want a device that is untethered from a USB cable and has
Here are some ideas I’ve gotten to work and played with:
ESP32C3 as a WiFi access point and provides an HTML form which the phone or my computer can connect to. The problem with this is then I have to disconnect my phone/computer from the network, connect to the ESP, send an update through the HTML form, disconnect and reconnect to the router.
Cell phone as a WiFi access point, the ESP32C3 connects and fetches data from the phone. The problem with this is then I would have to disconnect the phone from the router, let the device connect, pull data, then I would reconnect the phone to my router for regular usage again. This is pretty clunky.
ESP32C3 connects to same WiFi network, then tries to push/pull data from a local IP address. Also possible is for the ESP32C3 to connect to a webservice via an API, but then this makes the device dependent upon proximity/access to both my home router and internet access.
The best way forward is probably a Bluetooth connection to my phone and an associated app. I’ve written some small apps using the MIT App Inventor, so this looks like the best way forward. I’m thinking, something along the lines of:
Use the app to create an ordered list of items
Press a button on the device, to “wake” it – which also makes it try to connect over Bluetooth to the device it’s been paired with, and pull the latest list
The device disconnects from Bluetooth, displays the topmost list item, and goes to sleep
I can can press a button to start a timer until X seconds has elapsed
When the time elapses, the device buzzes, vibrates, and/or lights up an LED
I can then press a button to sleep or another button to advance the task to the next item
Possibly an interval timer as well to remind me to get up and walk around / move :)
I’ve been on vacation for a few weeks and a big part of that was completely leaving work and a computer/laptop entirely behind. If I had a computer handy, I would have been tempted to noodle around on some project, jot down some notes on some new harebrained scheme, and potentially slide sideways into working. And, even if I didn’t do any of that, I would have been looking at a screen – rather than the scenery I had worked so hard to go and see.
Even so, I couldn’t help but notice things that still helped germinate ideas. In Europe lots of grocery stores and especially pharmacies made use of e-inkprice tags. Pretty nifty since they could probably be updated wirelessly via Bluetooth or perhaps with an IR protocol of some kind. These tags were often the really cool tri-color variants1 and I only l learned of the quad color variants just today.2
With the weather heating up, it might be neat to have a weather display – but I don’t just want another weather display. I would prefer something that had data I’m interested in – just the one task I have to be working on right now, the time I’ve allotted myself to work on it, maybe the weather, a timer button that can start/stop lights and/or a buzzer. I dunno, this is all very much in the “brainstorming” stage while I’m still fumbling around with e-ink code.
Random ideas:
It would be neat to have exercise, stretching, standing, eating, drinking, etc breaks built into the display. (I do realize there are circular themed smart-watch systems…)
My job requires various tasks with various timelines and monthly-ish metrics. It might be neat to have various trackers for that kind of data.
I know various wearables display neat graphics like circles that get completed, achievements, etc, when the person reaches a certain number of steps or level of activity. That would be neat to incorporate as a way to “gamify” certain aspects of my life / job. Additional colors would certainly add to this kind of flair.
I haven’t given up on the idea of feedback from the sticky-e-note via buzzer, speaker, vibration motor, haptic feedback, and LED’s or with inputs from buttons or touch capacitive sensors. However, the more of these things I pack into a device, the more unwieldy it becomes and longer it would take to learn / build. There’s certainly something to be said for a stripped down, elegant solution versus building a chunk pile of wires tethered to a USB cable.
Having just come back from vacation, my home office / lab area is an absolute catastrophe. It’s a tangle of all the things I might have packed, almost packed, unpacked, and the remnants of all the things I kind did while walking around all the aforementioned stuff. At a glance, I’m probably operating on about 10% of the normal surface area – mostly now devoted to a thin, windy, and treacherous path from the door to my desk.