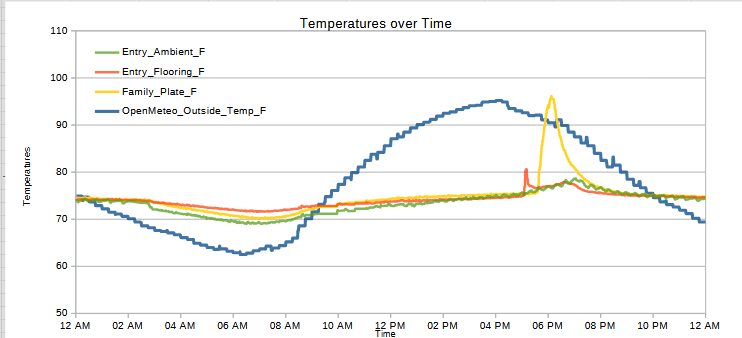
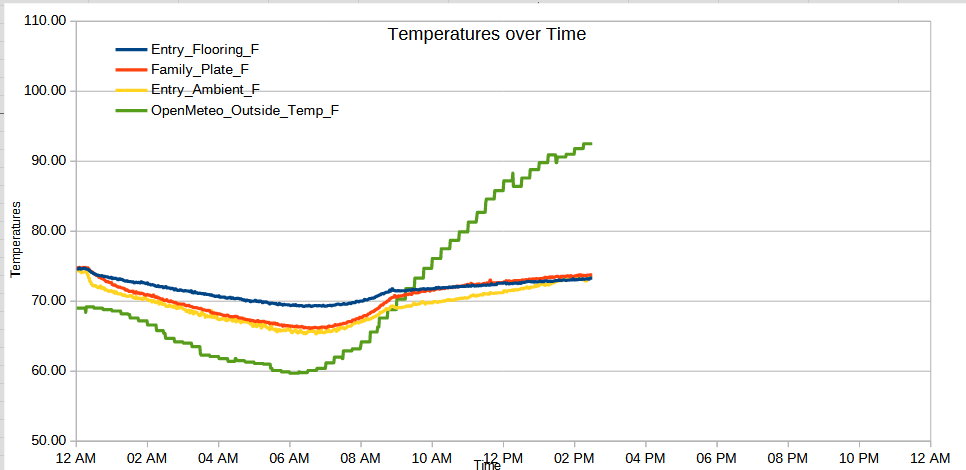
Just an update with the charts and measurements so far.
07/07/2026, readings from XIAO ESP32C3 and thermistors07/08/2026, readings from XIAO ESP32C3 and thermistors07/09/2026, readings from XIAO ESP32C3 and thermistors07/10/2026, readings from XIAO ESP32C3 and thermistors07/11/2026, readings from XIAO ESP32C3 and thermistors07/12/2026, readings from XIAO ESP32C3 and thermistors07/13/2026, readings from XIAO ESP32C3 and thermistors07/14/2026, readings from XIAO ESP32C3 and thermistors… totally broken07/14/2026, readings from Wemos D1 and AHT10 sensors07/15/2026, readings from Wemos D1 and AHT10 sensors07/16/2026, readings from Wemos D1 and AHT10 sensorsSummer Science - Testing Effects of Window Coverings on Interior Temperatures
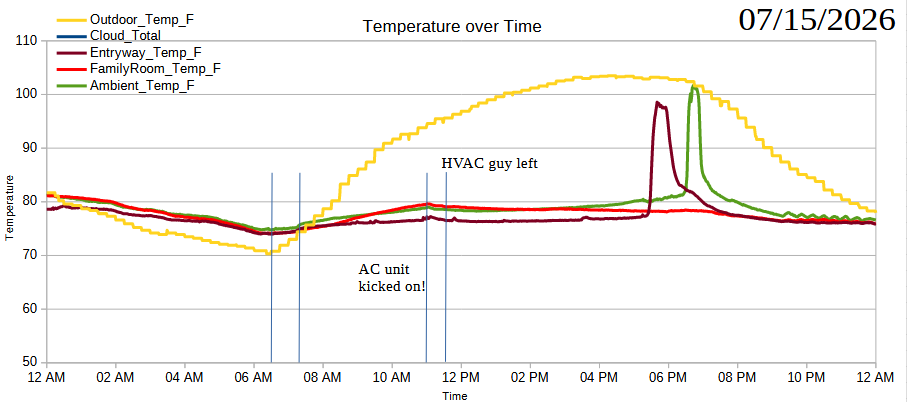
Okay, as of 11:30 AM, the AC was working again and battling against 104 degree heat. That means we can start looking at our data again – and plan out what to do about the window, sun shade, or other system for blocking some or all of the heat for this one picture window.
In an effort to help make this data more representative of what’s actually going on inside the house, I put a thin piece of aluminum around the sensor in the entry way. My thought was that it would help deflect some of the direct heat hitting the sensor and causing it to register ~100 degree heat on the ground.
Distributed temperature sensors for creating a “heat progression map” of temperatures in a house. Right now I only have three sensors, but these are inexpensive enough, that I could see creating several to send temperature back to my PC. There’s always a tradeoff between effort, speed, and cost.
One infrared thermometer. $15
One board, 3 sensors, lots of wire. ~$30 and lots of wire hassles
$5 XIAO board, $2 worth of thermistors and resistors, $2 protoboard, $15 wire
A small amount of soldering
Three boards with a sensor each. ~$25 and very portable / placeable
3x ($3 Wemos D1 Mini, $2 AHT10 sensor, $2 protoboard, $1 tap light, $1 for two AA batteries)
SO MUCH SOLDERING
For the best looking and most useful data, I think the three-board but higher effort approach is best. It also scales very nicely. For about $50 you could distribute 6 sensors throughout your house and get a sense of how heat moves around you home.
Summer Science - Testing Effects of Window Coverings on Interior Temperatures
Welp. I guess this is a good time to dust off this little gem from the book, “The Martian.”
Not give up, that’s what he’d do
I’ve been trying to get consistent readings inside the house for a little over a week now. The infrared thermometer was helpful, but was too manual and to variable in readings despite trying to control by checking at wider intervals and taking measurements in very specific sections of the floor, wall, and ceiling. The XAIO board and thermistors were a great first step, but required too many wires and it was also having trouble broadcasting data. 1 The Wemos D1 Mini, while an underpowered board, took a lot of fiddling to get running and a fair bit of soldering, but has worked very well.
Until external factors cropped up.
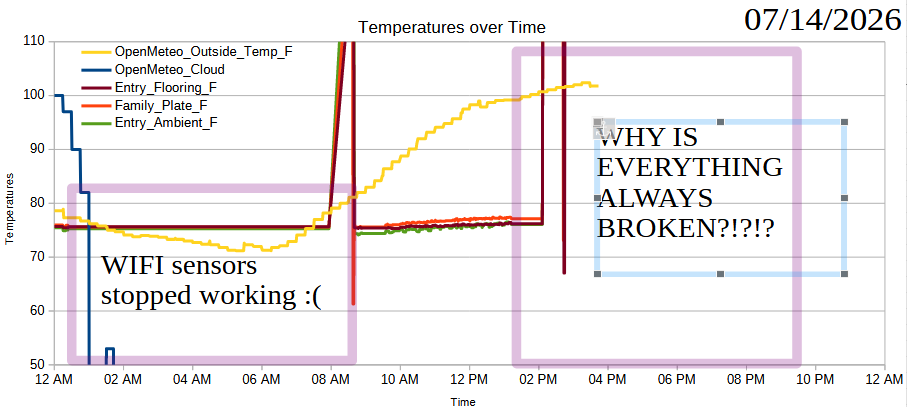
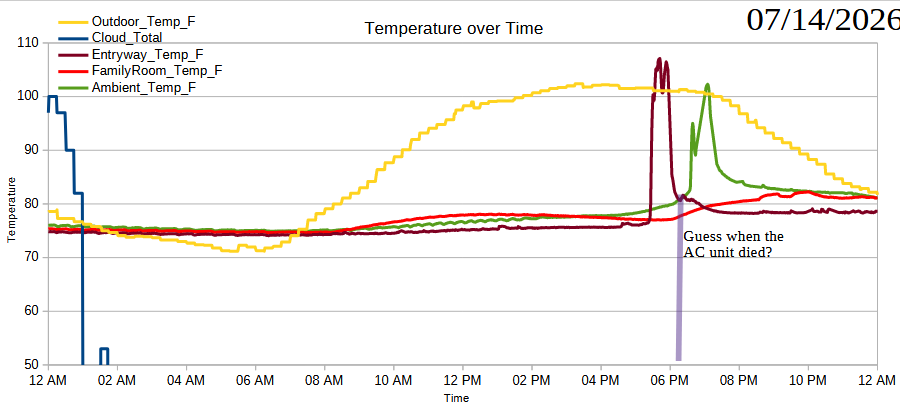
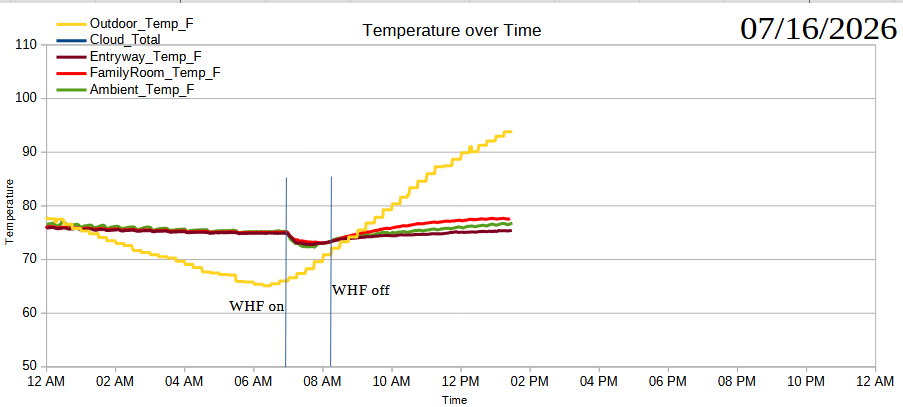
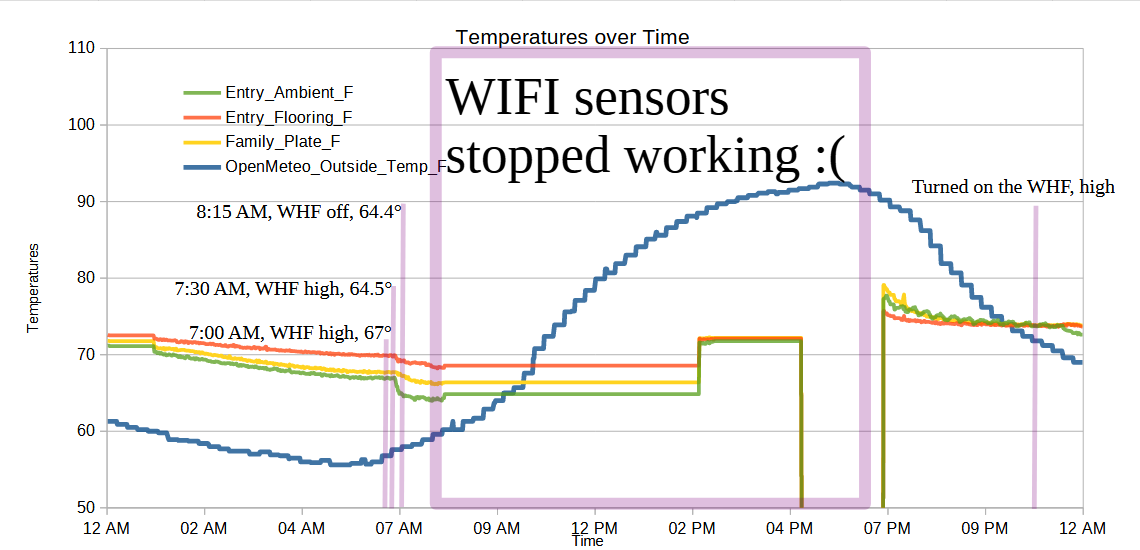
Yesterday, at the absolute peak of outside heat, our AC unit stopped working. I’m pretty sure the sound of it turning off yesterday was the last time it was working. The temperature inside reached about 86 degrees upstairs based on the home thermostat and stayed at that level until about midnight when we started up the whole house fan.2
If I were comparing a given day’s temperature to a different day’s temperature, all the readings would be basically useless. However, I’m actually more interested in figuring out if a single sunscreen can soften or blunt the increases in internal house temperatures. The data from yesterday is going to be useless for looking at absolute changes in temperature, but it certainly shows what would happen if we don’t have a working AC unit on a very hot day.3
Yeah, having the AC go out is a hassle – but on the bright side, at least it happened during a time when I was running some science experiments.
But, with about a week left to go, I’m less certain I’m going to be able to present the findings and associated original project I was planning on.
Summer Science - Testing Effects of Window Coverings on Interior Temperatures
At about 5:30 PM, right around the time the heat measured at the entryway started to rapidly increase, I noticed two things. First, our AC unit was louder and persistent – it hasn’t seemed to have turned off since in the 30 minutes since. Second, the cat went absolutely bananas – eyes super dilated, calling out, then splayed on the ground in an almost seizure like stretch, then a weird slow walk. I had remarked on this odd behavior to the fam yesterday.
In looking at the data / charts I have now, it’s clear there was a huge spike in the temperature measurement in the entryway as the sun approached and then covered that sensor. Annnnnnd… now I’m wondering about the advisability of leaving those batteries and that board in that temperature, even if it’s only for 30 minutes of peak temperature. Fortunately, I connected the sensors with a length of wire so I could conceivably keep the batteries out of direct sun / heat. I might need to extend this further.
I think it would be interesting to review the delta / change in temperature over time, rather than the actual temperatures over time. Right now I’m just looking at these colored squiggles and thinking “Oh, that looks neat, and this bit is spikey, and how about that uptick, huh?” But, by looking at the change over time, I could actually quantify these things.
I know I’d suggested the next time I make something like this, I’ll just use another XIAO board, since they’re only slightly more expensive than the Wemos D1 Mini’s, but given the kinds of problems I was having with the XIAO seizing up, maybe not? I could get another 5 D1’s for about $15 and I have plenty of extra sensors and wire now that I’ve taken down my XAIO setup, but I don’t have any extra tap light enclosures. :) I know I can make do with off-the-shelf battery holders – and goodness knows I’ve got plenty – but I do kinda want to have them all be about the same.
It’s now 6:03 PM and the AC unit just shut off. I know there are API ways to know when the AC unit is active, but that requires the cooperation of my smart thermostat company – and they haven’t replied to my requests. I could build something that would sense motion and tape it to the AC unit, but it would be easier to build another temperature sensor and place it near an HVAC vent and treat the sudden drop or rise in temperature as an indication the HVAC was on.
Summer Science - Testing Effects of Window Coverings on Interior Temperatures
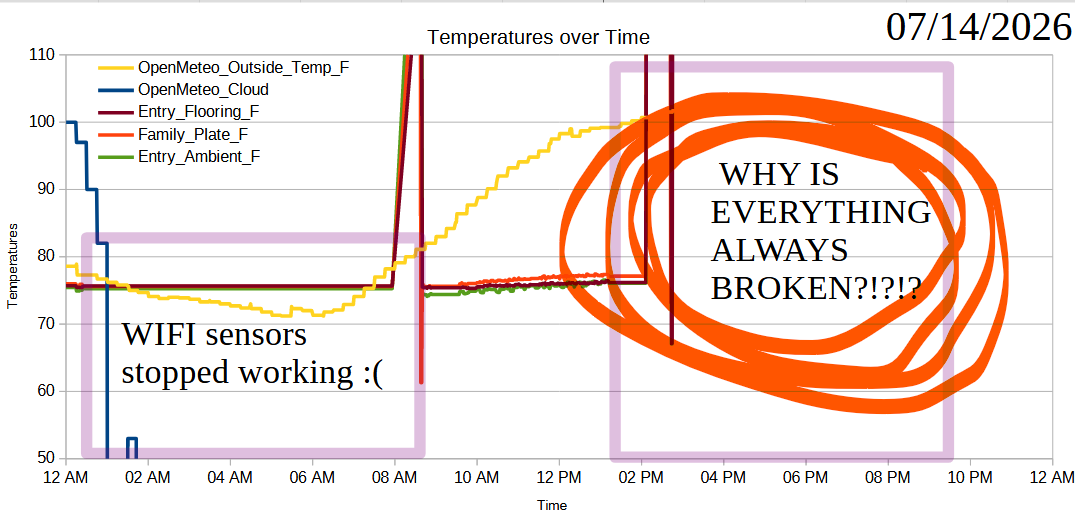
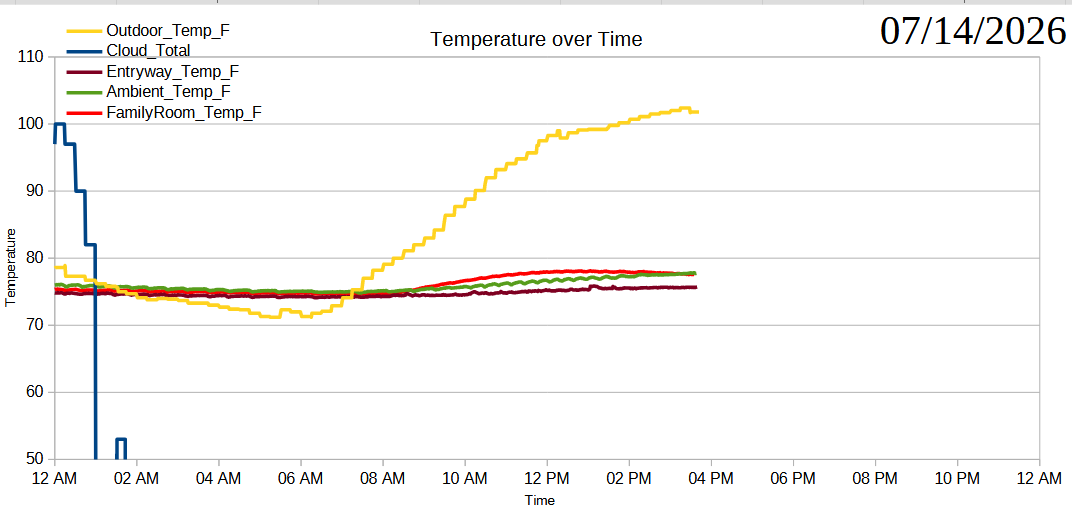
The running joke / perennial axiom of hardware startups is “hardware is hard.” I’m not even dealing with any kind of wild hardware. I’m using off-the-shelf sensors and an off-the-shelf board, connecting these in a way I can prove works, and transmitting data back to my PC. For some reason the XIAO ESP32C3 board is just not transmitting data back to the PC. Sure, sometimes I have to restart it which is no big deal. We all need a break. But, now it’s just not resetting properly when I power cycle it.
Anyhow, it’s clearly going haywire:
XIAO ESP32C3 board is acting up
The good news is that the sensor data coming in from the single microcontroller + three hardwired sensors seems very consistent to the data that’s coming in from the three microcontrollers + single sensors, both over the last day and when compared against readings over the last week.
The observed trends is basically:
Outside temperature dips overnight, with a low around 5-6 AM, peak heat at around 3-4 PM.
When there’s no cloud cover, the house temperature at the entryway bumps first, then the family room, then the ambient house temperature peaks about two hours after entryway bump.
The house and outside temperatures are about the same by 10 PM to 12 AM.
In an ideal world, I’d just restart all the readings right now using the new system, get the sunscreen, then compare these patterns. However, the science display is due in about 10 days, which means I don’t have a lot of time to keep restarting / pivoting.
I guess what I’m doing now is just looking at the baselines. From there, I’ll make a prediction about what would happen with a sunscreen. Some of this sunscreen stuff may depend on external factors – the availability of the sunscreen vendors to measure/make the sunscreen. I don’t know what their lead times are, but I imagine during this heatwave they might be extra busy. Otherwise, I might try to make some predictions about how else we can affect the house temperature and humidity, perhaps with timing the opening windows, opening/closing blinds, and use of the whole house fan.
Three Wemos D1 Mini boards
On interesting aspect of the more distributed Wemos boards / sensors is that these three sensors are also at different heights. The entryway sensor is at floor level in the path of the sun, the family room sensor is at about 6 feet off the ground, and the ambient sensor is at about 13-15 feet in the air. I am expecting the ground level to spike first, then the other two. I’m not sure if I should expect the 6 foot sensor to react first, because it’s closer to the ground height or the 13 foot sensor because it’s closer to the ceiling where the hot air will be collecting. If I had to guess, I would guess the higher one.
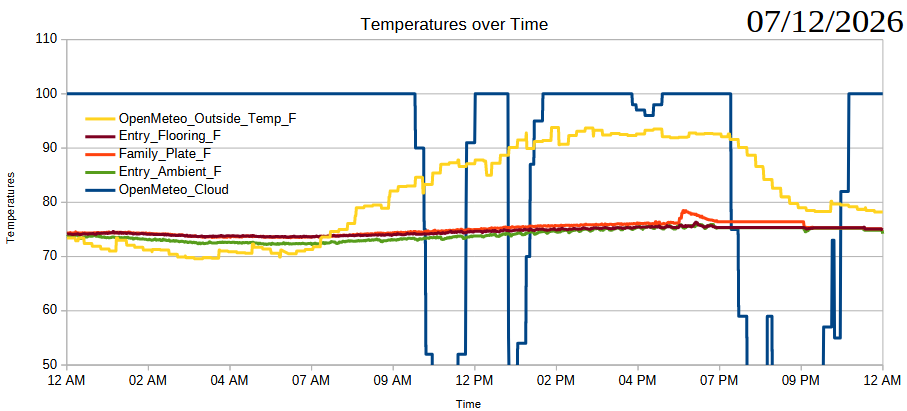
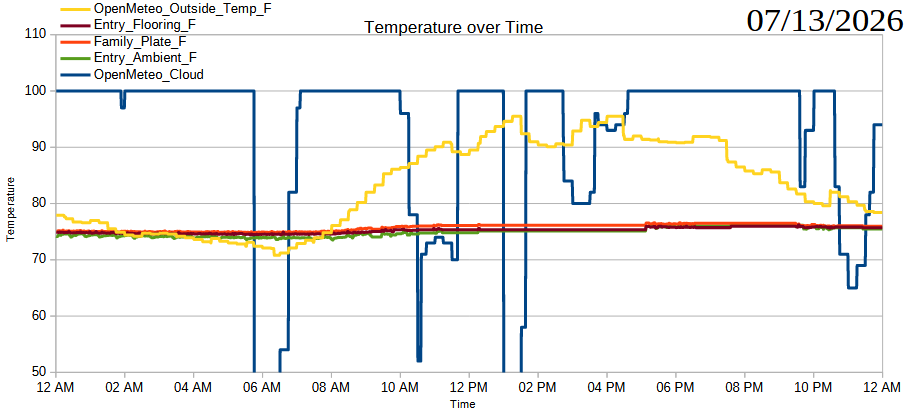
Although today is a real scorcher, the one upside is that I can compare it pretty nicely against the data from a very warm day last week with almost no cloud cover.
Summer Science - Testing Effects of Window Coverings on Interior Temperatures
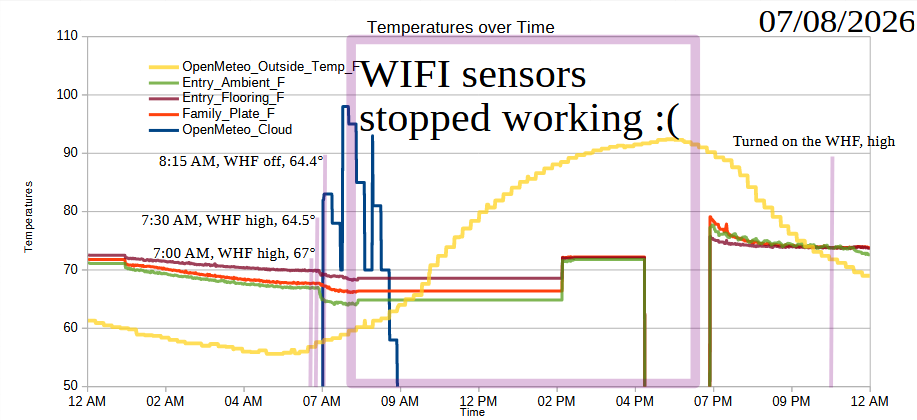
This is the second time the XIAO board stopped working for an extended period of time. Rebooting the board, unplugging/plugging the power cable and adapter from the wall, and even pulling the board from the headers, didn’t work to get it back online. I finally pulled the board, plugged it into USB, then made a do-nothing change to the main.py file1 and plugged it back into the headers, which worked perfectly. There were no obvious errors in the board – it just … needed a boring update to the code?
This slideshow requires JavaScript.
Anyhow, I’d discussed some of the pros and cons of running three Wemos D1 Mini powered sensors2 versus just one XIAO ESP32C3 powered sensors – but didn’t think about what happens when a single one goes down. Although the XIAO was out of commission, the three Wemos board kept going so I didn’t really lose any temperature data – especially since the data was so flat during from 12:30 AM to 9 AM this morning.
Admittedly, the locations for the three sensors aren’t perfectly matched. I have the three XIAO thermistors taped to the entryway flooring, taped to the metal plate just inside the family room, and one dangling in the air above the entryway out of any direct sunlight. The three Wemos AHT10’s are on the entryway floor near the entrance to the family room, well inside the family room on the mantleplace, and the last at the top of the stairs with the sensor in open air at almost the exact same height and area as the original XIAO ambient sensor. I actually wanted the second XIAO sensor over on the mantleplace as well – but didn’t want a run wires across the house that far to do it. I’m at peace with getting different readings from these sensors versus my historical readings because:
The AHT10’s are supposed to be more accurate – and also measure humidity which I’ll use near my 3D printer later on
There’s no really good way to tape the AHT10’s to a surface and that doesn’t really tell me much about the “feeling” of warmth inside the house anyhow
The floor readings were constrained by the amount of wire I had rather than really wanting measurements at those specific locations
Just looking at the charts of the incoming data suggests that the AHT10 sensor data is definitely less noisy than the thermistor data. Then again, it might be due to the way in which I’m taking readings every minute but then broadcasting the data every 5 minutes. I’m sure no one would notice or care if I sampled the data every 5 minutes, but when the peak heating coming in from that one picture window only lasts about 30 minutes, I think I’d like to get a better sense of what’s going on minute-by-minute rather than at 5 minute intervals.
Summer Science - Testing Effects of Window Coverings on Interior Temperatures
As with many of my projects, the scope and build has changed somewhat over time. This project started with me just taking readings around my house with an infrared thermometer at somewhat regular intervals. However, this was tedious and prone to variance as I measure things by hand. After that, I started using a single XIAO board with three hardwired thermistors around our entry way. The nice thing about this kind of a setup is that I really only have to build/program one board, set it up, and then let it send data to my PC. The downside is that there’s wires everywhere – and it used up my entire stash of glorious rainbow colored ribbon cable. 1
Practice when I work on a project is to buy replacement parts for the pieces I use up after I’m done. This way, I will still have stuff on hand for my next project. So, I’ll need to pick up more colored colored ribbon cables, small solderable prototyping boards, and replacement microcontrollers. Back in the day, I would stock up on Adafruit Trinkets, but for about a lower price and a slightly larger footprint, I can get a XIAO board with more IO ports, memory, speed, and built-in wifi/bluetooth. The little prototyping boards I’d purchased aren’t available from the same seller on Amazon, which is too bad. I really like these boards because they’re bigger than just the microcontroller, have power rails that run down the center rather than the sides and horizontal rows, and rounded corners. They’ve been incredibly convenient.
With this project, I wired up three Wemos D1 Mini boards, each to a different AHT10 temperature/humidity sensors, and shoved them into my favorite enclosure – cheap tap lights.2
This slideshow requires JavaScript.
As I’ve mentioned previously, I’m just not very good at soldering – which is why I go very slowly, checking, rechecking my progress as I go. Even so, I made two small and fixable mistakes, soldering the wrong connection somewhere and later accidentally bridging two contacts. Fortunately, some things are fixable.
The construction of these little wifi sensors isn’t very interesting. Rather than run each board off of 4.5 volts from three AA batteries, I’m using 3.0 volts from two AA batteries. By not passing that 4.5 volts through the voltage regulator to bring the power down to 3.3 volts, I should be able to save enough battery life to justify running this system off 2/3 the batteries. This meant I soldered the power connectors to the end and middle battery connectors. I have a suspicion that the XIAO boards are probably more power efficient, but if I don’t use those Wemos boards for something simple like this, well, I’ll probably never get around to doing it.
In any case, I now have these three sensors throughout the house near the locations of the prior sensors. I like these AHT10 sensors – but unlike the thermistors, I can’t really get the sensor right up against a surface. Hopefully it won’t matter much. While the readings directly off the flooring and metal plate were dramatic and gave a sense of the heat that was being absorbed and released by the house, it’s the actual temperatures in the house that are what I’m after. In the meantime, I’m running both systems in parallel so I can make sure they’re both pulling in reasonably consistent readings. If so, I’ll pull down the tangle of wires, wind them up, and set them aside for the next project.
Summer Science - Testing Effects of Window Coverings on Interior Temperatures
With some hunting, you can find a set of tap lights for about $1, they include a battery holder, switch, bright white LED, attractive sturdy case, and semi-translucent top. [↩]
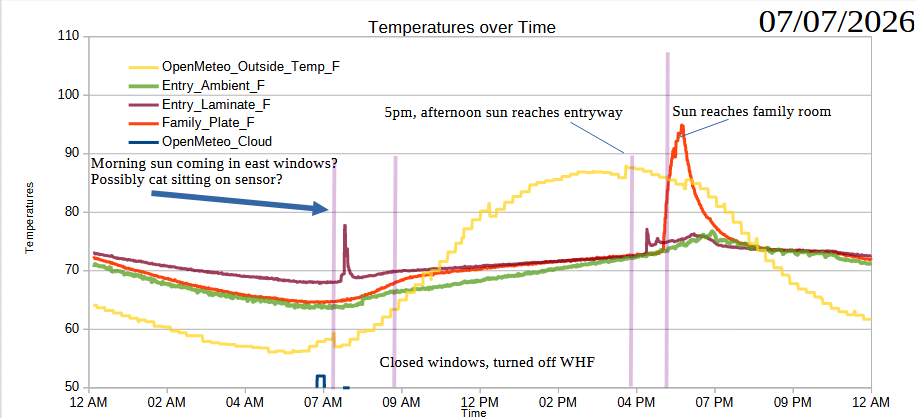
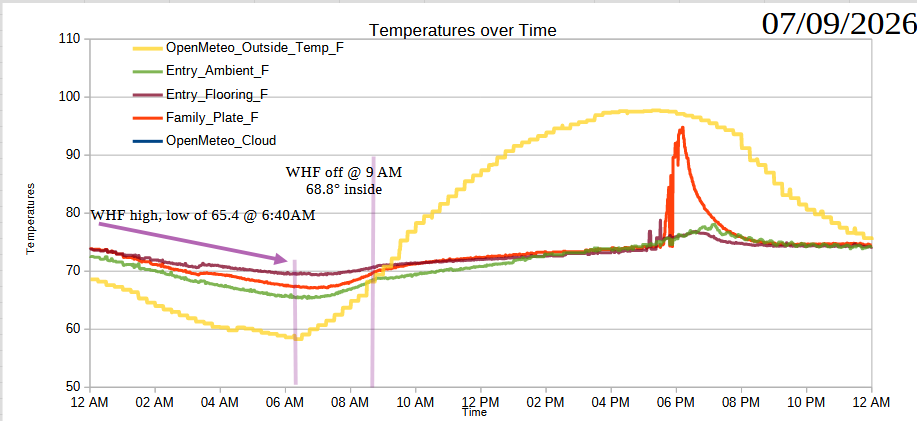
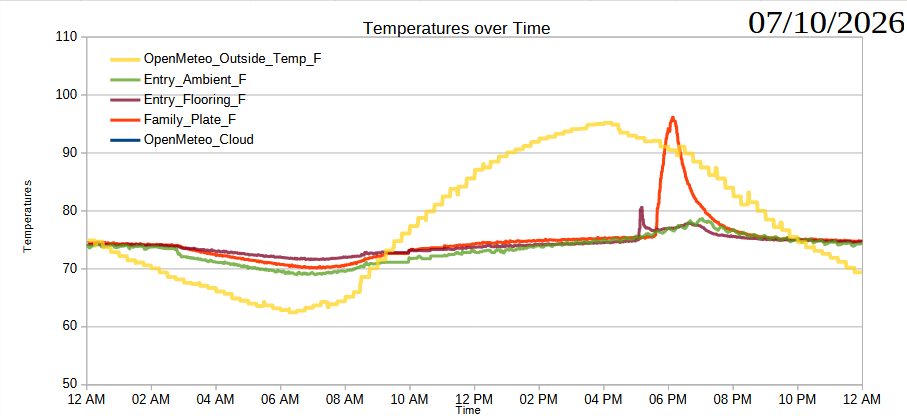
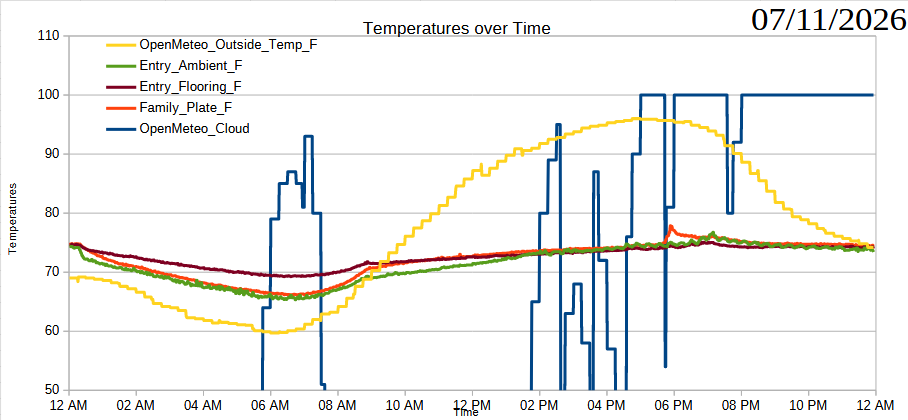
Here are the readings so far from 07/07/2026 to today 07/11/2026.
Readings on 07/07/2026
Readings on 07/08/2026
Readings on 07/09/2026
Readings over 07/10/2026
Readings over 07/11/2026 (so far)
There will be a few momentary blips in the data because now and then I have to restart my PC for some stupid reasons. In an ideal world, I’d have a dedicated Raspberry Pi (or even a special computer) designed to specifically capture this data. But, time constraints mean that I’m doing the best I can with what I have. I ordered some AHT10 boards to connect to the Wemos W600 boards (since this board doesn’t have an analog input) I have lying around – only to discover that the Wemos W600 boards are basically abandoned/unsupported and just won’t detect anything coming out of those sensor boards. I then tried some Wemos D1 Mini boards… and no dice there either.
I think the lesson might be… Just get more of the boards that I know will work. These days, that means the Adafruit QtPy boards and the SeeedStudio XIAO ESP32 line. They’re small and at $5-$8, I’ll save WAY more time than if I was trying to get a $2 board working. I guess it could be that the sensor boards are junk – but I won’t really know until I dig into these deeper and that’s not going to happen until the weekend.
I was inspired to start testing this stuff by a local science fair put on by our local utility company. But, let’s not kid ourselves, I’m only too happy to dive into a project like this. Rather than having a bunch of wires from one single ESP32 board going to three different locations in the house, I’d like to ideally have three remote sensors that are battery operated and I could place throughout the house. In a move that may well bite me in the backside, I’m trying to use a Wemos D1 Mini for these remote sensors. I already have them lying around, can run Micropython, and can connect to the I2C / AHT10 sensors I purchased. Rather than scrapping the existing system, I’m going to see if I can build up the new system in parallel, get it running, then disconnect the old system.
While I’ve shopped around for some window screens, I haven’t actually purchased one yet. However, I still have about 2 weeks to go before the science fair, so hopefully I still have time to get this done. :)
Summer Science - Testing Effects of Window Coverings on Interior Temperatures
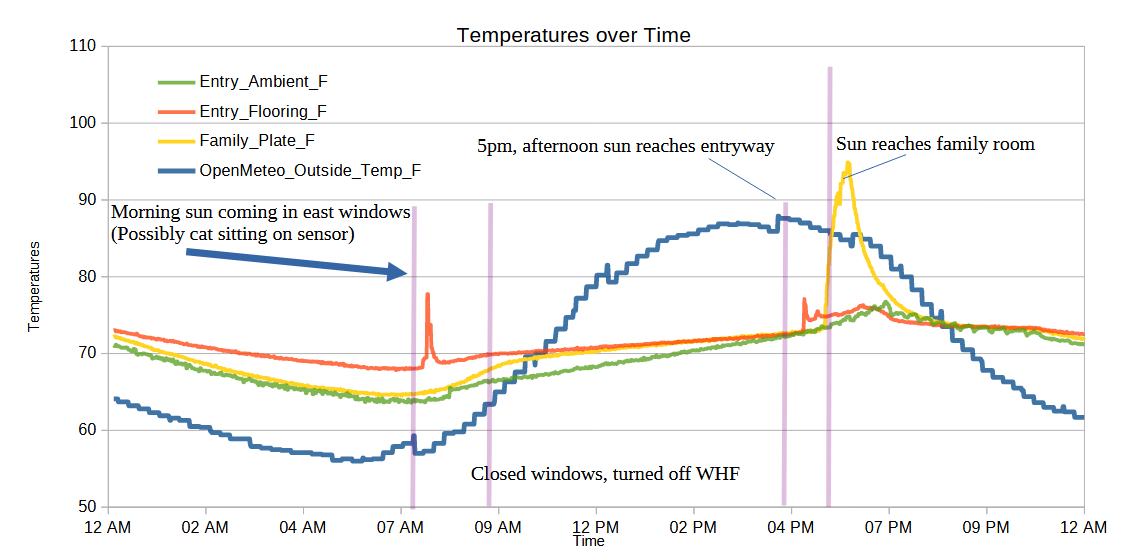
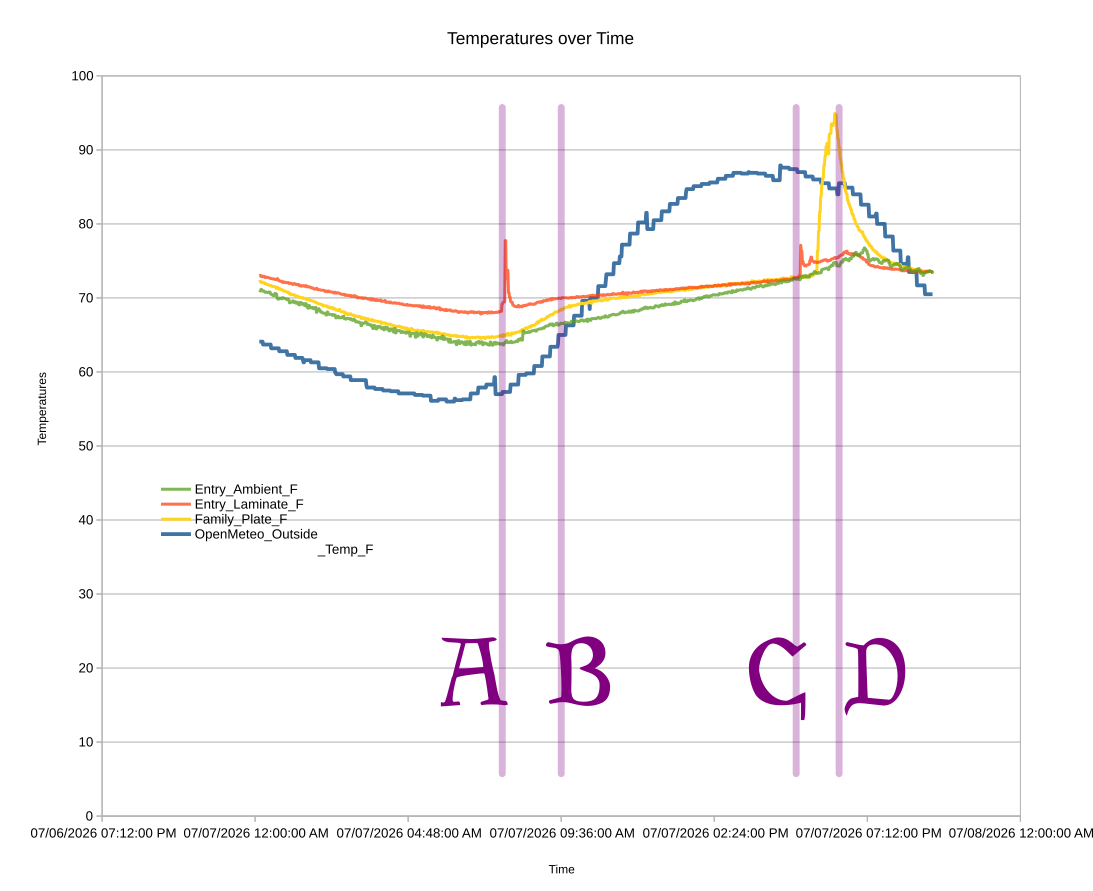
I’m not going to bury the lede. There are several spikes or “upticks” in the household temperature. There’s one at about 7:30 AM (A) I’ll discuss below, one at about 5 PM (C) which coincides with the afternoon sun reaching the entryway, and another starting around 5:45 PM (D) when the afternoon sun starts to creep into the family room. Around 9:30 AM I closed the the windows that were open overnight and turned off the whole house fan.
While the above graph is based on about 1,200 samples from about midnight on 07/07/2026 to about 9:30 PM the same day, it’s just a sample of part of one single day. Even so, I find some interesting take-aways:
I turned off the whole house fan and closed the windows at the right time. In another few minutes, the interior temperatures would have reached equilibrium with the outside temperatures – and then quickly overtaken.
The readings on the laminate and metal plate spiked when expected, the laminate before the plate. The more exaggerated uptick is probably because the metal plate absorbed heat faster and then held onto it longer than laminate.
What I didn’t fully appreciate before I started the experiment was that the interior ambient temperatures were clearly lagging behind the floor sensor temperatures.
There’s an a sharp rise on the laminate temperature in the morning as well as a rise in these temperatures from about 7 AM to 9 AM. I believe this probably coincides with the morning sun coming in from the east facing windows.
Another thing I didn’t think about until after seeing these results is – what else could explain a temperature rise in the afternoon? Obviously, the house is going to heat up overall throughout the day – but are there any other factors? Our front door is painted black and the hardware becomes uncomfortably warm/hot with later afternoon light. While I would expect certain household objections to painting the entire front door white or covering it in aluminum foil in the name of science… I could run a small and less objectionable test by putting something insulating over the exterior door hardware to prevent it from heating up, and thereby not heating up the internal hardware.
You might wonder why the blue line, indicating the exterior temperatures, is so jagged compared the more detailed and noisy interior temperatures. The exterior data comes from a public source and is only updated once very 5 minutes, thus, it’s going to look more choppy than the data I can sample over WIFI multiple times a minute if I want. With updates only every 5 minutes, variations can look more pronounced as well. There’s a strange dip in the exterior temperature at around 7 AM, 12 PM, and 4 PM. The 7 AM dip coincides with a sharp increase in the cloud cover and the 4 PM dip appears to line up with a modest increase in cloud cover. I don’t see any immediate patterns which jump out at me regarding the 12 PM dip in exterior temperature. It would be interesting to look at the temperature data on a time graph as well as the humidity, cloud cover, wind, direct/diffuse radiation from the sun, and possibly even the air particulate counts. But, that would really only help me better understand exterior temperature trends in my particular climate. I’m more interested in how do the exterior temperatures and sunlight affect my interior temperatures – and what could I do to favorably effect these results.
One thing I’m wondering is whether it’s “fair” to measure the temperature in the family room using a black metal plate that will absorb and retain heat. I can’t reliably measure the carpet temperatures using this setup, so I have to use something. I’m concerned cardboard would be too good an insulator, I don’t have a spare plank of clean wood or tile, so I’m just kinda making do with what I have. Fortunately, I don’t really care about the temperature of that section of the room or even this piece of metal – I care about what’s heating it up and how I can blunt those effects. If I put in a sun screen and all of a sudden that sharp spike gets dulled – wonderful!
Summer Science - Testing Effects of Window Coverings on Interior Temperatures
Or… perhaps a more useful title would be something a little fun like “Summer Sun Science!”
Our home has a large (4’x5′) picture window above the entryway which lets in a lot of afternoon sun in the summer, which seems to really heat up the house. From about 5pm to 8pm sunlight travels from our entry way over laminate flooring and into our carpeted family room. Our subjective experience is that this one window is responsible for a lot of the afternoon heat which seems to flood our home. Well, what would Mark Watney do?
I have a modicum of experience with electronics and figured I might be able to actually figure out just how much this sunlight is effecting our house. My plan is to use a microcontroller with a WIFI module and three temperature sensors to broadcast readings from three locations inside the house to my PC, where I can combine the data with local weather data. The three locations are:
Laminate in the entryway along the path of the afternoon sunlight
A black metal plate placed on the floor in the family room
A thermistor placed to hang off the wall about 13 feet in the air in the entry way – out of the path of the sun – to get a sense of the “ambient” temperature
I’ve already taken readings in these locations using an infrared thermometer and discovered that the laminate and a metal plate placed in the family room can reach 100 degrees Fahrenheit with peak sun exposure! Even though the climate control in the house is set to 78 degrees, the thermostats are placed on the wall about 5′ off the ground, so they’re taking readings between the cool air at ground level and warmer air near the ceiling. Even if the temperature change from the floor to ceiling isn’t perfectly linear, we know that it’s just going to be cooler at floor level versus the ceiling. So, when the laminate that was recently in the sun might be as much as 80 degrees, this implies that it’s either going to be warmer in the air above that – or that the warmed laminate will be radiating it’s heat into the air keeping the house feeling warm even after the direct sunlight has passed.
Planned Theories and Experiments
I have a few theories and proposed experiments about what will happen:
Theory 1: Ambient temperature in the house will steadily increase over the course of a summer day – and then spike in the late afternoon/early evening.
Background: As mentioned above, our subjective experience is that the house really heats up in the late afternoon. This seems to be supported by checking the thermostat on a warm day, discovering the downstairs is at 78 degrees and upstairs at 80 degrees, despite our AC unit’s valiant efforts.
Experiment 1: Measure the temperatures in the house throughout the day at 1-3 points and examine the data to see whether there is a period of marked increase.
Theory 2: If there are periods of spikes in heat during the day, they will coincide with the sun light coming in from this one window.
Background: This seems fairly obvious – if I’m testing the temperature at points in direct sunlight, well of course the temperature at those locations will increase. However, one of the sensor is up a high wall in mid-air out of the way of any direct sunlight, I’m getting a sense of how the temperature in the house overall is affected by incoming sunlight. The other data points would just be interesting to look at. Plus, sometimes we learn interesting things as we test seemingly obvious problems.
Experiment 2: Measure the temperatures throughout the day, compare against the times when the sun starts to enter the house and when the sun sets.
Theory 3: If there are periods of spikes in heat during the day, obscuring or covering this one window partially or entirely will reduce or eliminate the heat spikes.
Background: I don’t have a way to predict whether or not getting a sun shade for this window will have the desired effect of reducing afternoon heat in our home. However, this is exactly what this product is designed to do and the exact problem it is designed to solve. At roughly $200 for a sun screen, it’s a good investment even if it just makes us feel cooler in the afternoon/evenings. However, it’s an excellent investment if it can reduce our cooling bills over summer months. Given my experience in this area of California, it feels like we can get hot days as early as April and they can last through as long as October. I could see a $200 sun screen being immediately beneficial for comfort and also result in long term savings.
Experiment 3: This experiment would compare temperature data after covering a window fully with an obscuring material1 or filtering material such as a sun screen against previously obtained temperature data, to see whether the prior heat spikes (if they do exist) would be reduced or eliminated after using these obscuring materials/methods.
Theory 4: A room which has shutters on a window getting direct sunlight, will still experience heat spikes in the late afternoon.
Background: There is one other room in our house, a westerly facing room, with a window that opens and has interior shutters, which also gets much warmer starting around 6pm. My guess is the sun shines in, hits the shutters, warms up the shutters – but the light / heat is already inside the house – and warming up the room. That’s my subjective experience, anyhow. As Hannah Fry (a mathematics professor and math/science communicator) recently mentioned, “But, you’re sort of trying to stop the invaders once they’re already inside the room.” It would be interesting to see how much closing the shutters in this one room can “blunt” an afternoon heat spike.
Experiment: Once the other readings are taken, I could move my testing rig inside this other room to monitor for heat spikes in the late afternoon – when both the entry way and this room get direct sun.
Theory 5: Closing the shutters in a room that gets direct sunlight helps – a little, but will still experience heat spikes in the late afternoon.
Background: I already close the shutters in this room fully in the late afternoons, but it still gets very warm – even with the door open. I would be very interested to quantify just how much closing shutters helps – if at all.
Experiment 5: I could run the test again, only I never close the shutters! I’m guessing the temperature in the room will get much hotter, resulting in a higher spike. But, I would only know this after comparing temperature readings with / without closing the shutters.
Now, I realize each day will have it’s own different weather, wind, humidity, and cloud cover. That’s why I’m also sampling data from the OpenMeteo API so that I see whether variances in the data might be attributed to higher winds, more cloud cover, etc. The nice thing about taking temperature readings inside the house is that long as I’m not opening and closing the front door, these three sensors should be relatively shielded from external weather factors – except the sun. And, really, while I enjoyed building the testing rigs and protocols, I’m really looking for a “sense” of how much this one big window is affecting our home. My guess is that putting in just one sun screen will have a huge impact on household temperatures – and putting in a second one on the westerly facing room will also have a huge impact.
Building the Testing Equipment
I picked up several Seeed Studio XIAO ESP32C3 microcontrollers, a few 10K thermistors, and a pile of 10k metal film 1% resistors to build a test rig on a breadboard. The microcontrollers go for about $5, the thermistors as low as $0.30/each on Digikey or $8 for 10 on Amazon, and resistors ~$0.03 when bought in bulk on Digikey or $5 for 100 on Amazon. I also used roughly $15 worth of wire, a prototyping board I had lying around, and negligible amounts of solder.
Stock footage of me working
My process for the hardware was pretty straight forward. I cobbled together some components on a breadboard, moved them to a combination breadboard/paper circuits for each of testing, then moved it to a small proto-board where I could solder everything in place. I put headers for the ESP32 and the thermistor inputs so that I can test / reuse the microcontroller and adjust which wires go to which input easily.
As circuits go, this was a fairly simple one to build. Basically, we have a 10k thermistor where the amount of resistance will decrease the warmer it gets and more it will increase the cooler it gets. We have a 10k resistor to act as a reference and voltage divider, since the ESP32’s analog pins can only measure voltage and not resistance. I tried to make a TinkerCAD sketch (included in the photos below), but it doesn’t have thermistors or XIAO sized board components to add in – but it does give a sense of the wiring.
This slideshow requires JavaScript.
Software
If you didn’t already need proof, the photos above should demonstrate I’m not great at soldering. Honestly, I’m not that great a programming either. I did make use of some AI’s in writing, trouble shooting, and fixing code. If not for that kind of help, I’d still be stuck trying to get the A3 pin working and screaming at the Seeed Studio documentation which mentions a problem with this pin in their wiki. AI’s get some hate, but they also have their uses. The plan, the soldering, all of this writing, it’s all my own – but I did need a robotic boost when it came to writing the code.
The code is still a mess – which is how you know it wasn’t all written by a robot. There’s the code running on the ESP32C3 to sample the temperatures and transmit them to the PC, a script on the PC to capture that data, and then another script on the PC to take the household data and collect it with environmental data. If anyone really wants to see it, I am happy to share.
Construction Notes
I’m still a middling-beginner at soldering and programming projects. These are just hobbies and nothing related to my professional training. This is partially so I can keep these notes for myself as I work on the project and for future potential reference / reuse.
The leads on the thermistors were impossibly thin. They were so thin that I couldn’t reliably connect them to the breadboard. I tried using alligator clips, but these were very fiddly too. I ended up using a variety of tapes, including maker tape from my friends at BrownDogGadgets.com (not sponsored – I just think they do a great job of creating high quality STEM/STEAM educational materials and supplies!), to affix the tiny thin wires to a piece of cardstock and then alligator clip to that.
I think I may need to stock up on headers to add to projects.
The Seeed Studio ESP32C3 is supposed to have four analog inputs (A0, A1, A2, A3), but only A0 – A2 work reliably. I wanted to get a measurement of the laminate in other areas of the house that don’t get any direct sunlight, but this may need to wait for a further iteration.
I bought a BUNCH of taplights from a dollar store a long time ago. They are fantastic for making attractive small electronics project enclosures, include a power on/off switch, and battery holder. I’ve made several timers / buzzers / game pieces with them. I think these might make for interesting project enclosures for environmental sensors. I could drop an ESP32 and one or two thermistors into each, each thermistor having only a few feet of wire. I’d need to update my code a lot and figure out battery life, but it might be worthwhile to have redundancy in case one ESP32 goes down and also to keep piles of wires from walkways.
Normally I try to batch certain soldering tasks to complete while the soldering iron is hot. However, I’m glad I only soldered up one of the thermistors first because I ended up figuring out a much easier and cleaner way to do it.
There’s a point in the slideshow above where’s it obvious I’m testing things with my multimeter. I’m not very good at soldering2 so I have to go very slow and pretty much test all the joints for accidental bridges / short circuits and connectivity constantly. I’d rather than 10x as long to build something than incinerate a microcontroller or have to start all over again.
Things I learned Already / Future Ideas
Microcontrollers are cheap and they’re wireless for a reason. I used a LOT of wire to hook up these three sensor to this one microcontroller, mostly for testing purposes, and didn’t stop to think … you know, I could probably just have two more wireless microcontrollers for way less hassle. I mean, I used roughly 15′ ribbon cable, split into three sections, and strung this all over the entry way. This wire goes for $1/foot! It would have made SO much more sense to build three wireless devices, each with just one temperature sensor, and power them with three AA batteries, and then just stick those sensors in those three locations. Actually, I may just end up doing this anyhow. :)
I could see a case for adding light sensors as well. Right now I will be noting when I see the sun enter the house and when it sets. While this is an important factor for explaining why the temperature might spike in the late afternoon, the precise timing of this isn’t really critical to these findings. That said, it would be nice to have something in the data that I could point to and say “Ah! And *this* is where the light entered the house! Seek this spike?” The benefit to the current system is that it will be largely autonomous, quietly logging temperatures throughout the day, when I might be doing other things.
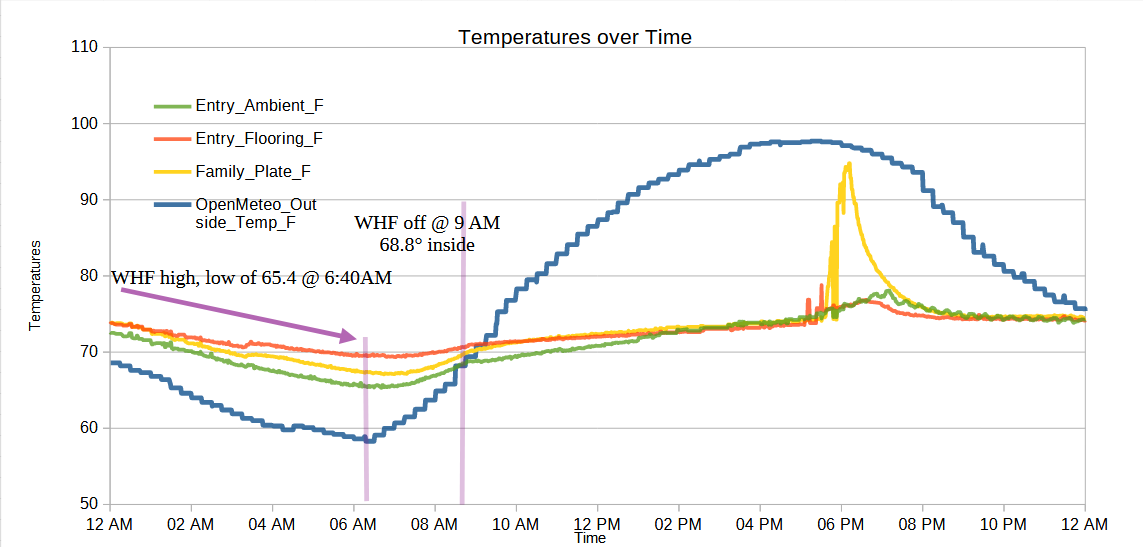
Testing impacts of our whole house fan and closing windows in the morning on ambient household temperatures throughout the day. I don’t have a good, pithy way to put this. I had the windows open all night, with the whole house fan running on low, resulting in the house cooling to 64~67 degrees overnight. I closed the windows and turned off the house fan at 9:30 AM, and while it’s 86 degrees right now at 2:30pm, it’s still a pleasant 71 degrees inside the house and the AC hasn’t kicked on once. (Well, to clarify, my homebrew sensors say it’s 71 degrees in the house, the downstairs thermostat says it’s 72 degrees and the upstairs thermostat says it’s 78 degrees). The upstairs thermostat is in a room we keep closed off most of the day, so it wouldn’t have cooled off much at night and may have started off the day warmer than elsewhere. Where was I? Right – I think it would be interesting to know the coolest times of the day/night inside the house with/without the whole house fan and also to test when would be the best time to turn the whole house fan on/high/low/off, and when the best time to open and close windows would be. Ideally, I would have a bunch of sensors throughout the house, able to know if the house fan is running, when we open/close certain windows, and then extrapolate from the data over a very long period of time – rather than trying to open/close/turn on/off things on a given schedule.3 But, this would take a lot more fiddling than I have time for at the moment.
Irrespective of the testing, if I had even on ongoing and reliable environmental monitor, I might be able to connect that sensor to a script on my PC which would allow me to connect to my thermostat’s API and adjust the climate control in interesting ways. Or perhaps I could just have it alert me to the best times to open/close windows or turn the whole house fan on/off?
Preliminary temperature readings. At roughly 3:30pm right now, I can see the temperature in the house has moved from about 68 early this morning to 72 now. This has been very gradual – but noticeable as the house goes from cool to comfortable. It’s been steady – but I’m very much looking forward to seeing what happens over the next few hours.
Summer Science - Testing Effects of Window Coverings on Interior Temperatures