Back on track

Good news!

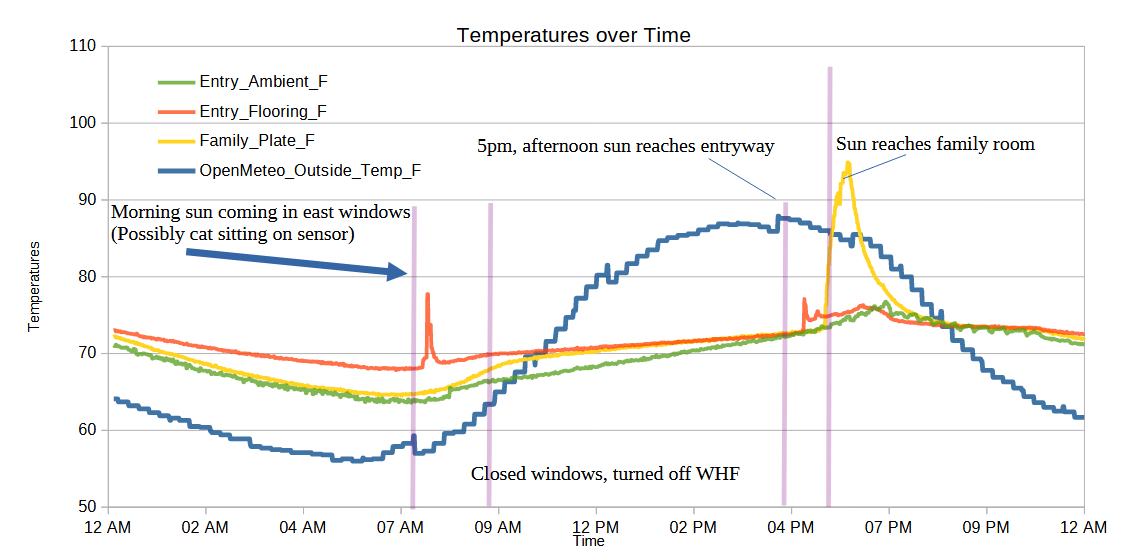
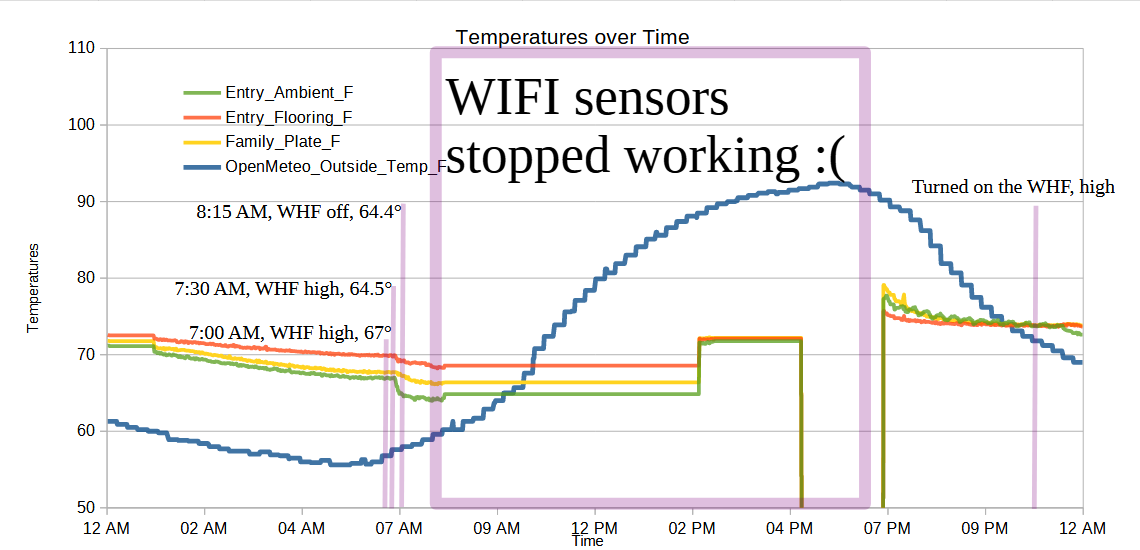
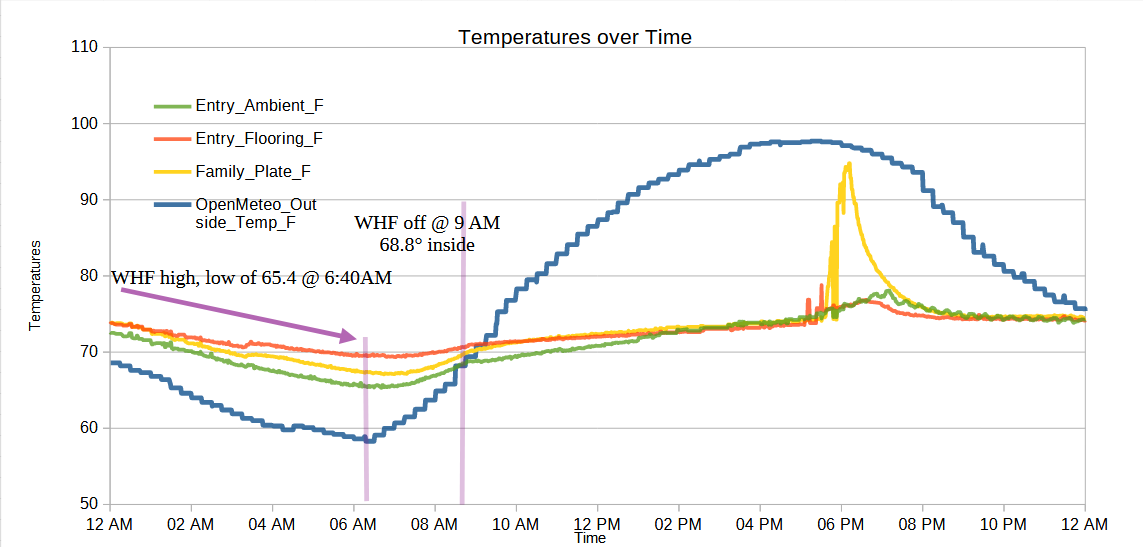
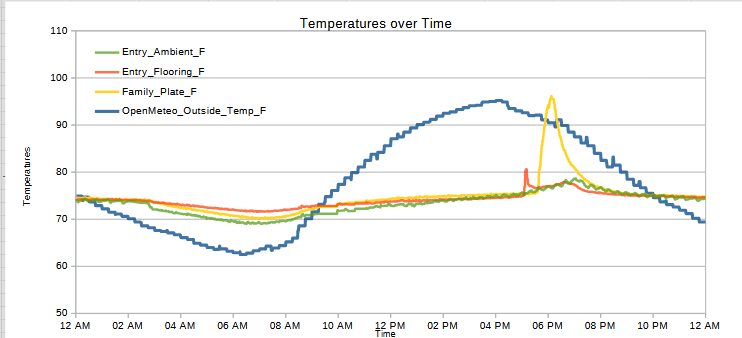
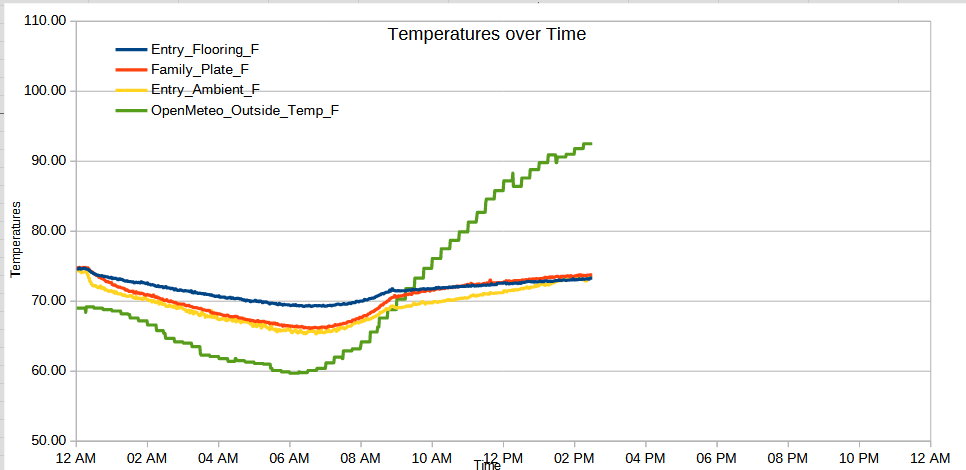
Okay, as of 11:30 AM, the AC was working again and battling against 104 degree heat.  That means we can start looking at our data again – and plan out what to do about the window, sun shade, or other system for blocking some or all of the heat for this one picture window.

In an effort to help make this data more representative of what’s actually going on inside the house, I put a thin piece of aluminum around the sensor in the entry way.  My thought was that it would help deflect some of the direct heat hitting the sensor and causing it to register ~100 degree heat on the ground.

Distributed temperature sensors for creating a “heat progression map” of temperatures in a house.  Right now I only have three sensors, but these are inexpensive enough, that I could see creating several to send temperature back to my PC.  There’s always a tradeoff between effort, speed, and cost.

  • One infrared thermometer.  $15
  • One board, 3 sensors, lots of wire.  ~$30 and lots of wire hassles
    • $5 XIAO board, $2 worth of thermistors and resistors, $2 protoboard, $15 wire
    • A small amount of soldering
  • Three boards with a sensor each.  ~$25 and very portable / placeable
    • 3x ($3 Wemos D1 Mini, $2 AHT10 sensor, $2 protoboard, $1 tap light, $1 for two AA batteries)
    • SO MUCH SOLDERING

For the best looking and most useful data, I think the three-board but higher effort approach is best.  It also scales very nicely.  For about $50 you could distribute 6 sensors throughout your house and get a sense of how heat moves around you home.

Summer Science - Testing Effects of Window Coverings on Interior Temperatures
  1. Testing the Effect of Interior and Exterior Window Coverings on Interior Temperatures
  2. Testing Interior Temperatures – preliminary results
  3. Readings so far… 07/11/2026
  4. Now with remote sensors
  5. Repeatedly Redundant (Sensing Sensors)
  6. WHY IS EVERYTHING BROKEN?!
  7. Musings on measurements and a wacky cat
  8. WWMWD?
  9. Back on track
  10. House Temperature Readings So Far

Repeatedly Redundant (Sensing Sensors)

This is the second time the XIAO board stopped working for an extended period of time.  Rebooting the board, unplugging/plugging the power cable and adapter from the wall, and even pulling the board from the headers, didn’t work to get it back online.  I finally pulled the board, plugged it into USB, then made a do-nothing change to the main.py file1 and plugged it back into the headers, which worked perfectly.  There were no obvious errors in the board – it just … needed a boring update to the code?

This slideshow requires JavaScript.

Anyhow, I’d discussed some of the pros and cons of running three Wemos D1 Mini powered sensors2 versus just one XIAO ESP32C3 powered sensors – but didn’t think about what happens when a single one goes down.  Although the XIAO was out of commission, the three Wemos board kept going so I didn’t really lose any temperature data – especially since the data was so flat during from 12:30 AM to 9 AM this morning.

Admittedly, the locations for the three sensors aren’t perfectly matched.  I have the three XIAO thermistors taped to the entryway flooring, taped to the metal plate just inside the family room, and one dangling in the air above the entryway out of any direct sunlight.  The three Wemos AHT10’s are on the entryway floor near the entrance to the family room, well inside the family room on the mantleplace, and the last at the top of the stairs with the sensor in open air at almost the exact same height and area as the original XIAO ambient sensor.  I actually wanted the second XIAO sensor over on the mantleplace as well – but didn’t want a run wires across the house that far to do it.  I’m at peace with getting different readings from these sensors versus my historical readings because:

  • The AHT10’s are supposed to be more accurate – and also measure humidity which I’ll use near my 3D printer later on
  • There’s no really good way to tape the AHT10’s to a surface and that doesn’t really tell me much about the “feeling” of warmth inside the house anyhow
  • The floor readings were constrained by the amount of wire I had rather than really wanting measurements at those specific locations

Just looking at the charts of the incoming data suggests that the AHT10 sensor data is definitely less noisy than the thermistor data.  Then again, it might be due to the way in which I’m taking readings every minute but then broadcasting  the data every 5 minutes.  I’m sure no one would notice or care if I sampled the data every 5 minutes, but when the peak heating coming in from that one picture window only lasts about 30 minutes, I think I’d like to get a better sense of what’s going on minute-by-minute rather than at 5 minute intervals.

Summer Science - Testing Effects of Window Coverings on Interior Temperatures
  1. Testing the Effect of Interior and Exterior Window Coverings on Interior Temperatures
  2. Testing Interior Temperatures – preliminary results
  3. Readings so far… 07/11/2026
  4. Now with remote sensors
  5. Repeatedly Redundant (Sensing Sensors)
  6. WHY IS EVERYTHING BROKEN?!
  7. Musings on measurements and a wacky cat
  8. WWMWD?
  9. Back on track
  10. House Temperature Readings So Far
  1. Changing something behind the comment line from “#==================” to the same thing with one less equal sign []
  2. Way more than triple the soldering []

Readings so far… 07/11/2026

Here are the readings so far from 07/07/2026 to today 07/11/2026.

There will be a few momentary blips in the data because now and then I have to restart my PC for some stupid reasons.  In an ideal world, I’d have a dedicated Raspberry Pi (or even a special computer) designed to specifically capture this data.  But, time constraints mean that I’m doing the best I can with what I have.  I ordered some AHT10 boards to connect to the Wemos W600 boards (since this board doesn’t have an analog input) I have lying around – only to discover that the Wemos W600 boards are basically abandoned/unsupported and just won’t detect anything coming out of those sensor boards.  I then tried some Wemos D1 Mini boards… and no dice there either.

I think the lesson might be…  Just get more of the boards that I know will work.  These days, that means the Adafruit QtPy boards and the SeeedStudio XIAO ESP32 line.  They’re small and at $5-$8, I’ll save WAY more time than if I was trying to get a $2 board working.  I guess it could be that the sensor boards are junk – but I won’t really know until I dig into these deeper and that’s not going to happen until the weekend.

I was inspired to start testing this stuff by a local science fair put on by our local utility company.  But, let’s not kid ourselves, I’m only too happy to dive into a project like this.  Rather than having a bunch of wires from one single ESP32 board going to three different locations in the house, I’d like to ideally have three remote sensors that are battery operated and I could place throughout the house.  In a move that may well bite me in the backside, I’m trying to use a Wemos D1 Mini for these remote sensors.  I already have them lying around, can run Micropython, and can connect to the I2C / AHT10 sensors I purchased.  Rather than scrapping the existing system, I’m going to see if I can build up the new system in parallel, get it running, then disconnect the old system.

While I’ve shopped around for some window screens, I haven’t actually purchased one yet.  However, I still have about 2 weeks to go before the science fair, so hopefully I still have time to get this done.  :)

Summer Science - Testing Effects of Window Coverings on Interior Temperatures
  1. Testing the Effect of Interior and Exterior Window Coverings on Interior Temperatures
  2. Testing Interior Temperatures – preliminary results
  3. Readings so far… 07/11/2026
  4. Now with remote sensors
  5. Repeatedly Redundant (Sensing Sensors)
  6. WHY IS EVERYTHING BROKEN?!
  7. Musings on measurements and a wacky cat
  8. WWMWD?
  9. Back on track
  10. House Temperature Readings So Far

Seeed Studio XIAO ESP32C3 and a small sticky note display

The chief benefit of the XIAO ESP32C3 appears to be it’s very low cost.  $5 for a microcontroller which can run Arduino or CircuitPython and has WiFi and Bluetooth sounds like a smoking deal.  As I’m fumbling my way through this project, I’m finding some little hiccups learning experiences along the way.

  1. The XIAO ESP32C3 doesn’t support USB file transfer, which is going to make putting CircuitPython on the board more interesting.
    1. One of the most convenient aspects of CircuitPython is being able to update the MCU over USB.  In an ideal world, I would have worked out the kinks on this project and then transferred the program to a cheaper Board.
    2. I went with this particular board since that’s what the author of the Hacksterio article used.  For $2.50 more I could have gotten a XIAO ESP32S3 which would support native USB rather than the ESP32C3.  I’ll just make sure to order some S3’s next time!  :)
  2. Using the guide linked above, you need to enable “Experimental Web Platform features” in Chrome.
  3. My “XIAO ESP32C3” showed up in the Adafruit web based ESPTool.  I noted the MAC address, erased the MCU (~15 seconds), and uploaded the new firmware BIN file from CircuitPython.org (~12 seconds).
  4. After futzing with Mu for a while, I ended up following an Adafruit guide and installing the portable version of Thonny on my PC which allowed me to update the board’s settings.toml file as described in the Adafruit guide.
  5. I wasn’t having a lot of success figuring out the MCU’s local IP address, so I used the Adafruit code for having print the IP address to the terminal.  For some reason I found the MCU’s MAC address appearing on my router’s wireless client page.
  6. Uploading files from my PC to the MCU using Thonny wasn’t quite intuitive.  There’s a file navigator on the left side of the screen.  On the top you can use to find files on the local PC and on the bottom navigate to the target MCU folder.  Once you’ve got these, you can right click on the local files and upload them to the target folder.  Later, I discovered I could select multiple files and upload them all at once, which made adding libraries way faster.
  7. After installing CircuitPython on the XIAO, I keep bumping into the error “ValueError: D8 in use”.  It took WAY longer to figure out this problem than I was anticipating.  After much hand wringing and rending of clothes, it turns out that if you don’t call “displayio.release_displays()” when initializing the board, it will claim this or that particular pin is in use and won’t let you do anything interesting.
  8. Even after solving that problem, it turned out that I was trying to use the wrong driver for the board.  I started with “il0373” which wouldn’t display anything, then “uc8151d” which also displayed nothing, and finally “ssd1680” which did work.

Here’s the pin connections I’m using, going from the label on the e-paper display, to what the acronym means, to the color of the wire on the cable, to the XIAO pin, to what that pin means:

E-Paper Meaning Color XIAO Meaning
BUSY Busy purple D4 D4 / SDA / GPIO6
RST Reset white D3 D4 / A3 / GPIO5
DC Data Command1 green D2 D2 / A2 / GPIO4
CS Chip select2 orange D1 D1 / A1 / GPIO3
CLK SPI SCK pin3 yellow D8 D8 / SCK / GPIO8
DIN SPI MOSI pin blue D10 D10 / MOSI / GPI10
GND Ground brown GND Ground
VCC 3.3 volts gray 3V3 3.3 volts

Here’s the code I could get working:

import displayio
displayio.release_displays()
import time
import board
import wifi
import socketpool
from adafruit_display_text import label
import adafruit_requests
from fourwire import FourWire
import board
import busio
import digitalio
from adafruit_ssd1680 import SSD1680
#import terminalio 
#import ipaddress
#These last two commented out as I try to figure out what's still necessary to get this project to run
spi = busio.SPI(clock=board.D8, MOSI=board.D10) display_bus = FourWire( spi, command=board.D2, chip_select=board.D1, reset=board.D3 ) display = SSD1680( display_bus, width=296, height=128, rotation=270, busy_pin=board.D4 ) # 🔧 Set custom hostname BEFORE connecting to Wi-Fi wifi.radio.hostname = "Sticky" # change this to whatever name you want print("Connecting to Wi-Fi...") if wifi.radio.ipv4_address: print("Connected to Wi-Fi!") print("My hostname:", wifi.radio.hostname) print("Connecting to SSID...") print("My IP address is", wifi.radio.ipv4_address) ipad = wifi.radio.ipv4_address else: print("Failed to connect to Wi-Fi.") # Fetch the IP address if wifi.radio.ipv4_address: ip_text = str(wifi.radio.ipv4_address) ip_text = "19.2.168.0.1" etext = f"Hello! It's me! \nA TOTALLY \nresponsible \nadult!" else: etext = "Hello eInk!\nWi-Fi not connected." from adafruit_bitmap_font import bitmap_font # Load a larger font (adjust path as needed) font = bitmap_font.load_font("/lib/Junction-regular-24.bdf") splash = displayio.Group() text = label.Label( font, text=etext, color=0x000000, x=10, y=15, line_spacing=0.7 ) bg_bitmap = displayio.Bitmap(296, 128, 1) bg_palette = displayio.Palette(1) bg_palette[0] = 0xFFFFFF # White background bg_sprite = displayio.TileGrid(bg_bitmap, pixel_shader=bg_palette) splash.append(bg_sprite) splash.append(text) print(etext) try: display.root_group = splash display.refresh() print("Waiting for refresh to complete...") time.sleep(5) print("Display refresh called.") except Exception as e: print("Error during display refresh:", e)

Here’s the progress so far:

This slideshow requires JavaScript.

Having gotten this to work, I’m pretty excited about the possibilities.  I would love to have a Doctor Who psychic paper display4 , an addition to my kid’s Pip-Boy, or a physical desktop widget that displays interesting / useful information.

With this setup I can manually hardcode a new message and update the e-paper display.  Not super useful in and of itself. However, with some elbow grease and a few late nights, I’m hopeful I can add the ability to connect to a Bluetooth device and update the screen, set off a buzzer, or set off a small vibration motor.  Right now there are 5 pins left unused:  D0, D5, D6, D7, D9.  I figure I’ll need one to wake the device from a deep sleep, one for an RGB / NeoPixel LED to provide a little instant visual feedback, one for a buzzer, one for a vibration motor, and then maybe one more for another button.

Sticky Note Timer
  1. Ah, just what I need! A new project!
  2. Sticky Note Timer, parts arrived!
  3. Seeed Studio XIAO ESP32C3 and a small sticky note display
  4. Brainstorming More E-Ink Stuff
  5. Smol Fonts for E-Ink Displays
  6. Tap Light Focus Timer System
  1. Data / Command selection [high for data, low for command] []
  2. SPI chip selection, low active []
  3. Clock []
  4. Thus, the “responsible adult” above []

Sticky Note Timer, parts arrived!

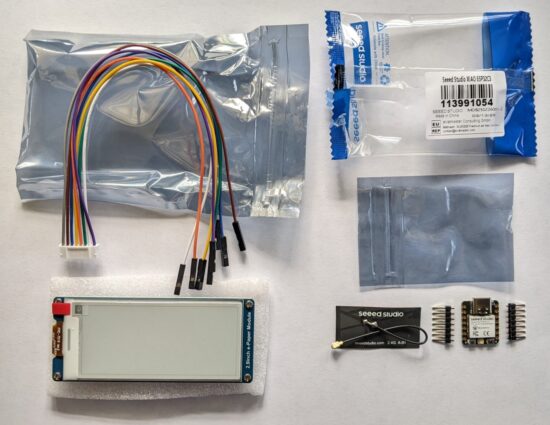
The parts have arrived for this project!  The three XIAO boards cost $17.33, were ordered on 04/10/2025 and landed on 04/17/2025. 1  The 2.9″ e-ink display cost $24.99 from Waveshare, were ordered on 04/11/2025 and landed on 04/14/2025.23

Parts!
Parts!

I’ll need to solder in the headers for one of the XIAO chips, connect it via jumpers to the e-ink display, and then see if I can update the screen with content.  For now, I’ll just power it with USB until I get it working, then solder in a LiPo connector.

Sticky Note Timer

  1. Ah, just what I need! A new project!
  2. Sticky Note Timer, parts arrived!
  3. Seeed Studio XIAO ESP32C3 and a small sticky note display
  4. Brainstorming More E-Ink Stuff
  5. Smol Fonts for E-Ink Displays
  6. Tap Light Focus Timer System

  1. This price includes shipping and after a $5 welcome coupon code for my first order []
  2. Again, this includes shipping []
  3. I’m not without some degree of self-reflection.  I’m ~$45 deep on this project which would buy four kitchen timers and 4,000+ sheets of off-brand sticky notes.  But, what price knowledge?  WHAT PRICE KNOWLEDGE?!?!? []

Ah, just what I need! A new project!

A rough sketch
A rough sketch

If you’re anything like me, you’re familiar with the idea of Too-Many-Tabs™️.  I see a cool thing, I open it in a tab, I might organize tabs, I might bookmark them, and see them now and then.  The worst part about this for me is that as long as they’re not yet bookmarked and organized, I don’t want to close the tabs – so that I don’t “forget” about them.  But, as long as I’ve not bookmarked/organized/blogged about something, it will feel like it is still using some level of brain bandwidth, running as a “background process” using a small, but non-zero, amount of brain attention.  The only good ways I’ve found to excise exorcise1 these ideas/tabs/processes is for me to act on them (get started building and/or blog about them) or kill them (bookmark/organize).

I’ve seen several projects recently which are swirling around several similar concepts for me:

All of these projects do interestingly adjacent tasks – displaying relevant information, in an attractive way, serving as a reminder, good either on a desktop or perhaps a wearable.  I could see making a version of Tymer as a wearable watch.  The build seems fairly straightforward – buttons to input times, deep sleep functions which wake once a minute to determine if it needs to set off the vibration motor.  I would love a small simple e-display such as the ESticky – to sit on my desktop, perhaps on/near/in front of my monitor.  What’d I’d really like, of course, is something that’s kinda does some of each.

I ordered the parts for the ESticky, since the Tymer appears to basically require just a battery charging board (already integrated into the ESticky’s Seeed Studio XIAO ESP32C3) and a vibration motor (which I have a stack of already).  I’ve not used a Seeed Studio product before, but it appears to be similar in formfactor and function to the Adafruit QtPy’s I’ve been using in various recent projects.  Because I know I’m going to want to use one XIAO board as my dev board with headers and breadboard, one in the project itself, and one because…  they’re cheap ($5) and there’s even odds I’ll blow one up.

My plan is to build a direct copy of the ESticky on a breadboard, add the vibration timer and buttons to manipulate it, see if I can do it in a more permanent format by soldering it together, then design / print a case.

I’ve never worked with a Seeed Studio product and not played with eink displays yet.  Hopefully this will be fun!

Bonus:  Now that I’ve purchased some of the parts, I can close dozens of tabs!

Sticky Note Timer

  1. Ah, just what I need! A new project!
  2. Sticky Note Timer, parts arrived!
  3. Seeed Studio XIAO ESP32C3 and a small sticky note display
  4. Brainstorming More E-Ink Stuff
  5. Smol Fonts for E-Ink Displays
  6. Tap Light Focus Timer System

  1. Edit:  Not excise.  Sheesh.  It’s more about trying to get these ideas out of me, so they no long []
Test