MakerBot Origami

1. Or, “Design Constraints and Creativity”

Origami is another of my hobbies and it is all about design constraints. 1 The rules are simple2 – one square sheet of paper only manipulated by folding. 3  Yet, within these rules it is theorized that a sufficiently skilled artisan can design and fold any arbitrary figure.  I find folding origami to be at once cathartic and contemplative. 4

Pondering the design constraints within origami reminded me of one of my own recent designs – the 3x2x1 Rubik’s style puzzle cube.  Quite apart from the medium or subject matter, I really liked the idea of a single print job resulting in parts that could be immediately hand-assembled without tools to form a useful object.  Then I thought – if the design constraints are one of the things I like about this design, what else is possible within these same constraints?

Thus, I propose a new style of “MakerBot Origami”:  One MakerBot print5 , multiple components6 , no tools or hardware7 .

What’s the coolest most awesome thing you can design within these constraints?

Update:  Cyrozap – sory fore mispellnig yoru mane.

((I waffled on that title.))
  1. I waffled on that title. []
  2. Modern origami rules, anyhow. []
  3. Designing an origami model is not about figuring a way to cheat those rules – rather a way to work within them to achieve a desired goal. []
  4. I recall one origami master referring to the folding of a particularly difficult and rewarding model as invigorating. []
  5. Or, as Cryozap Cyrozap calls them, “production file.” []
  6. Otherwise, people would be making whistles. []
  7. Thus, no bottle openers []

Printable Sonic Screwdriver progress

STL sheet for printable sonic screwdriver

STL sheet for printable sonic screwdriver

Sketch of Screwdriver

Sketch of Screwdriver

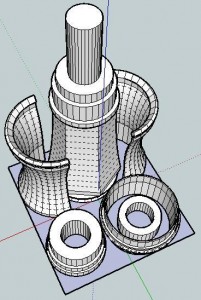
Off to the left is a picture of what the finished sonic screwdriver should look like.  Here’s a picture of the parts I’ve designed so far.  Assembled properly, these parts should be able to be assembled into the lower half of the sonic screwdriver.

I’ve arranged the parts so that they have a less than 60mm x 60mm footprint on the build platform.  I would really like it if the final product could be printed all on one build plate and assembled without tools or additional non-printed pieces.

After my recent design-print fail, I’m going back to the drawing board (slightly)1 wiser.  If nothing else, I like to think what I have so far is pretty neat. 2

  1. Make that very slightly. []
  2. Even if it doesn’t work at all. []

Design-print fail

I’ve been slowly working on the design of a printable (and fully MakerBottable) sonic screwdriver.  This model of the sonic screwdriver is built up of a number of concentric cylinders, has several significant overhangs well in excess of 45 degrees, and is larger than the MakerBot’s built capacity.  In order to deal with these design problems, I modeled it in sections.

In order to make the overall result something I could just pop/snap/slide together I designed it making some sections which were split vertically and other sections which slide around those sections to keep them together.  In order to make the parts quickly printable I designed all the parts at around 0.5mm thickness.

About 40% of the way through the print one of the vertical sections wasn’t coming out properly – probably because it was too thin.  The parts were too thin and flexible and ended up tearing between layers and just being too flimsy.

I also noticed something odd – the extrusion was too thin on that side of the model.   I can’t be sure why this is happening – but I suspect it’s due to the extruder not getting a good enough grip.  Perhaps I need to floss the extruder pulley or install a new extruder idler wheel.  However, it doesn’t explain why the extrusion was too thin on just that one side and no other spots.

Suggestions?

New affordable 3D printer – the Ultimaker

Ultimaker

Ultimaker

Update 3/28/2011:  The Ultimaker is available for pre-order!

Erik de Bruijn along with a newly formed Dutch RepRap group have put together this new design for a low cost RepRap alternative.  The stated goal of their blog is “designing/developing an easy to build low cost 3D printer with a small form factor but large build envelope.”  Erik has invited everyone to comment on this beta design.  It’s interesting to see their progression of prototypes in their second blog post.

The interesting thing about this model is that it combines some of the best parts of Darwin and MakerBot and what appears to be a Bowden extruder.

The very nature of FDM1 means that the robot will only move the Z axis a little bit every once in a while.  One of the design drawbacks to the Darwin was that the heavy extruder head (motors, gears, heating elements) were so heavy that the entire robot would rock or vibrate with the lateral XY movements.  MakerBot got around the heavy extruder head problem by moving the platform in the XY and moving the extruder head only up and down.  This design decision isn’t without it’s tradeoffs, however.  One downside is that their build area is much smaller than a Darwin.  Another downside of the MakeBot design is that once the object being built reaches a sufficiently large volume or height, moving the object around quickly on the XY platform causes it to vibrate, shake, and become somewhat unstable.

One of the main improvements inherent in the Bowden extruder is that it allows you to take the heaviest parts of the extruder head, separate them from the rest of the extruder head, and move those heavy pieces to a different location.  Using a Bowden extruder makes a Darwin style robot much more feasible – the small moveable print head won’t have the mass to cause the robot to become unstable.

It seems that combining either of the X or Y movements with the Z probably won’t matter all that much, since the Z axis will only move about 0.33mm or so per layer and the Z axis typically doesn’t operate at the same time as either the X or Y axis.  Combining the as the new RepRap version II, Mendel, design shows us that combining the Z axis along with either the X or Y axis, but not both, can lead to a very stable configuration.

What I like about the Ultimaker design is that it would appear to incorporate some of the best parts of the MakerBot and Darwin designs. It appears to have a bolt/nut/T-slot MakerBot style assembly structure using thin lasercut wood pieces for the body.  I found these parts to bolt together very quickly.  Contrast this to the Darwin/Mendel structure using lots of nuts and threaded rod and printed plastic parts to hold it together.  At the same time, by making use of a Bowden extruder and the Darwin body shape, it appears to be able to use most of the interior volume for printing.

I suspect it probably uses fewer parts than a typical Darwin, but I can’t be sure.  I also have to wonder about the cost of lasercut wood versus the cost of nuts and threaded rod.

Nice find RepRap Log Phase!

  1. Fused deposition modeling – basically creating a layer and then fusing a new layer on top of that layer in succession to build up an object. []

3x2x1 totally printable puzzle cube proof of concept success!

I’ve printed up pieces uploaded this morning to Thingiverse, tried them together, broke two pieces, modified them, printed, and fit some together.  I’ve just modified the STL for what I hope is the last time.  However, I have the barbell fit snugly into the center cube.  It rotates relatively freely and does not want to pop out.  (Of course, I’m sure it could/would if I applied enough force).  This leaves the outside cubes.  I modified the semicircular tabs a little and will reprint them later.

The only problem is that it takes about 40 minutes for my machine to print up two cube parts and a barbell, since they’re so solid.

The important thing is that I’ve just been able to print up and assemble the crucial mechanisms for this puzzle.  I think the next iteration may be what I needed.

Improving on the 3x2x1 Rubik’s Cube

I’ve been fiddling with the designs for the 3x2x1 Rubik’s Cube incorporating some of the changes I had considered:

  • I’ve widened the holes for the nut and bolt.
  • I’ve made all of the cubes solid.  I think it will just work better with solid parts.  I had left the four end cubes mostly hollow to:
    • Improve printing time
    • Use less plastic
    • Possibly make an interesting hiding place for something very small
  • I’ve shortened the “stem” that connects the semi-circular tab to the end cube to allow for a more snug fit.
  • I’ve made the semi-circular groove in the center cubes narrower, to allow for a more snug fit.
  • Make these cubes solid so that they slide against each other easier.
  • I’ve noticed that the nut and bolt I installed into either side of the center cubes were pushed sufficiently well inside that they don’t want to come out or rotate.  This is a very good thing for this design!  It turns out that if you rotate it too much in one direction, you can just rotate it back a few times and it will be tightened back up!  It also makes for easy disassembly/reassembly – just rotate the puzzle until it comes apart and rotate it back together to reassemble.

Designing with a MakerBot

After playing with this puzzle for a few days I’m really happy with how it turned out and I think the above improvements will make the next version a little bit better.  This reminds me of Forrest Higgs’ recent commentary on engineering with a RepRap in the design cycle.  It’s so easy to test out a new design that I don’t hesitate to whip something up, print it off, SEE and FEEL how it works and any unintended nuances of that design, and then redesign with these revelations in mind.

3D design constraints, problems, considerations, potential solutions

In the comments of a recent post Tony and I were discussing how we were each thinking about how to design and print an 11th Doctor sonic screwdriver. 1 2  Let’s set aside the nature of the object in question for a moment and consider the constraints, problems, considerations, and potential design solutions.3

There are a number of challenges facing one wishing to print this particular object.  Although the discussion4 pertains to the design challenges and decisions in this project, I’m hopeful it will be helpful to myself or another when it comes to some other design.  Thus, let us think only of the design challenges, problems, and potential solutions.

Sketch of Screwdriver

Sketch of Screwdriver

  1. This newest one is too large to be printed as one single piece.
  2. It has a number of overhangs.
  3. It has a number of moving pieces.
  4. It lights up.
  5. It is a comprised of a number of different colors.
  6. I don’t know the exact measurements.

Even if you want to print the non-extending, non-spring loaded, non-LED, non-swiveling bits there’s a fair number of considerations.  Often my most successful way of solving a problem is to just get started and figure things out as I go.

In this case I got started by examining the pictures Tony and I had located.  Quite separately we had both pulled the images out of the animated GIF.  I created a new smaller image of the open and closed versions side by side, for comparison’s sake.  Then, I reoriented both of them so they were vertical rather than on a slant.  Then I resized the picture of the screwdriver in someone’s hand5 6 so that it was roughly the same scale as the other two images.  This was placed next to the first two.  I traced the images in Sketchup and spun the parts around and ended up with a reasonable facsimile of a portion of the screwdriver.

The problem with designing and printing in segments is figuring out how to assemble it.

  1. Snap-fit?
  2. Glue together?
  3. Bolt together?
  4. Friction fit?
  5. Do we design it so that it can be disassembled easily?

And, what about other considerations?  If we want to install any electronics, lights, etc we probably want it to be easy to disassemble.  Ideally, the entire assembly7 would be hollow in order to incorporate electronic parts.  Besides, “if you can’t open it, you don’t own it,” right?  That means no easy glue or snap fit solution.  Bolting together means non-printable parts.  I generally have a preference for 100% printable designs when I can manage.  Here are some of the ideas I considered and dismissed:

  1. At first I was thinking of printing it in a series of tubes that fit over one another.  This approach has several problems.
    1. I considered a screw thread approach.  Basically a series of tubes which were screwed together.  I wasn’t crazy about the idea of generating a number of helices, but would do so if a good design required.  Although, I did like the idea of being able to just unscrew the entire thing when I wanted to take it apart.  There’s also the very visceral act of assembly by taking all the bits off the platform, cleaning them, and screwing them together in about 15 seconds without any additional tools.
    2. A variation on the above.  A system where the parts have a knob/groove connection similar to those very cool cylinder containers on Thingiverse.  Twist, lock.  It can be undone, and requires creating grooves instead of a helix, which is significantly easier.
    3. I considered a system where I create a long tube with a knob at one end.  Then, create all the other parts so they can slide on.  Affix something to the other end when done, glue/bolt, done.
    4. A variation on the above where all the parts are printed as tube, but press fit together.  Designing them to the correct tolerances would be tough.
  2. Then I thought about printing it in vertical halves.  Again, problems.  Again, none are insurmountable, just problematic.
    1. Cosmetically, I’m not crazy about the nut/bolt holes which would be required to assemble two vertical halves.
    2. Alternatively, a snap-fit would be great – but a good one would not be easily un-snap-able.
    3. Press fit using circular tabs going into circular holes like every Happy Meal toy you’ve ever seen.  There’s no real problem with this except that printing small nubs and circular holes is difficult.  Then again, I could print larger holes/nubs.  However, this means less room for a hollow interior.
Napkin sketch

Napkin sketch

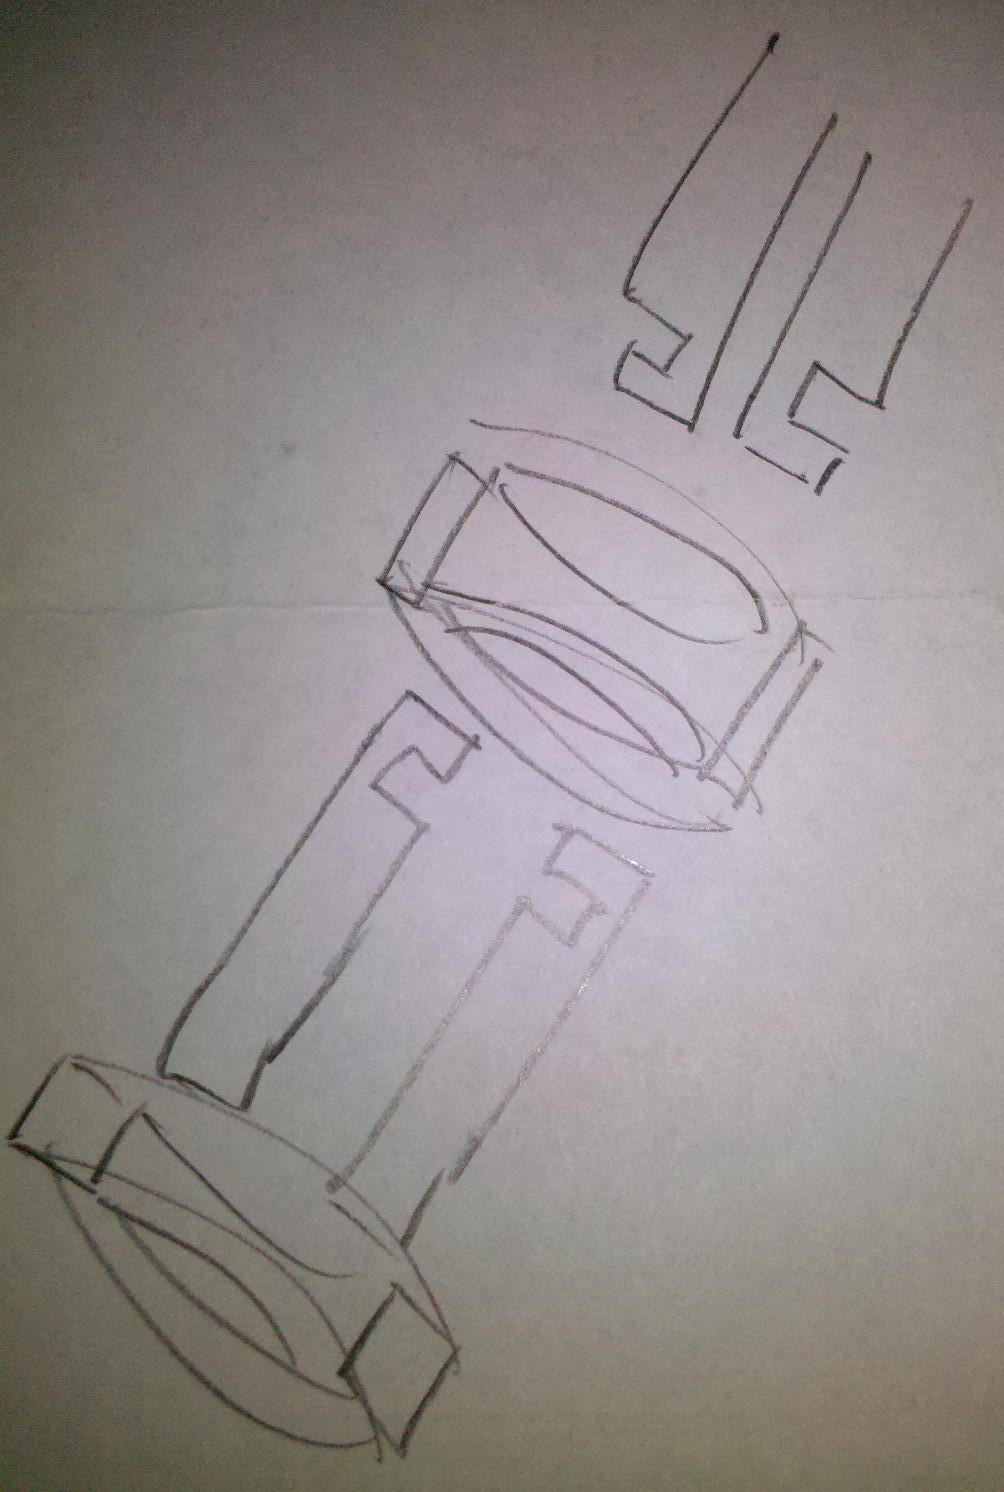
While sketching up the above in Sketchup8 I hit upon an idea.  I could print the assembly in sections9 – but not necessarily similarly constructed sections.  In this I was inspired by some of the design ideas I saw/recreated while creating a derivative 3x2x1 Rubik’s cube from TomZ’s 1x2x3 Rubik’s cube.  If you look at the design of this style of Rubik’s cube (either of these will do) you’ll notice the two cubes at either end have little bits that stick out into half-cylinders which widen into half-disks.  When you take two of these end cubes and set them together you end up with a full cylinder terminating in a full disk.  These two are then captured in the two center cubes which have half-cylinder, half-disk grooves – which allow the two end pieces to rotate freely.

So, what if I printed large sections of the screwdriver as pieces that fit together vertically – but had a groove around the edge?  You could leave the inside mostly hollow.  Then, you could slide a ring or thin cylinder around it.  If so, the ring would keep the two halves in place.  The ring could be kept in place either by friction or a notch/groove system.  The point is this design would:

  • Allow the interior to be hollow
  • Require only printed parts for assembly
  • Not be overly complicated to design
  • Be easily assembled and disassembled

Napkin sketch on right.

Amusingly, this only gets me 1/3 of the way.  I still need to figure out how to design the bits that slide and the bits that swivel the claw like bits at the end.  So, Tony, what you got?

Update:  Cyrozap – sory fore mispellnig yoru mane.

  1. Tony Buser, are you listening? []
  2. In case anyone from the BBC cares – I’m not doing this for pecuniary gain.  I’m just a nerdy American Doctor Who fan who enjoys making things. []
  3. FYI, this unbelievably long post has been brought to you by Cryozap Cyrozap, Schmarty, and Cameron.  I wanted to serve up truncated RSS feeds, but nooooooooo…  they just wanted you to have to endure more than a thousand words of my rambling nonsense. []
  4. Well, this is just me babbling, so it’s more rambling musings than discussion.  Then again, if there’s a single comment it becomes a discussion.  Single non-spam comment. []
  5. No doubt the hand of some snooty fancy hand model. []
  6. What bastards. []
  7. And it would have to be an assembly since I can’t print it as a single piece []
  8. OMG!!! I get it!!!  SKETCH-UP!!!  Ha! []
  9. Obv []

New Design: Sonic Screwdriver

Those of you who are not fans of Doctor Who may want to just skip this post.

In any case, what I’d really like to do is to design and print a life-size model of a sonic screwdriver.  Ideally it would have a spot for inserting an LED, space for a battery, switch, and be able to extend just as the one in the TV show.

Until then, here’s a sonic screwdriver cookie cutter.