3x2x1 Rubik’s Cube Production File

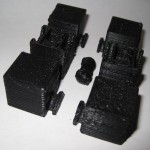
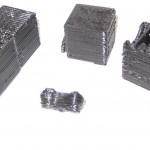
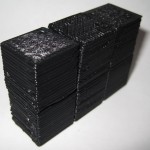
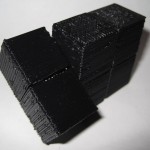
My prior copy of this 3x2x1 Rubik’s Cube was printed a few parts at a time – I’d print one part, test it, print up another, etc.  Last night I was able to use my production file to generate all seven pieces in one go.  It took 1 hour and 45 minutes to complete the print job, but well under three minutes to clear most of the pieces of the raft off the parts and assemble the puzzle.  In order to help people modify and improve upon my design, I’ve upload the original Sketchup files, the STL I used, as well as my own GCode.

Owenscenic on Thingiverse asked,

I am interested in trying your gcode, how did you generate it? How well does it minimize strings between the printed parts? I’ll look at is to see how it starts and the temp…

In case you’re wondering too, the answers are as follows:

  1. I generated the Gcode using my slightly tweaked RepG v18 built-in Skeinforge settings for ABS with a raft, with a build temperature of 220C.
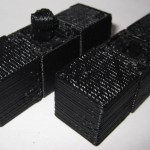
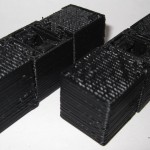
  2. The Gcode does pretty well with minimizing stringing.  However, some of the credit has to go with the part placement in the STL production file as well as the nature of the object.  As soon as you assemble it and start to rotate the parts, most of the remaining strings and little blobbies will pop right off.

Owenscenic, please let me know how your print of this turned out!  Please post a picture!

3x2x1 Rubik’s Cube assembly pictures

The design should be pretty intuitive.  However, I went ahead and took some pictures of the assembly anyhow.

As I mentioned in an earlier post, I think this one came out really really well.  :)

3x2x1 Rubik’s Cube – done!

I’m so happy with the way this has turned out.

I’ve made a bunch of changes since the last revision of this printable 3x2x1 Rubik’s Cube puzzle:

  • I’ve totally redesigned the center barbell connector.  I simplified the design, removed the five support struts for each end and replaced it with a single support strut and a flat hexagon in the center of the piece.  The purpose of the hexagon is to give the barbell more contact area with the raft.  One of the earlier drafts didn’t have as many supports or this flat hexagon, and it tore off the build platform partway through the build.
  • I increased the diameter of the tube between the barbells.  This enabled it to print easier, made it a little more sturdy, and decreased the wobbliness of the barbell when everything is assembled.
  • I also shortened the entire barbell by 1mm, so that the entire puzzle is held together more closely.
  • I made the flat semi-circular tabs slightly thinner so they rotate a little more freely.
  • I significantly redesigned, thickened and simplified the two brackets that the barbell snaps into.  It’s been able to easily withstand numerous couplings/decouplings as well as numerous rotations.  With a few rotations, all parts now rotate easily.
  • All of the parts fit together SO much better than my first draft held together with a nut and bolt.
  • There is a slight bit of sideways flex that can occur with the use of the barbell.  It is really minor and it actually seems to help the puzzle be more forgiving as you manipulate it.  I see this more as a benefit than a design flaw.

The was one design choice on which I waffled.  I considered making the center cubes non-identical, with one having half a barbell stick out and with the other having the internal connector you see now.  This would have removed much of the sideways flex – since the barbell would be stationary.  I did not go with this design choice because whether the puzzle used one barbell and two connectors or male/female center cubes, there would always be some flex caused by the use of a connector rather than a static pin.  And, to be honest, I much preferred the symmetry of having everything assembled out of just three unique parts.

I know I’ve mentioned this before, but I really like the idea of a MakerBot printable toy that can be printed in one go and then assembled without tools or any additional hardware.  I also think this would make a great MakerBot print demonstration.

I’ll post some pictures of the parts a little bit later.

3x2x1 totally printable puzzle cube proof of concept success!

I’ve printed up pieces uploaded this morning to Thingiverse, tried them together, broke two pieces, modified them, printed, and fit some together.  I’ve just modified the STL for what I hope is the last time.  However, I have the barbell fit snugly into the center cube.  It rotates relatively freely and does not want to pop out.  (Of course, I’m sure it could/would if I applied enough force).  This leaves the outside cubes.  I modified the semicircular tabs a little and will reprint them later.

The only problem is that it takes about 40 minutes for my machine to print up two cube parts and a barbell, since they’re so solid.

The important thing is that I’ve just been able to print up and assemble the crucial mechanisms for this puzzle.  I think the next iteration may be what I needed.

Revising the 3x2x1 Rubik’s “Cube”

3x2x1 Rubik's Cube

3x2x1 Rubik's Cube

I finally found the time to print a copy of my 3x2x1 Rubik’s Cube.  Having printed it, I’d make a number of improvements in the next design iteration.  I would:

  • Make the circular slots in the center cubes smaller or the circular tabs in the four outside cubes larger.
  • Enlargen the holes for the nut and bolt.
  • Make these cubes solid so that they slide against each other easier.1
  • Consider replacing the entire nut/bolt requirement with a connection similar to the becco block connectors.  This would make for a totally printable solution.
  • Print the cubes two at a time to minimize warping without a heated build platform.

It slides reasonably well and is certainly functional.  However, after several center cube rotations I will tighten the center bolt.2

  1. The four cube sections at the extremities are hollow. []
  2. The hole for the nut is tight enough that it doesn’t rotate as I turn the bolt. []