How do upgrade your extruder firmware

Just as an FYI for anyone who’s having trouble upgrading your MakerBot Cupcake CNC plastruder firmware, the instructions built into ReplicatorG don’t tell you to unplug the TTL cable from the motherboard and plug it into the extruder board.

So, save yourself 5 minutes of frustration and googling for the answer…  and just plug the TTL cable into the extruder board.  :)

Things I learned while trying to unclog my extruder barrel

I learned a lot this morning!  And now you don’t have to learn, as they say, the hard way.

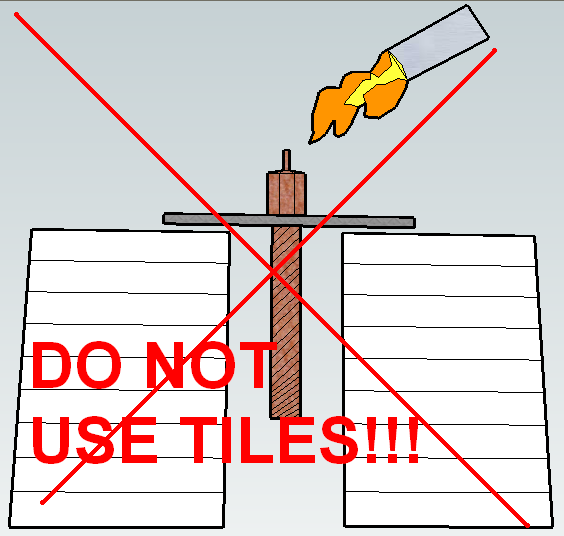
  1. Never ever ever use tiles. I thought I was being very clever with the tile idea.  Apparently leftover kitchen tiles can shatter and fly apart when you heat them.  Who knew?
  2. Instead, use a big piece of metal to hold the barrel. I ended up using a piece of metal I had laying around to hold the extruder barrel and weight it down with a rock.  This worked perfectly.
  3. Don’t tilt your blow torch too much. Probably an elementary thing for most people.  My torch kept going out when I tilted it too far – probably a safety feature.  This meant I had to change the set up so that the barrel was somewhat elevated so I could keep the torch mostly vertical.
  4. Keep a friend handy. This was one of my few ideas/preconceptions that actually worked out.  Thankfully I didn’t need him to use the fire extinguisher or garden hose, but I very well could have.
  5. Don’t leave a nut on the extruder barrel. At the last minute I decided to screw a nut part way on the barrel.  I figured I could prop the extruder barrel up in the washer, heat it, and not discolor the nut or washer.  This didn’t work out because I needed to apply more heat to the barrel to get the clog out.

MakerBot extruder clog experiment

DO NOT USE THIS extruder unclogger setup

DO NOT USE THIS extruder unclogger setup

UPDATE: DO NOT USE TILES!!!  THEY WILL SHATTER!  READ LATEST POST!

The bad news is this is my first clogged extruder.  The good news is I have all the spare parts to whip up a new extruder, no problem.  That means I can experiment with wild abandon!  My backup plan is to slice and dice the PTFE insulator into washers.

Having drilled out most of the plastic clog from the barrel, it’s mostly empty.  The PTFE is in pretty good shape with the threads intact, if a little worse for wear.  My plan to get the remaining plastic out of the nozzle is to put the nozzle/barrel assembly into the large washer upside down and prop it up on some ceramic tiles.

My hope is that by applying a heat source to the nozzle the plastic will just drip/fall out.  The suggestion for using a blow torch to clear out the barrel and nozzle comes from Rick Pollack / MakerGear.  Thanks again Rick!

By the way, wicked Google Sketchup skillz, no?

How to diagnose and fix a burned out thermistor

Unfortunately, Bender just stopped working.  As I was keeping the nozzle warm while I was working on a new model, I looked up to see a flash of fire/spark shoot out from the nozzle area, ricochet off the build platform, and disappear.  Looking at the RepG control panel I discovered that I wasn’t getting any readings from the thermistor.  Not good.

The RepG control panel showed 0.0 as the temperature, so I shut the plastruder down, not wanting the heater to burn out of control.  I restarted Bender and RepG – but I discovered that while I could control all three axes very slugishly, I could not move the extruder motor or detect temperature.  I’m guess I couldn’t have increased the temperature either, but I didn’t want to try it since I couldn’t monitor the temperature.  That about covers the symptoms.

In order to diagnose the problem I tried to isolate the various parts.  I pulled all of the wires out of the extruder board.  Then, while the wires were still out I tested the nichrome for resistance – still around 6ohms.  Then I tested the thermistor – no connectivity.  Again, not good.  I tested the  motor for continuity, and it was fine.  Since the nichrome and motor seemed fine, that left the thermistor and extruder board.  I popped a random resistor into the thermistor ports, but still couldn’t get a reading on it.  Unfortunately, after several resets of the motherboard and extruder board, I still couldn’t get the motor to move or a reading from the thermistor.  Also, I was getting an error message that the Payload was not big enough.

Rick Pollack of MakerGear suggested on the MakerBot Operators group that I reflash the extruder firmware.  After several failed attempts, I finally figured out how to flash my extruder firmware from the Arduino environment by holding down the extruder reset button.  This got rid of the payload error message as well as the avrdude errors and let me reflash the extruder.

I pulled the entire extruder apart and did a little maintenance.  I flossed the extruder pulley teeth, pulled all the stray bits of plastic out of the idler pulley wheel area, removed the old thermistor, unwrapped the nichrome (which was wound down and then doubled over itself as the original pictures in the wiki suggested) and rewrapped the nichrome (a single layer from the nozzle up the barrel following closely in the threads to make good contact everywhere) as suggested by several people in the MakerBot operators group.  I then tested the nichrome again once it had been taped down for the proper resistance, check.

Once I pulled the thermistor out of the heater assembly, I tested the thermistor at its own leads, rather than at the wires soldered to it (in case the thermistor had come apart from the wires).  Still nothing.  I plugged a random resistor into the thermistor ports and was now able to get a reading off the extruder (as well as move the extruder motor). Concluding my problem was the thermistor, I forged ahead with a plan to replace it.

Luckily, I had placed an order for some PLA and nearly every single part needed for a secondary extruder (or what would be needed to fix a broken extruder) including a new thermistor.  If you haven’t picked up backup parts, I highly recommend it.

I clipped the old thermistor off the wires, pulled out the new thermistor and taped it to a white piece of paper immediately, putting the tape across the leads just below the bead.  I then bent the leads upwards, tinned them, soldered them to the wires, taped down the wires, pulled up the original piece of tape, and then sandwiched the thermistor in tape as per the instructions.  I then plugged the heater, the motor, and the thermistor back into the extruder board – and was able to get a temperature reading, apply a little heat to the barrel, and move the extruder motor.  I also noticed that this removed the sluggishness from the 3 axes stepper motors.

With the heater, motor, and thermistor working separately I put everything back together and reassembled the plastruder, plugged it back into the board and tested it again – readings, heat, and extruder motor working.  I then popped it back into the dinos, did a test extrusion, and starting printing again.

“Rock on completely with some brand new components”

Things I learned while soldering opto-endstops

The opto-endstops marked the very first parts I had to solder for this MakerBot.  Not having soldering anything more complicated than two wires together, this was an adventure and learning experience.  Here’s what I learned today:

  • The 3-pin connectors used for two of the opto-endstops (on the Y-axis stage) are in the Generation 3 MakerBot Electronics Kit (Mostly Assembled) with some of the other connector bits.  I was a little confused about this for a while.
  • It helps to lay out all the little bits in an organized fashion beforehand.
  • Keep a long thin rigid stick handy for bending delicate leads into the circuit board holes.
  • Although I read the RepRap electronics fabrication guide and found it helpful, I still felt a little lost.  I found the most effective way to solder the parts in was to:
    • Get the soldering iron good and hot
    • Put the leads through the holes
    • Bend the leads a little so that they stayed in place
    • Flipped the board over so the leads were sticking up
    • Touched the solder to where I wanted the joint
    • Gently stroked the solder with the soldering iron tip towards the joint
    • This process seemed to create a pretty good joint
  • You’re going to burn a finger at some point, accept it.1
  • This almost goes without saying, but go slowly.
  • Check and double check the orientation and placements.
  • I found it helpful to take a large sheet of aluminum foil and shape it into a tray.  This helped contain the parts I was working on and was a good way to catch the flying leads that I clipped off.
  1. I burned two. []

Things I learned while assembling my MakerBot

I’ve assembled quite a lot of my MakerBot today.  This entailed assembling and putting together the X axis stage, Y axis stage, pulleys, putting gears on stepper motors, mounting gears, putting in the slider rods, Z axis threaded rods, bolting on the motors, and assembling the two “dinos.”

  • If you’ve got a Batch 9 MakerBot, definitely install the Z-axis after assembling the body of the MakerBot.
  • Put off adding the Z-stage/extruder-stage for as long as you can.  It will just be in the way.
  • Keep that sandpaper handy – you may need to sand down some tabs or widen slots or holes to make things fit, especially if you painted your MakerBot.
  • If the smooth slider rods are just a smidge too short, they will slide back and forth causing a little extra noise as your MakerBot operates.  I haven’t gotten mine running yet, but I have read this is the case.  I noticed that one of the slider rods for the X axis on my Batch 9 MakerBot was about 1mm too short.  When I put the caps on, I noticed that it still had some wiggle room.  I took a scrap of paper towel, folded it up so that it would push up against the end of the rod, and clamped it down.  There’s no wiggle room now, so hopefully that’s it.
  • Make sure the top bearing is just under the top edge of the top panel.  This is in the directions, but it’s really important to make sure everything spins freely.
  • Putting gears on the stepper motors is tough!  Even when you back the tightening screws on the gears out as much as you can, the fit is incredibly snug.  I eventually sanded the inside of the gear slightly, put the motor on cardboard, and then pushing downwards slowly and forcefully.
  • When you’re installing the geared belts, get them as level as you can manage.
    • For the top stage this will involve adding/subtracting washers/nuts from the printed pulleys as well as adjusting the gear’s placement on the stepper motor.
    • For the X and Y stages, the height would essentially be dictated by the height of the belt on the clamps.  The height of the belt on the clamp is essentially set, so the pulleys and gear on the stepper need to be matched to that.
  • When assembling the carriages with the plastic sliders, the instructions suggest you may need to sand the circular hole they fit into.  Just make a point of sanding them, if they’re tight they could affect the looseness of the stage on the rods.
  • Inspect your Y-stage pulley (this is the smallest printed pulley) to make sure the top is level and there are no protuberances.  Even a little bit of a nub will prevent it from rotating properly.
  • The easiest way to remove the itty-bitty sticky-paper protective acrylic cover is to use a razor blade or exacto-knife to pop them off.  You probably don’t need to, but it’s an aesthetic thing.

Additional parts and tools required for Deluxe kit

Although I have the CupCake CNC Deluxe kit, there are still some parts and tools required.  If you’re getting ready to build your own MakerBot, here’s what else you’d need to build everything in one go:

  • Primer, paint, masks, cardboard, duct tape, and pen – if you’re painting.  While the other stuff is obvious, I found the pen handy for labeling the cardboard next to the parts that had to be painted differently from other nearby parts.
  • Sandpaper for sanding down punch-out-nubs and leveling off plastic parts so they’ll fit.  Based upon my enormous background in robot building, I’d recommend a super fine sandpaper for the nubby bits wooden bits and a medium course sandpaper for sanding down plastic parts.  You won’t need much, so there’s no need to buy a whole pack.  You may also need the course sandpaper for widening the openings for the plastic sliders on the X and Y axis platforms and/or to make some of the tabs fit better if you’ve painted.
  • 3-in-1 oil is needed for the various slides/rods and as part of the cleaning of the Z-axis threaded rods.
  • Paper towels are just a good thing to have around.  Damp they’ll help you wipe down a little bit of the fine ash left by the lasercutter.
  • Electrical tape and an electric drill along with paper towels and 3-in-1 oil are used for the recommended method for cleaning the threaded rods.
  • Zip ties for organizing cables.  But, seriously, you should just have these necessities anyhow.  They’re good for everything.  If you’re going out for zip ties, I’d highly recommend picking up (1) an assortment of colors/sizes in a large pack (2) a pack of uniformly colored small zip ties and (3) a pack of uniformly colored large zip ties.
  • Hot glue gun, hot glue sticks are needed for affixing the plastic sliders on the X and Y axis stages.  Like zip ties, if you have these around you’re going to find they’re a good solution for a lot of problems.  It’s like Windex that way.
  • Popsicle sticks and black paint are needed for completing and installing the opto-endstops.
  • An exacto-knife or razor blade will come in very handy for removing the very very tiny bits of protective cover on the acrylic lasercut parts.
  • Super glue is needed for affixing a pulley to the idler pulley and for laminating some parts of the two “dinos.”