
I just placed my order for my own birthday presents on behalf of my technically challenged family. :)
What it may lack in surprise, it will make up for in AWESOME.
Q: What did you get for your birthday?
A: A bunch of awesome robot parts.
All things MakerBlock: RepRap, MakerBot, Cupcake CNC, open source, and plastic building toys!
I just placed my order for my own birthday presents on behalf of my technically challenged family. :)
What it may lack in surprise, it will make up for in AWESOME.
Q: What did you get for your birthday?
A: A bunch of awesome robot parts.
I recently bought the Perhaps with a joule thief?)1 Since I know very VERY little about electronics, I’d appreciate some diagrams, descriptions of parts, etc.
My end goal is to install this device into a MakerBot made replica of the 11th Doctor’s Sonic Screwdriver.
If you’re interested in this project or just want to help, I’ll gladly accept any assistance. Let me know if I can help with any printing projects in return.
Thanks!
MakerBot Industries is giving away ten MakerBots to ten teachers at any educational level. Let’s just consider this my entry:
So, I’ve got a birthday coming up. Getting older doesn’t bother me much – it’s really just a number associated with the number of times I’ve traveled around the sun. 1 I will gleefully relate to anyone that I’m easily the luckiest man in the world. I’ve got a wonderful family, good friends, everyone is healthy, interesting and challenging work, and a fair amount of free time to do with as I wish. These are the sorts of things that are truly important to me, so by any measure of success I care about, I’ve got it all.
With my birthday approaching, my family starts to ask me about what they can get me for a present. My usual answer is, “Nothing, let’s just hang out.” This year, I actually have a list.
As it looks like both MakerGear and MakerBot are out of the magic pixie dust that will let me print in PLA without tears, the rest of my list is as follows:
I’m rather excited about some of these upgrades. I’m looking forward to a heated build platform for smoother warp free ABS builds. I’m looking forward to the rainbow pack for some crazy wacky fun. 2 And, I’m looking forward to needed the extra spare parts as infrequently as possible. :) Since my last major repair, I’ve been lucky enough to enjoy several months of carefree printing. 3
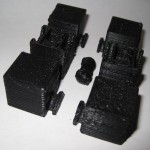
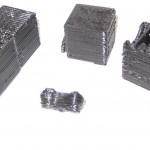
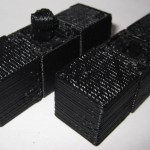
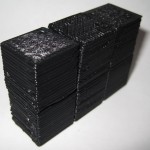
My prior copy of this 3x2x1 Rubik’s Cube was printed a few parts at a time – I’d print one part, test it, print up another, etc. Last night I was able to use my production file to generate all seven pieces in one go. It took 1 hour and 45 minutes to complete the print job, but well under three minutes to clear most of the pieces of the raft off the parts and assemble the puzzle. In order to help people modify and improve upon my design, I’ve upload the original Sketchup files, the STL I used, as well as my own GCode.
Owenscenic on Thingiverse asked,
I am interested in trying your gcode, how did you generate it? How well does it minimize strings between the printed parts? I’ll look at is to see how it starts and the temp…
In case you’re wondering too, the answers are as follows:
Owenscenic, please let me know how your print of this turned out! Please post a picture!
I’ve wondered for a while about the cost of operating a MakerBot. Let’s break it down and see what happens:
Thus,we may estimate the cost of operating a MakerBot in terms of consumption of goods and resources (excluding computer, human, and MakerBot time and wear and tear) as follows, where V is the volume of the extruded object in cubic centimeters or “cc”:
Supposing I wanted to recoup the entire cost of my MakerBot to date and spread it across the entire life of a single 5 pound roll of ABS. 2 Let’s round the cost of the MakerBot, all repairs, and all extra MakerBot related materials up to $1,500.00. One 5 pound coil would have 1890 cc’s of plastic. This would come to $0.794 per cc of plastic. So, I would suggest the cost of buying a MakerBot and printing off an entire coil of plastic would probably end up costing you about $0.85 per cubic centimeter of plastic.
Resource cost of printing a 19cc totally MakerBottable 3x2x1 Rubik’s Cube is $0.80.
Actual pro rated cost of printing a 19cc totally MakerBottable 3x2x1 Rubik’s Cube is $16.15.
Absolute cheapest MakerBot usage I’ve seen anywhere at Metrix:Create for members printing from Thingiverse is $0.30/minute, which would print the totally MakerBottable 3x2x1 Rubik’s Cube for $25.65.
The design should be pretty intuitive. However, I went ahead and took some pictures of the assembly anyhow.
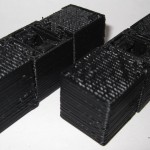
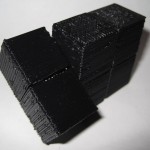
As I mentioned in an earlier post, I think this one came out really really well. :)
I’m so happy with the way this has turned out.
I’ve made a bunch of changes since the last revision of this printable 3x2x1 Rubik’s Cube puzzle:
The was one design choice on which I waffled. I considered making the center cubes non-identical, with one having half a barbell stick out and with the other having the internal connector you see now. This would have removed much of the sideways flex – since the barbell would be stationary. I did not go with this design choice because whether the puzzle used one barbell and two connectors or male/female center cubes, there would always be some flex caused by the use of a connector rather than a static pin. And, to be honest, I much preferred the symmetry of having everything assembled out of just three unique parts.
I know I’ve mentioned this before, but I really like the idea of a MakerBot printable toy that can be printed in one go and then assembled without tools or any additional hardware. I also think this would make a great MakerBot print demonstration.
I’ll post some pictures of the parts a little bit later.

This is easily my most intricate digital design for the MakerBot yet. It’s a 3x2x1 variation on the Rubik’s cube puzzle I had posted earlier.
This version incorporates the prior improvements as well as designing a connector system inspired by R3bbeca‘s beco block connectors.
This has enabled a totally printable toy. This just makes me happy. 1 The idea that I can crank out a set of these parts, clean them up a little, and just snap the toy together is just amazing.
TomZ‘s original 1x2x3 “friendlier” Rubik’s cube designs were also totally printable – but required a printed pin that was later glued in place. I like the ideal of all printed parts – but strongly prefer a design that can later be disassembled easily. And, as I mentioned above – the ability to hand assemble the toy is important to me.
I wasn’t able to recreate R3bbeca’s female connector designs2 so I made a simplified version that should suffice.
The simplified connection mechanism is essentially two plastic fingers that will (hopefully) pinch the barbell into place. This was made by designing the outline of the gripping “fingers,” creating a horizontal cylindrical hole slightly larger than the intended end of the barbell, then creating a vertical cylindrical hole in the center for the barbell to be inserted through, then a bit of cleanup.
The biggest potential problem is that this design will require a carefully tuned ‘bot. The center cube pieces have a lot of stuff packed in there – semi-circular slots for the semi-circular tabs, connectors for the barbell, and thin walls separating things. With those thin walls and interior overhangs, this may be a difficult design to print.
I think Bender is up to the task, but we’ll see in a few hours. :) I can’t wait to print this!
For me, having a MakerBot is like waking up to Christmas every morning.
Oh, and before I forget, if you want one of these – leave a comment or send me an e-mail through the Contact page. Make me an offer.

Pictured are:
Why am I telling you these things? Stay tuned…