So, I’m about to begin a completely new design on my little spider bot using what I’ve learned from the last try.
Failure is fun!
Things I learned, usually the hard way, so you don’t have to!
So, I’m about to begin a completely new design on my little spider bot using what I’ve learned from the last try.
Failure is fun!
I’ve got my Thing-O-Matic operational. There were some initial hiccups, but it seems to be working. However, I definitely need to calibrate Skeinforge and the “end.txt” cool down settings for this machine. More on those details over at the MakerBot blog. My initial print, a mini mug1 , turned out reasonably well – but is a little too sparse for actual toasting.
I love love love the idea of repurposing a MK4 plastruder into a plastic welding gun. Although, you could probably build a reasonable welding gun out of scrap parts even if you had only a MK4 – since it really only requires the PTFE barrier, barrel, nozzle, and some nichrome.
Building my MakerBot and getting it printing reliably was challenging, but totally doable by a technical novice such as myself. I have lots of people on the MakerBot Operators group to thank for their patience and help in getting my MakerBot online. 1 Looking back, I spent about a month building and then calibrating my ‘bot. 2
It’s easy for me to forget that first month of occasional frustrations and triumphant victories, now that I’ve been printing successfully for more than eight months. It actually makes me a little sad when I read people writing about their own frustrations and how they’re ready to throw in the towel. The most recent example was noobcake getting frustrated with her ‘bot and getting ready to sell it off in parts. Thankfully, Spacexula swooped in to help her out.
This brings me to We Alone On Earth‘s recent post. WAOE are a group of introspective, philosophically and technologically minded twenty-somethings. To give you you an idea of their frustration with their ‘bot, the post was entitled, “MakerBot: not very much fun at the moment (caveat emptor)” Yikes. 3 I realize that WAOE has revised their original post several times since the original publishing date – but they have a lot of legitimate concerns.
WAOE list off seven problems with the MakerBot. I’m not going to refute these points – but rather offer another perspective on them. After several updates, WAOE offer additional comments, I’ll include them here in “[]”.
A MakerBot Cupcake CNC kit is not for everyone – but the kit can be build and operated by anyone who is willing to invest the time to do so. It is a cheap, hackable machine that is literally going to be just as useful as you make it. Want less warpage, higher resolution, more reliable extrusion? You can buy an upgrade, build one from their plans, or design your own solution. 8 Want a CNC mill, CNC pencil, or CNC music box? Design the very first one! Then again, you don’t have to do any of these things.
A MakerBot kit is just a platform for your creativity. It’s just that big. 9
As for you, WAOE, if you want some help – drop me a line!
I’ve posted about other people’s MakerBot work space set ups,1 but not much about my own yet.
Right now there’s a bunch of junk2 in the way so no pictures of the setup for now. My MakerBot – “Bender,” a laptop3 , and a large long cardboard box with a wooden dowel running the length with badly cut cardboard spools holding what was once a 5 pound coil of black ABS4 , a very nearly 5 pound coil of clear PLA5 , and a full pound of white ABS I’ve never used. 678
All of this resides in our living room on an enormous former-library card catalog. For those of you youngsters out there, a library card catalog is the kind of thing you see in the background scenes of Warehouse 13. Imagine a huge chest about four feet tall that has lots of small, deep, drawers. It is what libraries used to use to store information about their collections – an analog database. Frankly, I didn’t realize the one I bought was quite so large. 9 It’s literally big enough for about six identical MakerBot/laptop/plastic coil setups to the one I have. 10 The drawers beneath the area where my Makerbot resides are devoted to tools and spare parts. Right now the surface is covered in a number of unfinished projects and some totally finished projects.
Library card catalogs are super handy and useful ways to incorporate storage and a raised level surface for working. The only problem is that these things are absolutely enormous and way way heavier than they look.

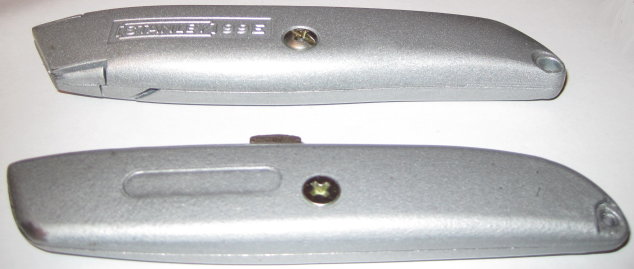
Several months ago I made an impulse buy at the local hardware store. I picked up a utility knife that came with 6 blades for $1. It was a good deal, if even for just the razors, and I couldn’t find my usual $3 knife.
Here they are, side by side. My trusty Stanley utility knife on top. This knife has a good heft, stores a few extra blades in its handle, and is slightly wider, making for a more comfortable grip. The two sides also interlock as well as screw into one another. Clicking the blade out another notch requires a small amount of force – just enough so you’ll never do it by accident – and so that it will stay in each notch as long as you don’t intentionally depress the button.
On the bottom is my no-name brand knife. It’s lighter, slightly thinner, rattles with the extra blades inside, and the button to extend/retract the blade has a little bit of wobble and play to it. Also, there’s no interlocking between the two halves.
I discovered that the seams between the two halves of the cheapie utility knife left a lot to be desired. While using the knife I felt a sharp poke in my palm. Turns out that some of the spare razor blades were poking through the incomplete seam.
So, if you’re headed to the hardware store, invest the extra $2 in the better knife. :)
If I’m printing an object with a 0.5mm thickness, chances are the very first time there’s a slight overhang it will go pear shaped. When the walls are that thin, there’s almost nothing underneath even a very slight 20-30 degree overhang.
Duh.
I’m going to warn you right now, this post has nothing to do with RepRap or MakerBot.
Three years ago I was unemployed with a big fat mortgage payment. The year that followed my newfound unemployment was a roller coaster. I took contract work for others, I had a few small clients of my own, taught myself how to program in PHP/MySQL, built my first website, tried to turn that website into a business, did some freelance programming, and generally did whatever I could do in order to make ends meet. It was an exciting and scary time. About a year after becoming unemployed I accepted an unsolicited job offer and have been there ever since.
I wish that I had read Tim Ferriss’ Four Hour Work Week and Guy Kawasaki’s Art of the Start back then.1 I just finished reading the FHWW for the first time and I’m glad I bought it. Like Reality Check and The Art of the Start before it, these are books I’m positive I will be using as reference manuals. It would have been sooo helpful to have Guy’s book around when I started my first website business. I needn’t have learn so many lessons the hard way.
The same goes for the FHWW. Tim’s book includes a lot of advice that would have been invaluable to me as an unemployed entrepreneur-by-circumstance2 . Basically, when I had a surplus of time and deficit of money. With a steady job I no longer have a deficit of money3 , but I do have a deficit of time. Some days I will daydream about what I could accomplish if only I had a little more time in the day. I won’t know until I try, but the Four Hour Work Week may just be my chance to find out.
Suffice it to say, I’ve read both books and will probably re-read both again soon. If you’re unemployed or want to start a business4 , you should definitely pick up both of these books.
Okay, back to your regularly scheduled nonsense. :)
I’ve wondered for a while about the cost of operating a MakerBot. Let’s break it down and see what happens:
Thus,we may estimate the cost of operating a MakerBot in terms of consumption of goods and resources (excluding computer, human, and MakerBot time and wear and tear) as follows, where V is the volume of the extruded object in cubic centimeters or “cc”:
Supposing I wanted to recoup the entire cost of my MakerBot to date and spread it across the entire life of a single 5 pound roll of ABS. 2 Let’s round the cost of the MakerBot, all repairs, and all extra MakerBot related materials up to $1,500.00. One 5 pound coil would have 1890 cc’s of plastic. This would come to $0.794 per cc of plastic. So, I would suggest the cost of buying a MakerBot and printing off an entire coil of plastic would probably end up costing you about $0.85 per cubic centimeter of plastic.
Resource cost of printing a 19cc totally MakerBottable 3x2x1 Rubik’s Cube is $0.80.
Actual pro rated cost of printing a 19cc totally MakerBottable 3x2x1 Rubik’s Cube is $16.15.
Absolute cheapest MakerBot usage I’ve seen anywhere at Metrix:Create for members printing from Thingiverse is $0.30/minute, which would print the totally MakerBottable 3x2x1 Rubik’s Cube for $25.65.

This is easily my most intricate digital design for the MakerBot yet. It’s a 3x2x1 variation on the Rubik’s cube puzzle I had posted earlier.
This version incorporates the prior improvements as well as designing a connector system inspired by R3bbeca‘s beco block connectors.
This has enabled a totally printable toy. This just makes me happy. 1 The idea that I can crank out a set of these parts, clean them up a little, and just snap the toy together is just amazing.
TomZ‘s original 1x2x3 “friendlier” Rubik’s cube designs were also totally printable – but required a printed pin that was later glued in place. I like the ideal of all printed parts – but strongly prefer a design that can later be disassembled easily. And, as I mentioned above – the ability to hand assemble the toy is important to me.
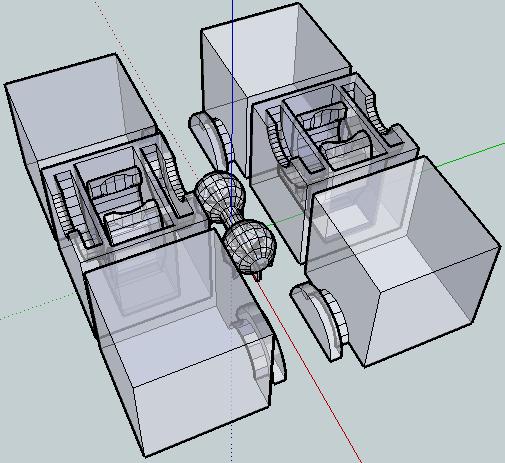
I wasn’t able to recreate R3bbeca’s female connector designs2 so I made a simplified version that should suffice.
The simplified connection mechanism is essentially two plastic fingers that will (hopefully) pinch the barbell into place. This was made by designing the outline of the gripping “fingers,” creating a horizontal cylindrical hole slightly larger than the intended end of the barbell, then creating a vertical cylindrical hole in the center for the barbell to be inserted through, then a bit of cleanup.
The biggest potential problem is that this design will require a carefully tuned ‘bot. The center cube pieces have a lot of stuff packed in there – semi-circular slots for the semi-circular tabs, connectors for the barbell, and thin walls separating things. With those thin walls and interior overhangs, this may be a difficult design to print.
I think Bender is up to the task, but we’ll see in a few hours. :) I can’t wait to print this!
For me, having a MakerBot is like waking up to Christmas every morning.
Oh, and before I forget, if you want one of these – leave a comment or send me an e-mail through the Contact page. Make me an offer.