The Lost Blog Posts

A sign in front of a desolate wasteland says "YOU ARE LOST"
But at least you’re here

I’ve got a lot of unpublished draft blog posts here.  Like a lot.  At the time I’m writing this post, I’ve got 1,134 published posts and 329 drafts.  This isn’t versions of drafts.  It’s posts that I’ve started and then didn’t publish for some reason or another.  On probably 300 different topics.  Some are, admittedly, little more than a collection of links and indecipherable shorthand texts from a madman.  However, others are filled with research, links, images, code, and were so close to publishing that I can only imagine that something distracted me before I could… squirrel!

The oldest of these dates back to December 2009 and relates to the cutting edge, new to market, MakerBot Cupcake CNC’s plastic extruder, the “plastruder.”  I don’t know that anyone would be interested in this kind of content any more, but I kinda like the idea of “Drafts Zero” and spending about 5-15 minutes dusting off an old draft and just publishing it.1

Let’s see how this goes.

Update:

  1. In just the first few posts, I discovered that I wanted to add some additional comments.  Look for these at the top, in italics and in brackets to provide context.
Drafts Zero - The Lost Blog Posts
  1. Misnamer [11/28/2010]
  2. The Lost Blog Posts
  3. Plastruder! [Draft 12/25/2009]
  4. UNTITLED [Draft 12/25/2009]
  5. Preparing to print [Draft 12/27/2009]
  6. More prints [Draft 01/04/2010]
  7. Prototype Pricing [Draft 01/19/2010]
  8. MakerBot tuning [Draft 01/20/2010]
  9. Plastic Screw Anchor [Draft 02/02/2010]
  10. Magic [Draft 02/03/2010]
  11. How are you printing with PLA? [Draft 02/16/2010]
  12. Rebuilding my extruder [Draft 02/16/2010]
  13. MY robot [Draft 02/18/2010]
  14. more things i learned [Draft 02/20/2010]
  15. First commissioned piece! [Draft 02/22/2010]
  16. MakerBot: Toy or Tool? [02/25/2010]
  17. Idea for Skeinforge settings… [Draft 03/27/2010]
  18. RepRap and MakerBot alternatives [Draft 04/05/2010]
  19. RepRap Parts for Sale [Draft 04/07/2010]
  20. Where is the Othercutter? [Draft 06/08/2015]
  21. Mendel Parts – Printed, Cast, CNC’d, Lasercut or Injection Molded? [Draft 04/12/2010]
  22. MakerBot Operator’s Manual [06/04/20210]
  23. MakerBot on CBS! [07/07/2010]
  24. New Print: Soft-Pawed Albino Stoat of South Wales Cookie Cutter [07/07/2010]
  25. House calls [07/11/2010]
  26. Digital assistant? [08/05/2010]
  27. MakerBot + Junk = Stuff! [08/06/2010]
  28. Design choices in RepRap, Goals of RepRap [08/14/2010]
  29. Upgrades and obsolescence [08/25/2010]
  30. Dear Anonymous [08/25/2010]
  31. The ultimate in customer service [08/26/2010]
  32. Open Source Makes You Smarter [08/27/2010]
  33. Getting my Plastruder MK5 running [09/06/2010]
  34. Weird new kind of spam [09/19/2010]
  35. An open letter to Ms. Word [10/18/2010]
  36. Printing with PLA again! [10/18/2010]
  37. Halloween costume too [10/27/2010]
  38. Dream jobs [10/29/2010]
  39. The nuances of time travel [10/31/2010]
  40. Printed Pink Panther Person [11/22/2010]
  41. Skein them all and let ‘Bot sort them all out [11/24/2010]
  42. The Patents for disc shooters [12/10/2010]
  43. Princess Bride with Lightsabers [12/13/2010]
  44. Dilbert comic [12/13/2010]
  45. Ultimachine PLA review [12/15/2010]
  46. Mendel to the power of 101 [12/21/2010]
  47. Potential improvements for Leonardo Voltron [12/27/20210]
  48. You can keep your filthy money [12/28/2010]
  49. I watched Primer the other night [12/30/2010]
  50. 10 Printing Predictions for 2011 [01/03/2011]
  51. I’d rather be making [01/04/2011]
  52. Best use for the MakerBot Unicorn? [01/04/2011]
  53. There’s just something profoundly meta and wrong with this. [01/05/2011]
  54. MK4 plastruder parts for sale [01/10/2011]
  55. Phone conferences… [01/10/2011]
  56. ADD? [01/12/2011]
  57. Chicken, part III – and oversharing [01/13/2011]
  58. Plastruder re-build [01/17/2011]
  1. A take on the “Inbox Zero” productivity / organization strategy []

Goblin Hours, Enabled

Live Webcam Feed
Live Webcam Feed

I’ve often told my family that if it were not for them, I’d basically work all night, every night, on whatever latest project popped into my brain, and then fall asleep at the workbench/eating plank/soldering station every night/early morning.

The thing is, these tendencies just aren’t very conducive when it comes to trying to live with other people, especially those you’re semi-responsible for.1 It’s especially challenging to work in a professional environment at DayJob™️when I’m working crazy hours.  I don’t want my clients or the other people I work with realizing they’re communicating with the functional equivalent of three meth-addled racoons in a trench coat.23

I have a few ways of passing for a socially normative respectable professional.  Here are some of my coping mechanisms:

  • I’ve put several buttons into Outlook’s quick access toolbar.  The most important are:
    • “Delay Delivery” so that I can draft and hit “send” on an email, but not have it go out until a socially acceptable time
    • “Signature” so that I can easily send an email with my “mobile” email signature or my full fledged obnoxiously enormous “professional” email signature.  Why would I do this, you ask?  Well, if I want to get away with a quick reply and not really do a deep dive, I’ll fire off an email as if I were typing from my phone.  I’ll even introduce “strategic typos” to really sell the impression.  Then again, if I’m typing a really long email into my phone and want to have it appear more impressive, I’ll use the “professional” signature.
    • “Work Offline” so that I can work uninterrupted for even a little while.  Being able to shut off the firehose that is my daily work email inbox is incredibly helpful.
  • I addressed strategic typos earlier, but it’s really genuinely a real coping mechanism aside from just an email signature.  Adding typos makes it more likely someone will focus on appreciating your responsiveness and less likely they’ll get nitpicky about the content.
  • My old cell phone using Google Voice as my “personal cell phone” number.  I don’t want to talk to people, but it’s basically unavoidable.  Then again, a quick text from the phone can handle many situations.  Even better, clients feel like they really have access to me.  It’s also nice that I can keep Google Voice open on my desktop and be able to “text” from my computer and using my keyboard.  In reality, I just leave this secondary phone and just … walk away from it.  No one outside my family needs that much access to my life.
  • I’ve spent a lot of time tracking my productivity and know what days I’m the least productive.  Unsurprisingly, it’s Mondays and very especially Fridays.  This means I try to avoid meetings on these days as much as possible so that I can lean into unproductivity if I need to.  Why flog myself into working ever harder when I already know that however hard I push myself, it’s just not gonna be a productive day?
  • I really try to avoid all meetings.  Mercifully in person meetings are all but extinct.  Video meetings are nearly as bad, but at least I don’t have to wear pants.  Whenever I have a video meeting (or phone conference), I will make a special effort to ask for an “agenda.”  If you don’t have an agenda, or at least some kind of idea about what you want to accomplish at a meeting you’ll never know if you’ve succeeded at the meeting … or when it should end.  And, once I have the agenda, I will send an email with as much detail and cover as many points as possible.  Sure, no one will read it… but its’ my way of preparing for the meeting and I can keep referring back to it as necessary. I’d say in roughly 40% of situations that email is enough to torpedo the entire meeting.
  • Recently I created, with the help of ChatGPT4 I wrote an Outlook macro which will help me automate when I send emails.  Whenever the “Work Offline” button is toggled and I hit “send” on an email, it picks a random time between 7:15 AM and 7:59 AM and schedules the email to go out on the next business day.  Sure, this means people will get a flood of emails from me first thing on Monday morning.  But, it’s that a lot better than getting a stream of emails from me all weekend?
  • I hate phone calls, so I will dodge as many as I can get away with.  And, when I’m on a long phone call, I will play a recording of someone knocking on my door and asking for my attention in increasingly urgent tones, until I can get off the line.

I don’t know – maybe this all adds up to some kind of antisocial behavior or DSM IV diagnosis?  What I do know is that with these various tools I’m able to better work with others in a professional setting.

It’s a little after 4AM right now.  I’m not sure how to end this post so I’m just going to publish it.  :)

  1. In so far as I can be responsible for other humans []
  2. God, wouldn’t that be an amazing Halloween costume?!  Me dressed as three racoons dressed as me?!!? []
  3. Where was I? []
  4. Don’t @ me.  I don’t care. []

Combining Multiple Video Files

Rather than send me a single set of video files, my client’s vendor sent me… 149 separate MP4 files, ranging from a few seconds to about 11 minutes long.  I have no interest in sorting through dozens of video files, cataloging them individually, and then trying to review them in order.

While I would have thought VLC would have been a good drag-n’-drop way to stitch them all together, the version I had and the newest version available both weren’t letting me save multiple files into a single file.

A bit of googling and I stumbled across an old friend – ffmpeg!  I hadn’t used this program to transcode video since the early days of DIVX, backing up DVD’s back in the late 1990’s / early aughts.

Here’s the process I settled on for my Windows machine:

  • Created a batch file to create a list of the video files (which included spaces, commas, and all kinds of nonsense command line tools hate).  The entire contents of the batch file was:
    • dir *.mp4 /b > list.txt
  • Since I’m using Notepad++, I used the find/replace function to search / replace on “list.txt”:
    • /r/n
    • ‘/r/nfile ‘
  • Even using some find/replace magic, I still needed to adjust the first and last lines, but that wasn’t so bad.
  • Then, the videos which had been named in semi-logical pattern, were not in strictly alphanumeric order.  I re-ordered them in the text list to the order I’d wanted to view them in.
  • I dropped the FFMPEG executable, downloaded from this mirror, into the folder with the video files and list.txt, then made a new batchfile which contained the following:
    • ffmpeg -f concat -safe 0 -i list.txt -c copy combinedfilename.mp4
  • Now, I could have typed this into the command line, but since I wanted to batch certain files together, it was just easier for my purposes to have the batch file.  Plus, now I have the executable and the batch file for future use.

Anyhow, I hope this helps save someone, perhaps even myself, a few minutes of hair pulling and searching.  :)

Night Before Going to Maker Faire

Annnnnnnnnnnd…  my robot which has been working for a solid year is now completely unresponsive.

My wife’s robot is working, Dexter Starfighter’s robot is working, Kim’Dael LightingSlayer’s pendant is working.

And my robot not only doesn’t work, I have spent so much time trying to get it functional that I still don’t have a good way to mount it on my shoulder.

I could cry.

How to Uninstall McAfee AntiVirus

I got to my computer this morning and discovered a pop-up from McAfee AntiVirus altering me to some nonsense or other.  Without going into all the reasons, I don’t like or want McAfee on any of my computers.  Given when it was installed, I believe it was quietly bundled with the Adobe Reader I installed yesterday (and now uninstalled as well).

I went through the normal process of trying to uninstall a program:

  • Settings
  • Add / Remove Programs
  • Find “McAfee” and click “Uninstall”
  • When you do, you’ll see a small window pop up offering you some promotion.  However, this is where the uninstallation process stopped for me!  The window appeared too small and the text too large and the only options available to me were to close the window (in which case McAfee stays) or click on their offer (which didn’t tantalize me either).  There was no way to scroll the contents of the window to see what else was below their text and offer.
  • I realized there might be more below their offer, so I hit the “Tab” button a few times.  This caused the window to focus on the next button “Uninstall” (in white) on the bottom left and to see the “Go to Offer” (or somesuch, I wasn’t paying attention to it) button on the bottom right.
  • I clicked Uninstall and it hasn’t been back since…

Hope that helps!

Review of DriveThruCards.com

TLDR:  The cards from DriveThruCards.com (DTC) arrived yesterday and I couldn’t be happier with the result.  Great customer service, product, and value.

This slideshow requires JavaScript.

  1. Shipping:  Great
    1. 3/19/2024:  I ordered 120 cards around 2 AM PST in California.
    2. 3/19/2024:  The DTC website was updated with the following statuses:  Pending Payment Approval, Paid For, Sent to printer, Confirmed.
    3. 3/24/2024:  I received a shipping confirmation email from DTC in Overland Park, Kansas with a USPS tracking number at about 4:32 PM PST.
    4. 03/25/2024:  The date on the “External Packing Slip” included with the box.
    5. 3/28/2024:  USPS sent me a notification the package arrived around 8:29 AM PST.
    6. This was basically exactly as long as my Reddit lurking had suggested (about 10 days) it would take.

      Order confirmation and status screen
      Order confirmation and status screen
  2. Packaging:  Great
    1. The cards arrived wrapped in a cellophane band, within packing paper, inside a small box (about 5″x5″x3.5″ cube).  This was perfectly fine for these cards.  They have options for tuck boxes and other containers, but I didn’t need or want these for this project.
  3. Card Quality:  Great
    1. Text and images were sharp, legible, and colors rich but slightly darker than what I saw on my computer screen.  By tinkering with Inkscape, I would guesstimate the final card was about 5-10% less bright than what I saw on my screen.  Without comparing the cards directly against a large bright monitor, I don’t think I would have noticed this difference.
    2. When I set the deck down on a flat surface and run my finger over the side of the stack of cards, there’s a very slight variation over a few cards.  It’s barely perceptible and probably totally fine for any kind of card usage or card game except a super precise cut for casino playing cards.
    3. When the cards are viewed edge-on in a stack, you can tell see a faint bit of the card’s edge color.  I grabbed some “Magic: the Gathering” cards and looked at a mix of black and white bordered cards and noticed that even the black border cards seem to look white-ish when viewed edge on.  The slight bit of color here doesn’t bother me at all and for most purposes would be totally irrelevant.
    4. The cards were 2.503″ or 63.57 mm wide and 3.506″ or 89.05 mm tall, or about 0.2% large.  Some variation is to be expected in any order and this miniscule variation would be completely unnoticeable except I used digital calipers to measure them.
    5. The cards, printed on DTC’s “premium stock,” advertised as 11.4 pt (0.0114″) were 0.0115″ or 0.29 mm thick.  Flicking the cards against a table, right next to an actual casino poker card, they felt identical.  (The casino card has a slightly raised texture, but the flex, bounce, and flick of the card stock felt identical).
    6. Card Cut.  This is the one aspect that didn’t come out exactly as I had planned.  Ten of the cards I printed had borders, but they were visibly different widths at each end.  These cards were Premium U.S. Poker sized (2.5″ x 3.5″), the PDF itself was 2.75″ x 3.75″ (to account for the 1/8″ bleed area at each edge).  Unfortunately, I didn’t notice this until after I had used the cards a bit, so I don’t know whether top or the bottom was slightly thinner.  Since these cards are basically dividers, this isn’t a huge deal for me.  However, I’d prefer being able to get them back with an even border all the way around.

      This slideshow requires JavaScript.

  4. Customer Service:  I discussed the responsiveness of the DTC customer service team in the prior post.  They went out of their way to help me with my project – and it really smoothed things for me.

I simply could not be happier with these cards.  I will absolutely be trying them again.

Print On Demand Custom Cards
  1. Custom Cards with DriveThruCards.com
  2. Review of DriveThruCards.com
  3. Designing Custom TCG Cards and Proxies

Gluing Polypropylene Corrugated Plastic (Coroplast)

Late at night, when I should be doing work or, better yet, sleeping, ideas spring to mind.  I’ve created a few small projects from big sheets of coroplast or polypropylene corrugated plastic.  This is the kind of material you see in use for yard signs.  They are big, cheap, sturdy (as long as you’re not bending it with the grain), and lightweight.  They can be bent or cut easily.  However, since it is polypropylene, it is fairly resistant to most glues, adhesives, and paints.

Duct tape and hot glue work well, but have their downsides.  The duct tape can be unsightly and not very good for “laminating” several layers together.  Hot glue works well for laminating layers, but it cools so fast that it’s hard to glue big sheets together.

Anyhow, all of this is to say I found a great website by Christine DeMerchant which provides a lot of information and insight on how to glue these materials together.

How to “Unthread” Emails in Thunderbird v115

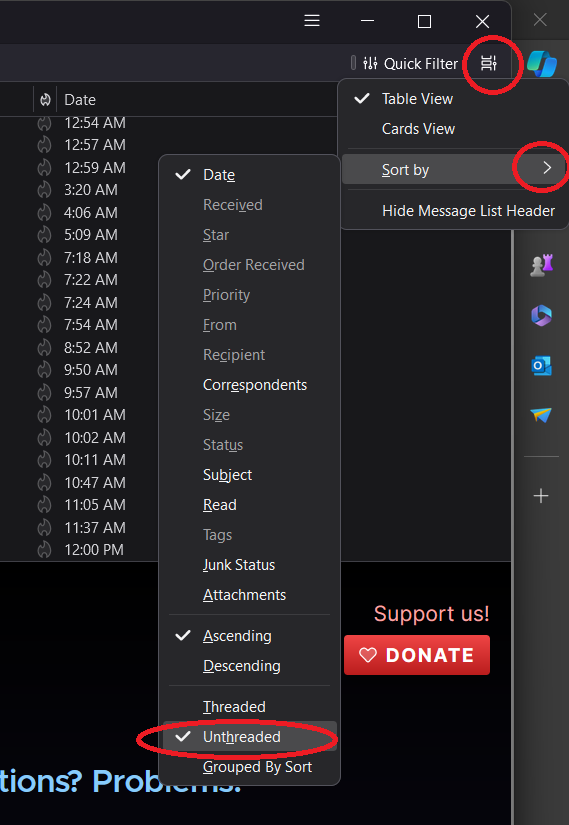
If you’re just here for the solution (or, you’re actually me, returning some time in the future to fix the problem after perhaps a Thunderbird update), here’s all you need to know:

  1. Click on the icon in the top right that looks like a film strip which displays the “Message list display options” when the mouse hovers over it.
  2. Sort by -> Unthreaded
Just follow these steps, starting with the menu at the top right

I suppose there are times when threaded email view is useful.  However, when reviewing emails at a glance, it’s incredibly frustrating because your inbox will show you have a new unread email, but you won’t know which thread it’s nested under.

I found numerous “solutions” online for how to unthread Thunderbird emails, but none of them worked for me since the answer wasn’t buried in any of the settings, the hamburger menu didn’t help, and nothing relevant showed up in the help sections or even in searching the settings section.

Of course, right clicking on the columns allowed me to hide the “thread” column, but that didn’t stop emails from actually being threaded.

I spent some time searching for the answer, watching snippets of videos, and finally stumbled across the solution here after seeing multiple people voice the very same frustrations I did, discussing.  Hopefully the above screenshot helps you (or me!) solve this problem in the future.

DIY Carved Eraser QR Code Stamp

After some modest success carving some neat designs into pink erasers, I tried making a QR code stamp.  It didn’t work well at all, with exactly just one impression working … sometimes.

The first attempt took a really long time and turned out terribly.  After a few days break, and some mental distance from the project, I returned with some new ideas and inspiration.

Here was my new approach and plan:

The Stamp

  1. Go Slow.  Proceeding slowly and methodically is always a good idea with sharp instruments.  I went fairly slowly the first time, but this time I would be even more methodical.
  2. Cutting.  Rather than using the carving blades for the QR code features, I switched to using a craft knife.  It was just too hard to cut precise lines with a V or U shaped blade, managing not just the direction and speed of the cut – but the depth as well – for both sides of the blade.  The craft blade let me focus on just one side at a time.  I used the blade to cut at about a 45 degree angle along one side, then other side.
  3. Don’t Cut Too Much.  I used calipers to measure the pixels cut into my first attempt as well as the stamped result.  I discovered \the stamp pixels were very slightly larger than their rubber counterparts.  This tells me it would be better to cut too little rubber – and cut more later if necessary.
  4. Removing Scraps.  Rather than sticking my big old fingers into the eraser or trying to pop it out with the blade, I used a pair of 3D printed tweezers to pluck them out.

The QR Code

  1. Optimize the QR Code.  There are several ways to optimize a QR code for eraser / stamp carving. 1.  I used as many of these methods as I could:
    1. “Pixel” Size.
      1. As you add more information into a QR code, the QR code generator will need to use more black and white units2 to encode the information.  After some tinkering it seems like the smallest QR code that can be generated is 441 total pixels, 21 wide by 21 tall.  The absolute largest QR code I could generate looks like one of those “magic eye” posters.  I didn’t even try to count how many pixels wide this thing was.  It’s 9,216 pixels, 96 wide by 96 tall.

        This slideshow requires JavaScript.

      2. I was having a hard time carving a stamp 21 pixels wide into a 24.5 mm3 wide eraser, so the idea of carving more than 21 lines into an eraser by hand seemed not feasible.  The very next step up from the 21×21 grid would be a 25×25 grid, so I knew I had to find a way to limit the data, find the best error correction, and find a way to cut these small pixels and thin features.
    2. Proper Error Correction.
      1. QR Codes have built in “error correction” that allows the user’s scanning device to scan information from a partially formed, damaged, or obscured code.  These settings range from L (low), M (medium), Q (quality), and H (high quality) able to error correct from up to 7%, 15%, 25%, and 30% damage respectively.  Lowering the error correction allows you to create a smaller QR Code, but it will also be less robust.
      2. I fiddled with these settings a lot to find the maximum amount of data I could put into a QR code while still retaining a maximum size of 21×21 pixels.  I was able to encode about 16 characters in a L, 13 characters in a M, 10 characters in a Q, 6 characters in a H.  The code stores numeral easier and requires more pixels to store letters and special characters.
      3. My first attempt used an error correction level of L, but was basically unusable as there must have been more than 7% distortion.  This time, I decided to try for a very high level of error correction with the Q setting for 25%.
    3. Reducing Data.  This is where I used some tricks you may, or may not, be able to replicate.
      1. URL Shortener.  A TinyURL link to my Instagram page requires 29 characters.  Looking above, this would immediately suggest a 21×21 pixel QR code would not be possible.
      2. Trimming a Link.  After some fiddling, I realized that as long as the data encoded looked like a URL (as in some characters separated by a “.”), the QR code scanner would interpret it as a link.  This means we can skip the “http://” and “https://”, saving 7-8 characters!  Unfortunately, this still doesn’t let me encode the shortest URL that TinyURL could give me which requires 20 characters after discarding the “http” stuff.
      3. Maybe Just a Domain?  Maybe you just wanted to point someone to your website and not a big long link, shortened with a URL shortener.  Let’s work the numbers backwards.  Most commonly used domains end with “.com”, “.org”, “.biz” – with 4 characters each.  Using the information above, this means we could use a domain name with up to 12 characters for an L encoded QR code, 9 for an M, 6 for a Q, and just 2 for an H.  While it would be easy to find a 12 character domain, you’re stuck with only a 7% margin for your error correction.  A domain with 6 to 9 characters for Q and M would allow for 25% and 15% error correction.  You can still find 6 character “.com” domain, but… they’re unlikely to be very memorable.  This isn’t necessarily a problem.  You might be able to find a good short domain with an unmemorable name, but forwards the user to your real website.  The problem, of course, is that no one is going to want to click on that link.
      4. How About a custom URL Shortener?  It’s still possible to purchase a short URL, but they’re pricey.  I happened to buy a good one several years ago and have hung on tightly to it.  I slapped a YOURLS install on it, and have been using it ever since.  Using my own URL shortener means I can keep the URL down to just 9 characters – including the TLD!

Okay, back to carving.  I grabbed my headphones, put on some music, and took it very slowly – a little under two hours.  Here’s some progress photos:

This slideshow requires JavaScript.

Here’s how it looked (with some additional shots to show the original design overlaid):

This slideshow requires JavaScript.

I stamped this design 9 times – and all 9 were more or less easily scannable.  The neat thing about this design is that it points to a URL shortener I own, so not only is it about as tiny as possible, but I can change the destination if I ever needed – without having to spend two hours recarving an eraser stamp!

Eraser Stamp Carving
  1. Carved Eraser Stamping
  2. Further Adventures in Eraser Carving
  3. DIY Carved Eraser QR Code Stamp
  1. I won’t get too much into the weeds on the actual method of generating QR codes, mostly because I haven’t studied the math in it, but I did find a great article which has a lot of good background info and explanations []
  2. I’ll call them “pixels” from this point forward []
  3. Just barely under an inch []

Heat Transfer Vinyl T-Shirts – Without A Vinyl Cutter, Part II

I recently posted my method for making DIY heat transfer vinyl t-shirts without a craft / vinyl cutter.  I used the process to make an Avatar: The Last Airbender themed t-shirt, then a set of four Fallout themed t-shirts for the entire family.  After that I designed, cut, and ironed several more t-shirts. (You’ll see me refer to ironing the design several times, but each time I ironed the vinyl through a piece of parchment paper, to protect the design from scorching and the iron from being marred by melted plastic)

I learned a few more things along the way and thought I’d share these newb-mistakes and pro-tips.

But first, how about some pictures?!

This slideshow requires JavaScript.

  1. Cutting Designs
    1. Just be careful and go slow.
  2. Design Size
    1. I tend to make designs that are no more than about 6″ wide.  This has seemed to be a really good size to show off a cool design, but also fits neatly in the center of an 8.5″x11″ piece of standard printer paper.  You could make something a lot larger, but for all of my designs, this has worked out really well.
  3. Preparing Designs
    1. I forgot to take a picture of it, but it helps to draw an X and Y axis into your drawing.  The purpose of this is to help orient your design at the center of the fabric.  After I had cut out the design entirely, I then used the craft knife to cut triangles into the protective layer pointing towards the center of the XY axis center of the design.  Then, once this was done I could draw the XY axis lines on the protective layer.
    2. I used a yard stick to estimate the center line of the shirt, which I could then align with the XY axis lines on the design itself.
  4. Position Your Design
    1. After looking at various other t-shirts, I decided they tended to look best when the top of the design was about 3″ lower than the bottom of the “V” in my v-neck shirts.
    2. Once I had the shirt on the ironing board, I also put pieces of masking tape with a pen line on the ironing board to help me position and orient the yard stick repeatedly.
  5. Heat / Press
    1. Unlike my first attempt, I made sure to really push hard on the iron.  The idea is that you’re not just melting the vinyl adhesive, but actually melting it into the fabric.  If your iron isn’t hot enough, you’re not ironing long enough, or you’re not pressing hard enough, it won’t actually melt into the fabric.
    2. When you’ve melted it properly, you should see an almost… bubbly texture underneath the protective coating.  Then, once the vinyl is cool and you’ve peeled the coating off, the vinyl should look a little rippled since it is taking on the texture of the underlying fabric.
    3. This slideshow requires JavaScript.

  6. Iron, Cool, Wait, Inspect Vinyl, then Peel
    1. I made this mistake with the arc reactor t-shirt.  As I peeled the protective coating off, in one spot the vinyl got pulled up and in another spot it tore the corner off a sharp trapezoid in the design!  While it is possible I didn’t have the iron hot enough or press hard enough, I think the most likely explanation is that I didn’t wait long enough for the vinyl to cool – so it was still molten enough to be adhering to both the shirt and protective coating, causing the design to be damaged and torn.
  7. Peeling Direction
    1. If your design includes very thin or sharp little pieces (such as the pointy trapezoids in the Iron Man arc reactor), consider changing the direction of the protective coating peeling to avoid peeling towards a sharp point.  These little points have so little surface area they can easily stay stuck to the coating and get pulled off the shirt, ruining all your hard work.
  8. Repairing Mistakes
    1. The problem with making a mistake with heat transfer vinyl is that if you make a serious mistake to your design or application, you may have ruined a shirt.  (I would 100% wear a comfortable shirt even if the design wasn’t perfect.)  However, a little mistake doesn’t have to be the end of the world.  I made two mistakes on my arc reactor t-shirt, that I was able to fix well enough that they probably wouldn’t be obvious to the casual observer.

      Yellow arrows show where the design pulled up and wrinkled slightly. The red arrows point to where the design tore and was repaired.
      Yellow arrows show where the design pulled up and wrinkled slightly. The red arrows point to where the design tore and was repaired.
    2. The design of the arc reactor is about 3″ across, to give you a sense of the scale and size of the mistakes.  You can see two slight wrinkles in the vinyl, pointed out by the yellow arrows.  The red arrows points to where you can barely make out what appear to be wrinkles – but show where the design was torn and repaired.
    3. I didn’t find any really good way to fix the wrinkles, other than to really iron those areas very very hard.  It mostly pressed the wrinkles flat and they’re barely noticeable on the shirt.  Between the shimmery / reflective quality of the vinyl and uneven way a shirt would hang on a non-rectilinear organic body or form and the size of the wrinkles on the small design, it’s almost imperceptible.
    4. The torn design was initially quite heartbreaking.  By the time I had worked on this shirt, I had already created five other shirts without any kind of mistake.  It just so happened I either incompletely cut the design out (I don’t think so) or was a little impatient as I peeled the design (probably), and tore a pretty big piece off of the end of the right side trapezoid pointed out by the red arrow.  I tried to use my craft knife to peel the tip of the trapezoid off the protective coating, but it wasn’t working and I ended up mangling it beyond repair.  After stewing a bit, I figured I would simply cut out a new trapezoid piece and iron down over the torn piece.  I made sure to cut the new piece very slightly larger (we’re talking probably only 0.5 mm in each direction) and position it carefully over the damaged section, before ironing it down very firmly, waiting for it to cool down all the way, peeling the coating, then ironing it again.  Once again, I think the damaged portions wouldn’t be noticeable to most observers.

I would guesstimate a 5-foot long and 12″ wide roll of heat transfer vinyl could comfortably make 10-15 good sized designs and as much as 20 if you’re very careful.  Let’s say you can only make about 14 designs out of a roll, to be on the conservative side.  At about $7 for a basic color roll, this about $0.50 worth of vinyl per shirt.  My wife bought me several 2-pack blank v-neck shirts in assorted colors for about $14 per pack.  Ignoring the cost of my time (it’s a hobby, remember!) this is only about $7.50 per custom shirt.  I think this could make a really cool and inexpensive project for a class, letting all the kids make their own designs (by cutting the vinyl with scissors instead of craft knives, if they’re young) or to create a set of team shirts for a field trip or club.

Not only has this been a very fun and inexpensive hobby, I end up with a great looking custom t-shirt at the end that will probably last years.

I’ve got several more designs I’m working on and look forward to a few more updates.

Heat Transfer Vinyl T-Shirts (Without a Craft Cutter)
  1. Heat Transfer Vinyl T-Shirts – Without A Vinyl Cutter
  2. Heat Transfer Vinyl T-Shirts – Without A Vinyl Cutter, Part II
  3. Heat Transfer Vinyl T-Shirts Without a Craft Cutter (2023)
Test