I recently posted my method for making DIY heat transfer vinyl t-shirts without a craft / vinyl cutter. I used the process to make an Avatar: The Last Airbender themed t-shirt, then a set of four Fallout themed t-shirts for the entire family. After that I designed, cut, and ironed several more t-shirts. (You’ll see me refer to ironing the design several times, but each time I ironed the vinyl through a piece of parchment paper, to protect the design from scorching and the iron from being marred by melted plastic)
I learned a few more things along the way and thought I’d share these newb-mistakes and pro-tips.
But first, how about some pictures?!
This slideshow requires JavaScript.
Cutting Designs
Just be careful and go slow.
Design Size
I tend to make designs that are no more than about 6″ wide. This has seemed to be a really good size to show off a cool design, but also fits neatly in the center of an 8.5″x11″ piece of standard printer paper. You could make something a lot larger, but for all of my designs, this has worked out really well.
Preparing Designs
I forgot to take a picture of it, but it helps to draw an X and Y axis into your drawing. The purpose of this is to help orient your design at the center of the fabric. After I had cut out the design entirely, I then used the craft knife to cut triangles into the protective layer pointing towards the center of the XY axis center of the design. Then, once this was done I could draw the XY axis lines on the protective layer.
I used a yard stick to estimate the center line of the shirt, which I could then align with the XY axis lines on the design itself.
Position Your Design
After looking at various other t-shirts, I decided they tended to look best when the top of the design was about 3″ lower than the bottom of the “V” in my v-neck shirts.
Once I had the shirt on the ironing board, I also put pieces of masking tape with a pen line on the ironing board to help me position and orient the yard stick repeatedly.
Heat / Press
Unlike my first attempt, I made sure to really push hard on the iron. The idea is that you’re not just melting the vinyl adhesive, but actually melting it into the fabric. If your iron isn’t hot enough, you’re not ironing long enough, or you’re not pressing hard enough, it won’t actually melt into the fabric.
When you’ve melted it properly, you should see an almost… bubbly texture underneath the protective coating. Then, once the vinyl is cool and you’ve peeled the coating off, the vinyl should look a little rippled since it is taking on the texture of the underlying fabric.
This slideshow requires JavaScript.
Iron, Cool, Wait, Inspect Vinyl, then Peel
I made this mistake with the arc reactor t-shirt. As I peeled the protective coating off, in one spot the vinyl got pulled up and in another spot it tore the corner off a sharp trapezoid in the design! While it is possible I didn’t have the iron hot enough or press hard enough, I think the most likely explanation is that I didn’t wait long enough for the vinyl to cool – so it was still molten enough to be adhering to both the shirt and protective coating, causing the design to be damaged and torn.
Peeling Direction
If your design includes very thin or sharp little pieces (such as the pointy trapezoids in the Iron Man arc reactor), consider changing the direction of the protective coating peeling to avoid peeling towards a sharp point. These little points have so little surface area they can easily stay stuck to the coating and get pulled off the shirt, ruining all your hard work.
Repairing Mistakes
The problem with making a mistake with heat transfer vinyl is that if you make a serious mistake to your design or application, you may have ruined a shirt. (I would 100% wear a comfortable shirt even if the design wasn’t perfect.) However, a little mistake doesn’t have to be the end of the world. I made two mistakes on my arc reactor t-shirt, that I was able to fix well enough that they probably wouldn’t be obvious to the casual observer.
Yellow arrows show where the design pulled up and wrinkled slightly. The red arrows point to where the design tore and was repaired.
The design of the arc reactor is about 3″ across, to give you a sense of the scale and size of the mistakes. You can see two slight wrinkles in the vinyl, pointed out by the yellow arrows. The red arrows points to where you can barely make out what appear to be wrinkles – but show where the design was torn and repaired.
I didn’t find any really good way to fix the wrinkles, other than to really iron those areas very very hard. It mostly pressed the wrinkles flat and they’re barely noticeable on the shirt. Between the shimmery / reflective quality of the vinyl and uneven way a shirt would hang on a non-rectilinear organic body or form and the size of the wrinkles on the small design, it’s almost imperceptible.
The torn design was initially quite heartbreaking. By the time I had worked on this shirt, I had already created five other shirts without any kind of mistake. It just so happened I either incompletely cut the design out (I don’t think so) or was a little impatient as I peeled the design (probably), and tore a pretty big piece off of the end of the right side trapezoid pointed out by the red arrow. I tried to use my craft knife to peel the tip of the trapezoid off the protective coating, but it wasn’t working and I ended up mangling it beyond repair. After stewing a bit, I figured I would simply cut out a new trapezoid piece and iron down over the torn piece. I made sure to cut the new piece very slightly larger (we’re talking probably only 0.5 mm in each direction) and position it carefully over the damaged section, before ironing it down very firmly, waiting for it to cool down all the way, peeling the coating, then ironing it again. Once again, I think the damaged portions wouldn’t be noticeable to most observers.
I would guesstimate a 5-foot long and 12″ wide roll of heat transfer vinyl could comfortably make 10-15 good sized designs and as much as 20 if you’re very careful. Let’s say you can only make about 14 designs out of a roll, to be on the conservative side. At about $7 for a basic color roll, this about $0.50 worth of vinyl per shirt. My wife bought me several 2-pack blank v-neck shirts in assorted colors for about $14 per pack. Ignoring the cost of my time (it’s a hobby, remember!) this is only about $7.50 per custom shirt. I think this could make a really cool and inexpensive project for a class, letting all the kids make their own designs (by cutting the vinyl with scissors instead of craft knives, if they’re young) or to create a set of team shirts for a field trip or club.
Not only has this been a very fun and inexpensive hobby, I end up with a great looking custom t-shirt at the end that will probably last years.
I’ve got several more designs I’m working on and look forward to a few more updates.
Heat Transfer Vinyl T-Shirts (Without a Craft Cutter)
I’m going to commit the sin of a thousand online recipe websites and give you a bit of backstory before I get to the method. If you don’t like fun, feel free to skip the first few paragraphs.
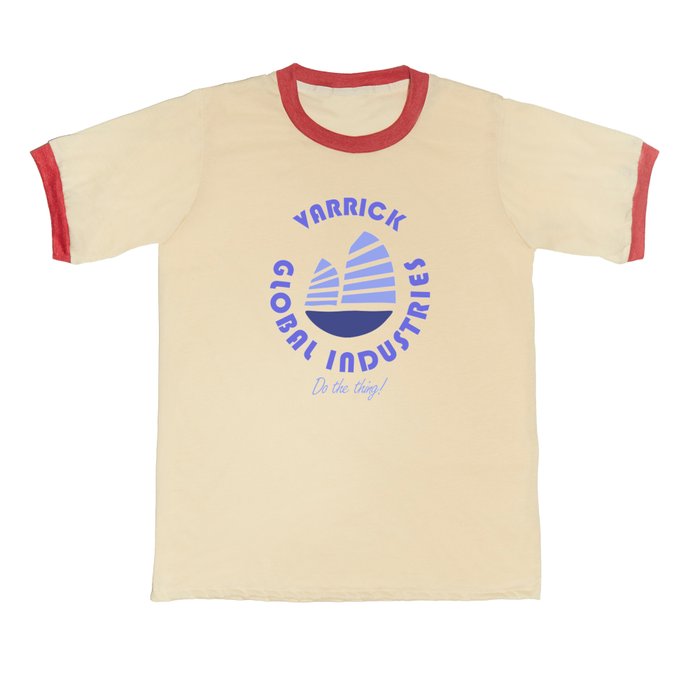
I recently watched Avatar: The Last Airbender and Avatar: The Legend of Korra with my kids. 1 Both shows were fantastic, but one particular character from A:TLOK was my absolute favorite. Varrick Iknik Blackstone is a fast talking, sometimes erratic, flamboyant industrialist / inventor voiced by John Michael Higgins. Imagine a cross between Tony Stark and Zaphod Beeblebrox.2
Psst… Do the thing!
You can find a few t-shirts out there which feature Varrick’s catchphrase3 and logo for Varrick Global Industries… but they all seem to suffer from at least one flaw. They all appear to depict the logo mirror flipped with the big sail on the right hand side. I think I know why too. An artist under the username of RogerBernstein on DeviantArt posted a very large, high quality version of the Varrick Global Industries logo in 2017, which just so happened to be mirror flipped. His image has the distinction of being one of the first Google Image search results for “Varrick Industries Logo.” I’m thinking people swiped his work, perhaps altered it a little bit, and then slapped it on t-shirts. I mean… just look at this…
This doesn’t look right
Why am I so sure these logos are mirror flipped? I paused TLOK during scenes in Season 2 – 4 when you can see Varrick’s yacht, near a plane, on a plane, on a jacket, and near some jewelry. Now, I’m not even close to the kind of cosplayer / propmaker who has the patience, concentration, or dedication who can recreate their favorites props with meticulous planning, research, measuring, and endless revisions. Even so, I’d at least like my designs to face the same direction as the show. There are lots of other pictures showing this orientation, but this was the easiest one to locate.
The logo is partially visible on the yacht to the right side of the image
Anyhow, with the help of GIMP, Inkscape, the pause button, and my trusty laser printer, I created my own design for the Varrick Global Industries logo – ready to put on a t-shirt.
Basics
Creating a design with “heat transfer vinyl” is reasonably straight forward. The heat transfer vinyl is a thin sheet of vinyl stuck to a sheet of clear plastic with a mild adhesive. You cut away what you don’t want, leaving the mirror of your design still stuck to the clear plastic, turn it over on a piece of fabric, and melt / fuse the design onto the fabric with heat.
With access to a craft cutter ($250 – $1,000) and a heat press ($100 – $300), you could automate a lot of cutting work (but you’d still have to manually pull the excess vinyl out of the design) and have really fine control over the heat (if that was important to you), but none of that is actually necessary. While these things might be helpful if you creating designs all the time, you don’t really need much more than some heat transfer vinyl and stuff you already have (a way to cut it, an iron, and some fabric).
Materials
Heat transfer vinyl.
Also known / marketed as “HTV,” you’ll probably want to look for “stretch” or “stretchable” heat transfer vinyl if you intend to putting it on wearables like a t-shirt or similar. If you’re not putting it on a wearable, you could probably get away with non-stretchable HTV.
As this was my first such attempt, I went with some relatively cheap stuff that was only $9 for 5-6 feet worth of material. I bought two rolls – one was a blue-purple metallic “chameleon” and the other was a dark silver-gray reflective. Under normal indoor light conditions both look fantastic. In brighter light they’ll look… well… brilliant.
Pro Tip: If your HTV came in a roll and packed in a box, consider keeping the box. I normally discard boxes, but this way I can stack the rolls easily without having them roll away.
Craft knife & Cutting Mat. You may not be using a vinyl cutter, but you’ll still need a cutter. If your design was very simple or you wanted to live dangerously and freehand it, you could probably get away with just using scissors. We have an old medium size (12″ x 18″) cutting (possibly self-healing?!) mat which works well for most of our purposes. These days they’re relatively cheap and definitely worth springing for a 2′ x 3′ model.
Printer paper or Sharpie. I created my design on the computer and printed it out (mirror flipped), then taped it to the HTV, then taped that down on the cutting mat. If you wanted to just freehand your designs, you could just freehand the design directly on the HTV first.
Tape. Masking or blue painter’s tape. The HTV arrived rolled up pretty tightly, so it definitely wanted to roll up while I was working. The tape kept everything down and in place while I worked.
Iron. The HTV I purchased recommended applying heat for 5-15 seconds at 300 – 330 °F. Our iron doesn’t list the temperatures – just the settings for different materials. I ended up using the “Wool” setting based upon 30 seconds worth of internet research and going to Wikipedia. The Wikipedia article suggested wool, silk, and polyester would all result in about 300 °F temperatures. While I can’t vouch for the actual temperatures, the wool setting worked really well for me.
Ironing Board. I suppose an ironing board isn’t strictly necessary. But, it sure was nice to have a big, flat, soft, narrow surface to lay my shirt on in order to iron it flat. You could probably get away with putting down a blanket on a board or some sheets on top of some cardboard or a table. However, if you already own an iron, chances are you’ve got access to an ironing board.
Parchment Paper. I used parchment paper because it’s cheap, plentiful, and non-stick. It’s also slightly translucent, which makes it great for making sure everything is positioned properly and visually seeing when the design is starting to melt into place. I’m sure there are lots of other nonstick options, but this worked well enough that it would definitely be my go-to in the future.
Optional:
Yardstick. This is helpful in finding the center line for the t-shirt when you’re ready to apply the design. It’s helpful, but not necessary. Since you’re just using it as a straight edge, you could make do with just a long piece of straight cardboard.
Specialty Tools. You can buy specialty tools for “weeding” heat transfer vinyl, special tools for centering designs on shirts, and special heat pressers to apply vinyl. For a few shirts now and then, I don’t think any of these are necessary.
Process.
A Note On Double-Checking. As the old saying goes, measure twice and cut once. While there are very few “mission critical” steps to this process, there are a few points where it makes a lot of sense to spend the time to legitimately completely check and then double-check something.
Double-Check the Vinyl. Depending upon the type of HTV you get, it might have two or three layers.
Two Layers. If it is two layers, there will be a thick clear/clear-ish protective plastic coating and the vinyl. The side of the vinyl facing the protective coating is the part that will appear on the outside of your fabric and the side without the protective coating is the part that will melt and adhere to your fabric.
Three Layers. When there three layers, the vinyl will be sandwiched between the thick clear protective plastic coating and (at least in my case) a blue film on the back. Again, the side of the vinyl facing the protective coating is the part that will appear on the outside of your fabric and the side with the thin film is the part that will melt and adhere to your fabric.
I would recommend checking your HTV by cutting a thin corner off and peeling it to see how many layers you have. I was alerted to this two/three layer issue by reading a lot of reviews. My chameleon blue-purple vinyl had three layers and the dark gray reflective only had two. You could probably remove it before you started cutting out your design, but you’ll definitely need to remove the film layer before ironing.
Pro-Tip: I would also recommend labeling the box your HTV is in with “two-layer” or “three-layer” to help yourself remember which kind you have when you come back to make a new design next time.
Double-Check the Design.
For most applications, you’ll want to mirror-flip your design. You can do this in the graphics design program of your choice, probably using some printer settings.
Pro-Tips:
If you’re trying to create a vinyl pattern from some photograph, magazine page, or similar, you might want to photocopy it and then trace the design onto the back of sheet it’s printed on using a lightbox.
Unless you’re creating a multi-layer process, consider making your entire design two-tone black and white. When it comes time to cut out your design, this will make it a lot easier for you to remember which parts should be cut away and removed.
You’ll be removing lots of areas from the vinyl in a later step. There’s no harm to your design if you “over-cut” into these areas. Overcutting allows you to ensure you’re definitely separating sections of the design from the parts that will be discarded. I would recommend actually drawing in these “over-cut” spots into the design, either as part of the design process or manually with a pen after the design has been printed out.
I like to add the word “reversed” to the design, so I’ll remember to actually mirror flip it.
Since most anything I’ll be creating will fit on a t-shirt, I like to make my designs fit into a standard 8.5″x11″ sheet of paper. I created a template to do this which has several guidelines and a border 1/4″ all the way around the sheet to make sure the design can be printed within the printer’s margins.
Apply the Design. As suggested above, you could cut out your design with scissors or perhaps even built it out of scraps of vinyl. If you wanted to create lettering or follow a very precise pattern, I’d definitely suggest designing on a computer, printing it out (reversed), then taping the design to the vinyl so it doesn’t shift as you cut it, and taping the vinyl to the cutting mat so that doesn’t shift as you cut.
Cut the Design.
I used a craft knife and went slow, using steady medium-hard pressure to cut out the design. When I wasn’t sure I had cleanly cut all the way through the vinyl, I went back and cut that area again. Having done this a few more times since I started the blog post, I can say that I didn’t need to cut this hard – and could have used a medium pressure. More than this and the clear plastic layer gets cut or scored. This isn’t a problem, but it doesn’t lay flat quite as well any more.
As you cut, be mindful of the areas you’ll be removing that you can “over-cut” into and those areas of your design where you won’t want any knicks and cuts.
I made a point of “over-cutting” the critical pieces, especially at corners, because I did not want to chance the vinyl tearing as I removed the excess pieces. A single section tearing or stretching would basically ruin the entire design and require starting over.
I had to be sure I was cutting through the printer paper and cleanly through the vinyl, even at the risk of gouging the protective layer. I was very surprised the protective layer held up as well as it did. It was clearly scored where I had cut into it, but except for some very small parts, I never cut all the way through it.
Once your design is cut out, use scissors to cut the entire area out of the vinyl roll. I like leaving a 1/4″ allowance everywhere just so I know the scissors aren’t going to affect my design.
Pro-Tip: Before you start cutting, it might help to take a moment to plan out your cuts, draw in the areas for “over-cutting,” and even to make sure to darken in those areas that will be getting cut out to help keep things clear while you’re cutting.
“Weed” the Vinyl.
“Weeding” the vinyl is the process of pulling out all the vinyl pieces you’ve cut out that aren’t part of the design. While there are lots of cheap weeding tool options for sale online for $5-10, I just used the point of my craft blade to pick these little pieces out. I suppose it might help to have tweezers, a pushpin, a paperclip, or a toothpick, but the craft knife worked perfectly for me.
I’d recommend going slowly, especially at corners, and making sure the parts getting removed are fully cut free from the design elements that are staying.
Iron Fabric. Definitely take the time to iron your fabric flat. It would be a shame to discover a wrinkle on the underside of your t-shirt because the design was warped only after the vinyl was fused to the fabric.
Orient the Vinyl.
Once my pattern is cut and weeded, it’s ready to be placed on the t-shirt. You can buy patterns, templates, and devices for centering a design on a t-shirt, but these seem unnecessary if you’re willing to simply be careful. Heck, even if you had these specialty tools, you’d still need to be careful.
I made sure my t-shirt was flat and centered on the ironing board, there were no wrinkles in the fabric, the amount of the shirt hanging on the left and right sides were about equal, and then used a yardstick to estimate the center line of the shirt running from the tag down.
I put the design about four inches down from the neck in my shirt after looking at the designs on other t-shirts I had purchased.
If you chose to cut out your design so there was a little extra room all the way around it, the empty clear protective plastic layer will still be “tacky” and help keep the design in place.
Pro-Tips:
It wouldn’t hurt to double-check that you’ve got the exposed vinyl side facing the fabric. You definitely don’t want it melting against the parchment paper or your iron.
One of the nice things about printing the design with guide marks and registration marks was that it made it a little easier to orient the design neatly on the shirt. I printed a second copy of the design, then placed it on the shirt – then put the vinyl design down on the shirt underneath the paper.
Before you place the vinyl on the fabric, take a moment to double check there are no stray pieces of weeded / discard vinyl stuck to the protective layer. They’ll be impossible to remove once you’ve started ironing.
Cover with Parchment Paper.
My design was only about a 6″ diameter circle, so I only needed a piece of parchment paper slightly larger than this. Since the parchment paper isn’t really consumed by this process, I went ahead and got a big square of it so I can reuse it on other shirts.
The parchment paper I’m using is slightly translucent, which made it easy to ensure the design hadn’t shifted and so I could make a few last second adjustments.
Iron The Vinyl.
Obviously, read and follow the directions for your specific heat transfer vinyl. The vinyl I purchased recommended 300 – 330 °F for 5 to 15 seconds. I don’t have a fancy iron, so I heated the iron to the “wool” setting (estimated to be 300 °F) and ran the iron over the parchment paper, pressing firmly, in a small circular pattern for about 15 seconds in each area. I kept the iron moving so as not to scorch any part of the design, the shirt, or the parchment paper.
Pro-Tips:
It never hurts to do a few test pieces. I tried ironing both kinds of HTV onto an old undershirt to make sure the heat settings worked, I understood which sides needed to face against the fabric, how I would remove the backing once it had been ironed, and how it all worked.
Having now done this a few times since I started the blog post, I would recommend putting something rigid or semi-rigid under the shirt. The first time I ironed the design, it looked great – but came out slightly wrinkly in the wash. I re-ironed it using really heavy pressure and the same shirt has held up in the wash ever since.
Remove Backing.
The instructions for my vinyl told me to “hot peel” the backing. I took this to mean that I should carefully remove the clear protective coating from the heat fused vinyl. There were a few small spots where it looked like the vinyl wanted to come up a little bit, but the backing came up cleanly everywhere.
Cover and Iron Again.
Since there were a few small spots where it looked like the vinyl might have come up slightly as I was removing the backing, I put the parchment paper back down and ran the iron around the entire design for about 5 seconds in each spot.
Don’t Wash for 24 Hours.
My instructions say to wait 24 hours before washing the garment. I spent a while on this design, so I wasn’t about to chance it by throwing the shirt in the wash.
Iron Again (Optional).
After I washed the first shirt I made, the design appeared to have buckled slightly. After a second ironing, it has stood up to repeated washings without a problem.
This slideshow requires JavaScript.
Heat Transfer Vinyl T-Shirts (Without a Craft Cutter)
I’m going to reference these shows and their contents a lot. I don’t own their intellectual property, they do, I just wanted to make a fun t-shirt for myself. [↩]
I saw a shirt today that had three words I found very intriguing. Zombie, apocalpyse, and homeschool. The woman wearing the shirt was gone before I could get a good look, so I may never know.
I now fear what will happen to this child of the traditional educational school system on the day of the zombie apocalpyse.
If you’ve seen this shirt, please tell me what it says.
I’m not going to turn down $25 if it were sent to me.
I lodged my entry mostly because I had the idea for my printable mousetrap as soon as I read the challenge and couldn’t wait to get home and model it. But, I’m hoping I’ll win because I would love to have a MakerBot t-shirt.
Did I ever mention I have already printed up a MakerBot version of a Stargate SG-1 “Replicator” cell? Well, I did. I basically “borrowed” someone’s Sketchup file from the google 3D warehouse, saved to STL, and printed it up!
In any case, it made me think of a cool T-shirt idea. The back side of the shirt would have a Stargate Replicator with a red circle slash over it, labeled “Bad Replicator.” The front could have a picture of a ‘bot saying “Good Replicator.”