MOAR WHISTLES

The other day I was trolling Thingiverse1 looking for the best quick-printing model to show off DIY 3D printing to 3rd graders.

After a bit of searching, I found it: the simple whistle.

There are whistles a-plenty on Thingiverse, but the DarkAlchemist remix of the muddtt Emergency Whistle is easily the smallest by far.  I compared these two against several other options, tossing all of them into my slicing program and doing a visual double-check for good measure.
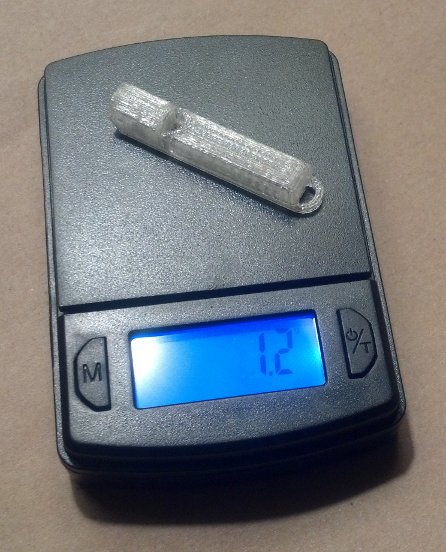
Emergency whistle, clear PLA as designed by DarkAlchemist

Emergency whistle in clear PLA as designed by DarkAlchemist

There’s no doubt about it – these are SMALL.  They are less than 2.7cc2 and weigh about 1.2 grams a piece.  Best of all, they print very quickly.  Printing just one whistle with 0.2mm thick layers, including printer warm up time, took 7 minutes.  10 whistles at once?  Only 47 minutes.

Naturally, I took the opportunity to print up 20 more whistles.  This is what 30 whistles looks like:
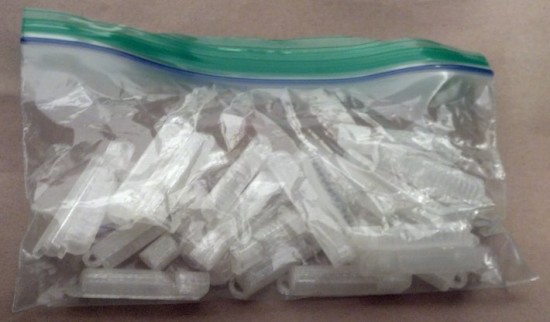
THIRTY emergency whistles, clear PLA as designed by DarkAlchemist

THIRTY emergency whistles in clear PLA

That got me thinking – could they be even smaller?!

Turns out they can.  I redesigned the whistle in OpenSCAD with a hacky thickness adjustment.  In doing so I discovered that the existing designs on Thingiverse used 1mm thick walls.  A one-millimeter wall thickness is pretty good if you have a small part that needs to be sturdy – but a bit of an overkill if you just need a small functional quick-printing thing.  By removing the little loop at the end of the whistle and creating a wide hole in the top of the whistle, I reduced a fair bit of plastic while keeping the ability to be connected to a cord.

I exported a version with 0.5mm thick walls and a copy with 0.4mm thick walls.  Printed at 0.2mm layers the 0.5mm thick walled version was functional – but the 0.4mm thick walled version was not.  The layers didn’t fully overlap, causing small gaps which prevented the whistle from making any noise.  Printing the 0.4mm thick walled version at 0.1mm layers3 turned out both beautiful and functional.  Best of all, they’re 1/3 the weight of the 1mm version!4
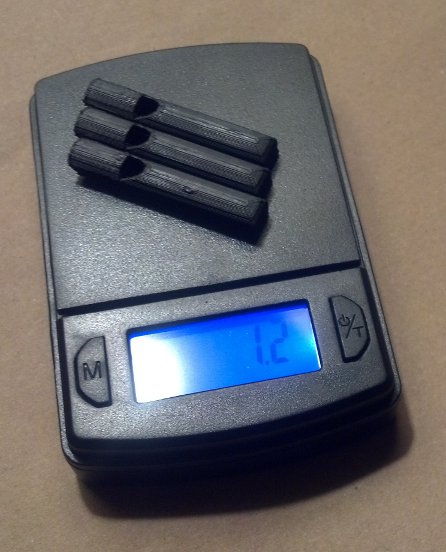
Three emergency whistle in black ABS as remixed by MakerBlock

Three emergency whistle in black ABS as remixed by MakerBlock

A friend recently suggested that his plastic filament supplier of choice ships via Amazon Prime for a ridiculously low $22-23 per kilogram.  Ignoring the amortized cost of the robot and electricity, I could make about 2,500 whistles for about 0.88 cents a piece!

Now, just imagine the following scene.  I take my HedonismBot ((As my MakerBot Replicator 1 Dual Extruder is named)) to my daughter’s third grade class.  I show off the robot printing a single whistle and call a random student up to test it.  Thank you, a pat on the head, and the whistle is yours!  Golly, I guess that’s the whole show everyone.  Oh, you want a whistle too?  Check under your desk.  You get a whistle!  You get a whistle!  You get a whistle!  You ALL GET WHISTLES!  What’s that?  Your sister is in second grade?  It just so happens it only took 80 hours of printing to make enough whistles for every damn student, teacher, and student teacher in the school.

MOAR WHISTLES.

  1. and Youmagine!  I can’t forget you Erik and Team Ultimaker! []
  2. Close approximate dimensions: 8mm x 8mm x 42mm []
  3. Basically, twice the vertical “resolution” []
  4. Just 0.4g each?! []

Robbed. During broad daylight. At work. By the mailroom guys.

At least, this is what it felt like

At least, this is what it felt like

I was waiting to surprise you with this, but last week I bought a MakerBot and had it shipped to work. 1

Well, it arrived today… and really… I suppose this is my own fault… but… you see… I was just robbed.

One of the best and most irreplaceable things about getting an awesome new robot is unboxing it.  The mailroom guys at work, well intentioned though they are, opened my MakerBot box.  I suppose I could have told them in advance that the robot should be arriving soon and to be on the look out for it.

Nevertheless!  Tonight I have to clear a space in my Robot Work Area so that I can add my Replicator to the line of robot workers.  But what to name it?  My MakerBot Cupcake CNC is named “Bender,” the MakerBot Thing-O-Matic is named “Flexo.”  There are so many Futurama robots to choose from.

I suppose I could chose a non-Futurama name for my new robot, but it really seems such a shame to break a streak.

  1. Photo courtesy of Timo Newton-Syms []
  2. She’s also a bending unit! []

I had a dream last night

One of my favorite songs has this line in it, so I just like saying and writing it.  So much so that I’ve used that same exact title for three posts, including this one.

Okay, so, in this dream a huge package arrived from MakerBot.  It contained a bunch of spools different colored plastics, a brand-spanking new Replicator, and a galvanized steel industrial strength sewing machine as big as a saw horse.  I’ve never seen a sewing machine that big, so it was entirely an invention of my mind.  And, now that I think about it, I don’t even know how it would even work.  I recall thinking, in my dream, that the thing was strong enough to sew a stack of denim jeans together.

Um, there’s not much else to this post.  I suppose the dream was probably about my excitement over a new delivery from MakerBot so I can finish my DrawBot and the prospect of getting a Replicator one day. 1

  1. I think now that we have two 3D printing robots, Bender the Cupcake CNC and Flexo the Thing-O-Matic, an Egg-Bot, and I’m in the process of building a drawing robot my wife has caved to the sense of inevitability that whatever new robot MakerBot produces I will buy. []

DrawBot – Giant Unicorn?

As you may know, I’ve got a MakerBot Cupcake named “Bender” and a MakerBot Thing-O-Matic named “Flexo“.  There’s really no doubt in my mind I’ll be springing for a Replicator with dual extrusion1  Thankfully, I think there’s a way for me to make use of each of my robots, in its own special way.  I figure I can keep the Cupcake rocking a Unicorn Pen Plotter, use my Automated Build Platform in my Thing-O-Matic for mass production of smaller parts, and put a Replicator to work printing new, wacky, and/or large designs.

But, why am I talking about giant unicorns?!  Sandy Noble, the creator of the Polargraph,2 just posted about how he has created a vector graphics importer for the Polargraph software.  This is some pretty amazing stuff.  The MakerBot Unicorn has several software toolpaths that take vector graphics to GCode for printing through ReplicatorG.  The end result is that a Polargraph rocking a vector graphic importer should be able to draw arbitrary shapes, without the need to draw scribbly bits.

I think it would be particularly awesome to have a DrawBot draw a frame/border and then fill it with a scribbly/pixelated drawing.  Or, perhaps, draw the outline of an object and then fill it in with scribbly/pixelated shadings.

Default Series Title
  1. Will my extravagance know no bounds?! []
  2. Which is probably the best documented DrawBot on the internet []

Making a MakerBot make a MakerBot

Not a MakerBot Replicator

Not a MakerBot Replicator

Thingiverse user Webca has uploaded a printable MakerBot.

Back in February I thought it was audacious to hope someone would design a printable Y stage.  Later that day I realized that if you had a MakerBot Cupcake Deluxe kit, you’d have all the tools plus much of the materials to build another MakerBot – suggesting the second MakerBot would only be about $500.00 or so of extra components.  More the fool was I when I thought I had published a comprehensive list of the MakerBot printable components of a MakerBot.

Webca clearly dreams (and designs) so so so much bigger than I.  I am in awe of the awesomeness of that MakerBot made MakerBot.

150 plus printed parts, a month of solid printing, and more than 5 pounds of plastic.  So, what’s the final cost of a second MakerBot made MakerBot?  Setting aside issues of shipping and tax, it sounds like it would be about $50.00 worth of plastic plus all the bits from the $575.00 laserless MakerBot kit, plus some cables, cords, and power supply.

It’s a testament to MakerBot’s rock bottom pricing that a mostly-printed $625.00 MakerBot is not a tremendous discount off the $750.00 basic MakerBot Cupcake kit.  But, cost-savings is almost certainly not why he designed and printed this.  A month of printing and $50.00 of plastic is far more than it should take to print all the parts for a Mendel.

Yes, an unbelieveable amount of work, but now I want a PLA MakerBot…

Replicators

Did I ever mention I have already printed up a MakerBot version of a Stargate SG-1 “Replicator” cell?  Well, I did.  I basically “borrowed” someone’s Sketchup file from the google 3D warehouse, saved to STL, and printed it up!

In any case, it made me think of a cool T-shirt idea.  The back side of the shirt would have a Stargate Replicator with a red circle slash over it, labeled “Bad Replicator.”  The front could have a picture of a ‘bot saying “Good Replicator.”

I’d wear it.