MakerBots for Teachers

MakerBot Industries is giving away ten MakerBots to ten teachers at any educational level.  Let’s just consider this my entry:

  • Your name
    • Uh.  I’ll stick with “MakerBlock” for now.
  • Your school’s name
    • Sheesh.  These are getting harder.  Okay, how about “MakerBlock.com”?  No?  “MakerBlock U”?
  • The address you’d like the MakerBot sent to if you are chosen
    • Same place as my last order.  ;)
  • A paragraph describing how you would integrate the MakerBot into your curriculum. Include some description of the learning environment and what you teach
    • I would integrate a MakerBot into my curriculum by using it as a demonstration of iterative design, digital fabrication, digital design, invention, and innovation.  The learning environment is the whole freaking internet. 1  I teach digital plastic AWESOME.
  • A lesson plan that you will implement if you get a MakerBot
    1. Pssh.  Just one?  I’ll give you THREE.
    2. You’ve got a MakerBot, a laptop, unlimited plastic and electricity.  You are trapped in a mineshaft.  How do you get out?
    3. You’ve got a MakerBot, a laptop, unlimited plastic and electricity.  You are trapped in a mineshaft with a tiger.  How do you get out?
    4. You’ve got a MakerBot, a laptop, unlimited plastic and electricity.  You are trapped in a mineshaft with a tiger shark.  How do you get out?
  1. Actually, according to Feedburner and Google Analytics, the number is just a few hundred people a day []

3x2x1 Rubik’s Cube assembly pictures

The design should be pretty intuitive.  However, I went ahead and took some pictures of the assembly anyhow.

As I mentioned in an earlier post, I think this one came out really really well.  :)

3x2x1 Rubik’s Cube – done!

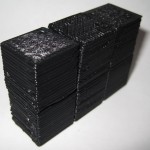
I’m so happy with the way this has turned out.

I’ve made a bunch of changes since the last revision of this printable 3x2x1 Rubik’s Cube puzzle:

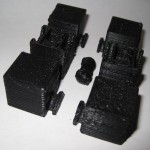
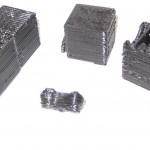
  • I’ve totally redesigned the center barbell connector.  I simplified the design, removed the five support struts for each end and replaced it with a single support strut and a flat hexagon in the center of the piece.  The purpose of the hexagon is to give the barbell more contact area with the raft.  One of the earlier drafts didn’t have as many supports or this flat hexagon, and it tore off the build platform partway through the build.
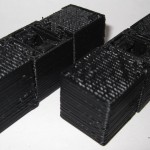
  • I increased the diameter of the tube between the barbells.  This enabled it to print easier, made it a little more sturdy, and decreased the wobbliness of the barbell when everything is assembled.
  • I also shortened the entire barbell by 1mm, so that the entire puzzle is held together more closely.
  • I made the flat semi-circular tabs slightly thinner so they rotate a little more freely.
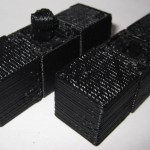
  • I significantly redesigned, thickened and simplified the two brackets that the barbell snaps into.  It’s been able to easily withstand numerous couplings/decouplings as well as numerous rotations.  With a few rotations, all parts now rotate easily.
  • All of the parts fit together SO much better than my first draft held together with a nut and bolt.
  • There is a slight bit of sideways flex that can occur with the use of the barbell.  It is really minor and it actually seems to help the puzzle be more forgiving as you manipulate it.  I see this more as a benefit than a design flaw.

The was one design choice on which I waffled.  I considered making the center cubes non-identical, with one having half a barbell stick out and with the other having the internal connector you see now.  This would have removed much of the sideways flex – since the barbell would be stationary.  I did not go with this design choice because whether the puzzle used one barbell and two connectors or male/female center cubes, there would always be some flex caused by the use of a connector rather than a static pin.  And, to be honest, I much preferred the symmetry of having everything assembled out of just three unique parts.

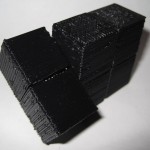
I know I’ve mentioned this before, but I really like the idea of a MakerBot printable toy that can be printed in one go and then assembled without tools or any additional hardware.  I also think this would make a great MakerBot print demonstration.

I’ll post some pictures of the parts a little bit later.

3x2x1 totally printable puzzle cube proof of concept success!

I’ve printed up pieces uploaded this morning to Thingiverse, tried them together, broke two pieces, modified them, printed, and fit some together.  I’ve just modified the STL for what I hope is the last time.  However, I have the barbell fit snugly into the center cube.  It rotates relatively freely and does not want to pop out.  (Of course, I’m sure it could/would if I applied enough force).  This leaves the outside cubes.  I modified the semicircular tabs a little and will reprint them later.

The only problem is that it takes about 40 minutes for my machine to print up two cube parts and a barbell, since they’re so solid.

The important thing is that I’ve just been able to print up and assemble the crucial mechanisms for this puzzle.  I think the next iteration may be what I needed.

MakerBlock Repurpose Design Contest #1!

I really like the Pilot G-2 gel pens. They’re basically all I use at work. Although we buy refills, I still end up with a surplus of the pens.1 The pens, although technically disposable, use a small metal spring as part of the mechanism. While swapping in a refill the other day, I thought it was such a shame that this little spring is destined for a landfill. 2

Thus, I propose a contest!  I think of this as a repurposing and/or recycling contest.  What’s the most awesome MakerBot printable thing you can design that re-uses any of the parts from this pen? 34

How to enter?

  1. To enter upload your designs as an STL and the original design files to Thingiverse
  2. Then leave a comment on this post with a link to your design!

What are the rules?

  1. The design must incorporate one or more parts of the Pilot G-2 gel pen.
  2. Must be MakerBot printable.  So, keep in mind size, time, overhang, and resolution requirements.
  3. It’s under the Creative Commons Attribution Share-Alike license.

What are the prizes?

The prize will be a print of your choice of either anything I’ve designed and posted to Thingiverse (except the Unblended Mendel – I didn’t really design that) or your winning design!

  1. What it really boils down to is that I’m a pen thief. I walk into a room, pick up a pen, start writing something, put it into my pocket without thinking about it, and then walk away. LRR. []
  2. Of course, there are also other little bits that could theoretically be useful. []
  3. Awesome as judged by me, obv. []
  4. FYI, I’ve already thought of the topic for my next Repurpose contest… []

Working with MakerBot

MakerBot is looking for a web code warrior.

This is one of those things where I can think of a thousand reasons to NOT do something and only one reason to do it.  In the “NOT” column would be the long commute (CA to NY), I’m not a professional programmer1 , and the job requirements are a little beyond my abilities.

That said, the reason in favor is…  it would be awesome.

  1. However, I do have some mean WordPress plugin chops []

Improving on the 3x2x1 Rubik’s Cube

I’ve been fiddling with the designs for the 3x2x1 Rubik’s Cube incorporating some of the changes I had considered:

  • I’ve widened the holes for the nut and bolt.
  • I’ve made all of the cubes solid.  I think it will just work better with solid parts.  I had left the four end cubes mostly hollow to:
    • Improve printing time
    • Use less plastic
    • Possibly make an interesting hiding place for something very small
  • I’ve shortened the “stem” that connects the semi-circular tab to the end cube to allow for a more snug fit.
  • I’ve made the semi-circular groove in the center cubes narrower, to allow for a more snug fit.
  • Make these cubes solid so that they slide against each other easier.
  • I’ve noticed that the nut and bolt I installed into either side of the center cubes were pushed sufficiently well inside that they don’t want to come out or rotate.  This is a very good thing for this design!  It turns out that if you rotate it too much in one direction, you can just rotate it back a few times and it will be tightened back up!  It also makes for easy disassembly/reassembly – just rotate the puzzle until it comes apart and rotate it back together to reassemble.

More stolen content???

This time I blame DaveDurant.  As you can plainly see from his opening blog post, he freely admits that he is TAKING the content that was being published HERE quite regularly and putting up on his OWN site!!!

For shame, DaveDurant, for shame.

Kidding aside, Dave just published some great stuff about his MakerBot high resolution printing record and Skeinforge Support.

http://davedurant.wordpress.com/2010/07/31/skeinforge-support-part-1/

Yes, I will fix your computer

Tech Support Cheat Sheet

I have a rule for all of my friends.  I will fix their computers for free, twice.  :)

It’s a good rule and it has helped my friends and myself on many an occasion.  Contrary to the impressions of those unfamiliar with the inner workings of their own computers, diagnosing and fixing a computer problem is not a matter of innate knowledge.  It’s basically 50% making common sense interpretations of errors and common sense changes to settings and 50% Googling for the answer.

Given fixing computers can be tremendously time consuming, WHY would I spend my free time fixing them for free?  Simple.  My rule is, I’ll fix your computer twice.  First time, you give me your broke down computer and I get the OS working, repair whatever it is, and give it back to you good as new(ish) and if there’s a problem with it again, you give it to me to fix again.  Second time, you give me your broke down computer and I get the OS working, repair whatever it is, and I keep it.

Oh, and if you want to know why you should never help someone with their computer problems unless it is really dire, check out this Dilbert comic.

Dilbert
Dilbert
Test