
Saturday, October 21
Zone 2 – Make: Demo Stage
2:30 pm – 3:00 pm
Let’s goooooooooooooooooooo!
Category: Things I Learned
Things I learned, usually the hard way, so you don’t have to!
Companion Robots and Maker Faire Season!
I’m super excited for Maker Faire Bay Area / Mare Island and Mini Maker Faire Rocklin.1 I’m not just excited to see everything, but to show all the things I’ve been working on for a while now. It’s also time to pick up all the little dev boards I’ve somehow accumulated and see if I can make anything with them to show off.
- Project Boards
- Wemos D1 Mini. A small insanely cheap (~$3?!) WiFi enabled dev board2 , which has 4MB onboard and can run Arduino. I think it can also run MicroPython, but I haven’t tested this yet.
- Wemos 600 Pico. An even smaller, even cheaper (~$2 when ordered from China) WiFi enabled dev board that runs… MicroPython? I think?? I’m saying “I think” because I haven’t been able to get it to do anything yet.
- Since starting this blog post, I found a guide on installing MicroPython on Wemos boards that seems promising.
- Flashing MicroPython on an ESP8266
- https://github.com/espressif/esptool/tree/master
- Arguing with Python to let me use “esptool.py”
- esptool -p COM13 -c esp8266 flash_id
- As promising as that series of blog posts looked, I eventually scrapped the Wemos because it was just too much of a pain to get going with MicroPython. I think I could have made it work, but for $7 I could also just use the Adafruit QtPy I already have. The advantages of simply uploading code over a USB cable into a virtual drive just can’t be overstated.
- Since starting this blog post, I found a guide on installing MicroPython on Wemos boards that seems promising.
- Other Boards
- I have a bad habit of picking up dev boards. I’ve got several Adafruit QtPy’s, several Adafruit Trinkets, an Adafruit FX Sound Board, Raspberry Pi Pico (non-WiFi), various Digispark boards, a small handful of ATTiny85’s, and an even weirder assortment of VERY small programmable circuit boards (ISD1806B-COB) designed to go in greeting cards (just 6 seconds), etc.
- Companion Robot
- Background.
- I started this post at least a month ago when I only had a vague idea of what I wanted to make and even fewer skills. After seeing my kid’s companion robot take shape, I wanted to get in on the action and make my own. I decided to make a really small companion robot with just some LED’s, piezo, and small microcontroller unit. I’d taken a stab at making a companion robot a few years ago, but set it aside for a variety of reasons and never went back.
- The idea for this new robot would be something a little less ambitious, make more use of NeoPixels than in prior projects3, with a little more interactivity, trying out some CircuitPython, and… let’s be real… more pizzazz!
- Idea: Friendly Cloud/Vapor/Flame
- I still really like the copper-toned PLA I’ve been using since it has something of a steampunk flair to it. I settled on repurposing a small plastic enclosure with a clear dome as the “body” for the robot. I wanted it to look something like a small entrapped / captive / domesticated4 sentient cloud of vapor or perhaps flame held within a steampunk enclosure.
- As a very small, inexpensive board that could run either Arduino or CircuitPython, I decided on the Adafruit QtPy M0. It could run NeoPixels, there were lots of cool guides on it, plenty of pinouts, and could definitely fit within the confines of my enclosure.
- Enclosure:
- I started the enclosure by trying to design and 3D print a part to mate with the clear plastic dome. It took a few tries.
- Once I had that, I extended the base so it could hold more electronics. I could definitely have shoehorned everything into the dome, especially if I took up some of the space inside the dome, but even with an “elevated base” it was still plenty small and could use a battery pack rather than a rechargeable lipo.
- Once I had a good design for the enclosure, I tried to make it work with an existing 3xAAA battery pack. In the process I yanked off the connector and ended up soldering the battery pack leads directly into the circuits.
- Internal Electronics
- I’m just not a great electrical engineer and am still copy/pasting from various guides, tinkering, changing bits of code, swapping out parts, and using “close enough” resistors. Wiring up some LEDs or a piezo to a project isn’t very difficult – it’s some of the more fiddly bits.
- Piezo Element Speaker
- I wanted to use a piezo buzzer/speaker because they’re large and incredibly thin. They’re not without their downsides. The crystal wafer is also thin and a little fragile. The piezo buzzer without additional electronics has the potential to act as a knock sensor and can generate a high voltage spike which can fry a board. And, without additional electronics, the piezo just isn’t very loud. There are some libraries for the Arduino that basically double the volume of a piezo by connecting it to two pins and then running each opposite of the other, doubling the voltage difference, but they only work for Arduino chips.5
- After searching for various ways to increase the sound of the piezo elements, I settled on trying to use the Adafruit piezo amp. I bought two – and tried desoldering the terminal blocks. This completely ruined one. The other one worked great, but for the modest volume gain it was just too big in an already cramped enclosure.
- After searching around, I found some amplifier circuits using a small number of common parts.6
- Then I tried building an amplifier circuit using an NPN transistor. After reviewing the datasheets for my NPN transistors (and PNP transistors), and breadboarding the circuit with resistors, I sketched it a few times, laid it down with copper tape, soldered it in place with SMD resistors, then pulled it off and placed it onto a piece of Kapton tape and put another piece on top – “laminating” it in place.
- Capacitive Touch
- Buttons are great and all, but with a capacitive touch pad, I could add metallic elements to my robot rather than a much bulkier button. I bought a few brass upholstery tacks because they looked great – but they just would not accept molten solder. I ended up cutting the prongs short with wire cutters, wrapping the stub with copper tape, then soldering the wires to the tape. I’d also added a little piece of heat shrink tubing over the connection to help keep it together. It’s been working well so far.
- LED Animations
- As we know from Phillip Burgess‘ incredible “power sipping NeoPixel” guide, we can conserve power and increase the impact of the LED’s by reducing the number of LED’s, keeping max brightness ~20% for a disproportionately large impact, running fewer LED’s at a time, and even running fewer colors at a time. Between Phillip’s work, Todbot’s guide, and the specialized QtPy NeoPixel guide by Kattni Rembor, I was able to put together a few neat animations.
- Piezo Sounds
- I had a heck of time getting the piezo buzzer to do anything interesting. Fortunately, with my kid helped convert the piano music for “Paint It Black” into tones for me. I haven’t gotten all the note timings right, but I’m working on it!
- Background.
- Future Modifications
- More Accessible Enclosure. Right now the “lid” with a hole for the LED ring just sits on the enclosure with a light friction fit. One idea is a hinged lid, either with a conventional hinge or perhaps a hidden swivel hinge. The problem with that, of course, is it requires even more internal space. Other ideas include a ring on top that screws down, holding the top down and in place. I’m crap at designing screw threads, so I’ve avoided this.

Hinged lid for enclosure - Piezo Knocks. Perhaps the next version will include some kind of tap / double tap / knock sensors using one or more piezo elements.
- Knobs. There’s not a ton of room inside the enclosure, but by including a gear within a gear, I might be able to rotate part of the case and have it manipulate a potentiometer.
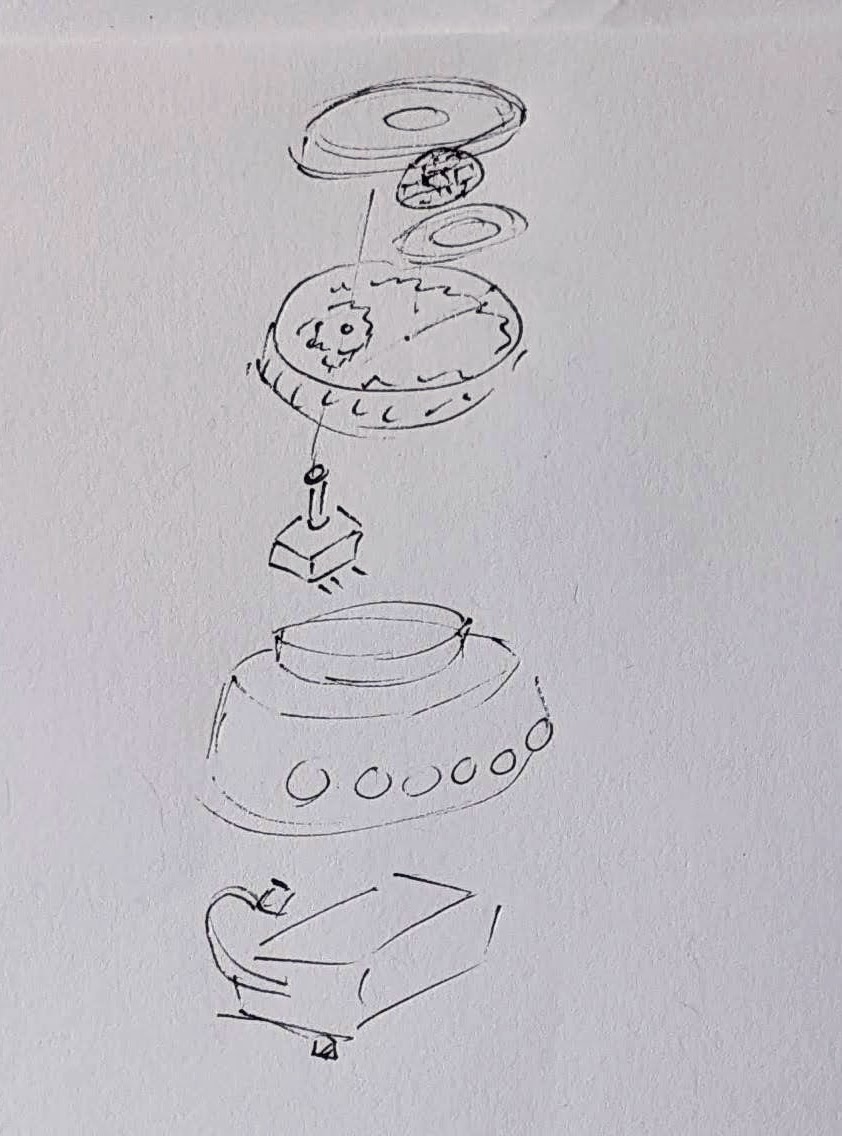
Offset gear within gear, manipulating an off-center internal potentiometer - Motors. A robot that just flashes lights and makes a few beeps can still be pretty interesting. However, I have some neat potential features that could be added with just one or two motors. There are some interesting limitations with the current incarnation of this robot and using a QtPy. I’ve only got 10 pinouts7 , 1 for NeoPixels, 1 for the piezo, 6 in use for the capacitive touch sensors, leaving 2 for other potential tasks.8 However, space is already tight so one or two micro servos would be a big space commitment. I’ve seen some really tiny micro servos that might work, but I have no idea where to source them. One silly idea is a “weapons system” using a spring loaded projectile activated by a very small servo.
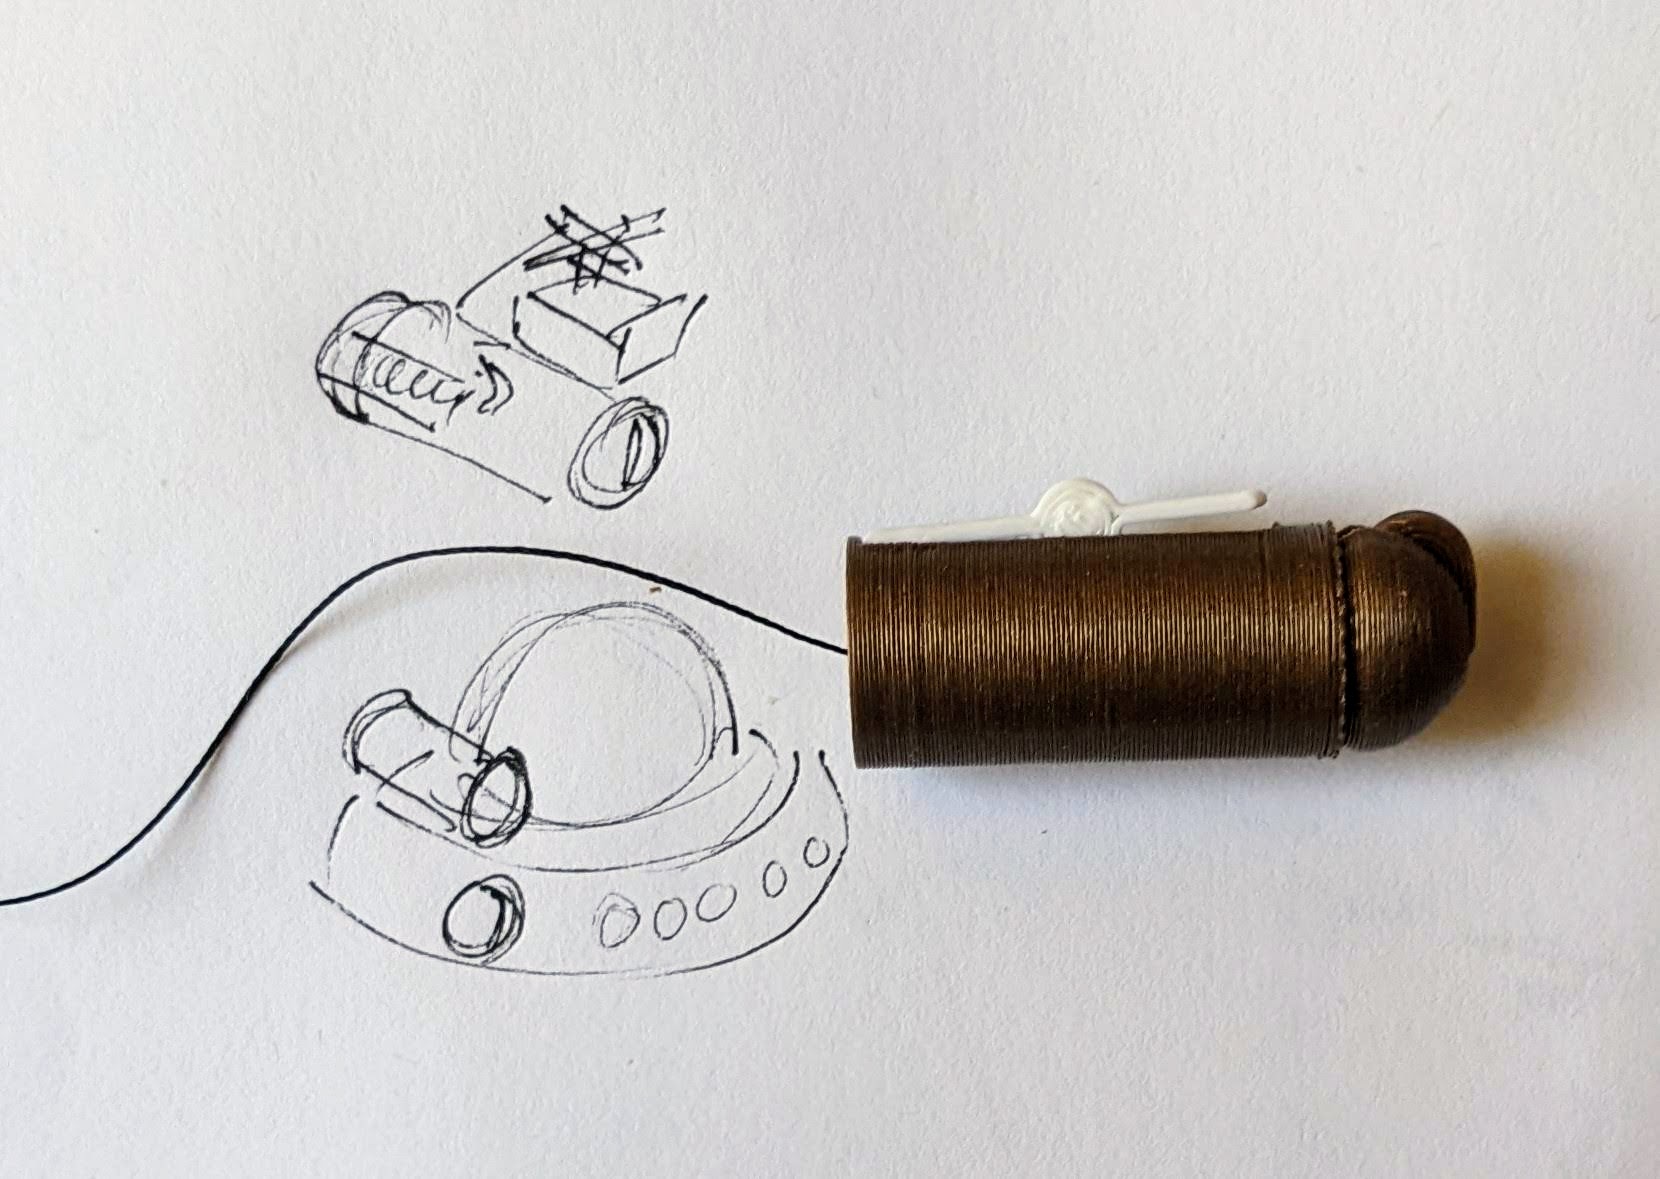
A small spring loaded projectile launcher, actuated by a small servo - Creating Tone Library. The basic piezo tones are easy enough to play, but including the entire list of tones and the frequencies associated with them seems eat up the poor little QtPy’s memory. I think compressing them into a library might be the way around this issue.
- Playing WAV files. WAV files are bulky, but that’s the only sound file format a QtPy M0 can play. However, with the extra 2MB from the SPI chip installed, this shouldn’t be a huge problem. I used Audacity to mix the sound clip down to mono then to 22 KHz sample rate. My preliminary tests worked – but it was incredibly quiet. I haven’t run it through the audio amplifier yet, but I’m planning to.
- Sleep / Deep Sleep. Ever since I swapped out the tiny LiPo for a 3xAAA battery pack, I’ve had a lot more battery life, so adding sleep / deep sleep functions haven’t been a priority. However, this inclusion just couldn’t hurt.
- More Accessible Enclosure. Right now the “lid” with a hole for the LED ring just sits on the enclosure with a light friction fit. One idea is a hinged lid, either with a conventional hinge or perhaps a hidden swivel hinge. The problem with that, of course, is it requires even more internal space. Other ideas include a ring on top that screws down, holding the top down and in place. I’m crap at designing screw threads, so I’ve avoided this.
- Other QtPy and CircuitPython Resources
- Cephalopod Robot Friend, the story so far
- Cephalopod Robot Friend Progress
- CuttleBot Body and OpenSCAD Design Tips
- An Assembled CuttleBot Body
- Building the Monocle Top Hat Cat for #MicrobitVirtualConcert
- Companion Robots and Maker Faire Season!
- I just got a notice they’re no longer a “Mini”! [↩]
- pinouts for my future reference [↩]
- LED goggles and a Marvel Universe inspired set of “Infinity Knuckles” [↩]
- OMG dome-sticated?! [↩]
- This is just my very basic understanding of how it works. I’m entirely positive this is far too simplified. [↩]
- And one very long article about using a lot of parts [↩]
- 12 if you want to count the onboard NeoPixel [↩]
- Or 4… [↩]
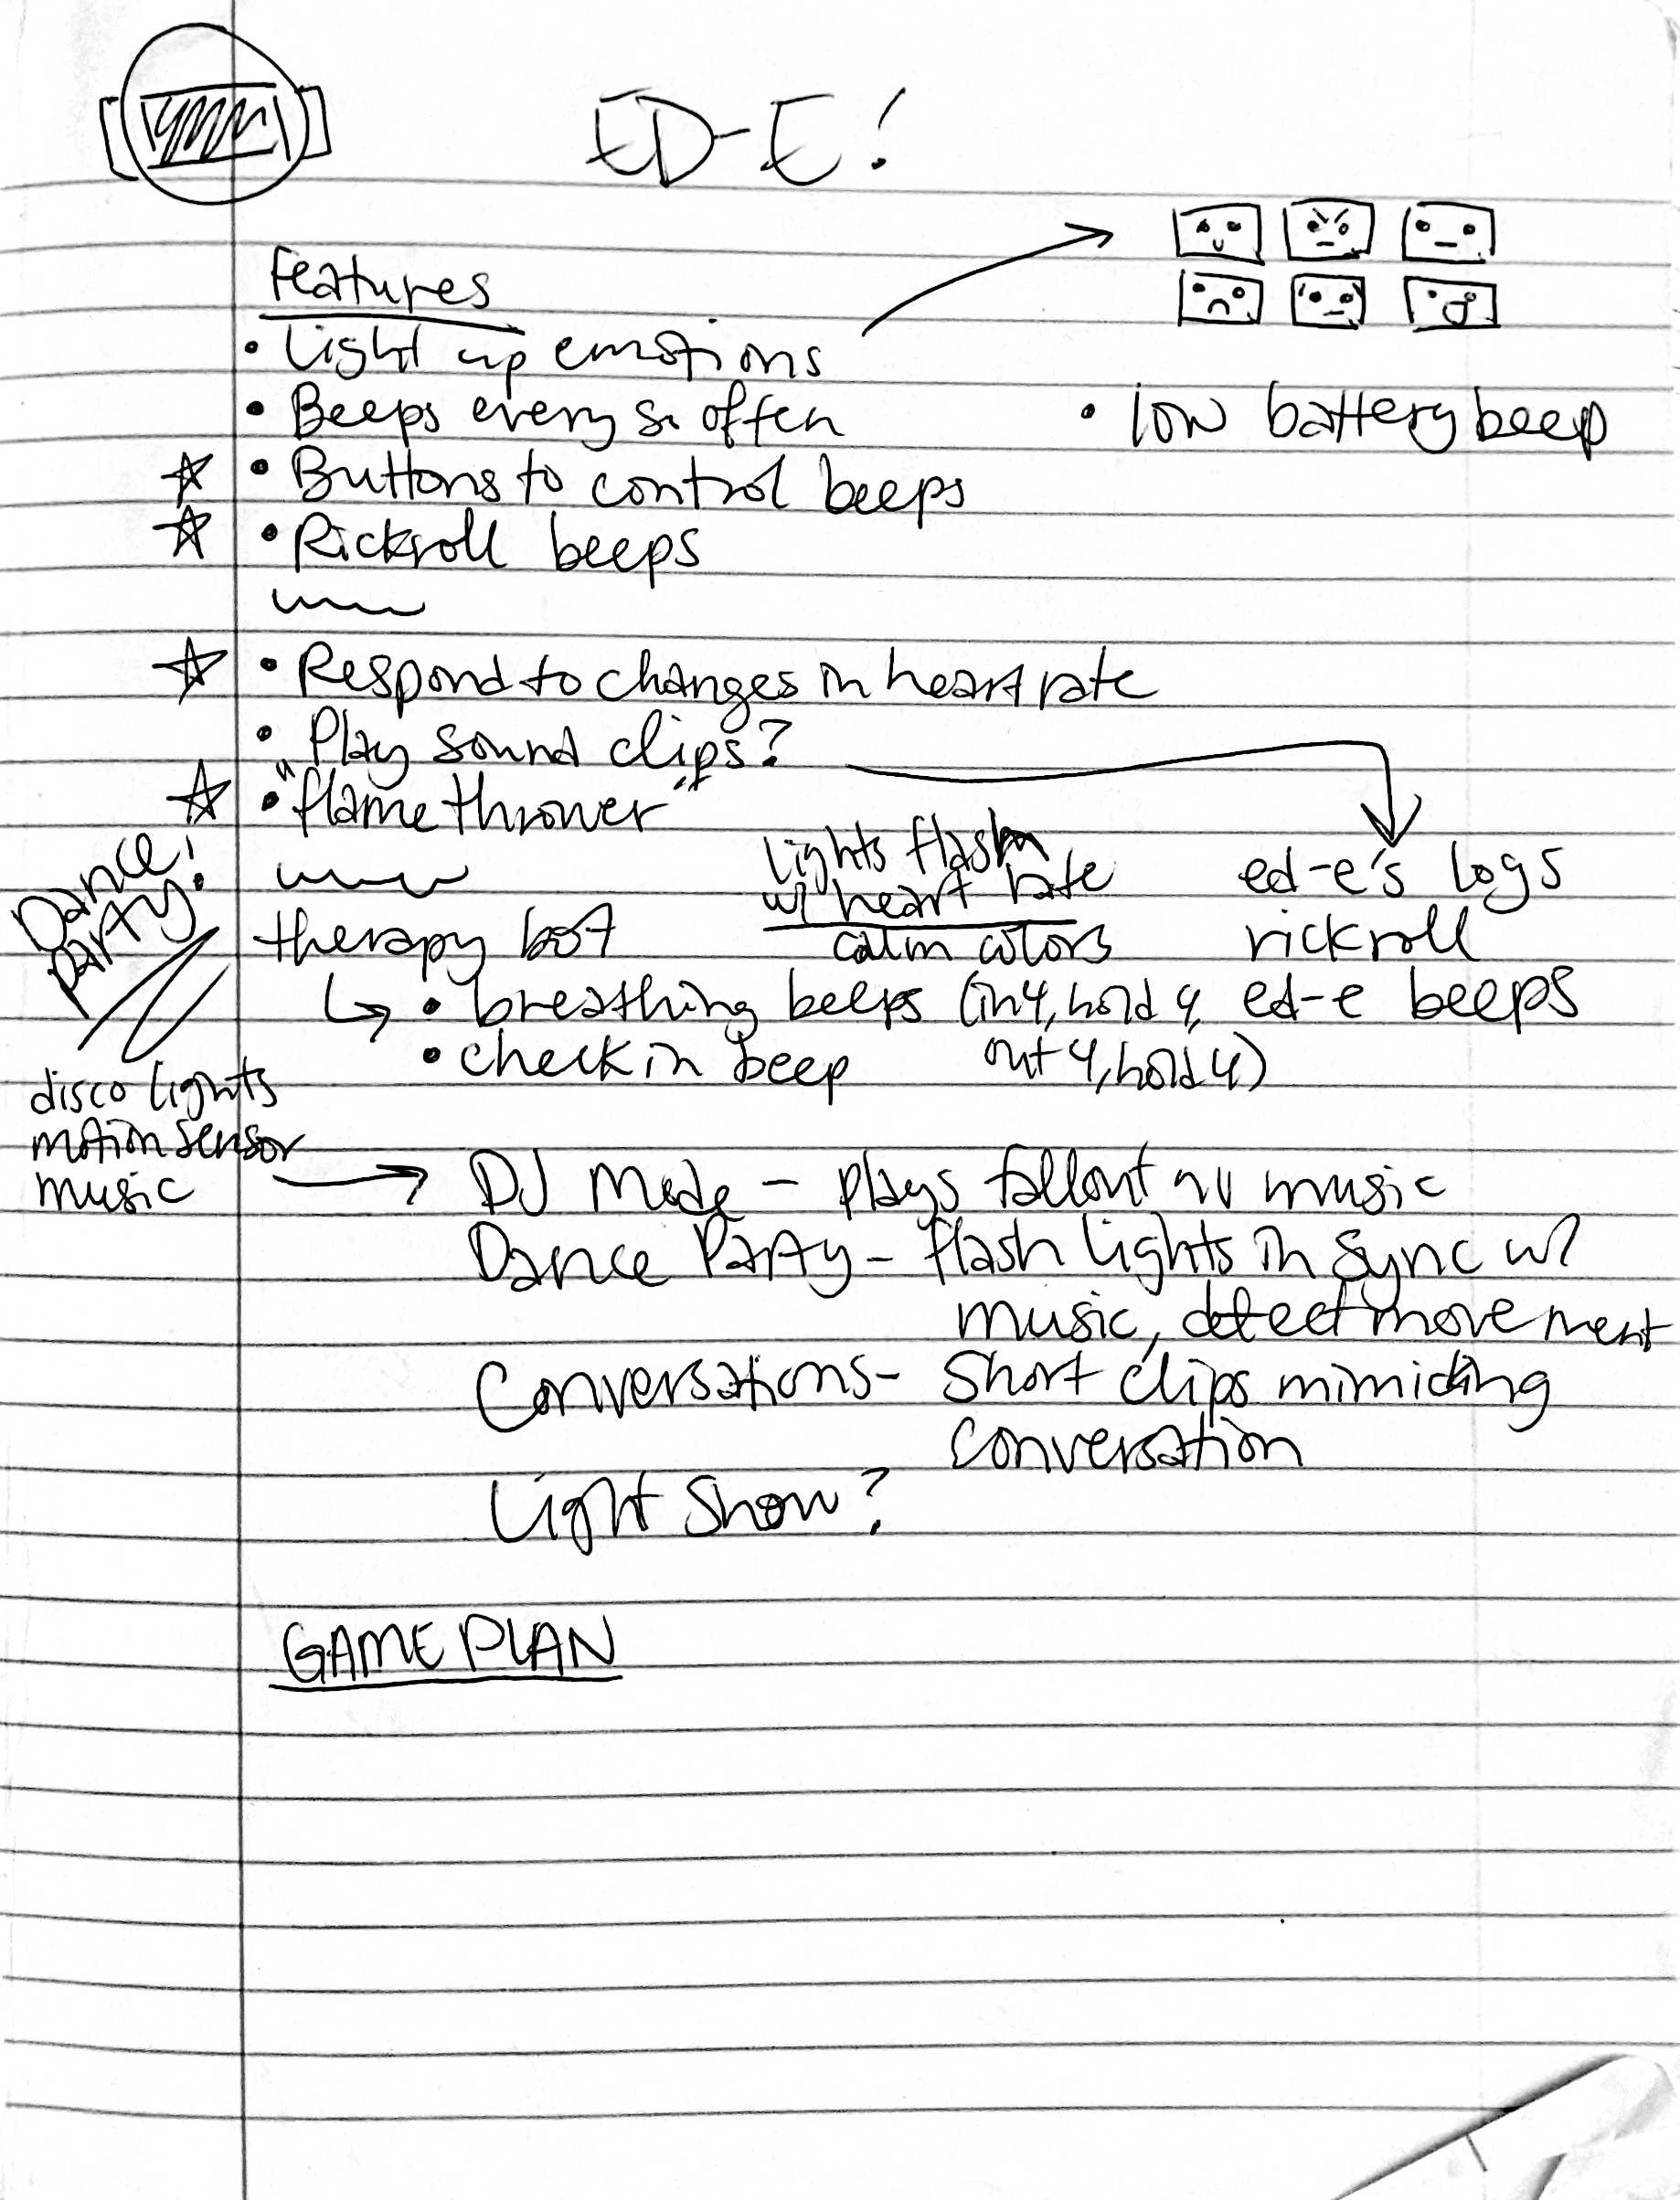
Beep Boop: Emotions for ED-E
So I’m trying to program emotions for ED-E.
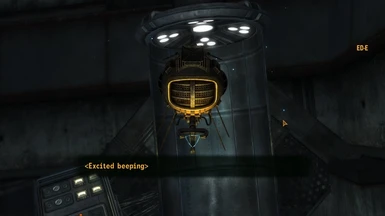
In Fallout New Vegas, ED-E doesn’t use regular dialogue, but communicates through beeps. Basically, he gets <(Emotion) + beeping> as his dialogue. Obviously the only way to research his beeping for this project is to replay Fallout New Vegas and talk to everyone’s favorite eyebot. I came up with a list of some of the emotional beeps he has in the game (and some that I just want) to start programming into him. I have ideas for what I want him to sound like, but I just need to find the right pitches and durations.
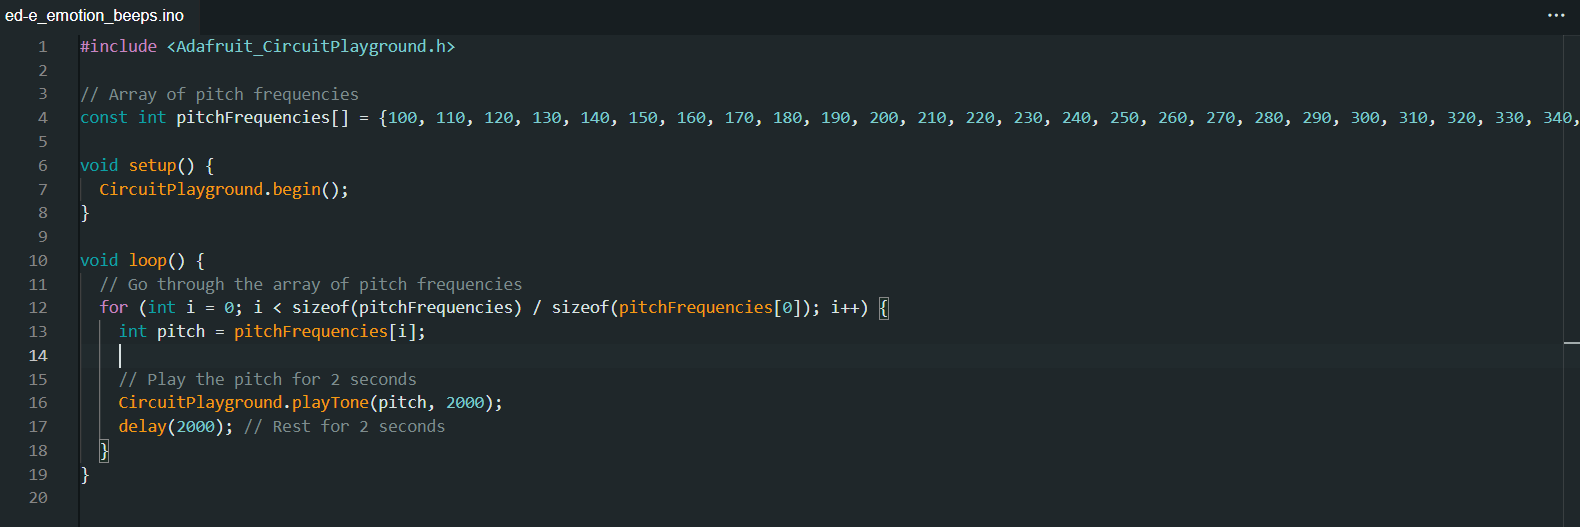
By this I mean I am sitting in my room and saying “beep beep” to myself at different pitches in sync with a program I wrote.
Yesterday my dad was checking in on me and how my programming was going and asked how I was doing. I replied, approximately, “bleurrrrghhhhh.”
I was having trouble programming the emotional beeps because I have very specific ideas for what ED-E should sound like and no way to get that into a computer. I’m a huge music nerd, but I unfortunately don’t have perfect pitch or some superhuman ability like that to use to get ED-E to sound exactly like I want him to.1 Dad suggested using a loop with an array going up every time, which made everything so. Much. Easier.
This plays frequencies starting at 100hz and going up by 10hz every time. I started with 100hz but going up by 50hz every time, but I liked the specificity of 10hz. Once I get in the ballpark of where I want to be, I can then just run the program and correct the pitches if need be.
If you read my last post, specifically the spoiler section, you will know why I started with a shy beep. If you didn’t read my last post, go do that! If you didn’t read the spoiler section, that’s fine. What you really need to know is that I want ED-E to make noises.
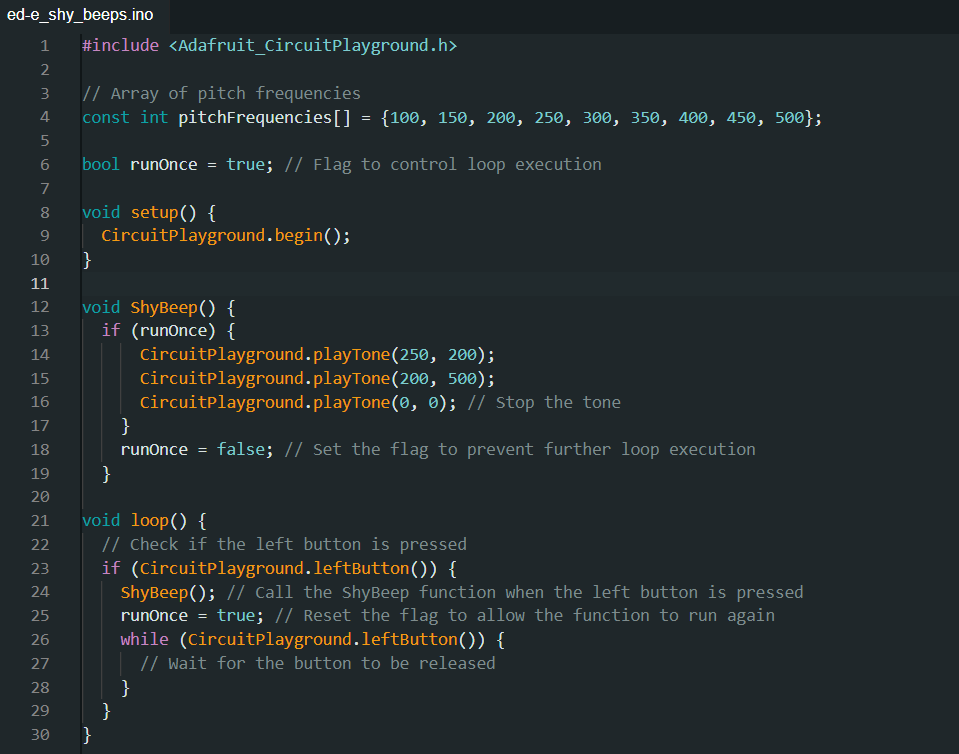
I’ll admit, this took a while to get right. Not playing the tones or even figuring out what pitches they were or how long they should play for. No, getting the tones to play was easy. Getting them to stop… was much harder.
ED-E was shyly screaming at me on repeat for at least 10 minutes while I was slowly losing my mind and trying to make him shut up.
I turned to ChatGPT to help me fix this, but it was utterly unhelpful and I ended up fixing the problem myself by deleting a bunch of the garbage it generated. Now the problem was that I had to continually upload the code to make the ShyBeep function run again. I was happy that it wasn’t looping anymore, but I wanted to fine tune the beeps and making it upload again and again was a pain. That’s why I decided to make it run when a button is pressed.2
It took a little while to make it run when a button was pressed, but then it would only run once and never again, even if the button was pressed. I finally realized that this was happening because runOnce was set to false, and fixed that.
Now that I have this framework, it has been much easier to program more beeps. Now I have a sad beep, and I’m going to start working on a happy beep because I have had just about enough of ED-E’s negativity.3
ED-E Companion Bot Project
- I almost decided to use the definitions of pitch from my Rickroll code so I could just ask the computer to start at middle C and go down or say I want the pitch to be a half note in 3/4 time. I then realized I was making this WAY more complicated than it needed to be and just used seconds and hz like a normal-ish person [↩]
- I seriously love Circuit Playgrounds. They have everything. [↩]
- Just kidding ED-E, I love you [↩]
ED-E Project: Origins
Hi, I’m DexterStarfighter, offspring of MakerBlock.1 I am a maker and artist with possibly too many interests that include drawing, writing, cats, theatre, video games, horror podcasts, folklore, coding, Jenga, history, triangles, succulents, and reading literally anything. I have been going to MakerFaire for basically my entire life and it has always been something I look forward to for the whole year. As soon as Dad told me MakerFaire was coming back, I knew I had to make something super cool for the occasion. This brings me to my latest project, a companion robot.
First, some background. My favorite game is part of the Fallout series (New Vegas, if you were wondering). I started the Fallout series because my dad played them when the first Fallout came out and I wanted to be able to share a cool game with him. I started Fallout 1 and loved it, then played Fallout 2 and 3. Over the summer, Epic Games released Fallout New Vegas with all DLCs for free and of course, I played the crap out of that.23
In Fallout New Vegas, there are various companions you can take with you on your journey through the Wasteland. There are human companions of course (and ghoul and nightkin), but you can also take with you one nonhuman companion. At first I was super disappointed that I couldn’t find Dogmeat. I don’t actually like being around dogs in real life, but I got Dogmeat in Fallout 1 and somehow I have become very attached. (I do not even want to think about how many times I have reloaded a save to keep that little jerk alive.) I quickly got over my disappointment though, because there is a statue of a dinosaur and now I’m disappointed that you can’t have a dinosaur robot companion. Anyway, in my travels through the Mojave, I found two interesting nonhuman companions. The first one I found was this little eye bot named ED-E. I play as a charismatic nerd (high INT and CHA with good repair, speech, barter and science) so I was able to fix him up. ED-E was still only able to beep in ways I couldn’t understand and when I brought him to where I was supposed to for his quest, there was some sort of glitch and I couldn’t interact with the lady for the quest. ED-E seemed kind of lame to me then, so I took him back to the place I found him and left. I later ran into a dog named Rex who I had to take care of for an Elvis impersonator (no, really) and found he was a pretty good companion.
Flash forward to the endgame. I had met a cowboy robot, climbed a dinosaur statue, resurrected a B-29, fought a soldier for a dog’s brain, charmed a scientist, accidentally sided with the mafia, cleaned out an entire casino, assassinated a 261-year-old man, had my vital organs removed, stolen 27 bars of gold, befriended a man wrapped in toilet paper, and was well on my way to conquering New Vegas for myself. I had only one more thing to check off my list: walking the Courier’s Mile. Don’t worry, I won’t spoil the Lonesome Road quest for you- I’ll just tell you that I met ED-E again. Somehow, within the first few minutes of interacting with him, I had become so completely charmed by this little robot that I would do literally anything to protect him. I’m not sure what about ED-E made him so endearing to me, but he became my best friend.

In 2019, I met Odd_Jayy at MakerFaire. I remember seeing his spider bot and thinking how cool it was. I’ve always liked the idea of a companion bot, but I’ve never actually had a specific idea of what I want out of one. When dad told me that we would be going to MakerFaire again, I immediately thought of an ED-E companion bot.4 Dad loved the idea too and gave me lots of good tips on how to get started. I have a tendency to get lost in the details, so he helped me focus on the big picture and the first steps I could take to achieving my goals.
I have a lot of ideas about what I want ED-E to do eventually, but I’m a complete beginner at Arduino programming. Knowing this, Dad suggested starting small. First, turn on one light. Then multiple lights. Then make them flash. Then make them change colors. Then add beeps. Stuff like that. I was like “cool, cool” and immediately programmed ED-E to beep the entirety of Never Gonna Give You Up instead of doing literally anything sensible.
I regret nothing. It was frustrating at first because I was super out of my depth. I used Chlorondria’s arrangement of Never Gonna Give You Up and used ChatGPT to help me learn how the code works. ChatGPT was super helpful because I could get feedback on why my code wasn’t working. The sense of accomplishment when I finally recognized the tune made all the frustration so incredibly worth it.
After my self-indulgent first project for ED-E, I moved on to taking Dad’s suggestions. Sort of. I’m a teenager, and therefore I am legally obliged not to listen to any authority figures, real or perceived. I made ED-E flash some rainbow lights. I started with just red lights and it took a while to make the code work, but once I made it work, I just changed the color brightnesses. Fun fact: my ED-E bot now actually glows two shades of blue in his rainbow light show pattern. For some reason I decided RGB stood for Red Yellow Blue and messed up with the color values when I was trying to make green and accidentally made a light blue. The light blue actually looked pretty cool, so I decided to keep it.
Today, I worked more on5 ED-E’s… musical function. I’m going to warn you right now: there will be spoilers for MakerFaire below! I intend to take ED-E to MakerFaire with me, and if you meet him, there will be some fun surprises in store for you. Not if you read the spoilers, though. MakerFaire is a big place and I don’t expect everyone who visits this page to run into me at the Faire, so I’ll include some stuff about the surprises below.

***SPOILERS START***
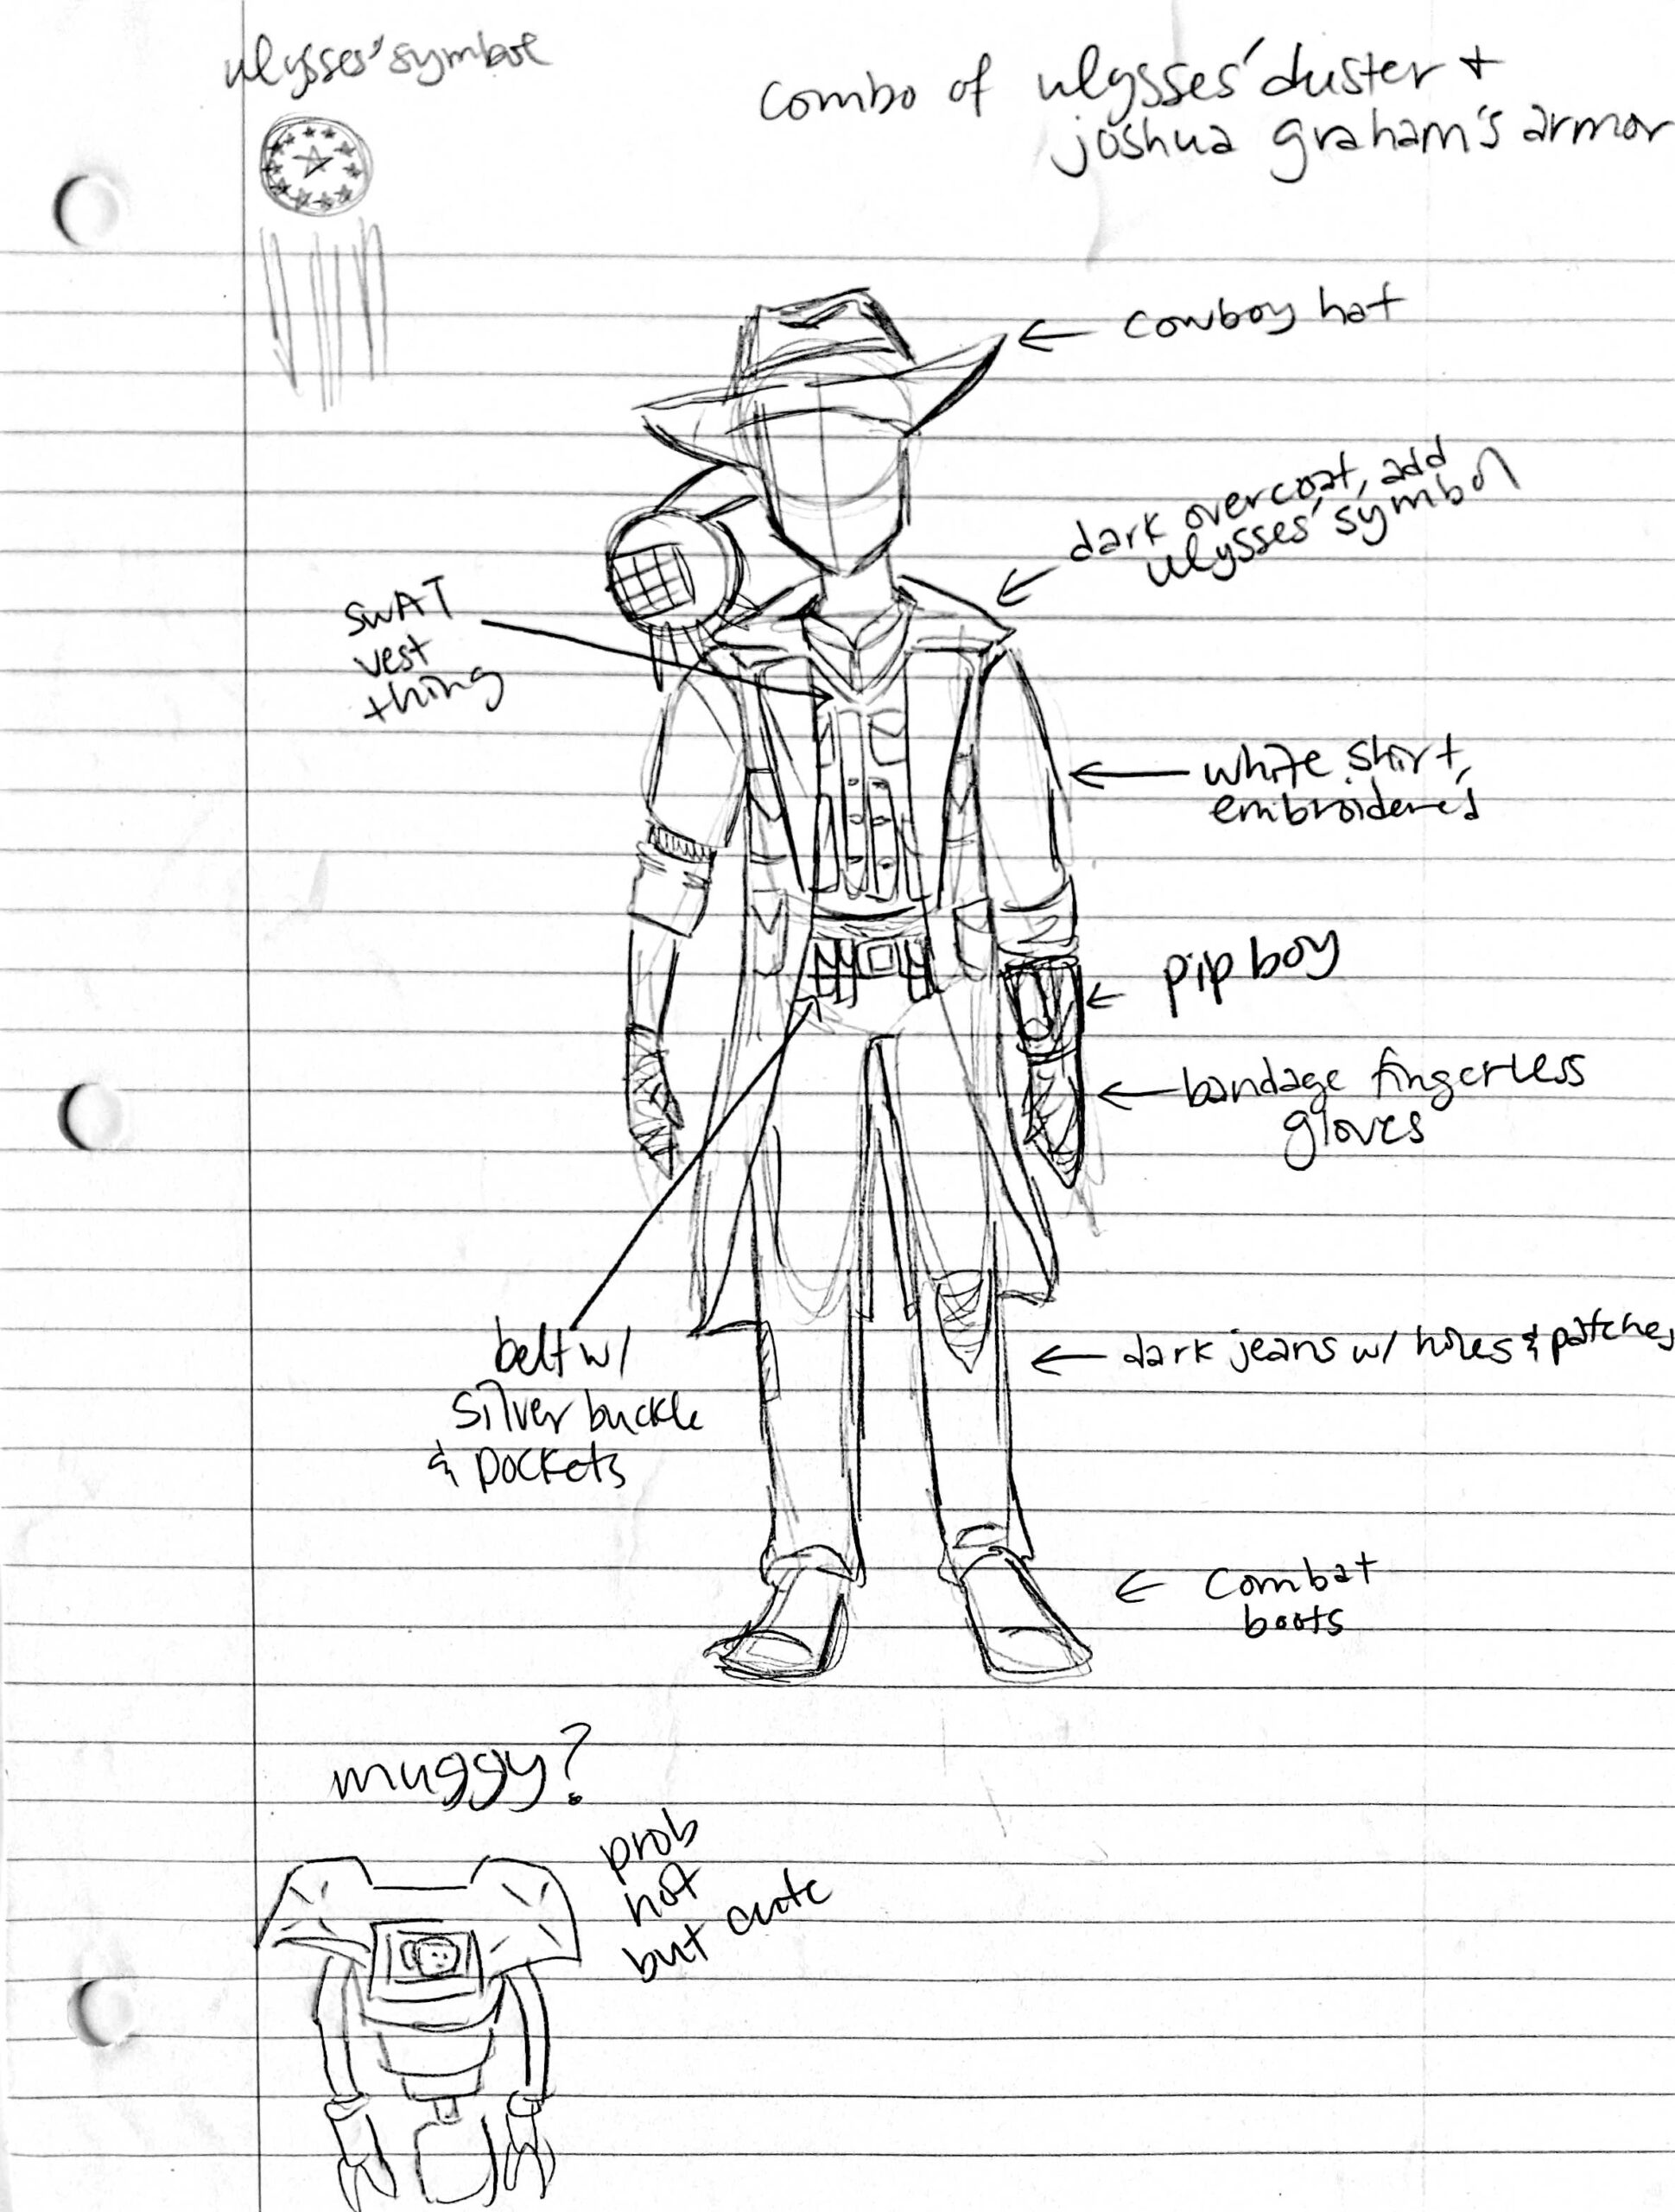
If you’re still here, I assume you want to read this. One of my favorite things about ED-E in Fallout are the little conversations you can have with him. I want to be able to have a few little “conversations” with my companion bot, kind of like in the game. I’m going to have a Pip-Boy with various buttons to run functions for ED-E, but one of the first conversations I thought of had to do with his musical function. This was my idea:
Me: Hey, ED-E. Do you wanna sing them your favorite song?
ED-E: [Shy beeping]
Me: Aw, are you shy?
ED-E: [Shy beeping]
Me: Come on, ED-E. We’d all really like to hear you sing!
ED-E: [Questioning beeping]
Me: Yes, of course! Listen, I’ll ask them. Do you want to hear ED-E sing his favorite song?
Other person: Yes!
Me: See, ED-E?
ED-E: [Pleased beeps, wait, then Rickroll beeps]
Obviously, I’m not going to make ED-E understand my words and respond to them. ED-E will be a shoulder mounted bot, so I want to be able to have conversations that trigger based on movement. I’m using a Circuit Playground, so I intend to take full advantage of all the different sensors it has. I programmed ED-E to run his Rickroll function if he senses a significant change in acceleration. I’ll pop my shoulder like I’m giving him a nudge, triggering the function. He waits for 8 seconds to give me time to talk, then plays the Rickroll beeps.
I have to admit, this took a WHILE to get right. It was still incredibly satisfying to see it all come together and go right. I was so excited when it started working! I did a lot of testing to get the sensitivity right because I don’t want it to trigger if I’m just walking around. I’m still fine tuning that part because I bumped the cord earlier and he started Rickrolling me. Then again, maybe ED-E just has a funny sense of humor.
***SPOILERS END***

So, what’s next for ED-E? I think the next thing I want to work on is getting his beeps right. I can make him beep music, and that’s great, but I also want to have him beep every so often and have “conversations” with him. I’m going to program some little beep clips for different emotions or situations that I can then mix and match into various conversations. I might also actually listen to Dad for once and work on a light show.
Thanks for reading about my ED-E project! I’ve enjoyed working on him and I’m so excited to share him with other makers. I’ll try to post updates regularly (they shouldn’t be as long as this one since you won’t need all the background next time). Thank you to Odd_Jayy for the inspiration, Chlorondria for the musical arrangement, ChatGPT for the troubleshooting help, Adafruit for making awesome boards, whoever made Fallout New Vegas, MakerBlock for being a great dad and helpful sounding board, and to you for reading this post.
ED-E Companion Bot Project
- I considered saying progeny and descendant of the House of MakerBlock, but offspring sounded the best. Progeny sounded weird and the descendant thing reminded me of Game of Thrones, which I have not read or watched, but I might someday and I don’t want to invite spoilers. [↩]
- I love Epic Games. Free games every week? Yes please! Disclaimer: I am not being sponsored by Epic Games, but if I was, that would be awesome. [↩]
- New Vegas is best Fallout, you can fight me on this. [↩]
- I also considered a Muggy companion bot. I love Muggy and if ED-E turns out well, Muggy might be my next project. [↩]
- Lol, moron [↩]
Coding with an LLM Sidekick
I fell down a rabbit hole recently which lead me to think about my experiences in the nascent field of “prompt engineering.”12
As a thought experiment, I was thinking about what I’ve managed to accomplish working with an LLM, the challenges along the way, and perhaps even where I can see the frayed edges of its current limitations.
After several starts and stops trying to hire someone to assist with a website I own, I turned to the idea of getting help from an LLM. 3 4 After all, some of them were touted as being able to actually draft code, right? Besides, if the first step in even hiring a developer is just being able to describe what you need, and the first step of getting an LLM to generate some code is defining what I need, then…

-
Task 1: Pie Chart WordPress Plugin
- I started off with a simple and easy to define task. My original plugin was a quick and dirty bit of code, so if ChatGPT could create a WordPress plugin, there was a chance it could do something simple like this.
- My first attempt was a wildly spectacular, but highly educational, failure. A brief description of the plugin’s function was enough to get a WordPress plugin template file with very little functionality. Then came the arduous LLM wrangling, my asking it for refinements, it losing track of the conversation, and the endless sincere heartfelt apologies from ChatGPT about forgetting really basic pieces of information along the way. Some changes were minor, but changing the names of variables, functions, the plugin, switching API’s, forgetting requirements, etc. It was constant whack-a-mole that spanned nearly 90 pages of text.
- My next attempt was more focused. I created a framework for discussions, provided more context, goals, descriptions of workflow, and resources for examples. The result was a lot better, with portions of largely functional code. However, the LLM kept forgetting things, renaming variables, files, directories, etc.
- Next I created the directory structure and blank placeholder files, zipped these, and uploaded them as an attachment for the LLM to review – along with a description of the contents and the above additional context. This was even better than before, but after a certain depth of conversation no amount of reminding could bring the LLM around to the core of the conversation.
- My thinking was that after a certain level of conversation, the LLM was not going to be able to synthesize all of nuance of our conversations plus the content of the code drafted. To get around this I would begin a conversation, make a little progress, then ask it to summarize the project, the current status, and a plan for completion – which was fed into an entirely new conversation. This way, Conversation N was able to provide a succinct and complete description which Conversation N+1 could use as a jumping off point. My thinking was that the LLM would be best positioned to create a summary that would be useful to another LLM.
- This process of minor “restarts” in the conversation was one of the most successful and powerful techniques I’ve employed to combat LLM hallucinations and forgetfulness.
-
Task 2: Blog Post Series Plugin
- After rewriting the above pie chart plugin using an LLM, I turned my attention to a slightly more complicated plugin. The pie chart plugin is really just a single file which turns a shortcode with a little bit of data into a nice looking pie chart. There’s no options page, no cross post interaction, database queries or anything. It was really just a test to see if an LLM could really draft a basic piece of working code.
- The series plugin is still a reasonably simple piece of code, but it has several additional feature which require a settings page, saving settings, custom database queries, and organizing information across multiple pages. It’s also one of the most used plugins on this website.
- I figured I would try feeding the LLM a description of my plugin, all the code in a directory structure, and then my initial “base” prompt which explains our roles, needs, resources, and scaffolding for a discussion. I asked the LLM to summarize the function and features of the plugin, which it did quite nicely. I added a few additional features I had previously worked on and asked it to incorporate this into the description. Asking the LLM to simply “build this WordPress plugin” was met with a “you need to hire a developer” recommendation. However, asking it to propose a workflow for building a plugin with these features was successful. I was provided with a roadmap for building5 my plugin.
- This system worked reasonably well, allowing me to compartmentalize the steps, backtrack, retrace, revise code, working on a section, then another, sometimes going back to a prior sections at the LLM’s direction. The LLM still tended to get lost, renamed variables/paths/directories/filenames, but it was less pronounced than before. I did find it harder to use the “summarize and restart” strategy when dealing with a multi-step code development system. However, it was still workable since I could upload all the code produced so far.
- The result was a new plugin, with better functionality than what I’d written myself 10 years before. Here, the new strategy of having the LLM break the project into sections and providing a roadmap was particularly helpful.
- Strategy: Conversational Scaffolding
- I mentioned “conversational scaffolding” and “frameworks” for discussing things with the LLM above. This was an overarching and evolving strategy I use to help focus the LLM on the goals, keep it on track, and hopefully help it provide meaningful and useful replies. The full text of my “prompt framework” file is too large to include here, but I’m happy to provide the highlights.
- Personas. I assigned the LLM three distinct personas with differing backgrounds, strengths, and goals. Their personas were defined in reference to one another, so the first would activate, the second would then review and interact with the first, after this process completed the third would be activated, perhaps interact with the first two, then it would move on. I would say this process was rather successful.
- Myself. I would describe myself, my goals, level of expertise, etc. I found that I if I referred to myself as an expert, the LLM would not be as likely to offer me code proposals – but if I described myself as a newbie, it would recommend I hire a developer rather than tackle such a complex problem myself.
- Rules for Conversation. These are a collection of 12 rules (at last count) which helped myself and the LLM interact. The high points are:
- Answer Numbering, Answer Format, Eliminate Guesswork, Organize Assumptions, Conversational Review, Complex Answers, Context Refresher, Problem Solving Approach, File Structure, @Rules, and Personas.
- Each of these items were followed by a few sentences explaining something about how the LLM should be expecting to receive information and react. My favorite of these was the rule “@Rules” which directed the LLM to begin it’s response by reviewing the Rules and following them.
- Knowledge. There are a number of programming languages and technical topics I’m interested in and have used an LLM to address. To this point, I solicited a list of useful resources from the LLM and started including a “Knowledge” section where I listed dozens of the most important resources for the languages and API’s I most commonly use.
- By beginning each prompt with the above “framework” (~10k of text) and following it up with a short description of my project or a file to consider, I found I was able to jump right into the project without having to provide additional significant background information.
- Task 3: “Project Drift”
- This is a considerably more complicated task I will simply refer to as “Project Drift.” This isn’t a real codename since the developer base is all of exactly one dude, but I don’t want to name the location/website for a variety of reasons. In any case, Project Drift involves multiple user interfaces, numerous settings, database queries, data sanitation and validation procedures, administrator functions, and numerous other facets. All of the above tasks and attempts were basically part of the run-up to this (ongoing) project.
- Using the LLM’s ability to open and read a ZIP file, as well as propose code, has been invaluable. This in conjunction with my prompt framework allows me to get the LLM up to speed after a micro-restart – and it’s summarization procedures help me get back in the mindset after I’ve stepped away from the project for a few days.
- Since this project isn’t done yet, I can only give a progress report. It’s going very well. Much of the heavy lifting, scaffolding of the code, can be assembled for me, tedious database queries and chunks of code provided. There are still large areas where the LLM is unable to be very helpful – and that relates to pinpointing a bug in the code (or between code sections). This still requires a knowledgeable hand at the helm.
- As a solo-coder, having the assistance of another “persona” to keep me on track with a given section of code has been helpful. I have only assigned three personas, but I could see adding a few more to fulfill different roles.
I would estimate Project Drift is roughly 30-50% complete, but this is still an incredible amount of progress in a very short time. I would also estimate it has cut the amount of my development time by 90% (but on the easiest and most tedious stuff).
Software Development with LLMs
- Series Plugin Test for Illustrative Purposes Only
- ChatGPT WordPress Plugins
- Coding with an LLM Sidekick
- I know, it feels pretentious, doesn’t it? [↩]
- I’ve got the same knee-jerk reaction to “visionary,” “thought leader,” “polymath,” and “futurist.” [↩]
- Don’t get me wrong, some of the developers I’d hired simply disappeared while other relationships didn’t work out due to timing. I don’t think anyone was malicious, just… busy, really. [↩]
- Still, the job needs to be done. [↩]
- Re-building? [↩]
ChatGPT WordPress Plugins
This is kinda bananas. Years ago I wrote a plugin to solve a problem I had. I wanted a simple WordPress plugin where I could insert a shortcode into a blog post, specify a series title, and have it automatically search up all the other blog posts that used the same shortcode and series title, and then insert a nice looking list of blog posts in that series in chronological order.
It was one of my first plugins, still available on WordPress.org – just hidden since it hasn’t been updated in almost a decade. It still works to this very day, if occasionally a little buggy. After several WordPress versions, it no longer properly displays the series title, which is a real shame.
On a whim, I tried using ChatGPT to generate some plugins.
Here’s an example of my old plugin and the new ChatGPT written plugin (in this order):
Default Series Title
See how bad that was? It completely mangled the title.
Edit: Since publishing this post, I realized that I would have to choose between
- Leaving the old defunct plugin in place just to make a point about how it didn’t stand the test of a decade’s worth of WordPress updates, but then also leaving broken series titles sprinkled through my back catalog of blog posts.
- Go back through nearly 10 years of blog posts12 to change them over to the new plugin shortcode.
- Disable the old plugin, but have the new plugin work with the old shortcode as well as it’s own new shortcode, at the cost of losing an example of how bad the old plugin performed.
I went with option 3. Just take my word for it, it looked bad.

Now for the ChatGPT version:
Software Development with ChatGPT
It took me about an hour to whip up a working WordPress plugin with the same core functionality. I would break down the time I spent as follows:
Time Spent Creating Series Plugin with ChatGPT
But, that’s not all! You see, as I was writing this blog post, I realized it would be fun to include a pie chart to indicate the time I’d spent on this. Unfortunately, the plugin I had written to do exactly this many years ago has apparently completely given up the ghost. Thus, before I proceeded to this very sentence, I used ChatGPT to create a plugin for displaying custom pie charts!
Time Spent Creating Pie Chart Plugin with ChatGPT
Obviously, this plugin took a lot longer. The first few versions were having all kinds of problems between the HTML Canvas code and trying to figure out how to make sure the javascript was not loading too early or too late. In the end, I just asked it whether it was capable of even creating a pie chart – and it gave me a piece of workable javascript. I told it to refactor the plugin using this same javascript, and then it was a matter of fine tuning the result.
If you don’t know anything about writing WordPress plugins, you could probably use ChatGPT to create a very simple plugin. However, once it got slightly more complicated, it would likely require some troubleshooting to figure out what was happening. In the series plugin it took me a while to root through the WordPress functions to figure out that apparently ChatGPT was trying to use a function in a way that simply did not work. I explained to ChatGPT that that particular function could not operate in that way, explained how the data it was feeding into that function needed to be first modified, and then asked it to refactor the code. From that point forward, it started to look a lot better. There were some additional quirks – like putting more than one series title in a single post would only display one. I suspect these problems of ChatGPT taking a shortcut to generate code, hardcoding certain variables and names, not considering that it might need to operate more than once on the page, may be difficult for it to anticipate and address. Without some degree of WordPress development knowledge, I think a novice user armed only with ChatGPT would need to do a lot of refactoring, asking the program to generate the plugin all over from scratch many times, before arriving at a workable result. Then again, a million monkeys at typewriters, right?
I think ChatGPT could be great for creating relatively simple plugins like a series plugin, a pie chart plugin, or even a table of contents plugin. However, having seen how much time it cut out of the development process, I think it would be interesting to try developing an A/B testing plugin or more complicated plugin.
I think the next task to see if I can get it to generate QMK code for a keyboard, Arduino code, Raspberry Pi code, or a chrome extension.
I can already see some ways to improve both of the ChatGPT generated plugins used in this blog post. My series plugin included two arrows at the bottom so the reader could navigate to the prior or next post in the series. And I think it would be great if the chart plugin had a feature where I could specify the units, so the magnitude data would be included with the labels. I may try getting it to shoehorn these updates later…
If you see these reflected in the charts above, I must have already done it. :)
Software Development with LLMs
Series Plugin Test for Illustrative Purposes Only
The only purpose for this post is to serve as a reference for a more interesting and useful post.
Software Development with LLMs
- Series Plugin Test for Illustrative Purposes Only
- ChatGPT WordPress Plugins
- Coding with an LLM Sidekick
Software Development with LLMs
- Series Plugin Test for Illustrative Purposes Only
- ChatGPT WordPress Plugins
- Coding with an LLM Sidekick
[]
DIY Carved Eraser QR Code Stamp
After some modest success carving some neat designs into pink erasers, I tried making a QR code stamp. It didn’t work well at all, with exactly just one impression working … sometimes.
The first attempt took a really long time and turned out terribly. After a few days break, and some mental distance from the project, I returned with some new ideas and inspiration.
Here was my new approach and plan:
The Stamp
- Go Slow. Proceeding slowly and methodically is always a good idea with sharp instruments. I went fairly slowly the first time, but this time I would be even more methodical.
- Cutting. Rather than using the carving blades for the QR code features, I switched to using a craft knife. It was just too hard to cut precise lines with a V or U shaped blade, managing not just the direction and speed of the cut – but the depth as well – for both sides of the blade. The craft blade let me focus on just one side at a time. I used the blade to cut at about a 45 degree angle along one side, then other side.
- Don’t Cut Too Much. I used calipers to measure the pixels cut into my first attempt as well as the stamped result. I discovered \the stamp pixels were very slightly larger than their rubber counterparts. This tells me it would be better to cut too little rubber – and cut more later if necessary.
- Removing Scraps. Rather than sticking my big old fingers into the eraser or trying to pop it out with the blade, I used a pair of 3D printed tweezers to pluck them out.
The QR Code
- Optimize the QR Code. There are several ways to optimize a QR code for eraser / stamp carving. 1. I used as many of these methods as I could:
- “Pixel” Size.
- As you add more information into a QR code, the QR code generator will need to use more black and white units2 to encode the information. After some tinkering it seems like the smallest QR code that can be generated is 441 total pixels, 21 wide by 21 tall. The absolute largest QR code I could generate looks like one of those “magic eye” posters.
I didn’t even try to count how many pixels wide this thing was. It’s 9,216 pixels, 96 wide by 96 tall. - I was having a hard time carving a stamp 21 pixels wide into a 24.5 mm3 wide eraser, so the idea of carving more than 21 lines into an eraser by hand seemed not feasible. The very next step up from the 21×21 grid would be a 25×25 grid, so I knew I had to find a way to limit the data, find the best error correction, and find a way to cut these small pixels and thin features.
- As you add more information into a QR code, the QR code generator will need to use more black and white units2 to encode the information. After some tinkering it seems like the smallest QR code that can be generated is 441 total pixels, 21 wide by 21 tall. The absolute largest QR code I could generate looks like one of those “magic eye” posters.
- Proper Error Correction.
- QR Codes have built in “error correction” that allows the user’s scanning device to scan information from a partially formed, damaged, or obscured code. These settings range from L (low), M (medium), Q (quality), and H (high quality) able to error correct from up to 7%, 15%, 25%, and 30% damage respectively. Lowering the error correction allows you to create a smaller QR Code, but it will also be less robust.
- I fiddled with these settings a lot to find the maximum amount of data I could put into a QR code while still retaining a maximum size of 21×21 pixels. I was able to encode about 16 characters in a L, 13 characters in a M, 10 characters in a Q, 6 characters in a H. The code stores numeral easier and requires more pixels to store letters and special characters.
- My first attempt used an error correction level of L, but was basically unusable as there must have been more than 7% distortion. This time, I decided to try for a very high level of error correction with the Q setting for 25%.
- Reducing Data. This is where I used some tricks you may, or may not, be able to replicate.
- URL Shortener. A TinyURL link to my Instagram page requires 29 characters. Looking above, this would immediately suggest a 21×21 pixel QR code would not be possible.
- Trimming a Link. After some fiddling, I realized that as long as the data encoded looked like a URL (as in some characters separated by a “.”), the QR code scanner would interpret it as a link. This means we can skip the “http://” and “https://”, saving 7-8 characters! Unfortunately, this still doesn’t let me encode the shortest URL that TinyURL could give me which requires 20 characters after discarding the “http” stuff.
- Maybe Just a Domain? Maybe you just wanted to point someone to your website and not a big long link, shortened with a URL shortener. Let’s work the numbers backwards. Most commonly used domains end with “.com”, “.org”, “.biz” – with 4 characters each. Using the information above, this means we could use a domain name with up to 12 characters for an L encoded QR code, 9 for an M, 6 for a Q, and just 2 for an H. While it would be easy to find a 12 character domain, you’re stuck with only a 7% margin for your error correction. A domain with 6 to 9 characters for Q and M would allow for 25% and 15% error correction. You can still find 6 character “.com” domain, but… they’re unlikely to be very memorable. This isn’t necessarily a problem. You might be able to find a good short domain with an unmemorable name, but forwards the user to your real website. The problem, of course, is that no one is going to want to click on that link.
- How About a custom URL Shortener? It’s still possible to purchase a short URL, but they’re pricey. I happened to buy a good one several years ago and have hung on tightly to it. I slapped a YOURLS install on it, and have been using it ever since. Using my own URL shortener means I can keep the URL down to just 9 characters – including the TLD!
- “Pixel” Size.
Okay, back to carving. I grabbed my headphones, put on some music, and took it very slowly – a little under two hours. Here’s some progress photos:
Here’s how it looked (with some additional shots to show the original design overlaid):
I stamped this design 9 times – and all 9 were more or less easily scannable. The neat thing about this design is that it points to a URL shortener I own, so not only is it about as tiny as possible, but I can change the destination if I ever needed – without having to spend two hours recarving an eraser stamp!
Eraser Stamp Carving
- I won’t get too much into the weeds on the actual method of generating QR codes, mostly because I haven’t studied the math in it, but I did find a great article which has a lot of good background info and explanations [↩]
- I’ll call them “pixels” from this point forward [↩]
- Just barely under an inch [↩]
Heat Transfer Vinyl T-Shirts – Without A Vinyl Cutter, Part II
I recently posted my method for making DIY heat transfer vinyl t-shirts without a craft / vinyl cutter. I used the process to make an Avatar: The Last Airbender themed t-shirt, then a set of four Fallout themed t-shirts for the entire family. After that I designed, cut, and ironed several more t-shirts. (You’ll see me refer to ironing the design several times, but each time I ironed the vinyl through a piece of parchment paper, to protect the design from scorching and the iron from being marred by melted plastic)
I learned a few more things along the way and thought I’d share these newb-mistakes and pro-tips.
But first, how about some pictures?!
- Cutting Designs
- Just be careful and go slow.
- Design Size
- I tend to make designs that are no more than about 6″ wide. This has seemed to be a really good size to show off a cool design, but also fits neatly in the center of an 8.5″x11″ piece of standard printer paper. You could make something a lot larger, but for all of my designs, this has worked out really well.
- Preparing Designs
- I forgot to take a picture of it, but it helps to draw an X and Y axis into your drawing. The purpose of this is to help orient your design at the center of the fabric. After I had cut out the design entirely, I then used the craft knife to cut triangles into the protective layer pointing towards the center of the XY axis center of the design. Then, once this was done I could draw the XY axis lines on the protective layer.
- I used a yard stick to estimate the center line of the shirt, which I could then align with the XY axis lines on the design itself.
- Position Your Design
- After looking at various other t-shirts, I decided they tended to look best when the top of the design was about 3″ lower than the bottom of the “V” in my v-neck shirts.
- Once I had the shirt on the ironing board, I also put pieces of masking tape with a pen line on the ironing board to help me position and orient the yard stick repeatedly.
- Heat / Press
- Unlike my first attempt, I made sure to really push hard on the iron. The idea is that you’re not just melting the vinyl adhesive, but actually melting it into the fabric. If your iron isn’t hot enough, you’re not ironing long enough, or you’re not pressing hard enough, it won’t actually melt into the fabric.
- When you’ve melted it properly, you should see an almost… bubbly texture underneath the protective coating. Then, once the vinyl is cool and you’ve peeled the coating off, the vinyl should look a little rippled since it is taking on the texture of the underlying fabric.
- Iron, Cool, Wait, Inspect Vinyl, then Peel
- I made this mistake with the arc reactor t-shirt. As I peeled the protective coating off, in one spot the vinyl got pulled up and in another spot it tore the corner off a sharp trapezoid in the design! While it is possible I didn’t have the iron hot enough or press hard enough, I think the most likely explanation is that I didn’t wait long enough for the vinyl to cool – so it was still molten enough to be adhering to both the shirt and protective coating, causing the design to be damaged and torn.
- Peeling Direction
- If your design includes very thin or sharp little pieces (such as the pointy trapezoids in the Iron Man arc reactor), consider changing the direction of the protective coating peeling to avoid peeling towards a sharp point. These little points have so little surface area they can easily stay stuck to the coating and get pulled off the shirt, ruining all your hard work.
- Repairing Mistakes
- The problem with making a mistake with heat transfer vinyl is that if you make a serious mistake to your design or application, you may have ruined a shirt. (I would 100% wear a comfortable shirt even if the design wasn’t perfect.) However, a little mistake doesn’t have to be the end of the world. I made two mistakes on my arc reactor t-shirt, that I was able to fix well enough that they probably wouldn’t be obvious to the casual observer.

Yellow arrows show where the design pulled up and wrinkled slightly. The red arrows point to where the design tore and was repaired. - The design of the arc reactor is about 3″ across, to give you a sense of the scale and size of the mistakes. You can see two slight wrinkles in the vinyl, pointed out by the yellow arrows. The red arrows points to where you can barely make out what appear to be wrinkles – but show where the design was torn and repaired.
- I didn’t find any really good way to fix the wrinkles, other than to really iron those areas very very hard. It mostly pressed the wrinkles flat and they’re barely noticeable on the shirt. Between the shimmery / reflective quality of the vinyl and uneven way a shirt would hang on a non-rectilinear organic body or form and the size of the wrinkles on the small design, it’s almost imperceptible.
- The torn design was initially quite heartbreaking. By the time I had worked on this shirt, I had already created five other shirts without any kind of mistake. It just so happened I either incompletely cut the design out (I don’t think so) or was a little impatient as I peeled the design (probably), and tore a pretty big piece off of the end of the right side trapezoid pointed out by the red arrow. I tried to use my craft knife to peel the tip of the trapezoid off the protective coating, but it wasn’t working and I ended up mangling it beyond repair. After stewing a bit, I figured I would simply cut out a new trapezoid piece and iron down over the torn piece. I made sure to cut the new piece very slightly larger (we’re talking probably only 0.5 mm in each direction) and position it carefully over the damaged section, before ironing it down very firmly, waiting for it to cool down all the way, peeling the coating, then ironing it again. Once again, I think the damaged portions wouldn’t be noticeable to most observers.
- The problem with making a mistake with heat transfer vinyl is that if you make a serious mistake to your design or application, you may have ruined a shirt. (I would 100% wear a comfortable shirt even if the design wasn’t perfect.) However, a little mistake doesn’t have to be the end of the world. I made two mistakes on my arc reactor t-shirt, that I was able to fix well enough that they probably wouldn’t be obvious to the casual observer.
I would guesstimate a 5-foot long and 12″ wide roll of heat transfer vinyl could comfortably make 10-15 good sized designs and as much as 20 if you’re very careful. Let’s say you can only make about 14 designs out of a roll, to be on the conservative side. At about $7 for a basic color roll, this about $0.50 worth of vinyl per shirt. My wife bought me several 2-pack blank v-neck shirts in assorted colors for about $14 per pack. Ignoring the cost of my time (it’s a hobby, remember!) this is only about $7.50 per custom shirt. I think this could make a really cool and inexpensive project for a class, letting all the kids make their own designs (by cutting the vinyl with scissors instead of craft knives, if they’re young) or to create a set of team shirts for a field trip or club.
Not only has this been a very fun and inexpensive hobby, I end up with a great looking custom t-shirt at the end that will probably last years.
I’ve got several more designs I’m working on and look forward to a few more updates.
Heat Transfer Vinyl T-Shirts (Without a Craft Cutter)
Heat Transfer Vinyl T-Shirts – Without A Vinyl Cutter
I’m going to commit the sin of a thousand online recipe websites and give you a bit of backstory before I get to the method. If you don’t like fun, feel free to skip the first few paragraphs.
I recently watched Avatar: The Last Airbender and Avatar: The Legend of Korra with my kids. 1 Both shows were fantastic, but one particular character from A:TLOK was my absolute favorite. Varrick Iknik Blackstone is a fast talking, sometimes erratic, flamboyant industrialist / inventor voiced by John Michael Higgins. Imagine a cross between Tony Stark and Zaphod Beeblebrox.2

You can find a few t-shirts out there which feature Varrick’s catchphrase3 and logo for Varrick Global Industries… but they all seem to suffer from at least one flaw. They all appear to depict the logo mirror flipped with the big sail on the right hand side. I think I know why too. An artist under the username of RogerBernstein on DeviantArt posted a very large, high quality version of the Varrick Global Industries logo in 2017, which just so happened to be mirror flipped. His image has the distinction of being one of the first Google Image search results for “Varrick Industries Logo.” I’m thinking people swiped his work, perhaps altered it a little bit, and then slapped it on t-shirts. I mean… just look at this…

Why am I so sure these logos are mirror flipped? I paused TLOK during scenes in Season 2 – 4 when you can see Varrick’s yacht, near a plane, on a plane, on a jacket, and near some jewelry. Now, I’m not even close to the kind of cosplayer / propmaker who has the patience, concentration, or dedication who can recreate their favorites props with meticulous planning, research, measuring, and endless revisions. Even so, I’d at least like my designs to face the same direction as the show. There are lots of other pictures showing this orientation, but this was the easiest one to locate.

Anyhow, with the help of GIMP, Inkscape, the pause button, and my trusty laser printer, I created my own design for the Varrick Global Industries logo – ready to put on a t-shirt.
- Basics
- Creating a design with “heat transfer vinyl” is reasonably straight forward. The heat transfer vinyl is a thin sheet of vinyl stuck to a sheet of clear plastic with a mild adhesive. You cut away what you don’t want, leaving the mirror of your design still stuck to the clear plastic, turn it over on a piece of fabric, and melt / fuse the design onto the fabric with heat.
- With access to a craft cutter ($250 – $1,000) and a heat press ($100 – $300), you could automate a lot of cutting work (but you’d still have to manually pull the excess vinyl out of the design) and have really fine control over the heat (if that was important to you), but none of that is actually necessary. While these things might be helpful if you creating designs all the time, you don’t really need much more than some heat transfer vinyl and stuff you already have (a way to cut it, an iron, and some fabric).
- Materials
- Heat transfer vinyl.
- Also known / marketed as “HTV,” you’ll probably want to look for “stretch” or “stretchable” heat transfer vinyl if you intend to putting it on wearables like a t-shirt or similar. If you’re not putting it on a wearable, you could probably get away with non-stretchable HTV.
- As this was my first such attempt, I went with some relatively cheap stuff that was only $9 for 5-6 feet worth of material. I bought two rolls – one was a blue-purple metallic “chameleon” and the other was a dark silver-gray reflective. Under normal indoor light conditions both look fantastic. In brighter light they’ll look… well… brilliant.
- Pro Tip: If your HTV came in a roll and packed in a box, consider keeping the box. I normally discard boxes, but this way I can stack the rolls easily without having them roll away.
- Craft knife & Cutting Mat. You may not be using a vinyl cutter, but you’ll still need a cutter. If your design was very simple or you wanted to live dangerously and freehand it, you could probably get away with just using scissors. We have an old medium size (12″ x 18″) cutting (possibly self-healing?!) mat which works well for most of our purposes. These days they’re relatively cheap and definitely worth springing for a 2′ x 3′ model.
- Printer paper or Sharpie. I created my design on the computer and printed it out (mirror flipped), then taped it to the HTV, then taped that down on the cutting mat. If you wanted to just freehand your designs, you could just freehand the design directly on the HTV first.
- Tape. Masking or blue painter’s tape. The HTV arrived rolled up pretty tightly, so it definitely wanted to roll up while I was working. The tape kept everything down and in place while I worked.
- Iron. The HTV I purchased recommended applying heat for 5-15 seconds at 300 – 330 °F. Our iron doesn’t list the temperatures – just the settings for different materials. I ended up using the “Wool” setting based upon 30 seconds worth of internet research and going to Wikipedia. The Wikipedia article suggested wool, silk, and polyester would all result in about 300 °F temperatures. While I can’t vouch for the actual temperatures, the wool setting worked really well for me.
- Ironing Board. I suppose an ironing board isn’t strictly necessary. But, it sure was nice to have a big, flat, soft, narrow surface to lay my shirt on in order to iron it flat. You could probably get away with putting down a blanket on a board or some sheets on top of some cardboard or a table. However, if you already own an iron, chances are you’ve got access to an ironing board.
- Parchment Paper. I used parchment paper because it’s cheap, plentiful, and non-stick. It’s also slightly translucent, which makes it great for making sure everything is positioned properly and visually seeing when the design is starting to melt into place. I’m sure there are lots of other nonstick options, but this worked well enough that it would definitely be my go-to in the future.
- Optional:
- Yardstick. This is helpful in finding the center line for the t-shirt when you’re ready to apply the design. It’s helpful, but not necessary. Since you’re just using it as a straight edge, you could make do with just a long piece of straight cardboard.
- Specialty Tools. You can buy specialty tools for “weeding” heat transfer vinyl, special tools for centering designs on shirts, and special heat pressers to apply vinyl. For a few shirts now and then, I don’t think any of these are necessary.
- Heat transfer vinyl.
- Process.
- A Note On Double-Checking. As the old saying goes, measure twice and cut once. While there are very few “mission critical” steps to this process, there are a few points where it makes a lot of sense to spend the time to legitimately completely check and then double-check something.
- Double-Check the Vinyl. Depending upon the type of HTV you get, it might have two or three layers.
- Two Layers. If it is two layers, there will be a thick clear/clear-ish protective plastic coating and the vinyl. The side of the vinyl facing the protective coating is the part that will appear on the outside of your fabric and the side without the protective coating is the part that will melt and adhere to your fabric.
- Three Layers. When there three layers, the vinyl will be sandwiched between the thick clear protective plastic coating and (at least in my case) a blue film on the back. Again, the side of the vinyl facing the protective coating is the part that will appear on the outside of your fabric and the side with the thin film is the part that will melt and adhere to your fabric.
- I would recommend checking your HTV by cutting a thin corner off and peeling it to see how many layers you have. I was alerted to this two/three layer issue by reading a lot of reviews. My chameleon blue-purple vinyl had three layers and the dark gray reflective only had two. You could probably remove it before you started cutting out your design, but you’ll definitely need to remove the film layer before ironing.
- Pro-Tip: I would also recommend labeling the box your HTV is in with “two-layer” or “three-layer” to help yourself remember which kind you have when you come back to make a new design next time.
- Double-Check the Vinyl. Depending upon the type of HTV you get, it might have two or three layers.
- Double-Check the Design.
- For most applications, you’ll want to mirror-flip your design. You can do this in the graphics design program of your choice, probably using some printer settings.
- Pro-Tips:
- If you’re trying to create a vinyl pattern from some photograph, magazine page, or similar, you might want to photocopy it and then trace the design onto the back of sheet it’s printed on using a lightbox.
- Unless you’re creating a multi-layer process, consider making your entire design two-tone black and white. When it comes time to cut out your design, this will make it a lot easier for you to remember which parts should be cut away and removed.
- You’ll be removing lots of areas from the vinyl in a later step. There’s no harm to your design if you “over-cut” into these areas. Overcutting allows you to ensure you’re definitely separating sections of the design from the parts that will be discarded. I would recommend actually drawing in these “over-cut” spots into the design, either as part of the design process or manually with a pen after the design has been printed out.
- I like to add the word “reversed” to the design, so I’ll remember to actually mirror flip it.
- Since most anything I’ll be creating will fit on a t-shirt, I like to make my designs fit into a standard 8.5″x11″ sheet of paper. I created a template to do this which has several guidelines and a border 1/4″ all the way around the sheet to make sure the design can be printed within the printer’s margins.
- Apply the Design. As suggested above, you could cut out your design with scissors or perhaps even built it out of scraps of vinyl. If you wanted to create lettering or follow a very precise pattern, I’d definitely suggest designing on a computer, printing it out (reversed), then taping the design to the vinyl so it doesn’t shift as you cut it, and taping the vinyl to the cutting mat so that doesn’t shift as you cut.
- Cut the Design.
- I used a craft knife and went slow, using steady medium-hard pressure to cut out the design. When I wasn’t sure I had cleanly cut all the way through the vinyl, I went back and cut that area again. Having done this a few more times since I started the blog post, I can say that I didn’t need to cut this hard – and could have used a medium pressure. More than this and the clear plastic layer gets cut or scored. This isn’t a problem, but it doesn’t lay flat quite as well any more.
- As you cut, be mindful of the areas you’ll be removing that you can “over-cut” into and those areas of your design where you won’t want any knicks and cuts.
- I made a point of “over-cutting” the critical pieces, especially at corners, because I did not want to chance the vinyl tearing as I removed the excess pieces. A single section tearing or stretching would basically ruin the entire design and require starting over.
- I had to be sure I was cutting through the printer paper and cleanly through the vinyl, even at the risk of gouging the protective layer. I was very surprised the protective layer held up as well as it did. It was clearly scored where I had cut into it, but except for some very small parts, I never cut all the way through it.
- Once your design is cut out, use scissors to cut the entire area out of the vinyl roll. I like leaving a 1/4″ allowance everywhere just so I know the scissors aren’t going to affect my design.
- Pro-Tip: Before you start cutting, it might help to take a moment to plan out your cuts, draw in the areas for “over-cutting,” and even to make sure to darken in those areas that will be getting cut out to help keep things clear while you’re cutting.
- “Weed” the Vinyl.
- “Weeding” the vinyl is the process of pulling out all the vinyl pieces you’ve cut out that aren’t part of the design. While there are lots of cheap weeding tool options for sale online for $5-10, I just used the point of my craft blade to pick these little pieces out. I suppose it might help to have tweezers, a pushpin, a paperclip, or a toothpick, but the craft knife worked perfectly for me.
- I’d recommend going slowly, especially at corners, and making sure the parts getting removed are fully cut free from the design elements that are staying.
- Iron Fabric. Definitely take the time to iron your fabric flat. It would be a shame to discover a wrinkle on the underside of your t-shirt because the design was warped only after the vinyl was fused to the fabric.
- Orient the Vinyl.
- Once my pattern is cut and weeded, it’s ready to be placed on the t-shirt. You can buy patterns, templates, and devices for centering a design on a t-shirt, but these seem unnecessary if you’re willing to simply be careful. Heck, even if you had these specialty tools, you’d still need to be careful.
- I made sure my t-shirt was flat and centered on the ironing board, there were no wrinkles in the fabric, the amount of the shirt hanging on the left and right sides were about equal, and then used a yardstick to estimate the center line of the shirt running from the tag down.
- I put the design about four inches down from the neck in my shirt after looking at the designs on other t-shirts I had purchased.
- If you chose to cut out your design so there was a little extra room all the way around it, the empty clear protective plastic layer will still be “tacky” and help keep the design in place.
- Pro-Tips:
- It wouldn’t hurt to double-check that you’ve got the exposed vinyl side facing the fabric. You definitely don’t want it melting against the parchment paper or your iron.
- One of the nice things about printing the design with guide marks and registration marks was that it made it a little easier to orient the design neatly on the shirt. I printed a second copy of the design, then placed it on the shirt – then put the vinyl design down on the shirt underneath the paper.
- Before you place the vinyl on the fabric, take a moment to double check there are no stray pieces of weeded / discard vinyl stuck to the protective layer. They’ll be impossible to remove once you’ve started ironing.
- Cover with Parchment Paper.
- My design was only about a 6″ diameter circle, so I only needed a piece of parchment paper slightly larger than this. Since the parchment paper isn’t really consumed by this process, I went ahead and got a big square of it so I can reuse it on other shirts.
- The parchment paper I’m using is slightly translucent, which made it easy to ensure the design hadn’t shifted and so I could make a few last second adjustments.
- Iron The Vinyl.
- Obviously, read and follow the directions for your specific heat transfer vinyl. The vinyl I purchased recommended 300 – 330 °F for 5 to 15 seconds. I don’t have a fancy iron, so I heated the iron to the “wool” setting (estimated to be 300 °F) and ran the iron over the parchment paper, pressing firmly, in a small circular pattern for about 15 seconds in each area. I kept the iron moving so as not to scorch any part of the design, the shirt, or the parchment paper.
- Pro-Tips:
- It never hurts to do a few test pieces. I tried ironing both kinds of HTV onto an old undershirt to make sure the heat settings worked, I understood which sides needed to face against the fabric, how I would remove the backing once it had been ironed, and how it all worked.
- Having now done this a few times since I started the blog post, I would recommend putting something rigid or semi-rigid under the shirt. The first time I ironed the design, it looked great – but came out slightly wrinkly in the wash. I re-ironed it using really heavy pressure and the same shirt has held up in the wash ever since.
- Remove Backing.
- The instructions for my vinyl told me to “hot peel” the backing. I took this to mean that I should carefully remove the clear protective coating from the heat fused vinyl. There were a few small spots where it looked like the vinyl wanted to come up a little bit, but the backing came up cleanly everywhere.
- Cover and Iron Again.
- Since there were a few small spots where it looked like the vinyl might have come up slightly as I was removing the backing, I put the parchment paper back down and ran the iron around the entire design for about 5 seconds in each spot.
- Don’t Wash for 24 Hours.
- My instructions say to wait 24 hours before washing the garment. I spent a while on this design, so I wasn’t about to chance it by throwing the shirt in the wash.
- Iron Again (Optional).
- After I washed the first shirt I made, the design appeared to have buckled slightly. After a second ironing, it has stood up to repeated washings without a problem.
- A Note On Double-Checking. As the old saying goes, measure twice and cut once. While there are very few “mission critical” steps to this process, there are a few points where it makes a lot of sense to spend the time to legitimately completely check and then double-check something.
Heat Transfer Vinyl T-Shirts (Without a Craft Cutter)