Category: MakerBlock
All things MakerBlock: RepRap, MakerBot, Cupcake CNC, open source, and plastic building toys!
MOAR WHISTLES
The other day I was trolling Thingiverse1 looking for the best quick-printing model to show off DIY 3D printing to 3rd graders.
After a bit of searching, I found it: the simple whistle.
There are whistles a-plenty on Thingiverse, but the DarkAlchemist remix of the muddtt Emergency Whistle is easily the smallest by far. I compared these two against several other options, tossing all of them into my slicing program and doing a visual double-check for good measure.

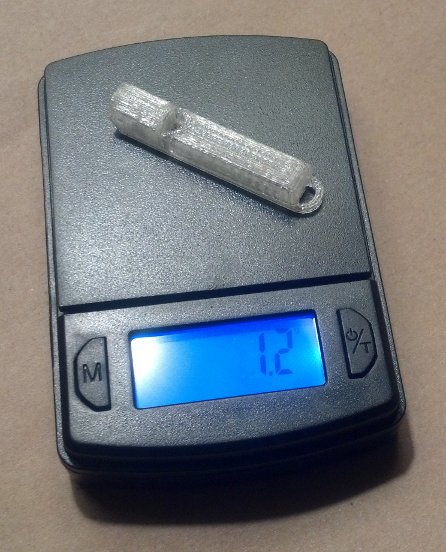
There’s no doubt about it – these are SMALL. They are less than 2.7cc2 and weigh about 1.2 grams a piece. Best of all, they print very quickly. Printing just one whistle with 0.2mm thick layers, including printer warm up time, took 7 minutes. 10 whistles at once? Only 47 minutes.
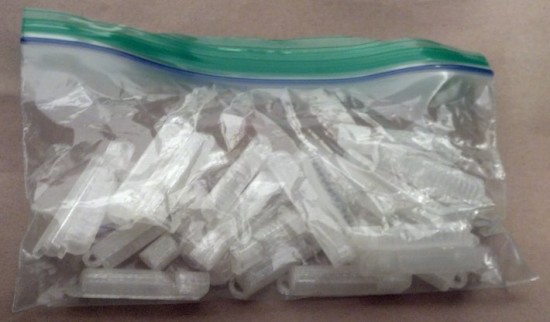
Naturally, I took the opportunity to print up 20 more whistles. This is what 30 whistles looks like:

That got me thinking – could they be even smaller?!
Turns out they can. I redesigned the whistle in OpenSCAD with a hacky thickness adjustment. In doing so I discovered that the existing designs on Thingiverse used 1mm thick walls. A one-millimeter wall thickness is pretty good if you have a small part that needs to be sturdy – but a bit of an overkill if you just need a small functional quick-printing thing. By removing the little loop at the end of the whistle and creating a wide hole in the top of the whistle, I reduced a fair bit of plastic while keeping the ability to be connected to a cord.
I exported a version with 0.5mm thick walls and a copy with 0.4mm thick walls. Printed at 0.2mm layers the 0.5mm thick walled version was functional – but the 0.4mm thick walled version was not. The layers didn’t fully overlap, causing small gaps which prevented the whistle from making any noise. Printing the 0.4mm thick walled version at 0.1mm layers3 turned out both beautiful and functional. Best of all, they’re 1/3 the weight of the 1mm version!4

A friend recently suggested that his plastic filament supplier of choice ships via Amazon Prime for a ridiculously low $22-23 per kilogram. Ignoring the amortized cost of the robot and electricity, I could make about 2,500 whistles for about 0.88 cents a piece!
Now, just imagine the following scene. I take my HedonismBot ((As my MakerBot Replicator 1 Dual Extruder is named)) to my daughter’s third grade class. I show off the robot printing a single whistle and call a random student up to test it. Thank you, a pat on the head, and the whistle is yours! Golly, I guess that’s the whole show everyone. Oh, you want a whistle too? Check under your desk. You get a whistle! You get a whistle! You get a whistle! You ALL GET WHISTLES! What’s that? Your sister is in second grade? It just so happens it only took 80 hours of printing to make enough whistles for every damn student, teacher, and student teacher in the school.
Loudest 3D Printed WhistleMy eyes! The goggles do nothing!
While I’m not much one for impulse buys, I was unable to prevent myself from purchasing the Adafruit Trinket-Powered NeoPixel Goggle Kit Pack. If you’re on the fence about dropping the $40 for this kit, let me help you out with the pro’s and con’s list I went through before buying my own.
- Cons
- I literally have no practical uses for these goggles
- Other than flashing lights, they don’t actually do anything useful
- Once assembled, they can’t be used as goggles since (a) the LED’s are too bright to expose to even your closed eyes and (b) if you’re able to close off the glare, you’ll have an incredibly narrow field of vision
- The kit is $40
- Pros
- They are seriously badass animated LED flashy goggles
- Sourcing all the parts separately would easily cost you $50, which makes this a deal at $40
Kit Review
As I have come to expect from Adafruit, the kit is, in a word fantastic. The parts are all packed neatly, wrapped, protected, and in a nice black cardboard box. If you’ve never purchased a kit from Adafruit or checked out one of their tutorials, you’re really missing out. The tutorials have lots of high quality pictures, helpful step-by-step directions, and little tips along the way that will undoubtedly make you a better hacker.
I got the basic electronics up and running pretty quickly.1 From there it was relatively easy to install them into the goggles. My wife and daughter, both skeptical when I first told them about the goggles, immediately demanded their own upon seeing mine.
If you end up buying this kit, I would recommend not doing what I did – hotgluing the Trinket and NeoPixel rings in place. Don’t get me wrong, this is exactly what you need to do to make affix these parts in place for wearing. The thing is – within 24 hours of completing the project my mind was boiling over with ideas of how to Make it Better.™
Hacking the Goggles
The thing is, the kit is actually capable of doing a whole lot more with very minimal hacking. Assembled exactly per instructions, the goggles use just one I/O pin on the Trinket, leaving four unused. The evening after I had assembled the goggles, I dismantled them in order to pull out the Trinket, and soldered additional wires to pins 2, 3, and 4 and spliced three new wires to ground. After soldering a big 12mm tactile button to each of three sets of wires, I hotglued the buttons above the right lens. Now I can use these buttons to interact with the goggles in some small ways.
If you’re thinking of modifying your goggles like my own, you’ll need a little more ribbon cable, three big tactile buttons, a battery extension cable, black craft foam, and a hotglue gun. You don’t really need the extension cable, but it will make keeping the battery inside the goggles and recharging the battery much easier.2
The Adafruit website provides several other ways to extend these goggles. You can their tutorials to make the goggles sound reactive, controllable by bluetooth, or if you’re using something more powerful than a Trinket you can add an accelerometer.
My Setup
If you’d like to use my animations, you can find my code on GitHub. I’ve updated the code with several animations:
- Larson Scanner. This is just a single LED lit up, travelling from the left to right and back again.
- Wave Scanner. Two LED’s are lit up, one travelling along the top of the lens and another along the bottom, until it reaches the far side of the goggles, then back again.
- Infinity Scanner. A single LED travels around one lens, then around the other in an infinity pattern.
- Spinny Wheels. Four LED’s on each lens spinning. This is part of the original sketch from Adafruit.
- Sparks. A single LED on each lens lights up briefly. This is part of the original sketch from Adafruit.
- Sirens. One red spinny wheel and one blue spinny wheel.
- aStrobe. The right and left lenses flash white on and off.
The buttons have specific uses as well:
- Button 1 (on pin 2) makes the current animation brighter
- Button 2 (on pin 3) cycles through the animations
- Button 3 (on pin 4) makes all LED’s light up bright red (won’t destroy your night vision!)
- Button 2 and 3 simultaneously make all LED’s light up bright white (destroy everyone’s night vision!)
If you are going to go through the trouble of building this kit, I would highly recommend adding buttons to it3 and leaving the USB port on the Trinket exposed for later re-programming. There are a few little tricks you can do with just a single button – treating a button click differently than a button press of a certain duration – but I feel that these would probably be more difficult to use than just adding a second button. With two buttons, there are up to three combinations4 , with three buttons would have up to seven combinations5 , and four buttons seven billion combinations.6
At this point, I’m still experimenting with with ways to make the goggles more useful/awesome. Perhaps another post is in order?
Default Series Title- It would have been even quicker if my Trinket skillz weren’t so rusty [↩]
- Beats the hell out of trying to get your goggles right next to a USB cable. [↩]
- Or, at the least soldering wires to the pins for later use [↩]
- 1, 2, and 1 + 2 [↩]
- 1, 2, 3, 1 + 2, 1 + 3, 2 + 3, 1 + 2 + 3 [↩]
- I might have gotten carried away with the math on the last one… [↩]
How to Make Awesome Cardboard Paper Mache Anything

A few weeks ago a friend of mine had a “bad movie night” where he was showing the film1 “Sharknado.” Inspired by the theme for the party, I decided I had to wear a shark hat for the event. After making my hat, my daughter requested a monkey hat. This was not a request I could refuse.
I took pictures of the process to show you how you can make your own. I haven’t ever tried to make paper mache hats before, so this was not only a lot of fun – but a great learning experience. While I own the really great paper mache monster books by Dan Reeder, I only used them for inspiration and tried out a few new things on my own.
Even though I used this process to make hats, the directions here could easily be adapted to making anything out of paper mache.
Step 1: Gather Materials and Tools

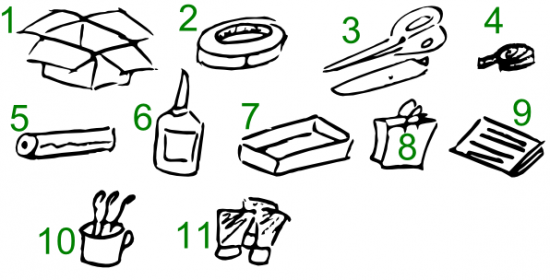
Here’s what you need to get started:
- Cardboard Boxes. Cardboard forms the “skeleton” of the structure. It’s cheap, ubiquitous, sturdy, and easy to cut and form.
- Masking Tape. Once the cardboard has been cut, liberal use of masking tape will keep your creation together until it can be covered with paper mache.
- Scissors and Utility Knife. Scissors can be very helpful in cutting cardboard or paper. While scissors can be helpful, and appropriate for kids, I find a utility knife gets the job done faster.
- Measuring Tape. If you’re not making a hat (or other apparel or armor) you won’t need this. But it is helpful when making measurements. ((In a pinch, you could just use a piece of yarn or string to mark lengths, and then put the yarn on the cardboard for reference.))
- Plastic Wrap. Whether you’re working with gluey paper or paint, the process is messy. I would recommend covering the work surface with plastic wrap. I happened to have a really large plastic bag, which I taped directly to the table.
- Glue. I just used a big bottle of Elmer’s white glue from the hardware store, but I’m pretty sure wood glue would have worked as well, if not better. It’s also more versatile and sturdy.
- Plastic Tray. The next time you get take-out or have a plastic liner from inside some packaging, save it. It makes a great wide tray for mixing water and glue or when your project is dry, it is also great for mixing paints.
- Paper Grocery Bags. The “twist” with this process is that I used torn up grocery bags, rather than the traditional newspaper. It turned out this was a really good idea for a number of reasons. Paper bags are a cheap and plentiful material. When thoroughly wet strips of paper bags are easy to place, mold and shape. However, the most important features of paper bags is that they hold glue and water really well and then dry quickly into a sturdy hard shell. In fact, they form such a sturdy surface that I only had to do a single layer of paper mache around the entire hat. This means that you can quickly put down a single layer of paper bag strips all over your cardboard form, wait a few hours for it to dry, and then get to work finishing the project.
- Paper or Newspaper. While grocery bags work really well to cover your cardboard form, they can leave some small gaps where they overlap. When I found gaps in the project, I simply used a few thin strips of the newsprint style paper to cover the holes and smooth out spots on the rough paper bag layer.
- Cup of Water and Paintbrushes. An old mug is best and pile of cheap dollar store brushes is probably fine.
- Paints. I prefer acrylic paints. They are cheap, can be diluted with water, easy to mix, they stay wet long enough for you to blend, but not so long that you have to wait days for it to dry. They also clean up well with water.
Step 2: Create Cardboard Form

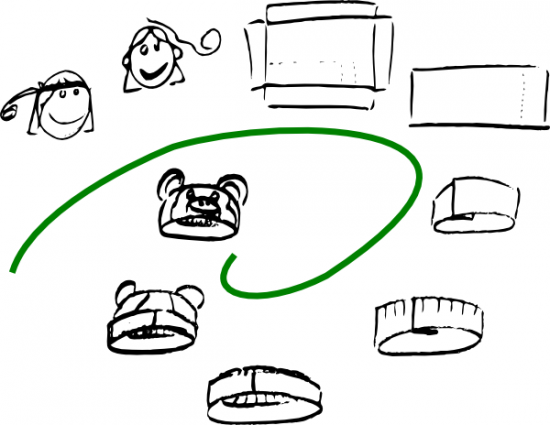
The process I used to create the cardboard forms for the hats was pretty quick and easy. I measured the circumference of my daughter’s head and then the distance from her ears to the top of her head. Using these measurements, I cut out a strip of cardboard as tall as the distance from her ears to the top of her head and as wide as the circumference of her head – with a little extra to allow for overlap.
In the pictures above you can see the strip of cardboard cut out and then taped into a cylinder with the masking tape.
Cut strips into the cardboard cylinder, fold them down, and add enough masking tape to mold it into a hat-shape.
Step 3: Add Embellishments
A paper mache hat is way more interesting with some kind of embellishment, like ears, shark fins, wings, or whatever else. Here I cut ear shapes out of cardboard, curved them slightly, taped them to hold the curve, and then taped them to the hat. When I made the shark hat, I cut a long slit into the hat through the tape and inserted the shark fin through the underside of the hat. Don’t be afraid to use a lot of tape.
Step 4: Prepare the Work Surface, Paper Strips, and Glue Mixture
Cover the work surface with plastic sheeting. I used a big plastic bag from a helium balloon order from my daughter’s birthday. However, a big garbage bag or plastic wrap would also work well. Paper bags from the grocery store work really well – but there are too thick in places. Tear off the handles and pull the paper bag apart at the seams. You’ll probably need to discard some of the sections where the the paper bag is too thick to use.
Add some glue (I used about a tablespoon) and warm water (about a half cup or so) to the plastic pan. It should look like milk or heavy cream once you’ve mixed it up.
Completely soak the strips of paper bag in the glue mixture. They should be completely soaked all the way through until they’re nearly translucent. Unlike paper mache with thin pieces of newspaper, you won’t need to put layers and layers of paper on the form – just one layer where the pieces overlap a little should work fine. The excess glue from the strips of paper will soak into the cardboard and help make the entire structure sturdy.
Step 5: Set Model to Dry, Patch Holes with Paper
Since the cardboard helps soak up the water, the entire structure should dry relatively quickly. I put the shark hat outside in the sun for a few hours and it was ready for painting. Once the hat is dry (or dry enough), you’ll probably notice some holes and gaps from the paper bag strips. Tear up some newsprint paper, soak those in the gluey mixture, and cover and smooth out any defects. Once these pieces dry, the project will be ready to paint!
Step 6: Paint to Suit
The great thing about acrylic paints is that they are so easy to work with. They dry really quickly, so you can paint one side of the model, work on the other side, and then come back to the first side to add details. In any case, just paint the project to suit and you’re done!
Each hat went together really quickly. I put the cardboard form together in about 15 minutes, covered it with the gluey paper bag strips over maybe 30 minutes, let it dry for several hours, and then paint it over the course of maybe an hour.
If you make your own paper mache hat (or other sculpture), let me know in the comments!
- And I use the word “film” loosely here [↩]
Maker MBA

I’ve been investigating the possibility of trying to make a business out of making.1 This got me thinking about the best series and the best single post about making money out of making. I got a lot out of these posts and I hope you will too:
- Ten Rules for Maker Businesses – Rule #1 Make a Profit. Chris Anderson, author, entrepreneur, and named as one of the 100 most influential people in the world by Time, has probably written the best “Ten Rules” list for a maker who is considering selling stuff. I’d rather have this list in my back pocket than an MBA any day.2 If you ever think about selling anything you’ve made, you should read every one of these posts:
- Make a profit
- It takes a lot of cash to stay in stock
- Buy smart
- Basic business rules still apply
- You get no leeway for being a maker
- Be as open as you can
- Create a community to support and enhance your products
- Design for manufacturability
- Marketing is your job
- Your second most important relationship is with your package carrier
- How the Innovation Economy is Turning Makers Into Manufacturers by Chris Anderson. This is another Chris Anderson article – this time he’s writing with the benefit of the experience of having moved from a magazine editor-in-chief fiddling with one of the first 3D printer kits to cofounding 3D Robotics and becoming an entrepreneur. Since his open source hardware drone company just raised $30 million in venture capital, he’s probably the kinda guy you wanna listen to.
- The Slowest $380 I’ll Ever Make. This is the tale of a man with a dream – a dream of making and selling electronic LED QR Code clocks. Michael Ciuffo covers the money he made, lost, and made in painfully excruciating detail – with more than a little levity. This is a cautionary tale for anyone looking to sell something awesome in their spare time – and some of the dangers hidden in success.
- How To Build A Hardware Startup – A complete guide from idea to market fit by Marc Barros. This book by Marc Barros is published online at Adafruit along with a number of their posts under the heading of “maker business.” I’ve only breezed through it, but it seems to contain a lot of focused detailed information and advice.
- Photo courtesy of Poster Boy [↩]
- Besides, no one makes pocket sized business school graduates, amirte? [↩]
Mechanical Movements and Design Inspirations

I’ve been working on a few different mechanical projects for a while now. On the one hand, I’m severely limited by my complete and utter lack of mechanical engineering knowledge. On the other hand, I’ve got a 3D printer so I can always arrive at a decent approximation through enough trial and error.
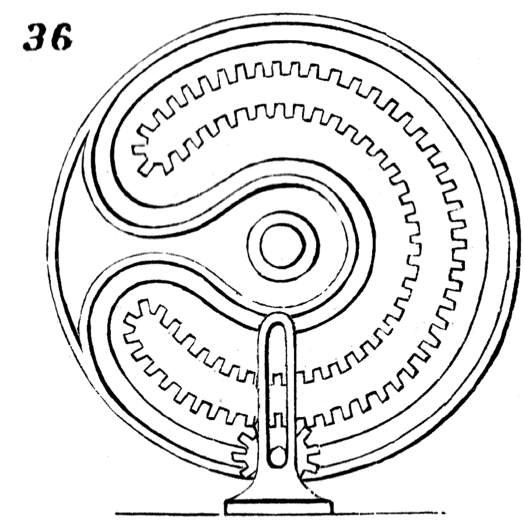
Of course, it’s not like it would kill me to actually learn something about the basics of mechanical engineering. With a bit of googling, I found a page named, “Kinematic Models for Design” which links to a large number of historical texts relating to mechanical engineering – including works from Charles Babbage and Leonardo da Vinci. I found two to be particularly useful – Mechanisms for Intermittent Motion, by John Bickford, 1972, and Five Hundred and Seven Mechanical Movements, by Henry Brown, 1871.
Last, but not least, I want to mention that a friend of mine, Rob Gisebert, told me about the website 507movements.com which is an online repository of the various movements from Brown’s book. Even more interesting, many of these complex movements are are accompanied by animated versions of the drawings in the book.
Come see us at Maker Faire Bay Area 2013!

It is now officially official!1 My daughter and I are going to be presenting our projects at Maker Faire Bay Area 2013!
How awesome is that!!!
- Photo courtesy of Lenore Edman [↩]
I swear I’m not jealous!

Before Maker Faire announced the official call for Makers, I had already downloaded and printed out the “call for Makers” information from the most recent Maker Faire and handwritten all of my responses in the form – just so I would be ready to submit my application to be a Maker this year. ((Photo courtesy of @Doug88888)) I ended up submitting my application within just a few hours of the call going out.
After I had submitted my application, my daughter wanted to submit her own application. Of course I was happy to help her, so I helped her prepare an application and submitted it on her behalf a little after 11pm on March 14, 2013, just under the wire.
Today Maker Faire sent her an acceptance! My daughter is going to be exhibiting at Maker Faire Bay Area 2013!
.
..
…
I just hope my acceptance letter comes soon. :/ Senior year all over again…
Robbed. During broad daylight. At work. By the mailroom guys.

I was waiting to surprise you with this, but last week I bought a MakerBot and had it shipped to work. 1
Well, it arrived today… and really… I suppose this is my own fault… but… you see… I was just robbed.
One of the best and most irreplaceable things about getting an awesome new robot is unboxing it. The mailroom guys at work, well intentioned though they are, opened my MakerBot box. I suppose I could have told them in advance that the robot should be arriving soon and to be on the look out for it.
Nevertheless! Tonight I have to clear a space in my Robot Work Area so that I can add my Replicator to the line of robot workers. But what to name it? My MakerBot Cupcake CNC is named “Bender,” the MakerBot Thing-O-Matic is named “Flexo.” There are so many Futurama robots to choose from.
I suppose I could chose a non-Futurama name for my new robot, but it really seems such a shame to break a streak.
- Photo courtesy of Timo Newton-Syms [↩]
- She’s also a bending unit! [↩]
Driving Lessons from Google

Last Monday I noticed a funny looking Google vehicle while driving back home from Palo Alto. 1 It was a white SUV with a big Google logo on the back passenger side door. Traffic was heavy and I didn’t get to look at the vehicle very long. I’ve seen the Google streetview car before – and this was not it. The streetview car has a tall device mounted on the roof with what appears to be four cameras pointing forward, right, left, and back. The vehicle I saw last Monday had a device the size of a small toaster mounted to the roof with four white pipes – and it was spinning very fast.
My guess was this was the Google self-driving car. When I saw this article the following day, picturing the exact vehicle I saw, I was certain.
I have to admit, when I saw this vehicle I was tempted, for just a moment, to drive slightly recklessly and unpredictably to see what Google’s vehicle would do. 2
My superego won out over my id, and I just observed the progress of the Google self-driving vehicle. I wish I had seen the vehicle earlier so that I could have observed more of the vehicle’s behavior from behind it. Here’s what I saw:
- I was in the #3 lane on I-680 North and the Google self-driving vehicle34 was in the #2 lane. Traffic was heavy during the late-afternoon early-evening commute and even though they were in a faster lane, we were probably both going no more than about 35 MPH. 5 6
- They must have left at least at least 5 car lengths worth of traveling distance in front of them.
- I didn’t see them switch lanes – except to take an exit.
- Interestingly, with the ebb and flow of traffic, the Google vehicle was at times far behind me and even a little ahead of me.
- Even though Google as a corporation is a person, and Google was likely present in that vehicle, it did not drive in the HOV/carpool lane.
If Google can drive for 300,000 miles without an accident, including travel in heavy traffic, I suppose there’s a few lessons we can learn:
- The ebb and flow of heavy traffic is enough to basically normalize any efforts to “get ahead,” so you might as well drive as slowly, conservatively, and with as much following distance as Google
- When traffic is congested, it might help to be in a lane farthest from the on/off ramps7
- Always carry two backup passenger/drivers in your vehicle
- Photo courtesy of Saad Faruque [↩]
- My guess – reduce my website’s PageRank and delete my Google+ page. That’s worse than a ding on your driving record, right? [↩]
- Along with it’s two passengers. [↩]
- Prisoners? How do you tell a self-driving vehicle you need to get out and pee? [↩]
- The traffic was so bad that my Android phone, with the Google Maps directions showing me the way back home, displayed the dreaded deep-red path that indicates congested traffic. [↩]
- I mention the Google Maps traffic congestion metric because I assume their vehicle was using the same information I was to make informed driving assessments. [↩]
- Google didn’t have three physical people present, so they couldn’t be in the fastest HOV/carpool lane [↩]


