

It is now officially official!1 My daughter and I are going to be presenting our projects at Maker Faire Bay Area 2013!
How awesome is that!!!
- Photo courtesy of Lenore Edman [↩]
All things MakerBlock: RepRap, MakerBot, Cupcake CNC, open source, and plastic building toys!
It is now officially official!1 My daughter and I are going to be presenting our projects at Maker Faire Bay Area 2013!
How awesome is that!!!

FitDay.com is essentially a food diary site that lets you look up or enter the nutritional content for the food you eat, set goals, and track your progress.1 A very long time ago I lost probably about 25 pounds by using the site. A friend lost about 80 using the same site!
Well, I started using FitDay.com again, at the time I’m writing this post2 it’s been 37 days. To put this in perspective, in January of 2012 I was able to consistently use the site for three whole days. Prior to that, I used the site for 35 mostly consecutive days. In any case, 37 consecutive days is a pretty good record for me.
As before, my diet consists of trying to not eat like a pig and keep my caloric intake to no more than 2000. While most days I stay below that number, there was a day in there where I just CRUSHED it. In the past I’ve basically completely abandoned the site after having fallen off the wagon. This time, I gave myself permission to go ahead and kick the crap out of my daily limit – as long as I still documented what I ate and kept at it the following day. Several weeks after the fact, even with a mini-vacation in the interim, I’m still logging my diet.
In my experience, a food diary not only helps not only with monitoring caloric intake, but also helps me be more mindful of my choices of food. Since I’m more aware of what and how much I’m eating, I find I choose things that are better for me.
***
I started writing this post back in February. At the time I’m hitting publish on 4/18/2013, I’ve logged everything I’ve eaten into my Fitday.com account for 100 days in a row. In this time I’ve lost 20 pounds – but more on this in a little bit.
Default Series TitleOkay, before you read any further, take a moment to click here and vote for my PlotterBot for the Road to Maker Faire Challenge.

I’ve been blogging about every little aspect of my own drawing robot – with this post1 it’s more than 80 posts on the topic. ((Photo courtesy of Vox Efx)) Everything from a list of other robots, to where I sourced the parts, to my failed attempts at designing parts, and a lot more posts about what I’ve done that does work. Using what I’ve learned from my own really colossal failures and the brilliant open source work of others like Sandy Noble and Dan Royer, I’ve designed all of my own printable plastic parts from scratch, explained my thoughts and considerations behind the designs in excruciating detail, and shared all the files and my source code for everyone to use.
The winner of Maker Faire’s contest “The Road to Maker Faire Challenge” gets $2,500.00. Dear gentle reader, should I be fortunate enough to win – I hereby make you these two promises:
So, please vote for my PlotterBot for the Road to Maker Faire Challenge!

Until very recently, I had only considered a drawing robot’s pen holder maintaining the pen at an angle to the drawing surface as an obvious and positive thing.1 I have now been cured of such illusions and understand that when the pen is mounted at something other than perfectly perpendicular to the drawing surface, it is possible for the pen tip skip or stutter across the drawing surface.
I’ve already droned on at length about the various ideal attributes I considered while designing a pen holder. In light of this new important attribute of pen tilt other than perpendicular causing pen skipping, would I modify my design?
It probably depends.
First let’s consider what causes the skipping itself. It seems to occur when the pen holder moves faster than the pen tip “wants” to be dragged across the drawing surface. The result is that the pen tip tilts slightly with an upward movement instead of drawing upward for a short distance, then the pen holder swings a little to compensate for the upward jerk, then the pen tip skips upward – leaving a gap the pen tip skipped over. (I feel like I”m not explaining this well…)
Once I read that post by Dan, I did some half-scientific tests.2 I dragged the pen holder around on the drawing surface. This is not even close to an operational simulation because I’m sure I didn’t keep the pen steady and the pen holder would almost never move that quickly. I found that when the pen was moved very quickly upwards, the entire pen holder would indeed skip. I tried the same “experiment” again after having adjusted the pen so that it was perpendicular to the drawing surface. This time the pen still skipped – just a little less than when it was at a 15 degree tilt in the pen holder. However, the pen I was using was a big marker.
Setting aside the pen tilt for a moment, I can’t think of any other benefits besides skip-reduction behind putting the pen perpendicular to the drawing surface. The next thing to consider is whether all pens skip equally. Not having actually performed a specific test to determine this, and speaking only from experiences in using different pens, I would suggest that not all pens skip equally. Specifically, good ball point gel based pens do not appear to skip when operated very quickly. In fact, running a gel based ball point pen seems to work quite well since it seemed to keep the itty-bitty ball inside the pen tip moving, which keeps the ink flowing.
I would suggest that the desirable pen holder tilt would depend upon (a) pen holder speed and (b) type of pen possibly as follows:
| Marker, perpendicular | Ball Point Pen, perpendicular | Marker, tilted | Ball Point Pen, tilted | |
|---|---|---|---|---|
| Fast Pen Holder | I would hypothesize a fast moving marker is going to skip whether it is mounted perpendicularly or not.However, from a semi-scientific test, I a tilted marker would skip a little more. It is important to note that a marker will draw equally well whether it is perpendicular or tilted. | First, gel ball point pen will quickly stop being able to draw ink if it is not held at a tilt. A non-gel ink ball point pen might not have this problem since at least some of the ink comes through via capillary action.Either way, drawing perpendicularly is a problem for ball point pens. However, since their tip makes a small point of contact with the drawing surface, they don’t seem to suffer from skipping problems, even at high speed. | I don’t think a marker held at an angle is going to draw lines any better or worse than one that is held perpendicularly.However, my limited testing suggests that markers drawing at an angle quickly will skip a little more than quick drawing markers held perpendicularly. | I suspect a ball point pen of almost any kind would work well if drawing at an angle. Almost every single drawing made with my first drawing robot was done with ball point pens operating at about a 30-45 degree angle.Admittedly, that robot never drew very quickly, but then again I never seemed to have problems with skipping. |
| Slow Pen Holder | If a pen holder with a marker is moving too slowly, the result will be ink bleeding all over the drawing and through the paper and pens that dry or run out too quickly. It’s really quite a mess.I suspect that running any marker too fast is going to cause skipping problems – whether it is at an angle or not. A marker’s tip either starts out much wider than a ball point pen, or it will end up that way after hours of drawing and being dragged across a large sheet of paper. In my experience, using a marker in this fashion will basically make the marker unsuitable for any other purpose. | With the caveat that pretty much any kind of ball point pen is going to have a difficult time drawing perpendicular to a vertical drawing surface, I would posit that moving the pen slow-to-medium would result in gaps in the drawings. However, I think those gaps in the drawing would likely be more due to the ball point pen not have sufficient friction to keep ink flowing consistently. | A slow moving marker makes about as much of a mess as an oil spill.Even assuming a medium-speed marker, I don’t think skipping would be that big a problem as long as the pen was not tilted at too severe an angle. | A ball point pen could probably be operated anywhere between slow and fast.As long as the pen is moving relatively continuously, a ball point pen should be able to provide a continuous stream of ink. |
Taking into account the potential for skipping, I would suggest based on the analysis above, that skipping is a problem for markers no matter the angle and largely irrelevant for ball point pens. I would also suggest that a very slight pen holder tilt of 15 degrees is extremely helpful, if not crucial, to ball point pens and mostly irrelevant to markers.
Hey Dan, what do you think?
Last but not least, this is post #80 in this DrawBot Adventure Series! And there’s still so much to cover!
Default Series Title
Mr. Noble is not the only one prone to hubris.1 After taking into account every post on ideal drawing robot pen holder criteria, I found one more post that I should have read first. Dan Royer of MarginallyClever.com suggests2 as good pen holder should:
My own prior post on ideal characteristics in a pen holder took into account Dan’s number 1, 3, 4 and considered 5. What I failed to consider was how friction can cause the pen to skip or stutter when the pen is mounted at an angle and the pen travels upwards.
Although I started diving into this consideration, but I’m putting all that over-pontification into its own post. This post is really about (a) Dan considered a very important factor in pen holder construction which I neglected and (b) how awesome open source is. My own pen holder would be a terribly complicated mess doomed to multiple revisions had I not had the benefit of being able to review a veritable legion of pen holders used by many many other people in their many many different kinds of vertical drawing robots.
So – Yay Dan! Huzzah open source!
The next post will be about whether this consideration would cause me to change my existing pen holder design.
Default Series Title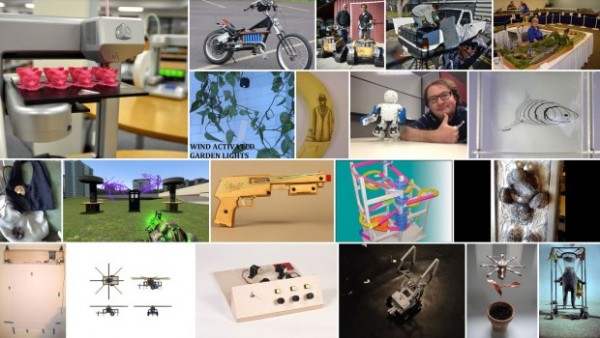
Early yesterday morning I got an e-mail from Make saying that my DrawBot project had been accepted to the “Road to Maker Faire Challenge!” If you check out Make’s latest post inviting applicants for the “Road to Maker Faire Challenge,” you’ll notice the tiny image in the bottom left is from this post. How cool is that?!
Default Series Title
Today at work I got an e-mail from the IT department saying everyone needs to set new, stronger, passwords.1 They suggested several things, like:
Assuming a black hat hacker is really determined to crack your password, they’re probably going to attack it like they mean it. Let’s assume there’s no defect in your system that allows a cracker to get in without actually entering the correct password. They might try a dictionary attack first, followed by a database of common passwords, but after that they’re left with brute force.
Here’s the most amusing part. Assuming none of the four “passwords” above are in any dictionary or a database of common passwords. Let’s rank the passwords, 1 being the strongest and 4 being the weakest.
The only things that really matter in passwords are that you’re not using (a) a dictionary word or a common password and (b) the length of your password.2
In any case, it’s concerning when information technology professionals don’t understand fundamentals of password security or how a malicious attacker would attempt to compromise a system.

A few days ago I found a DYMO LabelWriter 400 Turbo had been tossed into a cardboard box with used toner cartridges and broken printer parts.1 After making sure this really was a box of lost things, I swiped the label printer along with its power cord.
Tiny little printers such as this kind of label writer never use inkjet cartridges or require laser cartridges. They print using heat – like receipt printers. The catch, since they can’t get you with inkjet/toner cartridges, is that the labels are stickers with specially treated heat sensitive non-sticky sides.
Ideally, I would love to feed this little printer some cheap receipt paper and run it as a small, cheap, USB tethered printer. I already have an Adafruit IoT printer, which I love dearly – but it would be awesome to have one that my daughter could use. Apparently this has already been done more than once.
After loading up the newest drivers for the printer and trying out the newest software for it, I couldn’t get my laptop running Win 7 to recognize the printer. I’m looking forward to tinkering with this. :)
Two days ago I designed a new type of pen holder for my drawing robot based upon what I had learned from examining the pen holders other people have designed and used.
Here’s what worked and what didn’t:
Once I change the pen position and maybe use a larger servo arm, I’ll try a vector drawing which requires pen lifts and re-evaluate this design. Overall, this design has basically worked beautifully. I’m looking forward to experimenting with some new variations on the design to see if I can eliminate the few remaining issues.
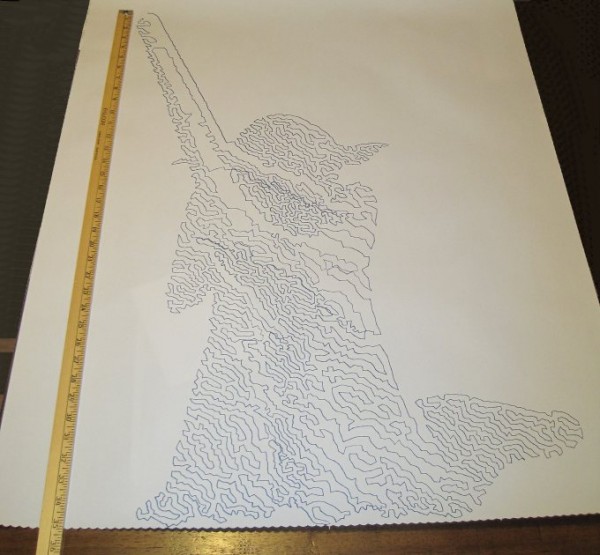
Default Series TitleLast night I connected my newly designed pen holder to my finished drawing robot and attempted a relatively “quick” drawing of Yoda. I say “quick,” because it only took about two hours. The one lone trade-off for having an cheap and easy to build robot capable of essentially unlimited drawing sizes is that it can take a long time. I took several photographs of my robot while it was drawing and turned them into an animated GIF, featured at the end.
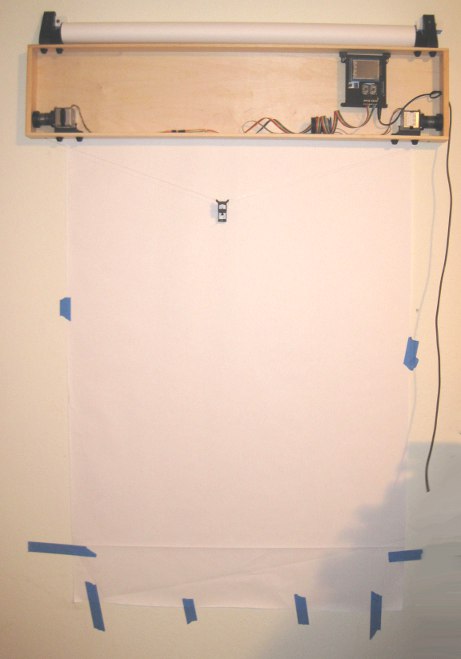
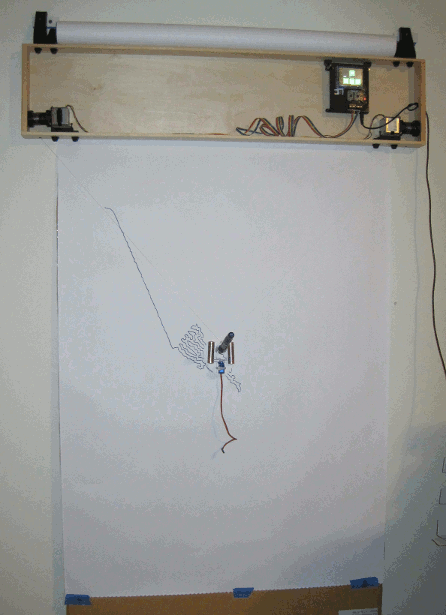
Above is the robot itself, mounted to the wall. I’ve made two minor changes to this setup since that photo, detailed just below. First, I’ve placed a large sheet of sacrificial cardboard under the paper so that any pen leaks will not mar the wall. Second, since the “home point” (exactly 130mm down from the exact midpoint between the two spots where the cord leaves the project box) is hidden by the paper when I pull it down, I needed a way to be able to center the robot without having to re-measure the home point each time. My solution was to take a small piece of leftover plastic about the size of a pinhead and tape it to the home point on the cardboard. Now, I can feel the home point through the sheet of paper and center the pen holder accordingly.
It’s a little difficult to make out in the photo above, but you can see the two big arrows pointing to the home point and a slight bulge in the tape caused by the small plastic speck.
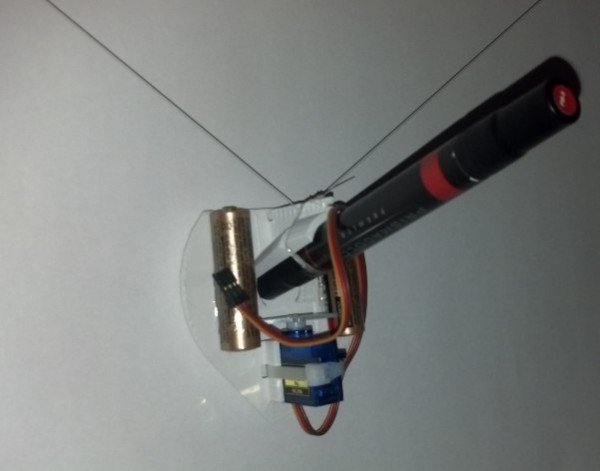
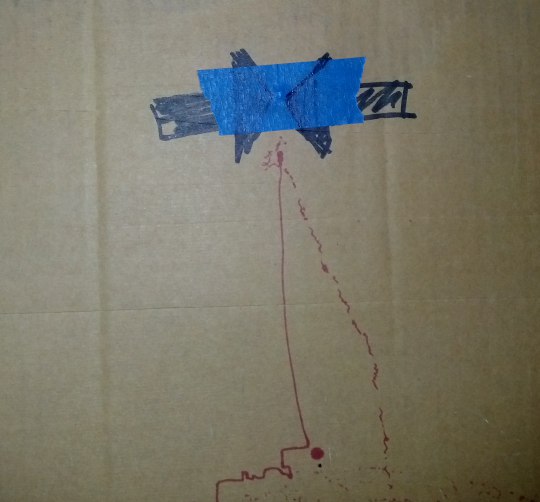
This picture shows the pen holder fully assembled. I operated it the first time without the benefit of a servo motor cable. I wanted to see if the pen holder would work well. Once the drawing was about 2/3 done and I was pretty happy with the pen holder’s operation, I soldered up a cable to connect the servo lift port to the servo motor.
The above animated GIF is comprised of eight separate photos from my digital camera on a tripod, combined in GIMP. I’ve never to make an animated GIF from a series of photos, but it very quick and painless. Since video takes up a lot of space and battery power, I figured a series of photos would be the easiest way to create a “time lapse” of the robot’s operation. You don’t get the low drone and hum of the motors, but you can see how it operates. Now that I’ve done one, I’m looking forward to making more of these.
And here is Yoda! As you can see from the ruler next to him, he’s about 35 inches tall from the tip of the lightsaber to his feet. There’s a “band” of the drawing that appears to be shifted downwards slightly, causing a little overlap at the bottom of that region and a slight gap above. This is probably due to me fiddling with the robot, but it could also be due to the motors slipping or skipping slightly during operation. If it was due to me fiddling with the robot, then the fix is simple – I just need to be more patient. If it was due to the motors skipping steps, then turning up the pots just a little would probably fix that. Given that this is the very first drawing from my very first draft of a new pen holder, I’m really happy with the result.