Once I started looking, I found a lot of options for a custom keyboard. In fact, I started seeing them everywhere. I found these offered as some combination of “media,” “macro,” “button,” “board,” “keypad,” and “keyboard.” I’m offering this list in no particular order – other than how I noticed each one.
“6 Key Macro Keypad” by
@iHayri1
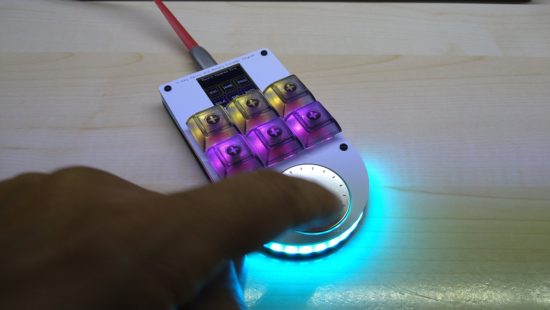
I found @iHayri1‘s keyboard in HackSpace magazine, issue #37, page 101. If you don’t happen to have it lying around – no problem! This magazine published by the Raspberry Pi Foundation gives away their digital version! While on the pricier end of the keyboards, it’s got a lot of interesting features. Six buttons, a media dial, an RGB LED under each key, a series of LED’s at the base of the keypad, and an LCD screen displaying each key’s current function. I would have ordered this one, except it’s been out of stock for a little while. :)
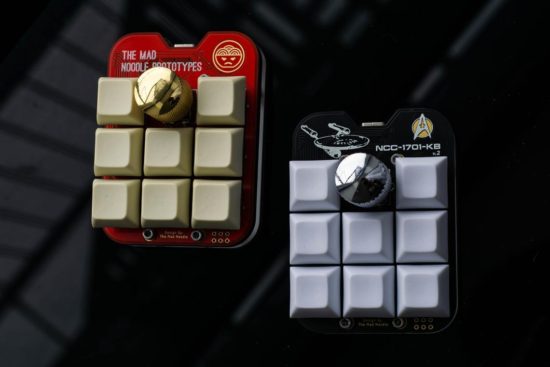
“NoodlePad” by @TheMadNoodle
I found the NoodlePad by @TheMadNoodle on Etsy after searching for media keypads. This is another beautifully designed board – eight buttons, knurled metal knob, mounted onto a shaped board and thick lasercut acrylic plate. This was the first board I saw referencing “QMK” firmware. This board is also offered in a “semi-assembled” state where the buyer supplies their own switches and keycaps. If you’re going to fall down a rabbit hole on mechanical keyboards, the switches may be what get you. The ordering options also offer “Cherry Red,” “Cherry Blue,” “Cherry Brown,” and “Cherry Black” switches. At first I thought this referred only to the color of the switch underneath the keycap. As it turns out, each color matches the little bit of plastic connecting into the keycap which in turn is associated with a different set of mechanical features for that particular kind of switch. Maybe you want a key with more bounce, requires more force, or a more gentle touch. That you can order your keypad with the exact keys you need says a lot about this maker and their product.
This slideshow requires JavaScript.
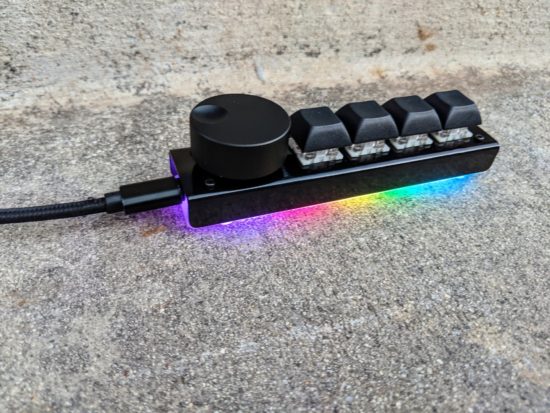
I happened to catch @travis_the_makr showing off a prototype “BYO Keyboard” on Adafruit’s Show and Tell. I should probably feel a little bad for hassling Travis to sell me one of these board immediately after his appearance on the show. Intended as both a way to get started with soldering and programming as well as an actually useful final project. I kinda love the project is powered by an Adafruit Itsy Bitsy M0 so you can use either Arduino or CircuitPython. I note QMK firmware support is a stretch goal. :) Don’t let this bare bones DIY kit without LED’s, knobs, and displays fool you. If, like me, you’re only now embarking on your mechanical keypad journey and don’t have a drawer full of Cherry MX switches and keycaps, this is an excellent and affordable starting point. Suffice it to say, I immediately pledged the Kickstarter and am really looking forward to playing with this project.
BigKnob by Leafcutter Labs
Of all the various keypads I’ve looked at, this was the very first one I ordered. I opted for the version with the black steel case, wonderfully heavy metal knob, and asked the owner for some variation in the keycaps. Craig shipped the keypad immediately and it arrived well packed in bubble wrap, only requiring that I pop in my choice of keycaps and apply the included sticky rubber feet. This keypad rocks four Cherry MX switches, a big hefty knurled metal knob, six RGB LED’s which glow through the lasercut acrylic base plate. My configuration (with the metal case) was $62, including shipping. While this is the only keypad I’ve actually used so far, it’s going to hard to top.
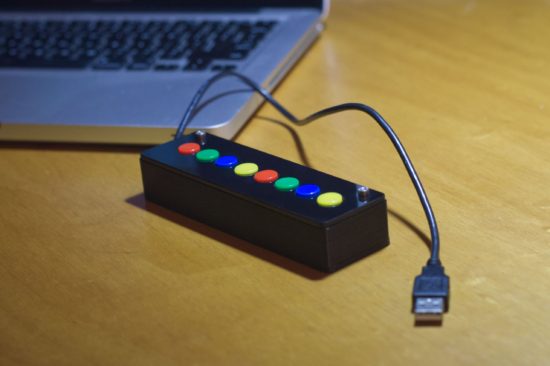
Once I started tweeting about picking out some keypads, my buddy Pete told me about the “8K Controller” by 2XLNetworks. This keypad has no LED’s, no metal knobs, no LCD displays – but it doesn’t need any of that. It comes with a built-in USB cable, you can order it with pre-programmed with custom button assignments at no extra cost, reprogram it if you like, and it unlike a hipster clicky-clacky Cherry MX switch, it rocks arcade buttons. If you need a bulletproof box that can stand up to repeated abuse at the hands of the public (perhaps for a photobooth, art project, school installation?), this is be the keyboard for you.
Default Series Title