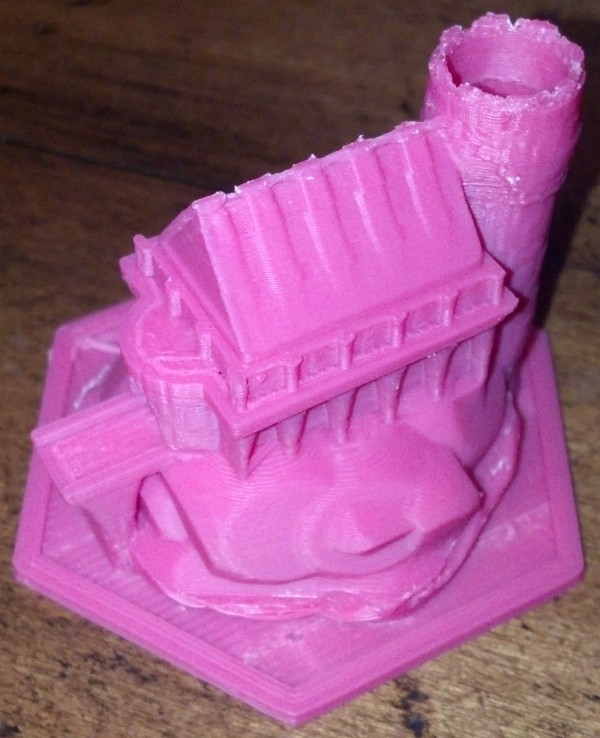
Sailfish + Print-O-Matic = Wow

dutchmogul's Keep

dutchmogul’s Keep

Last night and tonight I have been tinkering with Flexo, my Thing-O-Matic, to install Jetty’s Sailfish firmware update.  The setup text is very helpful, but not particularly optimized for a Thing-O-Matic with a MK6 extruder.  I also found that I had to heavily modify the “start.gcode” and “end.gcode” to keep my bot from shaking itself to pieces. 1

However, the results of combining Sailfish with ReplicatorG’s Print-O-Matic are impressive.  Dutchmogul’s Keep, pictured above, was printed with a layer height of 0.15mm, 10% infill, all with a stock 0.5mm nozzle.  That’s the very best resolution I’ve managed with my Thing-O-Matic, ever.  At 0.15mm thick layers, I have a difficult time seeing the layers if the model is more than 6 inches from my face and the ridges on the vertical parts is difficult to discern with a fingertip.

Now that I’ve finished that print I think I can push my ‘bot’s print resolution farther.  I’m willing to bet I can print down to 0.10mm layer height if I re-applied the Kapton tape and did a better job of leveling the print bed.  Also, one of the acknowledged challenges with 3mm filament based extruders is the pressure buildup that can lead to imprecise plastic deposits when dealing with non-contiguous parts. 2  Dialing in the Skeinforge “Retraction” or the Sailfish “Deprime” settings dialed in would really help with complex prints.

  1. The default “start.gcode” tried to home to the XY maximums and Z minimum – where there are no endstops.  The default “end.gcode” did the same thing for some reason.  I also had to modify the “start.gcode” so that the print head was better positioned for starting a print. []
  2. By this, I mean that when you’re printing two or more features that are not connected, say for example a table that is legs-side-up, an extruder will naturally ooze a little bit of plastic as it travels between legs, leaving a thin spider web like strand.  The “retraction” setting in Skeinforge is used to combat this, and does so fairly effectively in the case of a stepper based extruder.  That setting reverses the extruder motor quickly just after the print head leaves a leg and then quickly moves extra fast forward as it gets to the next leg, which prevents the spider web effect. []

DrawBot – Giant Unicorn?

As you may know, I’ve got a MakerBot Cupcake named “Bender” and a MakerBot Thing-O-Matic named “Flexo“.  There’s really no doubt in my mind I’ll be springing for a Replicator with dual extrusion1  Thankfully, I think there’s a way for me to make use of each of my robots, in its own special way.  I figure I can keep the Cupcake rocking a Unicorn Pen Plotter, use my Automated Build Platform in my Thing-O-Matic for mass production of smaller parts, and put a Replicator to work printing new, wacky, and/or large designs.

But, why am I talking about giant unicorns?!  Sandy Noble, the creator of the Polargraph,2 just posted about how he has created a vector graphics importer for the Polargraph software.  This is some pretty amazing stuff.  The MakerBot Unicorn has several software toolpaths that take vector graphics to GCode for printing through ReplicatorG.  The end result is that a Polargraph rocking a vector graphic importer should be able to draw arbitrary shapes, without the need to draw scribbly bits.

I think it would be particularly awesome to have a DrawBot draw a frame/border and then fill it with a scribbly/pixelated drawing.  Or, perhaps, draw the outline of an object and then fill it in with scribbly/pixelated shadings.

Default Series Title
  1. Will my extravagance know no bounds?! []
  2. Which is probably the best documented DrawBot on the internet []

Have you turned your MakerBot or RepRap into a robo-cutter?

I’m curious – has anyone out there retrofitted their MakerBot Cupcake CNC, MakerBot Thing-O-Matic, or RepRap1 with a cutting device?  I recall seeing an example of someone creating a laser cutter, but I was particularly interested in whether someone had made a cutting device using a blade.

If so, what kinds of blades did you use?  Did you create your own?  Did you use off-the-shelf replacement parts for a commercial robo-cutter?

  1. Or other DIY 3D printer, for that matter []

Creating an Online Profileinator

I’m always juggling multiple projects – that seems to be the mark of a Maker and/or a Maker with ADD. 1  I’m looking to tinker with a clockwork spider, an open source disc shooter, possibly an open source shooter compatible with Nerf darts, and now…  I’d like to create a web app that aids in the calculation of good profile settings.

I’ve downloaded a bunch of different Thing-O-Matic, Cupcake, PWM and RMP calculators off of Thingiverse and am tinkering with them to get a better understanding of how they run these calculations. 2  Once I understand these, I’d like to make a very simple front end for these calculations.

If you have a good idea of how these things work, please leave a comment or shoot me an e-mail through the contact form.  Thanks!

  1. Which, in my experience, might just be a redundant statement []
  2. I’ve put out the call to Dave Durant to help me get a better grasp on these calculations… []

It’s alive!

I’ve got my Thing-O-Matic operational.  There were some initial hiccups, but it seems to be working.  However, I definitely need to calibrate Skeinforge and the “end.txt” cool down settings for this machine.  More on those details over at the MakerBot blog.  My initial print, a mini mug1 , turned out reasonably well – but is a little too sparse for actual toasting.

  1. Natch []

It will be mine. Oh yes, it WILL be mine…

Want

Want

MakerBot just announced their brand spanking new 3D printer – the Thing-O-Matic!  As far as I can tell, the highlights are as follows:

  • Automated Build Platform – version 2.0???  Guys, I just built my version 1.0 a few DAYS ago!  Did you design a time machine to let you import new developments from the future?
  • MK5 Plastruder – I’ve got a MK5 and I’m very very happy with it.
  • Internal electronics like Charles Pax’ Muffin CNC.  The wires sticking out all over on my ‘bot make it look extra DIY.  Having all the electronics and wires inside certainly make the Thing-O-Matic appear more like a real honest-to-goodness appliance.
  • Generation 4 electronics.  I don’t know what in all this means – except that I can plug a standard USB cable into it rather than the funky cable I currently have and it will allow for some kind of automated printing.  The Cupcake requires a fair amount of attention when you’re setting it to build something – getting the print head to the exact right height is something you just get used to.  For all I know, there are other improvements with the Gen 4 boards – but I’m waiting to hear just like you guys.  :)
  • Higher resolution.  I can’t wait for more details!!!  From the announcement post, it appears that Z axis will move much faster – fast enough that the blobs that can occur between layers could be a thing of the past.  These have never been a huge problem and I’ve gotten used to a little post-production finishing on my parts – but it would be great to not have to do nearly as much.

I’m wondering how the Thing-o-matic homes in on the correct start position?  Does it do this with opto-endstops?

What do you want to know about the Thing-o-matic?