Sailfish + Print-O-Matic = Wow

dutchmogul's Keep

dutchmogul’s Keep

Last night and tonight I have been tinkering with Flexo, my Thing-O-Matic, to install Jetty’s Sailfish firmware update.  The setup text is very helpful, but not particularly optimized for a Thing-O-Matic with a MK6 extruder.  I also found that I had to heavily modify the “start.gcode” and “end.gcode” to keep my bot from shaking itself to pieces. 1

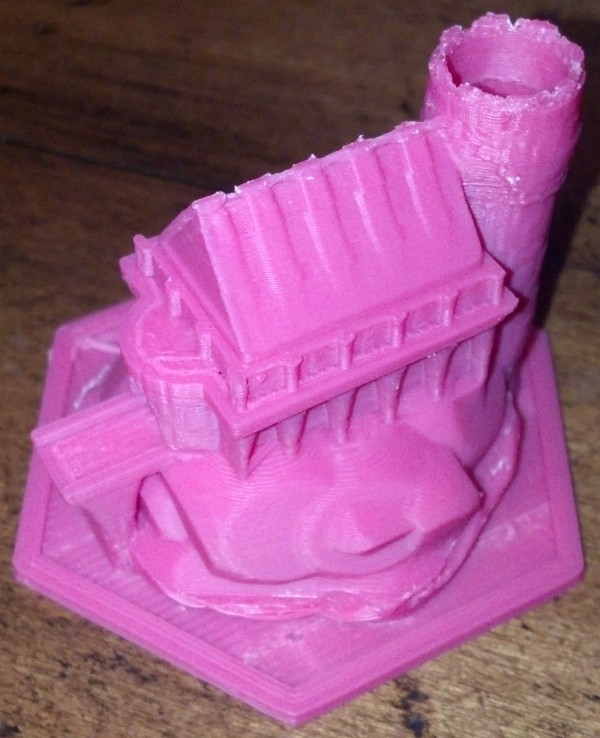
However, the results of combining Sailfish with ReplicatorG’s Print-O-Matic are impressive.  Dutchmogul’s Keep, pictured above, was printed with a layer height of 0.15mm, 10% infill, all with a stock 0.5mm nozzle.  That’s the very best resolution I’ve managed with my Thing-O-Matic, ever.  At 0.15mm thick layers, I have a difficult time seeing the layers if the model is more than 6 inches from my face and the ridges on the vertical parts is difficult to discern with a fingertip.

Now that I’ve finished that print I think I can push my ‘bot’s print resolution farther.  I’m willing to bet I can print down to 0.10mm layer height if I re-applied the Kapton tape and did a better job of leveling the print bed.  Also, one of the acknowledged challenges with 3mm filament based extruders is the pressure buildup that can lead to imprecise plastic deposits when dealing with non-contiguous parts. 2  Dialing in the Skeinforge “Retraction” or the Sailfish “Deprime” settings dialed in would really help with complex prints.

  1. The default “start.gcode” tried to home to the XY maximums and Z minimum – where there are no endstops.  The default “end.gcode” did the same thing for some reason.  I also had to modify the “start.gcode” so that the print head was better positioned for starting a print. []
  2. By this, I mean that when you’re printing two or more features that are not connected, say for example a table that is legs-side-up, an extruder will naturally ooze a little bit of plastic as it travels between legs, leaving a thin spider web like strand.  The “retraction” setting in Skeinforge is used to combat this, and does so fairly effectively in the case of a stepper based extruder.  That setting reverses the extruder motor quickly just after the print head leaves a leg and then quickly moves extra fast forward as it gets to the next leg, which prevents the spider web effect. []

Hi Rez Printing Problems

The stuff nightmares are made of: 1/4 of Disney's head

The stuff nightmares are made of: 1/4 of Disney's head

Earlier I had wondered about some of the challenges facing high resolution printing.  Specifically, I had suggested that a lower resolution would be better for overhangs, speed, and (after the suggestion of Erik) interlayer adhesion.

It looks like Dave Durant has a proof of concept with 1/4 of Disney’s head. 1  The layer height is unbelievably small – but as he points out:

Even smallish overhangs seem to be far harder to print at this layer height. I tried to print this one several times and it always went pear shaped as it got close to his chin, which is a pretty agressive overhang. Serious blobbage. :(

This certainly seems to demonstrate the flip side of my hypothesis – that thin layers are not good for printing overhangs.  I’ve been printing with a layer height of about 0.33mm.  This seems to give me enough resolution and overhang printability to make whatever I’ve needed so far.  However, I think it also gives us a reason to have several different configurations for a MakerBot for each kind of plastic:

  1. Thin layer printing
  2. Good overhang printing
  3. High speed/thick layer printing
  4. Printing small holes?

What other kinds of profiles would you suggest?

  1. Dave – your Flickr account says all rights reserved.  Obviously, I’m attributing this to you.  If you would like me to remove the picture, I will do so. []

MakerBot Hi Rez Printing Secrets revealed!

Warning: All responses from Dave are real, in the correct order, and unchanged.  I may have embellished my questions and responses.

  • MakerBlock: Dave!  How do you spell your last name?
    • Dave: dduranT.. T!!!! :P
  • MakerBlock: How exotic!  I’m having trouble pronouncing the last bit, so I hope you don’t mind me just calling you “Dave.”  Well, how did you do it?  Oh, and what’s your favorite vodka?
    • Dave: Patience, practice, Grey Goose.
  • MakerBlock: In two words or less, did you print slowly or fast?
    • Dave: Really, REALLY fastly.
  • MakerBlock: Um, I guess that counts.   I mean, you did only use two words – but you used one of them twice.  And I don’t think “fastly” is a real word.  Did you run the extruder slow or fast?  Please be sure and end your response with a preposition.
    • Dave: Slow but not as slow as I expected I’d have to.
  • MakerBlock: Did you use a custom nozzle or the standard MakerBot nozzle?
    • Dave: I do have a 0.35mm hot end from makergear.com (props to makergear – much awesome to be found there) but haven’t installed it yet. I’m still using the 0.5mm nozzle from MBI.
  • MakerBlock: Could you describe your setup for us?  Please be sure and include at least one plug for your all-time favorite MakerBot / RepRap blog written by me.
  • MakerBlock: Dave, it’s been great having you on the show.  Thank you for coming to speak to us and we’d love to have you back any time.

New MakerBot high resolution record!

MakerBot high resolution printing

MakerBot high resolution printing

Update:  Since this post others have achieved sub-0.1mm layer prints with their MakerBots as low as 0.075mm/layer

Ddurand123 has probably just taken the world record for highest resolution.  The current record holder is Rick Pollack at 0.15mm per layer.  Ddurant123 was able to print a 10mm test cube at 0.1mm per layer.

Dave!  How did you do it?

Did you print slowly or fast?

Did you run the extruder slow or fast?

Did you use a custom nozzle or the standard MakerBot nozzle?

Edit:  Dave, sonny abuut misspenning your nmae.  My bed.