DrawBot – The Delivery?

I don’t think all of my parts are going to arrive in time for me to take a crack at assembling a DrawBot this weekend.  Per the USPS:

  • MakerBot shipment:  Your item departed our OAKLAND, CA 94615 sort facility on January 13, 2012.
  • Adafruit  shipment:  Your item departed our NEW YORK, NY 10199 sort facility on January 13, 2012.

I think the best I can hope for is getting my motor shield tomorrow.  That’s okay, there’s plenty to do in the meantime.  I must learn patience.

Default Series Title

DrawBot – Giant Unicorn?

As you may know, I’ve got a MakerBot Cupcake named “Bender” and a MakerBot Thing-O-Matic named “Flexo“.  There’s really no doubt in my mind I’ll be springing for a Replicator with dual extrusion1  Thankfully, I think there’s a way for me to make use of each of my robots, in its own special way.  I figure I can keep the Cupcake rocking a Unicorn Pen Plotter, use my Automated Build Platform in my Thing-O-Matic for mass production of smaller parts, and put a Replicator to work printing new, wacky, and/or large designs.

But, why am I talking about giant unicorns?!  Sandy Noble, the creator of the Polargraph,2 just posted about how he has created a vector graphics importer for the Polargraph software.  This is some pretty amazing stuff.  The MakerBot Unicorn has several software toolpaths that take vector graphics to GCode for printing through ReplicatorG.  The end result is that a Polargraph rocking a vector graphic importer should be able to draw arbitrary shapes, without the need to draw scribbly bits.

I think it would be particularly awesome to have a DrawBot draw a frame/border and then fill it with a scribbly/pixelated drawing.  Or, perhaps, draw the outline of an object and then fill it in with scribbly/pixelated shadings.

Default Series Title
  1. Will my extravagance know no bounds?! []
  2. Which is probably the best documented DrawBot on the internet []

DrawBot – The Hacks

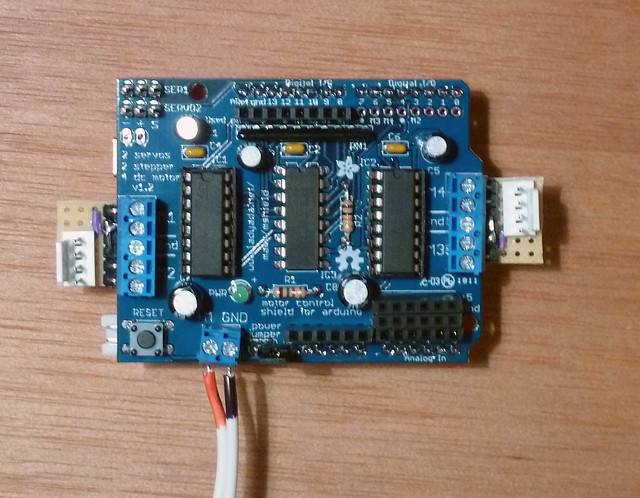
Sandy Noble's modifications to Adafruit's Motor Shield

Sandy Noble's modifications to Adafruit's Motor Shield

Chatting with Sandy Noble over at the Polargraph website has been extremely helpful1  It looks like he’s added three changes to the Adafruit Motor Shield:

  • Heatsink added23
  • Breakout boards to connect the terminals to the clips for the motor leads.  However, it looks like there’s a small little component of a circular purple variety also on that board.
  • Extra pins for hooking up a cooling fan.  Sandy says he doesn’t use them any more, but it really wouldn’t be a bad idea given that it would take hours for even a simple print.
Default Series Title
  1. The photo is from Sandy Noble’s photo stream.  It says All Rights Reserved and I will happily take it down if he asks and says this is not a fair use.  Given that all of his stuff has been very open source, I’m guessing this was just a default setting. []
  2. To the H-Bridges? []
  3. Also…  Where does one get a heatsink?  How do you attach it? []

DrawBot – The Plan!

What’s next?

Default Series Title


  1. Printing, for sure! []
  2. I don’t fish, but I have a bunch left over from a prior project []

DrawBot – What would you draw?

If you’re just tuning in, I’m going to be building a DrawBot.  Or, in the alternative, I intend to fail as spectacularly as I can.

However, it occurs to me that I need not be constrained by just my ideas of what a drawing robot should draw.  Admittedly, several of my anticipated print jobs are going to take a while since my daughter already has a stack of drawings she wants a drawing robot to replicate.  Here are the things I’m thinking about drawing:

So, if you had a drawing robot that could create sketches of arbitrary size, what would you draw?

Default Series Title
  1. I’m kidding []
  2. The reason I’m kidding is that a Polargraph tends to create a sketchy sort of design – so trying to replicate a Pollock painting would be an exercise in abstracting abstractness. []

DrawBot – Parts Shipped!!!

Yesterday I placed an order with Adafruit and MakerBot for all the parts I’ll need to build a DrawBot.  The MakerBot order shipped that same day and I just got a confirmation that the Adafruit order has shipped.

According to the USPS priority shipping estimates, it should take 2 days for these packages to get from Brooklyn to the SF Bay Area.  I figure it will probably take three.  So, hopefully the parts will arrive on or Saturday.  I’m really excited about building a DrawBot and my daughter is too.  She’s been drawing sketches for me to scan in for when we get the robot operational – so we can blow them up super huge.

Go USPS!  Fly like the wind!

Default Series Title

DrawBot – The Breakdown

The Breakdown:

  • Overall, this project cost to date is $103.30.   That’s less than I would have spent for a single really large framed print.  If I had to, I could have done this for less – especially if I were willing to be more patient.
    1. If I had placed my order with just one source and for the cheapest/slowest shipping option possible, I might have saved $5 in shipping. 1  For the extra $5, I’d rather have all the parts arrive this Thursday rather than next Thursday or a month or two when the shields were back in stock.
    2. I probably could have used an old power adapter from some other old scrap electronic device, but at $6.95 it just made sense to get a brand new device from Adafruit so I could dedicate the adapter to this project.
    3. I could have probably done without the micro servo and saved $6.00 since I’m mainly interested in doing single-line drawings – but this small investment will ensure I can do any kind of drawing I want by enabling pen lifts.
    4. I recently pulled two tin can stepper motors from old electronics, which could probably do the job.  However, at $14.00/stepper motor the price just seemed right.  These are pretty big motors that would be able to handle negotiating beaded cords with weights, if I ultimately have to go that route.
    5. Since I don’t have tons of parts lying around and I’d like to get started on this project before the weekend, it was worth it to me to pay a little extra.  However, if you just had to do this project for the cheapest possible amount and didn’t care how long it took, you could shop around to place a single order with one distributor, recycle a power adapter, and probably pull a small servo and two steppers out of some dumpster-score/junk heap.
  • At just a little over $100, I can use an identical hardware setup to John Abella – which means I can recycle his modifications to the Polargraph code.  Since he was using metal beaded cord and printed gears, he had to modify the code to accommodate these changes.  I’ll have to make some changes too – but it should be much easier to do so since I can compare John’s and Sandy’s code bases.  If the parts ship today, I should be able to get them on or before Friday.  The additional benefit of using the US Postal Service is that they’d deliver on Saturday if it comes to that.
  • For a full list of all parts I ordered, check out my post “DrawBot – Parts Ordered!!!
Default Series Title
  1. Adafruit was out of their motor shields, so I had to go to a third-party.  Admittedly, a third-party I love using.  Waiting until they were in stock and then placing a single order would probably have saved me $8, but the shield was already discounted $8 through MakerBot anyhow.  I guess that would have been a wash… []

DrawBot – Parts Ordered!!!

So, I just placed an order for all the electronics parts I’ll need.  A big thank-you to John Abella for this help in choosing the steppers and power adapter.  Here’s what I bought and from where:

Default Series Title


DrawBots for the slow learner

Today I bugged several people far more knowledgeable than I about Arduinos, drawbots, steppers, servos, and power supplies.  Here’s what I’ve learned:

Having just salvaged a bunch of parts from some old electronics this weekend, I think I’m ready to pull the trigger and start building this bad boy.  :)

Yay for learning!

Default Series Title

DrawBot, the Adventure Begins

Update:  If you want to find the latest on my DrawBot adventures and build log, check out this link!

Okay!  I think I’m ready to do this!  Is anyone interested in playing along at home?  Let’s give this a whirl!  Here’s what I’m thinking:

  1. Type.  There are at least three distinct drawing styles among the various drawbots.  However, I suspect this is mostly a software issue.  Der Kritzler draws with lines or little cross marks.  The Polargraph draws large “square” pixels.  Harvey Moon’s Drawing Machine draws tight concentric circles.  I’m not sure I have a preference among the various methods and, really, I suspect any differences really lie in the software, not the specific hardware setup.  In any case, for a variety of reasons, explained below, I’m going to try to build a Polargraph based drawbot.
  2. Documentation.  I like the Polargraph for its use of off-the-shelf parts like an Arduino and Adafruit motorshield and for its documentation.  The Make Magazine drawing machine also has a lot of documentation – but it is a very from-scratch design and there are some important images that are broken in the tutorials.  Der Kritzler also has decent documentation, but it appears to be more technical than I’m comfortable with at the moment.  One other huge benefit to the Polargraph is that Sandy Noble is still publishing updates for it – as recently as yesterday.
  3. Parts.  Der Kritzler uses expensive toothed belts, the Polargraph uses (plastic) beaded cord with weights, and Harvey Moon’s drawing machine uses something with weights – probably beaded cord.  The most interesting variation for me is monofilament spool method used by the Make Magazine system.  It has a weight on the “gondola” / printhead itself and winds/unwinds filament off the spool.  The benefit for me with this system is that it won’t have unnecessary hanging and swinging weights associated with each of the two cords.  When one has kids and cats it is best to minimize attractive nuisances.
  4. Sourcing.  Adafruit is out of their motor shields, so it looks like the MakerShed is going to be my best bet for picking up Polargraph-style parts.  An added bonus is that the MakerShed is located in Sebastopol, which is only a two-hour drive from my place in the SF Bay Area.  While I’m not about to drive four hours to save $15-$20 in shipping, it does mean the parts will get here quickly.
    1. Arduino: $30 @ the MakerShed
    2. Adafruit Motor Shield: $20 @ the MakerShed
    3. Stepper motors (one for each side): $10-$38/each.  However, which should I buy?!
    4. Servo motor (for pen lifts):  $15-$20.  However, which should I buy?!
    5. Power supply:  There are lots!  Which should I buy?!  Will I need a second to power the steppers?
    6. Since I’m planning to build a working Polargraph style robot using a monofilament spool rather than beaded cord, I’m going to forgo the beaded cord for the moment.  If I need the beaded cord, I can just print the gear/sprockets later. 1

Anyhow, your input on which steppers, servos, and power supplies is greatly appreciated.

Default Series Title
  1. Don’t you just love having your own 3D printing robot?! []