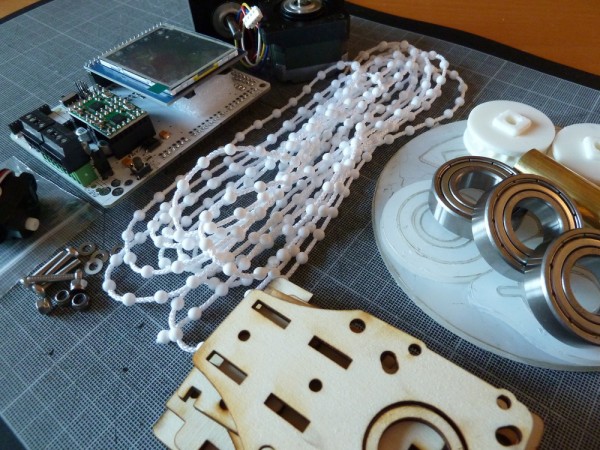
Sandy is responsible for having put together the best instructions for building a Polargraph/drawbot anywhere on the web. Sandy’s latest kit uses an Arduino Mega clone, a shield specifically designed by Sandy to provide all the Polargraph functions, two StepStick motor drivers, an SD card slot, socket for an XBee wireless module, connections for endstop and servo support, and – best of all – an LCD touch screen interface.
While my own DrawBot was built entirely from off-the-shelf parts, I’d like to make it really polished. At the moment my DrawBot does not look like much. It is two motors bolted to a chunk of plywood with some circuit boards in a plastic holder which is duct taped to the chunk of plywood. It works and is as reliable as the PC operating it, but it is far from pretty. Stay tuned for some new design ideas!
It’s been a while since I’ve talked about my DrawBot. In large part that’s because it’s been a while since I’ve even used my DrawBot.
After a little dry spell of making, I’ve been rocking the DrawBot. Previously I had been drawing things about the size of a sheet of paper. While this meant the drawings were relatively quick, it also meant I could just print whatever I wanted directly onto a 8.5″x11″ sheet of paper using my traditional black and white laser printer. This weekend I’ve cranked out a few drawings – but on a much grander scale. Several months ago I picked up a large roll of white paper at the local office supply store – and I’ve since created about three 3-foot tall drawings. One is a House Stark direwolf from Game of Thrones, one is an R2D2 commissioned by my daughter, and a third is an R2D2 and C3PO also at the request for my daughter.1
The last one is particularly cool. I’ll take a picture for you later. There’s a lot of room for improvement with the gondola. The current setup is… let’s say… non-optimal. I’m working on an improved version.
Where was I? Oh yes! The watched pot!
I’m using Sandy Noble’s seriously awesome Polargraphsoftware to power my DrawBot. I’m rocking version 0.182 and noticed that when I’ve got the program on the “Input” tab it draws about 42 points a minute and when it’s on the “Queue” tab it draws about 96 points a minute when working on SVG / vector graphic. The cool part about drawing with the “Input” tab open is that you can see the drawing in progress. So, when I’m watching the drawing, it runs slower.
So, here’s the thing. I really really really like the Maker Faire. I’m just torn as to the most optimal way to experience it.
First of all, I love taking my wife and daughter to Maker Faire. Getting to see so many amazing things all in one place – and getting to see them all through my daughter’s eyes is absolutely incredible. I could spend the entire weekend just walking from exhibit to exhibit with them.
Second of all, I love talking to Makers and finding out what they do, what they love to make, and how they learned all the things they did to get there. I honestly feel smarter just for having gone each year.1
Third, helping man the MakerBot table last year was AWESOME! There was basically a constant crush of people coming by all super interested in what a MakerBot was and what it could be used to make. Everyone was friendly, polite, interested, and had such excellent and insightful questions. Imagine a place where you got to just hang out with people you like2 and people would stop by and ask you to tell them all about your favorite hobby. Chances are you could talk endlessly and cheerfully about it.
Fourth, I’ve build and made some things over the last year of which I’m kind of proud. While all the actual innovation credit must go to Sandy Noble and others, I like to think that my little drawing robot is uniquely mine. It would be a lot of fun to put it up and have it draw a huge picture all weekend. It would be even better with a time lapse video playing nearby.
So, what’s a maker to do? Experience Maker Faire with the family, spend my time talking to makers, man the MakerBot table, or put something on display myself? In all likelihood I’ll probably hit the Maker Faire before the family is up, help MakerBot, catch up with the family. 3
Oh, Natalie Imbruglia, only you know how I feel!
Admittedly, it wouldn’t take much for that to happen [↩]
A summer rose from our garden, drawn by a freakin’ narcoleptic robot
The drawings are getting better with a little tinkering. I’ve designed, printed, and installed new motor spools. These have a thicker central core, so they should be able to collect more monofilament line with slightly less distortion. I’ve made a few changes to the setup. Dialing in the starting area and calibrating the starting home point were pretty important.
I’m still having a little trouble with the robot occasionally stalling out. Although, now I think it is a symptom of the controller software rather than a problem with the Arduino. There’s no set time after printing, no set time after running the program, or other noticeable precipitating event which seems to cause this problem. At some point during a drawing, the controller software just reports the Arduino as being busy. 1 Here’s what I do to correct the problem:
Disconnect the USB cable from the laptop
Click “Queue->Export Queue” and save as a text document
Open the text document and perform the following operation
Select, copy, paste the first line above the first line – so now you see a duplicate. So, for instance in the image above I had to copy “C05,2700,2370,10,247,END” and paste this above the same line – so that it would look like the robot would be receiving the same command twice.
Edit the line “C05,2700,2370,10,247,END” so that I change the command to start with “C09” and delete the last two numbers and the “END” statement, so that it now looks like, “C09,2700,2370,END”
Save the text document with these changes
Shut down/close the controller software
Restart the controller software
Reconnect the USB cable to the laptop
Click “Setup->Serial Port…” and click on the serial port of choice
Click “Queue->Import Queue” and choose the text document I just edited
Start the queue again!
The reason I suspect this is a controller software and not an Arduino firmware issue is that I don’t have to reset the Arduino at any point – just disconnect the USB, restart the controller software, reconnect the USB, and start the queue again. I would think that if there were a problem with the Arduino firmware, I would need to reset the board itself.
The lowest you can specify as the “grid size”2 in the Polargraph controller software is “20,” but you can use a smaller value by editing the “polargraph.properties.txt” file. In the image above I used a grid size of “10” which appears to cover 1/4 the area of the size 20 pixel. That image probably took about five hours to draw. I think it looks really nice. The image above seems to have been distorted by my scanner. It came out almost perfectly square with a slight warp to the top right corner. 3 You can see some bare spots in the image above – that’s where the pen, for whatever reason, just wasn’t making a mark on the paper. I suspect it has something to do with that region of the paper being either slightly smoother and/or slightly more depressed than the surrounding regions. Otherwise, there would be no reason why the next row would have a similar defect nearby.
I’ve noticed the controller software also tends to forget the machine width, page size, and page position. I’ve updated this, saved it, and uploaded it to the Arduino several times, but it doesn’t seem to stick past a reboot of the software. Ultimately, these are very minor concerns and really just something to be aware of when I’m printing. I just about couldn’t be happier with the controlling software. That piece of software plus the Arduino sketch together have basically made this a nearly effortless project. Besides a hiccup soldering a circuit board wrong, this entire project went together very quickly and yielded almost immediately gratifying results.
I’ve done several drawings in the last few days. I’m still having trouble getting a perfectly rectangular and centered result. I may have to adjust the Y offsets and double-check my machine measurements. I still also notice a slight upwards warp to a drawing in the top right corner. But, I’m looking forward to additional experimentation – it’s all part of the adventure!
Last, but certainly not least, I want to make it clear that Sandy Noble’s software for the Polargraph/drawbot is really really great. That I am having some minor calibration troubles speaks more to my incompetence than Sandy’s excellent program. So, a great big thank-you to Sandy for his continued hard work on this software!
A few thoughts about operating a DrawBot, in semi-organized fashion:
Vertical Surface Drawing. There is an interesting tension in the design of a vertical line-driven drawing robot. As the drawing surface orientation approaches horizontal, the easier time the robot will have using a standard pen to draw, the more difficult it will be to control the drawing component via a line system, the greater the weight that would be required,1 a greater weight puts a greater stress on the line and the motor and has some effect on the responsiveness of the drawing component, and the more the weights on the drawing component would be in contact with the drawing surface – possibly causing smudges. The closer the surface is to vertical, the easier it will be to actually operate as a line-driven robot, the less weight required,2 but the more difficult it would be to have a pressure from the drawing component on the drawing surface.
Robot Portability. Right now my robot is quite portable – and, of course, there are costs and benefits associated with this. Right now I’m limited to the “size” of my robot at 2’x4′ since that’s the size of the piece of plywood I bought and on which the motors are mounted. However, it is very easy to just move the robot by putting the plywood in a different location in the house.
Robot Location. This is, in some senses, the flip side to robot portability. I’d love to put the ‘bot up on the wall and draw something really really huge. I don’t see that happening until I’m more comfortable running the robot, have found a better pen/paper combination, and – perhaps most importantly – figured out how to run the robot wirelessly or off an SD card.
This my theory, anyhow. My reasoning is that as the surface approaches horizontal, the more weight you’d need to pull at the drawing component because more of the force of the weight would be absorbed directly by the drawing surface itself – along with some friction as it passes over the surface as well. [↩]
I just tried several pens. Here’s what I’ve found:
“Fine point” Sharpie, black. This is the kind you typically use. It makes a huge, stinky, black line that leaks all over. Not recommended.
“Ultra fine point” Sharpie, black. This also leaked right through the paper, made a super thick line, and made such a mess I stopped the drawing. Not recommended.
Pilot Precise Roling Ball V7, Fine, red. I really like this style of pen for writing. These gel pens feed ink easily, the ball point rarely gets messed up, and it’s just all-around easy to use. Unfortunately, as you can see from some of the drawings, it didn’t like drawing at a nearly horizontal angle. Even though I can see through the side that the pen has sufficient ink and that it is reaching the pen tip, it just wasn’t working very well.
Piolot G-2 10, black. While excellent for writing, this pen was miserable for use in a DrawBot.
Uni-ball Deluxe Micro, blue. So far, this pen is AWESOME. It seems to write amazingly well on a nearly horizontal surface, no bleeding, and it draws a very fine line of blue. I fully intend to buy several different colors of this pen. I believe it comes in all kinds of colors – black, blue, green, and red. If the drawing I’m having the robot work on now turns out, you’ll get to see just how awesome this pen really is.
Very smooth paper (like Bristol board) with hard-tipped fineliner pens. In the UK he uses ZIG Millennium pens. He suggests that Pigma MICRON pens may be a good choice for those in the states. I’ve used Pigma Micron pens for years and really like them for pen-and-ink drawing. They’re great on regular photocopy paper as well as serious art paper. I would have tried a Pigma pen, but I couldn’t find any around the house. I know I’ve got a stack of them – I just can’t find ’em. If and when I do, I’ll update this post.
After actually calibrating my machine, the results are MUCH better. I still need to adjust the settings a little, but otherwise I’m very very happy with this result. As you can see, the drawing is flipped. Once flipped back, I think it is reasonably apparent this is Van Gogh’s Starry Night. Here are a few things I’m going to try:
The pen I was using seemed to stop working in certain regions of the drawing. I bought a few new pens on my lunch break today. Both are art marker pens – one blue and one red. Unfortunately, both are too wide to fit in my current gondola. For now I’ll use a thin sharpie.
There is a slight curvature on the top and bottom of the drawing. This is probably due to a miscalculation in the mm per rotation. The downside to using a spool, rather than a sprocket/ball chain or gear/toothed belt, is that as the spool contains more cord, the diameter of the spool actually grows larger. This means that when there’s a lot of line on the spool each rotation releases more line and when there’s very little line left on the spool, each rotate releases less line. However, given the diminished space requirements, I don’t think this is going to be such a big deal.
I mostly measured the machine width. Basically what that means is that I did measure it, but then got distracted, then used what I recalled the width to be inches to calculate the width in mm. Clearly, there is room for increased precision.
For weights I’m using a bunch of spent batteries in a ziplock baggie tied with a wire to the gondola. Too many batteries were causing the line to be too jagged.
Starry Night by Van Gogh, drawn by a freakin’ dyslexic robot
Starry Night by Van Gogh, drawn by a freakin’ dyslexic robot, and flipped back
Okay, I’m stuck. I don’ t know what I’m doing wrong or what I need to do next. So, I’m calling upon John Abella, Sandy Noble, and Kongorilla for your help. :)
Here’s where I am:
The burning!
At last attempt, I hooked up some small steppers to the Adafruit motor shield, put the shield on my Arduino Uno, hooked up the USB cable and the 9v power adapter.
I heard a small pop and smelled warm electronics.1
After the burning
I can upload and run the Arduino basic blink sketch. I can alter this to change the blinking pattern.
I can upload and run the Arduino sketches to operate a microservo. I can alter this to change the microservo’s behavior.
I can upload the Adafruit sketches for steppers – but I can’t make the steppers move.
I can upload the Polargraph sketch – but I can’t make the steppers do anything.
When I connect the 9v power to the Arduino, all it does is make the two chips on the Adafruit motor shield very warm.
Now, I’ve got tons of questions for you:
Did I ruin my Arduino? I can still run the blink and microservo sketches.
Did I ruin my motor shield? How can I tell if it is operational? When I connect the power to the Arduino and have the little jumper in place, the green LED is lit up.
What am I doing wrong?
What should I try next?
How should I diagnose a problem?
Default Series Title
Now I’ve got a cold and couldn’t smell anything if I wanted [↩]
I debated with myself over how best to lay out my build log for this DrawBot. 1 Is it better to post the build process as I’m working on it, so that it would span numerous posts, or is it better to try to keep posting all the major steps into one post so that it is easy to follow? At the cost of appearing repeatedly repetitious over and over again, I think if I were following along at home I’d want to read either one long post that covers everything or a small series of posts that cover the few major steps. It’s easier at this stage to put all the information into one long post, revising it as I go along and pruning the ubiquitous2 nonsense out as I go.
FYI, I was explaining this DrawBot to a friend at a party yesterday. He suggested I create a wipe board robot instead, similar to the Lady Ada and Matt Metts robots, and call it the BotWiper. [↩]
Breakout boards to connect the terminals to the clips for the motor leads. However, it looks like there’s a small little component of a circular purple variety also on that board.
Extra pins for hooking up a cooling fan. Sandy says he doesn’t use them any more, but it really wouldn’t be a bad idea given that it would take hours for even a simple print.
Default Series Title
The photo is from Sandy Noble’s photo stream. It says All Rights Reserved and I will happily take it down if he asks and says this is not a fair use. Given that all of his stuff has been very open source, I’m guessing this was just a default setting. [↩]


