I got to my computer this morning and discovered a pop-up from McAfee AntiVirus altering me to some nonsense or other. Without going into all the reasons, I don’t like or want McAfee on any of my computers. Given when it was installed, I believe it was quietly bundled with the Adobe Reader I installed yesterday (and now uninstalled as well).
I went through the normal process of trying to uninstall a program:
Settings
Add / Remove Programs
Find “McAfee” and click “Uninstall”
When you do, you’ll see a small window pop up offering you some promotion. However, this is where the uninstallation process stopped for me! The window appeared too small and the text too large and the only options available to me were to close the window (in which case McAfee stays) or click on their offer (which didn’t tantalize me either). There was no way to scroll the contents of the window to see what else was below their text and offer.
I realized there might be more below their offer, so I hit the “Tab” button a few times. This caused the window to focus on the next button “Uninstall” (in white) on the bottom left and to see the “Go to Offer” (or somesuch, I wasn’t paying attention to it) button on the bottom right.
I clicked Uninstall and it hasn’t been back since…
I’ve been looking to get some playing sized cards for various purposes recently. I’ve enjoyed making my own cards from blanks ordered off of Amazon, but for things that might get used a little more regularly, it would actually help to have these things pre-typed/printed. And, as a long-time / returning enthusiast of a particular card card game, I was also looking to print up some proxy cards for casual play. I don’t want counterfeit cards – just make some obviously unofficial stand-ins for real cards in casual play.
Cost Breakdown
If you do any kind of Googling about searching for a company to print up cards of various sizes, you’ll quickly end up at MakePlayingCards.com – or a company that has a website that looks nearly identical to MPC. Getting a single deck of custom cards printed up through MPC is $26.15 for up to 108 cards (they offer incremental price breaks) plus $11.99 shipping (with tracking taking about 20 days) as the cheapest option, coming to $40.17 (including some tax). This is roughly $0.37/card.
Lurking in some Reddit forums, I found a few suggestions on different ways to create proxy Magic: the Gathering cards. These forums renewed my interest in getting some cards printed up – and lead me to DriveThruCards.com. I just placed an order for 120 cards,1 but I’ll describe the cost for 108 cards for an apples-to-apples comparison. A single deck of custom cards printed through DTC is $12.42, plus $5.99 shipping (USPS Ground Advantage and anecdotal evidence from Reddit suggests ~10 days), plus $1.00 in tax, comes to $19.41. This is roughly $0.18/card.
Benefits / Costs
There’s no question the MPC website is cleaner and slicker, featuring drag and drop options, without a lot of technical jargon about printing, colors, etc. They also seem to have many more options for card sizes, materials, and finishes. They also have lots of templates in various formats to download and populate. The obvious downsides are the length of shipping required and the cost, both estimated to be roughly twice that of DTC which is apparently in Overland, Kansas.
The DTC website is… by their own admission, “challenging to learn.” While I’m sure the interface permits a ton of customization, the dizzying array of options is daunting. Theyhavelotsofguidesontheirwebsiteandknowledgebase, as well aselsewhere, but it’s probably too much information. I went with DTC for my first custom card order because I wanted to inexpensively try out some ideas and I figured that after the first order, I’d probably get the hang of their system. However, one thing that really sets DTC apart is the responsiveness of their customer service. I’d emailed them in the middle the day and middle of the night (aka goblin hours) and someone always back to me super fast. Although DTC doesn’t have official PDF templates, Brian with DTC kindly whipped one up and emailed it to me which answered tons of my questions.
Anatomy of a Printed Card
Both MPC, DTC, and other print-on-demand (POD) websites have numerous descriptions, graphics, tutorials, and samples all using slightly different words, relating to the various sizes, printing zones, etc. I found it incredibly confusing. Now, I’m not certain I’ve gotten everything right, but here’s my best understanding…
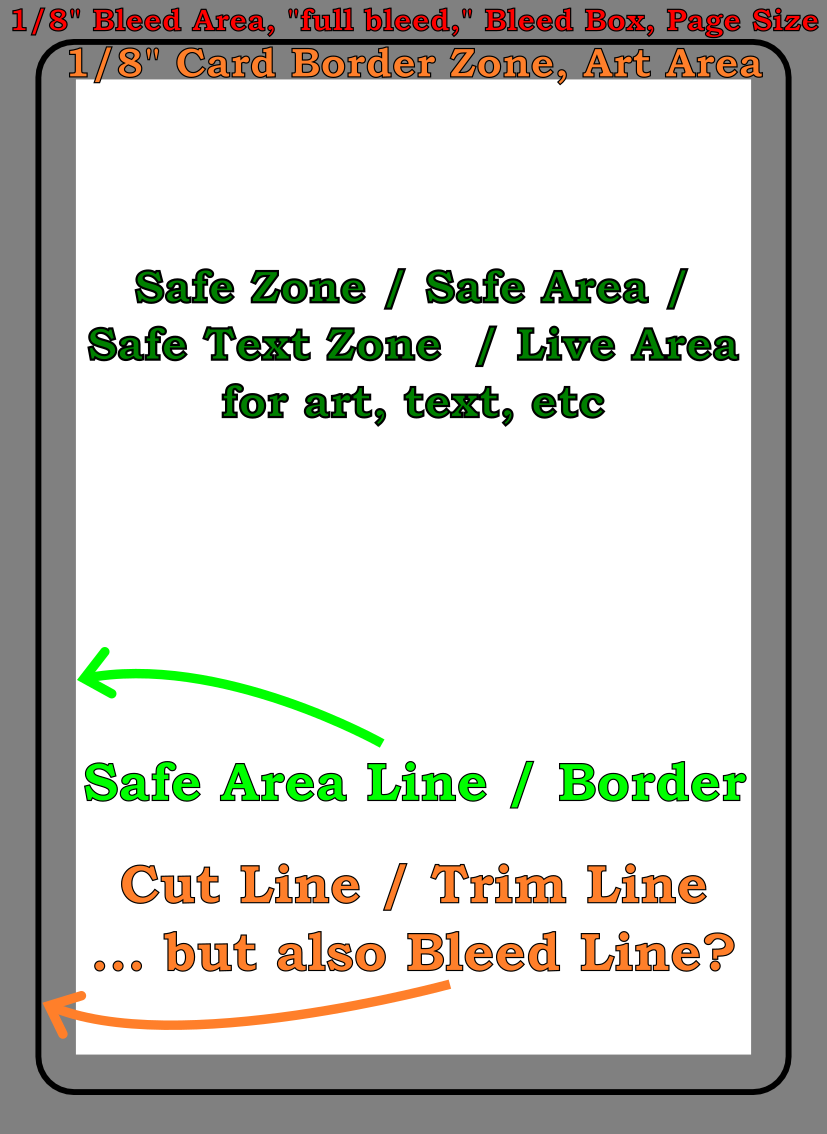
Annotated sample poker card
Cut Line / Trim Line / Bleed Line.
The area described by the solid black line will be where the card is trimmed to the exact dimensions of the card. The good thing about knowing what this line means is that if you know the final dimensions of your type of card, this is easy to look up and then design everything else around it.
Importantly, you don’t want to include this line in your designs. The purpose of the “safe” zone area is so the critical components of your design are certain to appear on the final product – even if it is perhaps slightly offcut. The purpose of the “bleed” zone is to make sure a “full art” card doesn’t have bits of white or black at the edge if it is very slightly miscut.
Safe Area Line / Border. The important part to know here is that the distance from the “cut line” to the safe area is 1/8″ or 3.175 mm on all sides. Thus, if you know the dimensions of the card you want, you just make sure your critical art and text don’t exceed this area. All the area inside the safe area line is the “safe zone.”
Bleed Box / Bleed Area / “Full Bleed” / Page Size. As with the Safe Area Line, this is easy to figure out – it’s just 1/8″ or 3.175 mm outside the edges of the cut line. This should be a rectangle.
Software / Design Process
I don’t have Adobe InDesign, Photoshop, Illustrator, or Affinity Publisher – and I wasn’t going to buy / subscribe to any of these just for this one project. What I do have, however, is OpenSCAD and Inkscape. Using OpenSCAD I started with a rectangle of the precise dimensions to match the exterior of the “US poker” card I wanted printed, then exported this to an SVG file. I then did this for a rectangle of the “bleed box” size, safe line, and also the trim line. I then imported all of these into Inkscape, layered them, and used them as guides while I designed my cards. I made sure the critical areas were within the safe line, but made the safe line, trim line, etc all invisible. Inkscape will allow you to export a file into a PDF file format which DTC accepts. I created fronts and backs for cards, each exported as a separate PDF, then combined all of them using one of my favorite pieces of freeware, PDFTK.
Potential Issues, Fixes
Unembedded Fonts. Apparently Inkscape did not embed all of the fonts used in the creation of the PDF. When I tried to upload the PDF originally, DTC’s uploader balked at this and said I’d need to embed the fonts. While I used a different PDF program (Foxit PDF is reasonably full featured and way less expensive than Adobe) to embed the fonts, I think I could have simply re-exported all the card faces as images instead of PDFs, then combined those into a new PDF which just had pictures (including pictures of the desired text). It might have been possible to change the fonts as well to be more uniform, but given the number of cards I was creating, I didn’t want to do that.
Currency. I’m putting this here more for me than anyone else who might stop by. At some point while using their website I accidentally did something which made all the prices and calculations appear in the Japanese Yen. :/ I’d been through the account settings numerous times and even cleared my cookies and website cache trying to fix this problem. After an embarrassingly long time, I gave up and emailed Brian to ask for help. As so often happens to me… moments after hitting send I saw website footer had a drop down box to choose the currency and language. Sorry Brian!
So, what’s next? Well, after placing the order at roughly 2am PST on 3/19/2024, now it’s time to just wait and find out if the cards are going to get produced and arrive! It’s now almost 6 pm PST, and their Order History page says “Sent to printer.” Some Reddit posts suggest that it takes another 1-2 weeks to actually ship.
Late at night, when I should be doing work or, better yet, sleeping, ideas spring to mind. I’ve created a few small projects from big sheets of coroplast or polypropylene corrugated plastic. This is the kind of material you see in use for yard signs. They are big, cheap, sturdy (as long as you’re not bending it with the grain), and lightweight. They can be bent or cut easily. However, since it is polypropylene, it is fairly resistant to most glues, adhesives, and paints.
Duct tape and hot glue work well, but have their downsides. The duct tape can be unsightly and not very good for “laminating” several layers together. Hot glue works well for laminating layers, but it cools so fast that it’s hard to glue big sheets together.
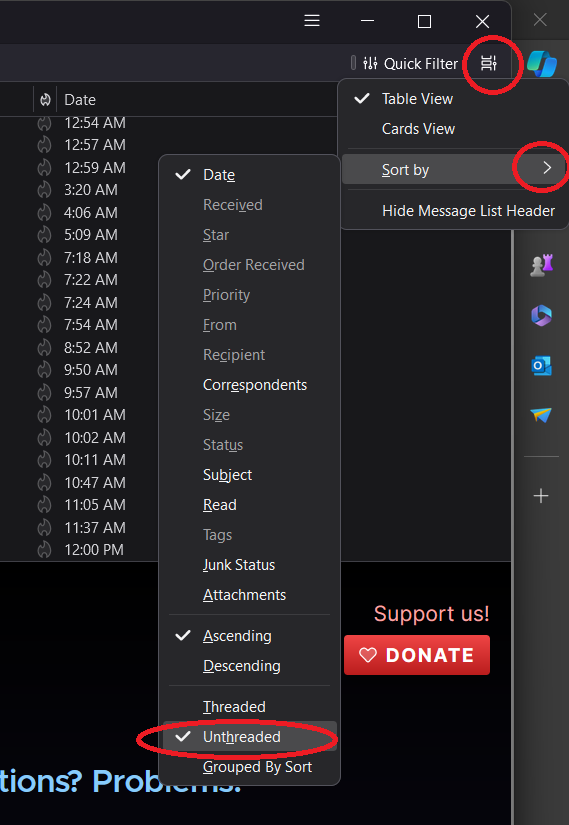
If you’re just here for the solution (or, you’re actually me, returning some time in the future to fix the problem after perhaps a Thunderbird update), here’s all you need to know:
Click on the icon in the top right that looks like a film strip which displays the “Message list display options” when the mouse hovers over it.
Sort by -> Unthreaded
Just follow these steps, starting with the menu at the top right
I suppose there are times when threaded email view is useful. However, when reviewing emails at a glance, it’s incredibly frustrating because your inbox will show you have a new unread email, but you won’t know which thread it’s nested under.
I found numerous “solutions” online for how to unthread Thunderbird emails, but none of them worked for me since the answer wasn’t buried in any of the settings, the hamburger menu didn’t help, and nothing relevant showed up in the help sections or even in searching the settings section.
Of course, right clicking on the columns allowed me to hide the “thread” column, but that didn’t stop emails from actually being threaded.
I spent some time searching for the answer, watching snippets of videos, and finally stumbled across the solution here after seeing multiple people voice the very same frustrations I did, discussing. Hopefully the above screenshot helps you (or me!) solve this problem in the future.
A little while ago I purchased an LG 38c “Optimus Dynamic” Android based touch screen “pay as you go” phone.1 Frankly, this phone has come in WAY more useful than I ever though it would. Here are a few ways in which I’ve actually used this phone recently:
I’ve mentioned that I’ve got this software-as-service website. 12 Today, while dealing with a tech support problem, I realized what I love most about this type of business.
But, first, the tech problem. A user e-mails me saying that he can’t log into the site from his iPhone (running iOS6) any more. First, I try his login/password to confirm they work. They do. I have him try refreshing the page – I’ve heard the new iOS sometimes causes weird caching problems. He still can’t log in. I try logging in from an iPhone 4 running iOS6 and an iPhone 4S running iOS6. No good. I get him to confirm he’s clicking “remember me” when he logs in. Yes, he is. I finally tell him I can’t explain what’s going on – I’ve tried to replicate his problem on another iPhone 4 running iOS6, just like his, and I can’t figure out what happened.
He e-mails me a little later to say that he figured out that his iPhone had been set to reject cookies, and thus, he was not able to log in.
Which brings me to the thing I love about my SaaS business. When someone says the site doesn’t work, all I have to do is confirm that it works in some browser somewhere on the internet – and then I’m basically 99% sure the problem is on their end. Now, I can help them troubleshoot a problem to a certain extent, but for the most part if my site works in any one browser, it should work anywhere. I don’t have to worry about their operating system, software conflicts, and other nonsense like that. Just get to the internet and the site should work. Default Series Title
A summer rose from our garden, drawn by a freakin’ narcoleptic robot
The drawings are getting better with a little tinkering. I’ve designed, printed, and installed new motor spools. These have a thicker central core, so they should be able to collect more monofilament line with slightly less distortion. I’ve made a few changes to the setup. Dialing in the starting area and calibrating the starting home point were pretty important.
I’m still having a little trouble with the robot occasionally stalling out. Although, now I think it is a symptom of the controller software rather than a problem with the Arduino. There’s no set time after printing, no set time after running the program, or other noticeable precipitating event which seems to cause this problem. At some point during a drawing, the controller software just reports the Arduino as being busy. 1 Here’s what I do to correct the problem:
Disconnect the USB cable from the laptop
Click “Queue->Export Queue” and save as a text document
Open the text document and perform the following operation
Select, copy, paste the first line above the first line – so now you see a duplicate. So, for instance in the image above I had to copy “C05,2700,2370,10,247,END” and paste this above the same line – so that it would look like the robot would be receiving the same command twice.
Edit the line “C05,2700,2370,10,247,END” so that I change the command to start with “C09” and delete the last two numbers and the “END” statement, so that it now looks like, “C09,2700,2370,END”
Save the text document with these changes
Shut down/close the controller software
Restart the controller software
Reconnect the USB cable to the laptop
Click “Setup->Serial Port…” and click on the serial port of choice
Click “Queue->Import Queue” and choose the text document I just edited
Start the queue again!
The reason I suspect this is a controller software and not an Arduino firmware issue is that I don’t have to reset the Arduino at any point – just disconnect the USB, restart the controller software, reconnect the USB, and start the queue again. I would think that if there were a problem with the Arduino firmware, I would need to reset the board itself.
The lowest you can specify as the “grid size”2 in the Polargraph controller software is “20,” but you can use a smaller value by editing the “polargraph.properties.txt” file. In the image above I used a grid size of “10” which appears to cover 1/4 the area of the size 20 pixel. That image probably took about five hours to draw. I think it looks really nice. The image above seems to have been distorted by my scanner. It came out almost perfectly square with a slight warp to the top right corner. 3 You can see some bare spots in the image above – that’s where the pen, for whatever reason, just wasn’t making a mark on the paper. I suspect it has something to do with that region of the paper being either slightly smoother and/or slightly more depressed than the surrounding regions. Otherwise, there would be no reason why the next row would have a similar defect nearby.
I’ve noticed the controller software also tends to forget the machine width, page size, and page position. I’ve updated this, saved it, and uploaded it to the Arduino several times, but it doesn’t seem to stick past a reboot of the software. Ultimately, these are very minor concerns and really just something to be aware of when I’m printing. I just about couldn’t be happier with the controlling software. That piece of software plus the Arduino sketch together have basically made this a nearly effortless project. Besides a hiccup soldering a circuit board wrong, this entire project went together very quickly and yielded almost immediately gratifying results.
I’ve done several drawings in the last few days. I’m still having trouble getting a perfectly rectangular and centered result. I may have to adjust the Y offsets and double-check my machine measurements. I still also notice a slight upwards warp to a drawing in the top right corner. But, I’m looking forward to additional experimentation – it’s all part of the adventure!
Last, but certainly not least, I want to make it clear that Sandy Noble’s software for the Polargraph/drawbot is really really great. That I am having some minor calibration troubles speaks more to my incompetence than Sandy’s excellent program. So, a great big thank-you to Sandy for his continued hard work on this software!