Sometimes you just gotta roll up your sleeves and craft your own fix
I recently purchased Minecraft for the PC (Windows 10) and tried to install it. It was brutal, but I got through it. I’m documenting my experiences here in the hopes it helps someone else.
The download was incredibly slow, would time out, get stuck, would give me the message “queued in position X,” or would simply not work at all. Sometimes it would download 10 or 50 MB and then stop. It was pretty frustrating. I tried a number of things and eventually found a constellation of things that ended up fixing the problem.
Things That Helped / Worked: From Simplest to Most Complicated
Making sure I was on a speedy wifi network.
The easiest first step was to get off the wifi extended and onto the main wifi network.
Ended all Minecraft processes / programs that were running.
Press Ctrl + Shift + Esc to open the Task Manager. (Right clicking on an empty space on the task bar can also bring this up as an option in the context menu.
Right click on any “Minecraft” processes as select “End task.”
Sign out of the Microsoft Store app.
You should see a two letter (probably your first and last initials) circular icon in the top menu bar for this app. Click “Sign out”
Reset the Microsoft Store app.
Start / Windows Button -> ⚙️Settings -> Apps
Scroll down until you see “Microsoft Store,” select it and click “Advanced options”
Click “Repair,” let the computer do it’s thing, then click “Reset.”
Make sure the time zone and clock are up to date.
This sounds kinda crazy, but it’s a legit reason why Minecraft might not be installing. Many programs try to synchronize and authenticate each other across the internet – using agreed upon times as a basis. An incorrect time might be used by a malicious person or program to breach a system.
Anyhow, here’s how you apply this fix:
Start / Windows Button -> ⚙️Settings -> Time & Language
Turn on “Set time automatically” and “Set time zone automatically” and click “Sync now”
Check to make sure you didn’t cripple the download speeds yourself.
When setting up my PC I had crippled Windows download speeds to 0.1 Mbps. While this helps my day-to-day computer usage and prevents Windows from chewing up all my bandwidth to update itself, it also crippled anything I wanted to download through the Windows Store app. I’d recommend removing all bandwidth caps while trying to download Minecraft.
Notes:
I can’t be sure, but Windows does a lot of stuff behind the scenes, but having checked the installed apps after Minecraft was fully installed, I noticed several other apps were also installed. I believe the Windows Store needed to install a bunch of other programs and app / dependencies before it would actually allow Minecraft to download. You may or may not see these pop up.
Things That Did Not (Seem To) Help
Restarting the computer didn’t seem to help. I suppose it’s worth trying.
Trying to install a prior version of Minecraft for Windows 7/8 didn’t work either. They seemed download fine – but wouldn’t run at all.
Trying to install the Minecraft Java version first. I ended up uninstalling all versions and all launchers and starting from scratch.
I hope this helped. If you’ve got some other fix that worked or idea how to help, I’m sure plenty of others would want to know. Feel free to leave a comment.
TLDR: I’m going to try some mechanical keyboards to help me work from home and blog about my experiences.
I’m fortunate that I’ve been able to work from home this pandemic. I’ve always made a special effort to make my work more “digital,” by scanning and organizing digital copies of important work documents. In many ways working from home hasn’t required too many changes to my overall workflow. My entire office and desk space shrunk to just a single laptop propped up on a plank of cardboard with some holes to help distribute heat. I have to be more disciplined about creating digital notes, since I can’t cover my work space in post-its and illegible scraps of paper. Two pairs of noise cancelling bluetooth headphones are are taking the place of four walls and a door to help me concentrate and communicate “I’m working” to the kids. 1 While I’ve gotten used to one medium sized laptop screen, in place of a dual monitor setup, the one thing that’s been extremely difficult is using a laptop keyboard instead of a full fledged keyboard.
Which brings me, dear reader, to the QMK or “quantum mechanical keyboards.” The QMK is a keyboard firmware2 that allows you to create very customized keyboards and keyboard layouts.
A while back I wrote a Chrome extension to help me with some work related data entry tasks. It works by intercepting some of the top row function keys, preventing their default actions, and replacing them with some macros. This setup probably slashed the number of required clicks and keystrokes by 75%. My fevered dream is for a custom keyboard which could cut this yet in half.
Now, if that keyboard also has some media controls and sweet RGB goodness, well, then, awesome. Of course, this means I can’t just go order a keyboard off a shelf. While there are plenty of neat custom and QMK keyboards, to really get the most out of a board, to get exactly what I need, I will need to roll up my sleeves and actually dive into the firmware itself.
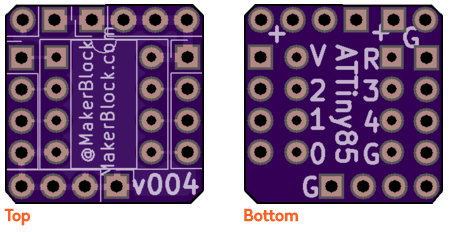
This series took me from knowing nothing at all about PCB layout and design to ordering my very first board through OSHPark. My first design isn’t anything amazing – it was basically a breakout board for an ATTiny85 to make it easier to build small projects.
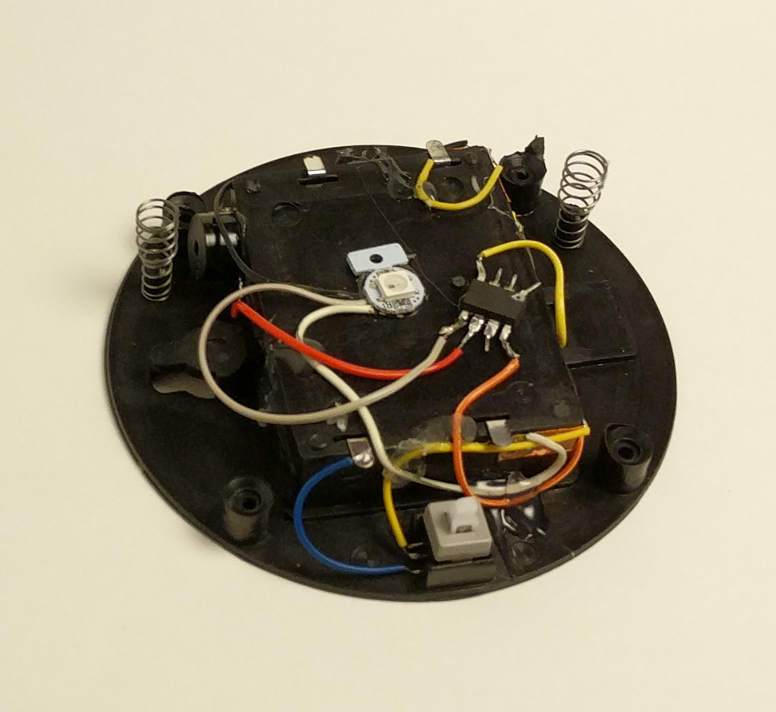
My first ATTiny hacked tap light was a mess. I soldered wires directly to the microcontroller making it a real pain to update. ((I ask you – is this the work of a sane man?)) I soon realized my mistake and soldered an 8-pin socket in its place so I could reprogram the chip easily.
This is the alternative to a custom PCB – a rat’s nest of wires soldered to a chip
Mercifully, Shawn’s tutorial series got me up and running very quickly. This post is not meant to be a tutorial for KiCAD, but more like a “lab notebook” for the workflow to create a board. If you haven’t built a board yet, go check out Shawn’s series and follow along in KiCAD. If you are a novice like me, you might find these notes helpful:
Eeschema
If you launch Eeschema separately from KiCAD, you can save different versions of a schematic. Keeping old versions of design files is hugely helpful to me and if you launch KiCAD directly, the option to save different file names and versions is not available!
The keyboard shortcuts in Eeschema are great. With just a few, it’s possible to really get around quickly.
“Shift-A” and left click to place parts
“M” to move parts
“R” to rotate parts
It is necessary to add “PWR_FLAG” to both the power and ground lines.
Double check your connections work by clicking on the bug icon.
Assign the parts you intend to use to match up with the symbols using the “Assign PCB footprints” icon.
Save your work and “Generate netlist” to have something the Pcbnew will be able to work with.
Pcbnew
First configure the Design Rules by going to Setup -> Design Rules. Shawn pulled these KiCAD Design Rules from the OSHPark.com website. KiCAD has apparently changed a little since the version used on the OSHPark website, but the settings are easy enough to identify and change.
Minimum track width: 0.006. Minimum via diameter: 0.027. Minimum via drill: 0.013Custom Track Widths: Track 1: 0.03
Read netlist” to bring your design over from Eeschema.
Placing parts and drawing lines gets a lot easier when you fine tune the Grid. I started with 5.00 mils at first, then smaller figures to place smaller parts and features.
Once the parts are arranged in Pcbnew, connect the ground and power lines using 30 mil traces and everything else using 10 mil traces.
Create the outline for the board cutout by clicking on “Edge.Cuts” and drawing with the “Add graphic lines” tool. Starting with my second board, I began cutting the corners off, so that they were a little nicer to hold and
Label things on the “F.SilkS” and “B.SilkS” layers using the “Add text”‘ button. Since my boards are so small, I wanted the text to be a fair bit smaller than the default settings. I edited the text settings by going to Setup -> Text and Drawings.
Copper text thickness: 0.007. Text height: 0.035. Text width: 0.035.
Create a copper pour with Place -> Zone, then choose “F.Cu”2 and “GND”.3 and draw a box around your board. Then repeat for the “B.Cu” and “GND.”
Again, I’m a total newbie at circuit design. If I got something wildly wrong, please let me know. :)
Sometimes I have to use regular expression or “regex” searches to parse a bunch of text, but I can’t remember how to use the search function to find a particular sequence of character and then reuse those found characters in the text I’m trying to replace it with. In Notepad++, this would be done as follows:
Search string: (7//*[0-9]*[0-9])\r\n
This will find all entries with “7/3” or “7/14” or similar digits with a line return afterwards
Replace string: \1/2018;
This will replace those entries with “7/3/2018;” and “7/14/2018;”, respectively
The trick here is that the first set of search information is collected together within a set of parenthesis, which are then referenced back by the “\1”. If you forget the parenthesis, the “\1” term won’t “know” what it’s supposed to be repeating.
If your Google Pixel is stuck displaying the “G” and forever looping through a boot screen, Google’s support will tell you there is no hope and you’ll either have to do a complete factory reset and data wipe of your phone or send it in so they can do it for you. However, if you are adventurous or have nothing to lose, there may still be hope.
I’m not saying this will work for you, or that you should even try what worked for me. But, if you’re as desperate as I was, you would try absolutely anything to get your photos back.1
While out of town on vacation, away from WiFi and cell carrier internet access, I took a lot of photos and a few short videos. My phone, a lowly Google Pixel with just 32GB2 of storage ran out of space. It claimed it was at “100%” usage of storage with only a few dozen megabytes of space left. I leaped into action, right there on the beach, deleting some large documents and ZIP files I had downloaded and then asked the Google Photos app to “Free Up Space.” Pats on the back! Job well done!
Except the Pixel had other ideas. I reached into my pocket later to pull out the phone and take a picture to discover that it was on the white boot screen with the colorful Google “G” logo and a light gray “progress” bar undulating underneath it. I thought this might be due to the phone overheat and put the phone away. When I pulled it out later, I found the phone was still showing the same white boot screen. I don’t know what caused this problem. I don’t know if it was the Android system update from a few days ago, the storage being mostly full, possibly being too warm from being in my pocket, or what.
I tried everything I could think of and everything I could find to no avail:
I was unable to boot the phone into anything resembling active status, not even the last measure of “Safe Mode.”
I could boot the phone into “Recovery Mode” which looks like the Google Android robot lying on its back with a front panel open and some text underneath. However, attempts to “Start”, “Reboot”, and use “Recovery Mode” were all unsuccessful.
If nothing else, this one possibility gave me hope that I could still interact with my phone, somewhat. I was careful to try out the specific OTA3 for my phone. As you navigate the various menus in the Recovery screens for Android, you’ll need to take note of the version of Android you’ve got – so you can place the same version over it.
As best as I understand this fix, you’re basically overwriting a possibly damaged or corrupted operating system with a shiny new factory fresh version – and that doing so leaves your data intact.
The thing that gave me the most hope was this post by Mac_DG on Reddit. Basically, they said, “If you can get there [the Google recovery screen], and it’s a software problem everything is fixable.”
I even spent 43 minutes4 chatting5 with Google’s Pixel support team member, Marlene. She was sympathetic, but assured me in no uncertain terms that my data was lost forever. My options were to send my phone to Google or take it to a repair facility for a diagnostic.
Finally, after much searching, I found this thread on Google’s product forum where someone named Jintoku described an identical problem to mine – and someone named Kara Alexander described an identical problem … and a solution suggested by Samuel Cooksey! If you think you’ve got the same problem – nearly full storage, frozen or looping “G” screen, and unable to enter Safe Mode, it is absolutely worth your time scrolling through this thread to see if this solution may work for you. It is also worthwhile reading through Jintoku’s conversation with Google’s representatives to see how hard they tried not to do a factory reset on the phone – and just how certain the Google representative was that this was the only possible solution short of outright replacement of the phone.
I will not duplicate the efforts of Techno Bill, Jintoku, Kara Alexander, Samuel Cooksey, and Mac_DG by repeating everything they’ve already said. Rather, you may use any of the above links from my search to follow along and, hopefully, set you on the correct path. If you would prefer a condensed guide, with links, I hope this will help:
If you’re on Windows, you either need to follow Techno Bill’s guide on updating your computer’s “Path” or, if you’re a little more comfortable doing so, you can skip steps 1-8 and instead open the command prompt and type
“SET PATH=%PATH%;c:\adb”
The benefit of doing it this way is that you don’t have to permanently add this path to your operating system, it’s a lot faster and easier than Techno Bill’s method, and you don’t have to restart your computer
It almost goes without saying that with words like “Developer”, “Beta”, and “Preview” in the title, this version of the Android operating system isn’t for the faint of heart. If you don’t know what you’re doing or, like me, don’t have anything to lose, you shouldn’t be trying this.
If this blog post, that I write as my phone is running the Photos application right now to back up my vacation photos, saves even one person’s data, I will be an incredibly happy person.
After all, what’s the worst damage I could do? In a worst case scenario, the phone would still be unresponsive or bricked permanently [↩]
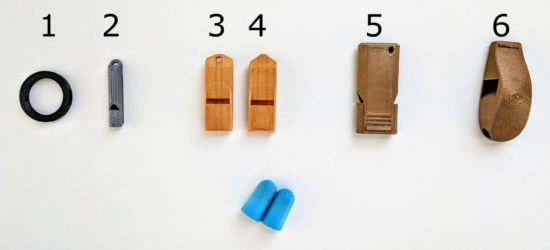
I ordered a decibel meter from Amazon the other day so I could drop some science on the claims from various 3D printed whistles on Thingiverse. There are several that claim to be the loudest. Well, today, I began my quest to put these claims to rest.
The closer the decibel meter is to a sound source, the higher it registers. To eliminate some of these variables, I placed the decibel meter on a counter in front of me and a chair 24 inches in front of that. For each of the whistles I was testing I stood just behind the chair and gave the whistle three hearty puffs. The decibel meter, which was set to record and display the “max” reading, would then tell me the loudest reading for that set of three whistle toots.
Without further ado, I declare the “Extremely loud and compact emergency whistle” by Whistleblower on Thingiverse the clear winner at 121.1 decibels. Both whistles by this designer took the top two scientifically determined spots.
Name
Thingiverse ID
Mass (grams)
Price
Print Time (minutes)
Decibels
Subjective Rank
Extremely loud and compact emergency whistle [v1]
2933021
3.9
$0.12
22
121.1
1
Extremely loud and compact emergency whistle [v2]
2933021
3.7
$0.11
18
111.5
3
v29 (Over 118 db!)
1179160
13.9
$0.42
90
110.4
4
2 chamber whistle (LOUD) [w5]
2616512
8.1
$0.24
49
109.5
2
Emergency Whistle with Solidworks 2014 source
495172
1.2
$0.04
7
101.8
5
Whistle Ring Modified [v2]
2027115
1.6
$0.05
9
90.8
6
Just how loud is 121.1 decibels? 1 Well, for starters, it’s just above the pain threshold of 120 decibels. It’s louder than:
Your iPod headphones at maximum volume
A baby crying, next to your ear
A full symphony orchestra
The subway
A sporting event
A chainsaw
A jetski
A marching band
It’s on par with:
Thunder
A shotgun
An ambulance siren
A rock concert
And, if you didn’t have earplugs, you would exceed the daily safe exposure limit for 121 decibels in 7 seconds.
There may be louder whistle on Thingiverse2 and, if so, please let me know. I’ll print the model and test against the others in my arsenal.
Whistles have been a staple on Thingiverse for years, probably because they’re such a small, simple, and impactful way to demonstrate the usefulness of a 3D printer. 1 I don’t know how many there are, but there are a LOT of whistles on Thingiverse. I’ve been curious about which whistles on Thingiverse are the loudest and conducted a semi-scientific experiment to figure this out.
Six whistles
I say “semi-scientific” because I don’t have a decibel meter.2 My methodology was to have my family at one end of the house while I went to the other side, closed the door, put in my earplugs, and wailed away on six whistles as hard as I could. In any case, here’s my findings:
Name
Thingiverse ID
Mass (grams)
Price
Print Time (minutes)
Rank
Decibels
Extremely loud and compact emergency whistle [v1]
2933021
3.9
$0.12
22
1
TBD
2 chamber whistle (LOUD) [w5]
2616512
8.1
$0.24
49
2
TBD
Extremely loud and compact emergency whistle [v2]
2933021
3.7
$0.11
18
3
TBD
v29 (Over 118 db!)
1179160
13.9
$0.42
90
4
TBD
Emergency Whistle with Solidworks 2014 source
495172
1.2
$0.04
7
5
TBD
Whistle Ring Modified [v2]
2027115
1.6
$0.05
9
6
TBD
I added a few columns that may (or may not) be of interest to you. I indicated the weight of each whistle, because sometimes I want to know how many whistles I could produce off a single spool of plastic.3 Sometimes I want to produce the loudest whistle for the time I have to produce a whistle.4 I showed the cost per model5 , because it brings me so much joy to know I can make my daughter’s classroom louder than a jet engine for less than the cost of a pack of gum.
I know there are a number of important variables are are simply not addressed in this test. Different frequencies sound louder or might be easier to hear through the door. I tried to blow each whistle the same amount, but some whistles are louder with less forceful or more forceful blows. Once that decibel meter shows up, I’ll be sure to post another update.
If you’re here checking out my site after my presentation, you can check out all the slides from my presentation above. If you’d like more information about the individual things in the slides, I posted an update for most of them over on Hackaday. If you’ve still got some questions, feel free to leave a comment below, hit me up on twitter, email me directly.
I’ve tried some of these methods, combinations of these methods, and here’s what I’ve come up with for my own life.
E-Mail
Reply quickly.
As Tony Soprano once said, “more important than the particular decision is that it happen in a timely fashion.” My number one rule of email management is simply this – reply immediately to anything that deserves a reply. Any timely response, even a non-optimal one, is better than a polished late response.
If you can’t get a quick response out because some action is required…
Act or Delegate, even to yourself. If there’s something to be done, do it already. From now on, you live in a world of “to done’s” not “to do’s.” If you can’t do it, then figure out what needs to happen first and work on that. If someone else needs to do it, ask them to take care of it and let you know when they’re done. If you need to do something else, copy yourself on the email and ask yourself to do it. Your own email will arrive in your inbox and you’ll need to…
Start a draft. If the matter really requires more information than you have at your fingertips or isn’t urgent, start a draft.
Turn drafts into emails. Every day turn drafts into emails and send them out. Since my job has become roughly 80-90% email, this is how I manage it all.
Ignore unimportant emails. Most of your emails are unimportant. Ignore them, mark read, move on.
Web Surfing
Tabs. Tabs are the enemy. They will rob you of your productivity. If you open a tab, read it, enjoy it, and close it or decide it is information you want to retain. If it is truly important and something you’ll need to refer to all the time, bookmark it. But, remember…
Bookmarks. Bookmarks are the enemy. These are kept to an absolute minimum and only for sites you really visit all the time. Otherwise, that information you wanted to keep will be lost in difficult to search bookmarks forever.
Everything else. If you find a web page, tweet, or some other information that you want to keep or reference in the future, share it or make a note.
Sharing
If you share information you help a friend and preserve the information in your sent folder, twitter stream, etc. Otherwise, make a note. The thing with notes is…
Notes
There are only two kinds of notes in the world. Information that is of temporary use and information that is of permanent use.
Temporary notes. Write these on whatever you have lying around. Discard when done.
Permanent notes. A permanent note really comes down to how you want to treat information. I like information either in an electronic searchable format or I want it written down so I can reflect on it or refer to it later. A permanent electronic note goes into Google Keep or an email to myself, in outine format, listing things in no particular order, with a few keywords in the subject line and body of the email near the link. When I need to find it again, I just search in Google Keep or for emails from me and specific keywords. A permanent written note goes in my…
Notebook
The problem with the Bullet Journal method is that it requires setup, discipline, and maintenance. If you screw those up, the notebook and all the lovely page numbers and organization systems become a burden, a hassle or, worse, useless.1
There are so many great things about keeping a notebook. It’s a quick and easy way to record interesting and useful information. While my handwriting is horrible, but I’m pretty decent at drawing and sketching. A notebook for me is something where I can brainstorm, start drafting an idea I can return to later, or where I can record information for posterity. I tend to work out ideas on scraps of paper before recording that data in a more permanent format by committing it to my notebook. Sometimes this means copying information by hand or, my personal favorite, literally cutting and pasting information into the notebook. The worst thing is probably that it isn’t particularly searchable.
Title and Date. Every entry in the notebook starts on a fresh page with the date at the top right corner and a helpful title at the top of the page. The date does more than provide you with context.
Cross Referencing. The dates at the top of the page function as your page numbers. When you need to refer to a page in the past, rather than referencing a page number, just reference the date of the prior page. When you write a cross reference down to a prior page, note the future date on the prior page.
DIY Flags. I placed several pieces of duct tape inside the front cover of the notebook. On top of that, I put several small 1/2″ x 1″ pieces of duct tape. These can be peeled off easily and folded over a page for a sturdy bookmark. More on this later.
Default Series Title
Well, this is my theory. I don’t actually know since I haven’t actually tried the Bullet Journal method… [↩]
A few weeks ago a friend of mine had a “bad movie night” where he was showing the film1 “Sharknado.” Inspired by the theme for the party, I decided I had to wear a shark hat for the event. After making my hat, my daughter requested a monkey hat. This was not a request I could refuse.
I took pictures of the process to show you how you can make your own. I haven’t ever tried to make paper mache hats before, so this was not only a lot of fun – but a great learning experience. While I own the really great paper mache monster books by Dan Reeder, I only used them for inspiration and tried out a few new things on my own.
Even though I used this process to make hats, the directions here could easily be adapted to making anything out of paper mache.
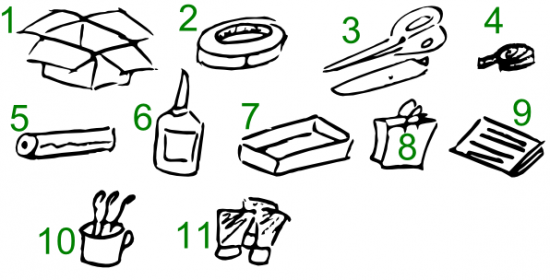
Step 1: Gather Materials and Tools
All the things you need to make your own awesome paper mache anything
Here’s what you need to get started:
Cardboard Boxes. Cardboard forms the “skeleton” of the structure. It’s cheap, ubiquitous, sturdy, and easy to cut and form.
Masking Tape. Once the cardboard has been cut, liberal use of masking tape will keep your creation together until it can be covered with paper mache.
Scissors and Utility Knife. Scissors can be very helpful in cutting cardboard or paper. While scissors can be helpful, and appropriate for kids, I find a utility knife gets the job done faster.
Measuring Tape. If you’re not making a hat (or other apparel or armor) you won’t need this. But it is helpful when making measurements. ((In a pinch, you could just use a piece of yarn or string to mark lengths, and then put the yarn on the cardboard for reference.))
Plastic Wrap. Whether you’re working with gluey paper or paint, the process is messy. I would recommend covering the work surface with plastic wrap. I happened to have a really large plastic bag, which I taped directly to the table.
Glue. I just used a big bottle of Elmer’s white glue from the hardware store, but I’m pretty sure wood glue would have worked as well, if not better. It’s also more versatile and sturdy.
Plastic Tray. The next time you get take-out or have a plastic liner from inside some packaging, save it. It makes a great wide tray for mixing water and glue or when your project is dry, it is also great for mixing paints.
Paper Grocery Bags. The “twist” with this process is that I used torn up grocery bags, rather than the traditional newspaper. It turned out this was a really good idea for a number of reasons. Paper bags are a cheap and plentiful material. When thoroughly wet strips of paper bags are easy to place, mold and shape. However, the most important features of paper bags is that they hold glue and water really well and then dry quickly into a sturdy hard shell. In fact, they form such a sturdy surface that I only had to do a single layer of paper mache around the entire hat. This means that you can quickly put down a single layer of paper bag strips all over your cardboard form, wait a few hours for it to dry, and then get to work finishing the project.
Paper or Newspaper. While grocery bags work really well to cover your cardboard form, they can leave some small gaps where they overlap. When I found gaps in the project, I simply used a few thin strips of the newsprint style paper to cover the holes and smooth out spots on the rough paper bag layer.
Cup of Water and Paintbrushes. An old mug is best and pile of cheap dollar store brushes is probably fine.
Paints. I prefer acrylic paints. They are cheap, can be diluted with water, easy to mix, they stay wet long enough for you to blend, but not so long that you have to wait days for it to dry. They also clean up well with water.
Step 2: Create Cardboard Form
Process for creating awesome hat
The process I used to create the cardboard forms for the hats was pretty quick and easy. I measured the circumference of my daughter’s head and then the distance from her ears to the top of her head. Using these measurements, I cut out a strip of cardboard as tall as the distance from her ears to the top of her head and as wide as the circumference of her head – with a little extra to allow for overlap.
This slideshow requires JavaScript.
In the pictures above you can see the strip of cardboard cut out and then taped into a cylinder with the masking tape.
This slideshow requires JavaScript.
Cut strips into the cardboard cylinder, fold them down, and add enough masking tape to mold it into a hat-shape.
Step 3: Add Embellishments
This slideshow requires JavaScript.
A paper mache hat is way more interesting with some kind of embellishment, like ears, shark fins, wings, or whatever else. Here I cut ear shapes out of cardboard, curved them slightly, taped them to hold the curve, and then taped them to the hat. When I made the shark hat, I cut a long slit into the hat through the tape and inserted the shark fin through the underside of the hat. Don’t be afraid to use a lot of tape.
Step 4: Prepare the Work Surface, Paper Strips, and Glue Mixture
This slideshow requires JavaScript.
Cover the work surface with plastic sheeting. I used a big plastic bag from a helium balloon order from my daughter’s birthday. However, a big garbage bag or plastic wrap would also work well. Paper bags from the grocery store work really well – but there are too thick in places. Tear off the handles and pull the paper bag apart at the seams. You’ll probably need to discard some of the sections where the the paper bag is too thick to use.
Add some glue (I used about a tablespoon) and warm water (about a half cup or so) to the plastic pan. It should look like milk or heavy cream once you’ve mixed it up.
This slideshow requires JavaScript.
Completely soak the strips of paper bag in the glue mixture. They should be completely soaked all the way through until they’re nearly translucent. Unlike paper mache with thin pieces of newspaper, you won’t need to put layers and layers of paper on the form – just one layer where the pieces overlap a little should work fine. The excess glue from the strips of paper will soak into the cardboard and help make the entire structure sturdy.
Step 5: Set Model to Dry, Patch Holes with Paper
This slideshow requires JavaScript.
Since the cardboard helps soak up the water, the entire structure should dry relatively quickly. I put the shark hat outside in the sun for a few hours and it was ready for painting. Once the hat is dry (or dry enough), you’ll probably notice some holes and gaps from the paper bag strips. Tear up some newsprint paper, soak those in the gluey mixture, and cover and smooth out any defects. Once these pieces dry, the project will be ready to paint!
Step 6: Paint to Suit
This slideshow requires JavaScript.
The great thing about acrylic paints is that they are so easy to work with. They dry really quickly, so you can paint one side of the model, work on the other side, and then come back to the first side to add details. In any case, just paint the project to suit and you’re done!
Each hat went together really quickly. I put the cardboard form together in about 15 minutes, covered it with the gluey paper bag strips over maybe 30 minutes, let it dry for several hours, and then paint it over the course of maybe an hour.
If you make your own paper mache hat (or other sculpture), let me know in the comments!