
If you’re here checking out my site after my presentation, you can check out all the slides from my presentation above. If you’d like more information about the individual things in the slides, I posted an update for most of them over on Hackaday. If you’ve still got some questions, feel free to leave a comment below, hit me up on twitter, email me directly.
Category: How To
Various how to’s with information about how to avoid, fix, and solve problems with your MakerBot
Hacked Tap Light Enclosure
Just seeing a post and pile of code about a project isn’t always that interesting. The nifty thing about this project is also one of the problems. They’re cosmetically identical – so you can only tell which one you’ve got by activating it. :)
I couldn’t be more pleased with the way this project came out. I basically took my daughter’s setup based off an Adafruit Circuit Playground, built a more specialized (and louder!) version into a breadboard using an Adafruit Trinket, and then ported the entire design into an ATTiny85. The only thing I would change about it would be to add a socket for the ATTiny to make it easier to modify down the line.
Default Series TitleCheapest Easiest Easy Button Hack EVER

I’ve always liked the idea of the Staples Easy Button. Not so much a button that says “That was easy,” but the idea of having an enormous button on my desktop that would do… anything at all. Official “Staples Easy Buttons” used to sell for about $20 and are now only about $7. But, this is still a lot to pay for a big button that I’d want to gut anyhow. Recently I figured out a way to build a big useful button, very inexpensively.
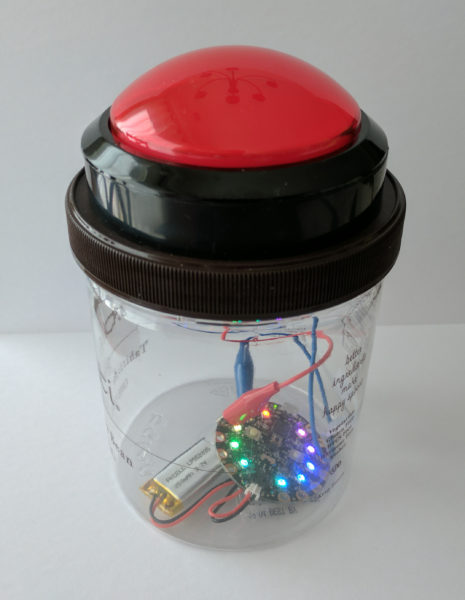
The secret sauce is … a tap light! You can buy a pack of 4 big (10cm diameter) tap lights for under $4 and they’ll ship free as a “Prime add-on.” For less than $1 each, you get a three AA battery holder, toggle on/off switch, a bright LED, all neatly organized into a big plastic button. This button also has another “feature” which is missing from many other pricier options. The dome over the light is white – which means you can put any color LED or, as I did, an Adafruit Neopixel inside and the dome will change color accordingly!
Here are some pictures of the disassembled tap light so you can see if it would work for you. I had originally bought these so that I could put a light right next to my newest 3D printer.123
There’s actually quite a bit of room inside the tap light for a small project. I was able to pack a Neopixel, a small buzzer, an ATTiny85, and a rat’s nest of wires. I expect this project to take a lot of abuse at Maker Faire, so I applied a liberal amount of hot glue inside to hold the wires down and out of the path of the springs, switch, case, and the likely path of the button dome.
Once reassembled, there really isn’t any way to tell the button was hacked. It looks identical to three other tap lights. I just love that I was able to make use of the battery holder and existing switch inside the project. The 4.5V supplied by the batteries is perfect for powering my ATTiny85 and lone Neopixel. If you’ve got a junk drawer, you could probably build something very similar for about $2-3.4 As it is, I “splurged” by using $1 worth of Neopixel because I was being lazy and didn’t want to either wire up three sets of LED’s or track down three resistors to go with an RGB LED. Even so, this is an incredibly cost-effective project enclosure.
In case it’s of interest to you, this project is the newest iteration of our 15 Second Timer-Buzzer from my daughter’s 15 Second Drawings project for Maker Faire Bay Area 2017. The prior version used an Adafruit Circuit Playground, a 100mm Red Button, and a LiPo battery and probably cost around $40 or so. 5
All of the code is on Github. Basically, the buzzer flashes amber three times with a very short tone in between flashes, then turns green for 14 seconds, amber for one more second, and then turns red and buzzes angrily to let you know time is up. I had written most of the code to work on an ATTiny45… until the code ballooned to a whopping 4560 bytes and I had to switch to an ATTiny85.6 If I had to build this over again, I’d solder in an 8-pin DIP socket for the ATTiny rather than mutilating the chip and hot gluing it directly to the inside. ;)
Default Series Title- I have a power strip next to it, but it’s fully utilized, I only need a little bit of light sometimes, and I was getting tired of holding a flashlight on it at night [↩]
- In my tradition of naming my 3D printers after characters from Futurama, my Monoprice Mini Delta is named “Roberto.” [↩]
- My prior 3D printers are Bender the MakerBot Cupcake CNC, Flexo the MakerBot Thing-O-Matic, and HedonismBot the Replicator 1 Dual [↩]
- I figure about $1 for an ATTiny85 and $1 for the button. Most people can find a way to scrounge an RGB LED or a few different LED’s, an old buzzer or piezoelectric disc, and some bits of wire [↩]
- Not counting the gelato we ate, of course [↩]
- What a waste!!! [↩]
Organizing
Everyone utilizes their own method of organization, notetaking, and motivation. Some use “Getting Things Done,” others go with “Inbox Zero,” or the “43 folders,” there’s Jerry Seinfeld’s “Don’t Break the Chain,” and a new one called the “Bullet Journal.”
I’ve tried some of these methods, combinations of these methods, and here’s what I’ve come up with for my own life.
- E-Mail
- Reply quickly.
- As Tony Soprano once said, “more important than the particular decision is that it happen in a timely fashion.” My number one rule of email management is simply this – reply immediately to anything that deserves a reply. Any timely response, even a non-optimal one, is better than a polished late response.
- If you can’t get a quick response out because some action is required…
- Act or Delegate, even to yourself. If there’s something to be done, do it already. From now on, you live in a world of “to done’s” not “to do’s.” If you can’t do it, then figure out what needs to happen first and work on that. If someone else needs to do it, ask them to take care of it and let you know when they’re done. If you need to do something else, copy yourself on the email and ask yourself to do it. Your own email will arrive in your inbox and you’ll need to…
- Start a draft. If the matter really requires more information than you have at your fingertips or isn’t urgent, start a draft.
- Turn drafts into emails. Every day turn drafts into emails and send them out. Since my job has become roughly 80-90% email, this is how I manage it all.
- Ignore unimportant emails. Most of your emails are unimportant. Ignore them, mark read, move on.
- Reply quickly.
- Web Surfing
- Tabs. Tabs are the enemy. They will rob you of your productivity. If you open a tab, read it, enjoy it, and close it or decide it is information you want to retain. If it is truly important and something you’ll need to refer to all the time, bookmark it. But, remember…
- Bookmarks. Bookmarks are the enemy. These are kept to an absolute minimum and only for sites you really visit all the time. Otherwise, that information you wanted to keep will be lost in difficult to search bookmarks forever.
- Everything else. If you find a web page, tweet, or some other information that you want to keep or reference in the future, share it or make a note.
- Sharing
- If you share information you help a friend and preserve the information in your sent folder, twitter stream, etc. Otherwise, make a note. The thing with notes is…
- Notes
- There are only two kinds of notes in the world. Information that is of temporary use and information that is of permanent use.
- Temporary notes. Write these on whatever you have lying around. Discard when done.
- Permanent notes. A permanent note really comes down to how you want to treat information. I like information either in an electronic searchable format or I want it written down so I can reflect on it or refer to it later. A permanent electronic note goes into Google Keep or an email to myself, in outine format, listing things in no particular order, with a few keywords in the subject line and body of the email near the link. When I need to find it again, I just search in Google Keep or for emails from me and specific keywords. A permanent written note goes in my…
- Notebook
- The problem with the Bullet Journal method is that it requires setup, discipline, and maintenance. If you screw those up, the notebook and all the lovely page numbers and organization systems become a burden, a hassle or, worse, useless.1
- There are so many great things about keeping a notebook. It’s a quick and easy way to record interesting and useful information. While my handwriting is horrible, but I’m pretty decent at drawing and sketching. A notebook for me is something where I can brainstorm, start drafting an idea I can return to later, or where I can record information for posterity. I tend to work out ideas on scraps of paper before recording that data in a more permanent format by committing it to my notebook. Sometimes this means copying information by hand or, my personal favorite, literally cutting and pasting information into the notebook. The worst thing is probably that it isn’t particularly searchable.
- Title and Date. Every entry in the notebook starts on a fresh page with the date at the top right corner and a helpful title at the top of the page. The date does more than provide you with context.
- Cross Referencing. The dates at the top of the page function as your page numbers. When you need to refer to a page in the past, rather than referencing a page number, just reference the date of the prior page. When you write a cross reference down to a prior page, note the future date on the prior page.
- DIY Flags. I placed several pieces of duct tape inside the front cover of the notebook. On top of that, I put several small 1/2″ x 1″ pieces of duct tape. These can be peeled off easily and folded over a page for a sturdy bookmark. More on this later.
- Well, this is my theory. I don’t actually know since I haven’t actually tried the Bullet Journal method… [↩]
How to Use a Vacuum Former
This is the second post in a short series about vacuum formers. You can start with the first post about how to make your own inexpensive and easy to use vacuum former or skip to the bottom of this post with a list of all of the posts in this series.
- Theory
- I discussed the theory behind a vacuum former in the prior post. This post is really about how to actually use a vacuum former in conjunction with a heat source.
- Parts
- “Buck”
- The things you’re going to create molds of with your vacuum former are called the “bucks.”
- Wire coat hanger
- The coat hanger will be bent out of shape and won’t be usable for hanging clothes after this. A coat hanger from your local dry cleaner would do just fine.
- The good news is that this is the only thing, besides the consumable plastic plates, that you can’t put back into its ordinary service as soon as you’re done vacuum forming.
- 4 or more binder clips
- Pretty much any size binder clips would work, as long as they can get around the thick gauge wire of the coat hanger. I only had four on hand, (which is probably the minimum necessary) but the more the better. As you heat the plastic, it will contract and deform. The more clips you have, the more circular you can keep the plastic as you lay it on top of the object.
- Oven mitt
- I used a cotton oven mitt that has a silicone rubber grip. This is probably overkill, but better safe than sorry.
- Everything you’ll be touching with the oven mitt will be cool to the touch within about a minute of taking it out of the toaster oven. I’m pretty sure a thin towel which has been folded over several times would work just fine.
- Toaster oven
- Preferably one that can do small round pizzas. If you’re out shopping for one, try and find one that will fit the 10″ diameter plastic plates. You can find a cheap toaster oven for about $30 on Amazon and about $15-20 on Craigslist. If you’re short of funds, I’m pretty sure garage sales or Goodwill would have a bargain.
- Out of an abundance of caution, I was using my toaster oven outside on the off-chance that heating the plastic was giving off some undesirable fumes. I’m also utilizing a used toaster oven donated by my brother. I’m pretty sure the process of heating a few pieces of plastic in the toaster oven don’t make it unsafe for cooking food, but again, I’m erring on the side of caution here.
- There’s nothing special about the toaster oven; it’s nothing more than a convenient and cheap heat source. If you were a more daring sort you could probably use your standard kitchen oven. I suppose in a pinch you could also use a cheap heat gun, but I haven’t tried this yet.
- Pliers (Optional)
- I got these out to help shape the coat hanger. In the end, I didn’t use it very much and it probably wasn’t necessary.
- “Buck”
- Consumables
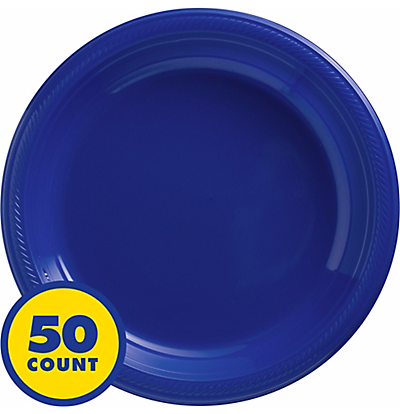
Round plastic plates, 10 – 1/4″ - Round plastic plates (~10″ diameter, without dividers?)
- These are just the bulk plastic plates we had left over from Party City. Next time I’m there, I’ll check and see just what kind of plastic they’re made of. Their website suggests they carry plastic plates with diameters from 9″ to 10.25″ to 10.5″. The plates I had were 10.25″ and they worked out really well. You can probably find a pack of 50 plates for less than $10. You might be able to do even better by hitting up a dollar store.
- Make the Plate Holder
- Using your hands or a pair of pliers, bend the coat hanger as pictured. The goal is to get it to fit around the underside of the rim of the plate.
- Clip the Plate to the Plate Holder
- Using four or more small binder clips, clip the coat hanger to the paper plate. Put two clips on either side of where the coat hanger handle meets the plate. Put the other two clips approximately 180 degrees from the first two clips. If you have more than four binder clips, they would be helpful since the plastic will pull away from the frame as it heats up. (I only had four on hand)
- Turn on the Toaster Oven
- Remove all the racks, except for the bottom drip tray, from the inside of the toaster oven.
- When it’s empty, turn it all the way up.
- Ready the Vacuum Former
- Set up your vacuum former as close to your heat source as is practicable. You want to be able to transfer the molten plastic plate to the vacuum former as quickly as possible so that it doesn’t cool down in transit.
- Prepare Buck and Turn on Vacuum Former
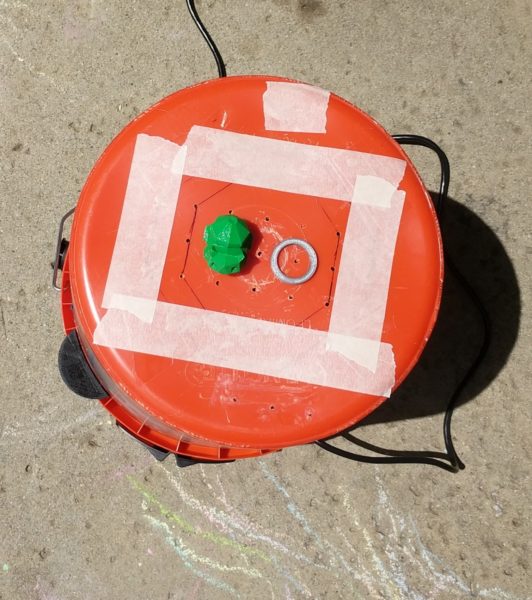
Vacuum former at the ready - Organize the bucks (the things you want to mold) on top of the vacuum former, then turn on the vacuum.
- You may notice the vacuum pushes or pulls some of the objects out of the way. Just rearrange them as necessary. I try to place things so that they’re surrounded by the holes in the top of the vacuum former.
- Basically, you want the vacuum pulling on the hot plastic plate, but not sucking air freely from around it. If the holes in the top of the vacuum former are spaced out way outside the perimeter of the plate, you’ll want to cover those holes up with some tape. Regular masking tape worked just fine for me.
- Heat and Vacuum!
- Put on your oven mitt, open the toaster oven, and hold the plate in the oven near the top heating element.
- The plates I used went through several physical changes before they were ready. First they softened a little, then they actually flattened all the way out, then then pulled away from the wire frame, then, finally, the plastic got very droopy. This whole process took less than a minute with the oven at full power.
- Once the plastic is nice and droopy, pull the frame out and place it on top of the vacuum former.
- The vacuum should pull the hot plastic around your objects. After a few seconds the plastic should no longer be flexible and warm. Once it’s cool, turn off the vacuum.
That’s it!
Bucket Vacuum FormerHow to Make a Vacuum Former
First, a huge thank you to Airship Noir and their Maker Faire Kansas City 2016 project, “Make Your Own Vacuum Formed Steampunk Goggles.” They were kind enough to post pictures and instructions about how they made an incredibly cheap, but effective, vacuum former.
Inspired by their project, I wanted to pay-it-forward and help others build their own vacuum former. Here’s how I built mine:
- Theory
- A “vacuum former” is a device which allows you to create thin plastic molds of objects by heating a sheet of rigid plastic until it is very malleable, placing it over an object, and applying a suction to pull the flexible plastic around the object.
- The plastic shell can be used for a variety of purposes such as actual tools, creating reusable molds, or just a simple form fitting shell for another project.
- This set of instructions will teach you how to create a suction device for use with a heat source of your choice.
- Parts
- Home Depot “Bucket Head” ($23)
- I had no idea this thing existed until I saw Airship Noir’s post. It’s basically a vacuum that clamps onto a bucket, turning it into a cheap low-power shop vac. I believe “Bucket Head” is the Home Depot branding for this, but that you can find alternates under the title of “Power Head.”
- 5 Gallon Bucket ($5)
- I bought a Home Depot brand bucket for this exact task. Although I have other 5 gallon buckets, it was worth the $5 to me to make sure I had something that would easily attach and detach from the vacuum top.
- 1/2″ wooden dowel, 4′ in length ($2)
- My own design uses 3D printed parts, a length of a 1/2″ wooden dowel, and a little hot glue. However, you can substitute whatever you have on hand. The Airship Noir vacuum former used wood shims, some nuts and bolts, and PVC pipe.
- Home Depot “Bucket Head” ($23)
- Tools
- Chisel
- Drill and 1/8″ drill bit
- Hot glue gun / hot glue
- Ruler
- Pen / pencil
- Hacksaw
- Sharpie
- Masking tape
- 3D Print Parts
- You can download all the 3D printable parts from Thingiverse.
- Print one vacuum cork. This will just be placed into the vacuum where the hose would normally go. This will cause the vacuum to suck air through the bottom of the bucket.
- Print two dowel caps. These will go on either end of a short length of wooden dowel, to keep the “float” inside the vacuum from falling into the vacuum.
- Print three bucket attachments and three “toes.” These will be used, with wooden dowels to elevate the bucket off the ground.
- Print the PDF of a 1″ grid on paper. This is actually a 1/2″ grid, with bold lines forming the 1″ grid. I searched for more information about optimal hole size and placement, but didn’t find anything dispositive. I think as long as you get close, you’ll be fine.
- Cut Wooden Dowels
- Use the hacksaw to cut three pieces of wooden dowel to approximately 8″ each. These will become the feet for the bucket.
- Cut a fourth piece of wooden dowel to approximately 6″. This will be used to keep the vacuum float from falling into the vacuum, when the bucket is turned upside down.
- Prepare the Bucket
- Turn the bucket upside down and, carefully, use a chisel to remove as much of the raised areas at the bottom of the bucket. Working slowly and carefully, it took me about 30 minutes to move the rim at the bottom of the bucket and all the little raised areas.
- Add Feet to the Bucket
- When the “Bucket Head” attachment is on the bucket, the top will be rounded. However, we’re going to need to turn the entire thing upside down to use the bottom of the bucket as the surface of our vacuum former. This means we’ll need to raise the vacuum top of the bucket off the ground so that it can stand flat – and so we can access the power switch.
- I designed the three bucket attachment parts so that they will slide snugly into the rim under the bucket. The rim has approximately 24 little fins under the rim. Place each of the three feet equally around the bucket – approximately 8 fins apart. Mark the outline of the part on the bucket with a Sharpie, remove the part, add hot glue, and slide the part back into place.
- Add a little hot glue to the end of each of the three 8″ wooden dowels, then some hot glue to the inside of the “toes,” then slide the gluey end of the dowel into the feet. You should end up with three short “drumsticks.”
- Don’t glue these into the attachments at the bucket sides. The attachment and bucket feet parts were designed to be as minimally obtrusive to the function of the bucket as possible. If placed properly, they shouldn’t interfere with the handle or bucket usage. The newly formed feet can be placed into the holes in the bucket attachments when you’re ready to start vacuum forming – and placed back inside the bucket for easy storage.
- Drill Holes
- Print the PDF of 1″ ruled grid paper from the Thingiverse page, courtesy of Kent State. Center the paper on the bucket, then tape it down.
- Drill 1/8″ holes 1″ apart along the grid.
- A word about these holes. The more holes you drill, the more holes you might have to cover up when making parts later. However, the more holes you drill now, the bigger the parts you can make later. It’s a little bit of a trade off.
- Once the holes are drilled, use the chisel to remove the burrs off the bottom of the bucket. You don’t need to remove the burrs from the inside of the bucket, but I did to keep the inside of the bucket as clean and useful as possible.
- Raise the Float
- Underneath the vacuum top there is a plastic cage surrounded by the filter, held in place by a big rubber band. Remove the rubber band and filter and you’ll see a little plastic cup that is designed to act as a “float” inside the cage. If you turn the vacuum upside down, the float will fall against the vacuum – and would prevent it from working.
- Holding the vacuum upright, insert the 6″ length of wooden dowel through the plastic cage and above the float, pushing it against the bottom of the cage. Use the plastic dowel caps to hold the ends of the dowel in place so it won’t slip out or rattle.
-
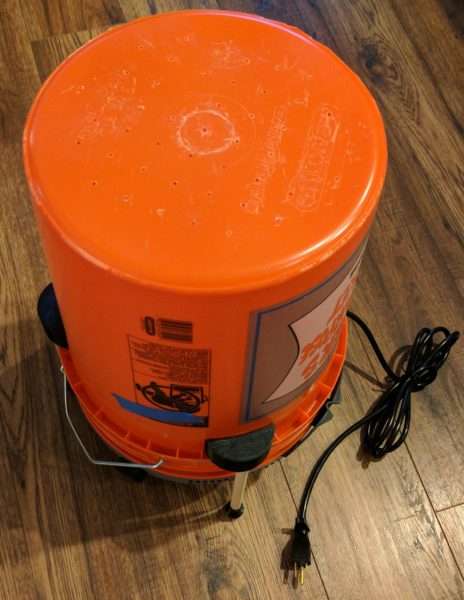
Completed bucket vacuum former! Put it All Together
- Place the Bucket Head on the bucket. You may need to rotate the Bucket Head slightly to make sure you can insert the feet into the plastic parts glued to the sides of the bucket.
- Insert the feet into the holes in the bucket attachment parts.
- Invert the bucket and you’re done!
I’ll do another post soon about how to actually use the device. If you’ve read the Airship Noir post, you know the basic steps are to place things on the bottom of the bucket, heat a plastic plate with a toaster oven, and lower the heated plate over the things you want to mold while the vacuum is one.
Bucket Vacuum FormerHow to Make Awesome Cardboard Paper Mache Anything

A few weeks ago a friend of mine had a “bad movie night” where he was showing the film1 “Sharknado.” Inspired by the theme for the party, I decided I had to wear a shark hat for the event. After making my hat, my daughter requested a monkey hat. This was not a request I could refuse.
I took pictures of the process to show you how you can make your own. I haven’t ever tried to make paper mache hats before, so this was not only a lot of fun – but a great learning experience. While I own the really great paper mache monster books by Dan Reeder, I only used them for inspiration and tried out a few new things on my own.
Even though I used this process to make hats, the directions here could easily be adapted to making anything out of paper mache.
Step 1: Gather Materials and Tools
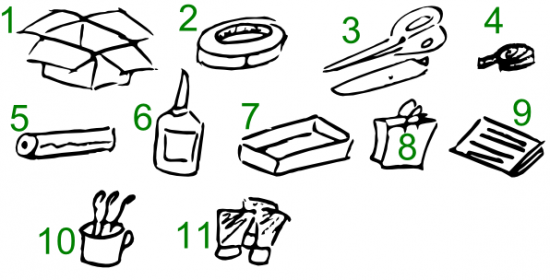
Here’s what you need to get started:
- Cardboard Boxes. Cardboard forms the “skeleton” of the structure. It’s cheap, ubiquitous, sturdy, and easy to cut and form.
- Masking Tape. Once the cardboard has been cut, liberal use of masking tape will keep your creation together until it can be covered with paper mache.
- Scissors and Utility Knife. Scissors can be very helpful in cutting cardboard or paper. While scissors can be helpful, and appropriate for kids, I find a utility knife gets the job done faster.
- Measuring Tape. If you’re not making a hat (or other apparel or armor) you won’t need this. But it is helpful when making measurements. ((In a pinch, you could just use a piece of yarn or string to mark lengths, and then put the yarn on the cardboard for reference.))
- Plastic Wrap. Whether you’re working with gluey paper or paint, the process is messy. I would recommend covering the work surface with plastic wrap. I happened to have a really large plastic bag, which I taped directly to the table.
- Glue. I just used a big bottle of Elmer’s white glue from the hardware store, but I’m pretty sure wood glue would have worked as well, if not better. It’s also more versatile and sturdy.
- Plastic Tray. The next time you get take-out or have a plastic liner from inside some packaging, save it. It makes a great wide tray for mixing water and glue or when your project is dry, it is also great for mixing paints.
- Paper Grocery Bags. The “twist” with this process is that I used torn up grocery bags, rather than the traditional newspaper. It turned out this was a really good idea for a number of reasons. Paper bags are a cheap and plentiful material. When thoroughly wet strips of paper bags are easy to place, mold and shape. However, the most important features of paper bags is that they hold glue and water really well and then dry quickly into a sturdy hard shell. In fact, they form such a sturdy surface that I only had to do a single layer of paper mache around the entire hat. This means that you can quickly put down a single layer of paper bag strips all over your cardboard form, wait a few hours for it to dry, and then get to work finishing the project.
- Paper or Newspaper. While grocery bags work really well to cover your cardboard form, they can leave some small gaps where they overlap. When I found gaps in the project, I simply used a few thin strips of the newsprint style paper to cover the holes and smooth out spots on the rough paper bag layer.
- Cup of Water and Paintbrushes. An old mug is best and pile of cheap dollar store brushes is probably fine.
- Paints. I prefer acrylic paints. They are cheap, can be diluted with water, easy to mix, they stay wet long enough for you to blend, but not so long that you have to wait days for it to dry. They also clean up well with water.
Step 2: Create Cardboard Form
The process I used to create the cardboard forms for the hats was pretty quick and easy. I measured the circumference of my daughter’s head and then the distance from her ears to the top of her head. Using these measurements, I cut out a strip of cardboard as tall as the distance from her ears to the top of her head and as wide as the circumference of her head – with a little extra to allow for overlap.
In the pictures above you can see the strip of cardboard cut out and then taped into a cylinder with the masking tape.
Cut strips into the cardboard cylinder, fold them down, and add enough masking tape to mold it into a hat-shape.
Step 3: Add Embellishments
A paper mache hat is way more interesting with some kind of embellishment, like ears, shark fins, wings, or whatever else. Here I cut ear shapes out of cardboard, curved them slightly, taped them to hold the curve, and then taped them to the hat. When I made the shark hat, I cut a long slit into the hat through the tape and inserted the shark fin through the underside of the hat. Don’t be afraid to use a lot of tape.
Step 4: Prepare the Work Surface, Paper Strips, and Glue Mixture
Cover the work surface with plastic sheeting. I used a big plastic bag from a helium balloon order from my daughter’s birthday. However, a big garbage bag or plastic wrap would also work well. Paper bags from the grocery store work really well – but there are too thick in places. Tear off the handles and pull the paper bag apart at the seams. You’ll probably need to discard some of the sections where the the paper bag is too thick to use.
Add some glue (I used about a tablespoon) and warm water (about a half cup or so) to the plastic pan. It should look like milk or heavy cream once you’ve mixed it up.
Completely soak the strips of paper bag in the glue mixture. They should be completely soaked all the way through until they’re nearly translucent. Unlike paper mache with thin pieces of newspaper, you won’t need to put layers and layers of paper on the form – just one layer where the pieces overlap a little should work fine. The excess glue from the strips of paper will soak into the cardboard and help make the entire structure sturdy.
Step 5: Set Model to Dry, Patch Holes with Paper
Since the cardboard helps soak up the water, the entire structure should dry relatively quickly. I put the shark hat outside in the sun for a few hours and it was ready for painting. Once the hat is dry (or dry enough), you’ll probably notice some holes and gaps from the paper bag strips. Tear up some newsprint paper, soak those in the gluey mixture, and cover and smooth out any defects. Once these pieces dry, the project will be ready to paint!
Step 6: Paint to Suit
The great thing about acrylic paints is that they are so easy to work with. They dry really quickly, so you can paint one side of the model, work on the other side, and then come back to the first side to add details. In any case, just paint the project to suit and you’re done!
Each hat went together really quickly. I put the cardboard form together in about 15 minutes, covered it with the gluey paper bag strips over maybe 30 minutes, let it dry for several hours, and then paint it over the course of maybe an hour.
If you make your own paper mache hat (or other sculpture), let me know in the comments!
- And I use the word “film” loosely here [↩]
Upcycling Plastic Bags into Fabric

Last year was our family’s second time at the East Bay Mini Maker Faire. October in Oakland tends to be a really rainy time – and the last few EBMMF’s are no exception. The rain didn’t seem to dampen the crowds or diminish attendance, but it did make the experience a little more trying. ((Don’t get me wrong – I love Maker Faire, even little ones. But, the EBMMF has been a tough one to love. There are small with tight quarters inside classrooms or open spaces outside – in the rain, there were long lines for the very few food options, and most of the vendors ran out of food really early on))
So, the point behind this post – I learned something really awesome I’ve been looking forward to putting to use. Some ladies, unfortunately I don’t recall who, were teaching people how to fuse plastic bags into a fabric. The basic process was shockingly easy – layered sheets cut from plastic shopping bags are ironed together between protective layers of paper. This one site has a good detailed description of the process with lots of tips and suggestions.
I’d love to make a bag, backpack, project enclosures, package linings, maybe a kite, and/or parachute using this stuff.
ProfileMaker Version 2.0 is coming!
A few cosmetic details to work out yet… but I’m almost ready to launch the second version of my ProfileMaker. I released the first version late last night.
I’d like to think that I’ve increased the number of options while still keeping a slim and intuitive user interface. I would really appreciate any comments, criticisms, or questions you may have.
OpenSCAD tutorial outline
They’ll continue, but I think the next one will come out on Friday. So far I’ve covered the interface of OpenSCAD, 2D forms, and 3D forms.
My goal is to show people how to use OpenSCAD in a way that is intuitive and builds quickly on what was taught earlier, with a secondary goal of getting the reader to be able to make something useful as quickly as possible. Here’s the rough outline/idea of where I’m going:
- OpenSCAD interface
- 2D forms
- 3D forms
- Union/difference/intersection
- Rotate/mirror/translate/scale
- Variables/module
- Linear and rotational extrusion
- Using other programs to make using OpenSCAD easier (Sketchup, Inkscape, Notepad++)
- Include/libraries
- Conditional and Iterator Functions
I know I’m leaving a lot out of that outline. What would you like to see?