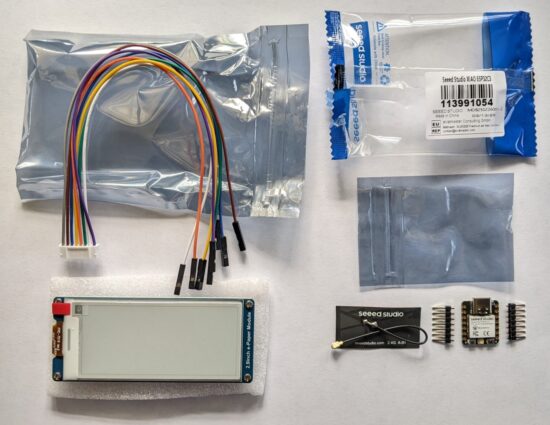
The chief benefit of the XIAO ESP32C3 appears to be it’s very low cost. $5 for a microcontroller which can run Arduino or CircuitPython and has WiFi and Bluetooth sounds like a smoking deal. As I’m fumbling my way through this project, I’m finding some little hiccups learning experiences along the way.
- The XIAO ESP32C3 doesn’t support USB file transfer, which is going to make putting CircuitPython on the board more interesting.
- One of the most convenient aspects of CircuitPython is being able to update the MCU over USB. In an ideal world, I would have worked out the kinks on this project and then transferred the program to a cheaper Board.
- I went with this particular board since that’s what the author of the Hacksterio article used. For $2.50 more I could have gotten a XIAO ESP32S3 which would support native USB rather than the ESP32C3. I’ll just make sure to order some S3’s next time! :)
- Using the guide linked above, you need to enable “Experimental Web Platform features” in Chrome.
- My “XIAO ESP32C3” showed up in the Adafruit web based ESPTool. I noted the MAC address, erased the MCU (~15 seconds), and uploaded the new firmware BIN file from CircuitPython.org (~12 seconds).
- After futzing with Mu for a while, I ended up following an Adafruit guide and installing the portable version of Thonny on my PC which allowed me to update the board’s settings.toml file as described in the Adafruit guide.
- I wasn’t having a lot of success figuring out the MCU’s local IP address, so I used the Adafruit code for having print the IP address to the terminal. For some reason I found the MCU’s MAC address appearing on my router’s wireless client page.
- Uploading files from my PC to the MCU using Thonny wasn’t quite intuitive. There’s a file navigator on the left side of the screen. On the top you can use to find files on the local PC and on the bottom navigate to the target MCU folder. Once you’ve got these, you can right click on the local files and upload them to the target folder. Later, I discovered I could select multiple files and upload them all at once, which made adding libraries way faster.
- After installing CircuitPython on the XIAO, I keep bumping into the error “ValueError: D8 in use”. It took WAY longer to figure out this problem than I was anticipating. After much hand wringing and rending of clothes, it turns out that if you don’t call “displayio.release_displays()” when initializing the board, it will claim this or that particular pin is in use and won’t let you do anything interesting.
- Even after solving that problem, it turned out that I was trying to use the wrong driver for the board. I started with “il0373” which wouldn’t display anything, then “uc8151d” which also displayed nothing, and finally “ssd1680” which did work.
Here’s the pin connections I’m using, going from the label on the e-paper display, to what the acronym means, to the color of the wire on the cable, to the XIAO pin, to what that pin means:
| E-Paper |
Meaning |
Color |
XIAO |
Meaning |
| BUSY |
Busy |
purple |
D4 |
D4 / SDA / GPIO6 |
| RST |
Reset |
white |
D3 |
D4 / A3 / GPIO5 |
| DC |
Data Command |
green |
D2 |
D2 / A2 / GPIO4 |
| CS |
Chip select |
orange |
D1 |
D1 / A1 / GPIO3 |
| CLK |
SPI SCK pin |
yellow |
D8 |
D8 / SCK / GPIO8 |
| DIN |
SPI MOSI pin |
blue |
D10 |
D10 / MOSI / GPI10 |
| GND |
Ground |
brown |
GND |
Ground |
| VCC |
3.3 volts |
gray |
3V3 |
3.3 volts |
Here’s the code I could get working:
import displayio
displayio.release_displays()
import time
import board
import wifi
import socketpool
from adafruit_display_text import label
import adafruit_requests
from fourwire import FourWire
import board
import busio
import digitalio
from adafruit_ssd1680 import SSD1680
#import terminalio
#import ipaddress
#These last two commented out as I try to figure out what's still necessary to get this project to run

spi = busio.SPI(clock=board.D8, MOSI=board.D10)

display_bus = FourWire(
    spi,
    command=board.D2,
    chip_select=board.D1,
    reset=board.D3
)

display = SSD1680(
    display_bus,
    width=296,
    height=128,
    rotation=270,
    busy_pin=board.D4
)

# 🔧 Set custom hostname BEFORE connecting to Wi-Fi
wifi.radio.hostname = "Sticky"  # change this to whatever name you want

print("Connecting to Wi-Fi...")

if wifi.radio.ipv4_address:
    print("Connected to Wi-Fi!")
    print("My hostname:", wifi.radio.hostname)
    print("Connecting to SSID...")
    print("My IP address is", wifi.radio.ipv4_address)
    ipad = wifi.radio.ipv4_address
else:
    print("Failed to connect to Wi-Fi.")

# Fetch the IP address
if wifi.radio.ipv4_address:
    ip_text = str(wifi.radio.ipv4_address)
    ip_text = "19.2.168.0.1"
    etext = f"Hello! It's me! \nA TOTALLY \nresponsible \nadult!"
else:
    etext = "Hello eInk!\nWi-Fi not connected."

from adafruit_bitmap_font import bitmap_font

# Load a larger font (adjust path as needed)
font = bitmap_font.load_font("/lib/Junction-regular-24.bdf")

splash = displayio.Group()
text = label.Label(
    font,
    text=etext,
    color=0x000000,
    x=10,
    y=15,
    line_spacing=0.7
)
bg_bitmap = displayio.Bitmap(296, 128, 1)
bg_palette = displayio.Palette(1)
bg_palette[0] = 0xFFFFFF  # White background
bg_sprite = displayio.TileGrid(bg_bitmap, pixel_shader=bg_palette)
splash.append(bg_sprite)
splash.append(text)
print(etext)

try:
    display.root_group = splash
    display.refresh()
    print("Waiting for refresh to complete...")
    time.sleep(5)
    print("Display refresh called.")
except Exception as e:
    print("Error during display refresh:", e)
Here’s the progress so far:
This slideshow requires JavaScript.
Having gotten this to work, I’m pretty excited about the possibilities. I would love to have a Doctor Who psychic paper display , an addition to my kid’s Pip-Boy, or a physical desktop widget that displays interesting / useful information.
With this setup I can manually hardcode a new message and update the e-paper display. Not super useful in and of itself. However, with some elbow grease and a few late nights, I’m hopeful I can add the ability to connect to a Bluetooth device and update the screen, set off a buzzer, or set off a small vibration motor. Right now there are 5 pins left unused: D0, D5, D6, D7, D9. I figure I’ll need one to wake the device from a deep sleep, one for an RGB / NeoPixel LED to provide a little instant visual feedback, one for a buzzer, one for a vibration motor, and then maybe one more for another button.
Sticky Note Timer- Ah, just what I need! A new project!
- Sticky Note Timer, parts arrived!
- Seeed Studio XIAO ESP32C3 and a small sticky note display
- Brainstorming More E-Ink Stuff
- Smol Fonts for E-Ink Displays
- Tap Light Focus Timer System


