Printable Sonic Screwdriver progress

STL sheet for printable sonic screwdriver

STL sheet for printable sonic screwdriver

Sketch of Screwdriver

Sketch of Screwdriver

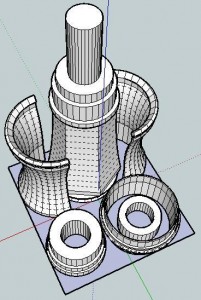
Off to the left is a picture of what the finished sonic screwdriver should look like.  Here’s a picture of the parts I’ve designed so far.  Assembled properly, these parts should be able to be assembled into the lower half of the sonic screwdriver.

I’ve arranged the parts so that they have a less than 60mm x 60mm footprint on the build platform.  I would really like it if the final product could be printed all on one build plate and assembled without tools or additional non-printed pieces.

After my recent design-print fail, I’m going back to the drawing board (slightly)1 wiser.  If nothing else, I like to think what I have so far is pretty neat. 2

  1. Make that very slightly. []
  2. Even if it doesn’t work at all. []

Design-print fail

I’ve been slowly working on the design of a printable (and fully MakerBottable) sonic screwdriver.  This model of the sonic screwdriver is built up of a number of concentric cylinders, has several significant overhangs well in excess of 45 degrees, and is larger than the MakerBot’s built capacity.  In order to deal with these design problems, I modeled it in sections.

In order to make the overall result something I could just pop/snap/slide together I designed it making some sections which were split vertically and other sections which slide around those sections to keep them together.  In order to make the parts quickly printable I designed all the parts at around 0.5mm thickness.

About 40% of the way through the print one of the vertical sections wasn’t coming out properly – probably because it was too thin.  The parts were too thin and flexible and ended up tearing between layers and just being too flimsy.

I also noticed something odd – the extrusion was too thin on that side of the model.   I can’t be sure why this is happening – but I suspect it’s due to the extruder not getting a good enough grip.  Perhaps I need to floss the extruder pulley or install a new extruder idler wheel.  However, it doesn’t explain why the extrusion was too thin on just that one side and no other spots.

Suggestions?

Electrical design help?

I recently bought the Perhaps with a joule thief?)1  Since I know very VERY little about electronics, I’d appreciate some diagrams, descriptions of parts, etc.

My end goal is to install this device into a MakerBot made replica of the 11th Doctor’s Sonic Screwdriver.

If you’re interested in this project or just want to help, I’ll gladly accept any assistance.  Let me know if I can help with any printing projects in return.

Thanks!

  1. Why do I get the feeling I’ve seen the guy on the right before??? []

3x2x1 Rubik’s Cube Production File

My prior copy of this 3x2x1 Rubik’s Cube was printed a few parts at a time – I’d print one part, test it, print up another, etc.  Last night I was able to use my production file to generate all seven pieces in one go.  It took 1 hour and 45 minutes to complete the print job, but well under three minutes to clear most of the pieces of the raft off the parts and assemble the puzzle.  In order to help people modify and improve upon my design, I’ve upload the original Sketchup files, the STL I used, as well as my own GCode.

Owenscenic on Thingiverse asked,

I am interested in trying your gcode, how did you generate it? How well does it minimize strings between the printed parts? I’ll look at is to see how it starts and the temp…

In case you’re wondering too, the answers are as follows:

  1. I generated the Gcode using my slightly tweaked RepG v18 built-in Skeinforge settings for ABS with a raft, with a build temperature of 220C.
  2. The Gcode does pretty well with minimizing stringing.  However, some of the credit has to go with the part placement in the STL production file as well as the nature of the object.  As soon as you assemble it and start to rotate the parts, most of the remaining strings and little blobbies will pop right off.

Owenscenic, please let me know how your print of this turned out!  Please post a picture!
What’s the cost of printing with a MakerBot?

I’ve wondered for a while about the cost of operating a MakerBot.  Let’s break it down and see what happens:

  • Plastic. According to some calculations on the MakerBot Operators group, the cost of MakerBot ABS is around $0.03 – $0.04 per cubic centimeter based upon a price of $70 for 5 pounds (or 2268 grams) of ABS, a density of 1.2 grams per cubic centimeter. 1  Using the current prices of $81.36 for a 5 pound coil after shipping, I calculate the price of ABS at $0.035 per cubic centimeter.  Since we’re talking about such large numbers, let’s just round on up to $0.04/cc.
  • Time. Skeinforge has been estimating about 85 minutes to print 19 cc of plastic.  This comes to about 4.5 minutes/cc.
  • Electricity. At at $0.20/kWh, a MakerBot probably draws around $0.03 per hour.

Thus,we may estimate the cost of operating a MakerBot in terms of consumption of goods and resources (excluding computer, human, and MakerBot time and wear and tear) as follows, where V is the volume of the extruded object in cubic centimeters or “cc”:

Supposing I wanted to recoup the entire cost of my MakerBot to date and spread it across the entire life of a single 5 pound roll of ABS. 2  Let’s round the cost of the MakerBot, all repairs, and all extra MakerBot related materials up to $1,500.00.  One 5 pound coil would have 1890 cc’s of plastic.  This would come to $0.794 per cc of plastic.  So, I would suggest the cost of buying a MakerBot and printing off an entire coil of plastic would probably end up costing you about $0.85 per cubic centimeter of plastic.

Resource cost of printing a 19cc totally MakerBottable 3x2x1 Rubik’s Cube is $0.80.

Actual pro rated cost of printing a 19cc totally MakerBottable 3x2x1 Rubik’s Cube is $16.15.

Absolute cheapest MakerBot usage I’ve seen anywhere at Metrix:Create for members printing from Thingiverse is $0.30/minute, which would print the totally MakerBottable 3x2x1 Rubik’s Cube for $25.65.

  1. No one has yet quoted me a price on a pint of tears. []
  2. Printing an entire coil would take about 142 hours. []