Is there anyone out there who built their own Polargraph, but does not have a plastic case for it?1
In designing my own I’ve got two perfectly serviceable cases that I’m not going to use.
Each case fits Sandy Noble’s PolargraphSD which consists of an Arduino Mega 256 clone plus an LCD touch screen and his custom shield for running the drawing robot. I’m also going to be taking my current Arduino Uno plus Adafruit Motor Shield powered drawing robot apart. When I do I will have another plastic case.
If interested, please drop me a line.
Oh, what’s with the skull and brains? Well, if you have a robotic brain, wouldn’t a nifty plastic skull go nicely with it?
According to the USPS my Polargraph has landed at my local post office where I keep a post office box. ((Photo courtesy of Grant MacDonald)) Hopefully I can pick it up after work today!
I mention this only because a new tiny CNC on Thingiverse reminded me of the Piccolo, which lead me back to the video for their Antler lasercut chair and to the song all over again, and it is a song I happen to like a lot.
I’ve been kicking around some design ideas for how my new DrawBot will look. I’d like it to be aesthetically pleasing and reasonably compact so that when not in use it will be reasonably unobtrusive. For the most part none of these designs would require the DrawBot to operate in a mechanically different way. However, most of them would probably look best with a fishing line spool rather than beaded cord and sprocket system.
Design and create a nifty DrawBot mounting system
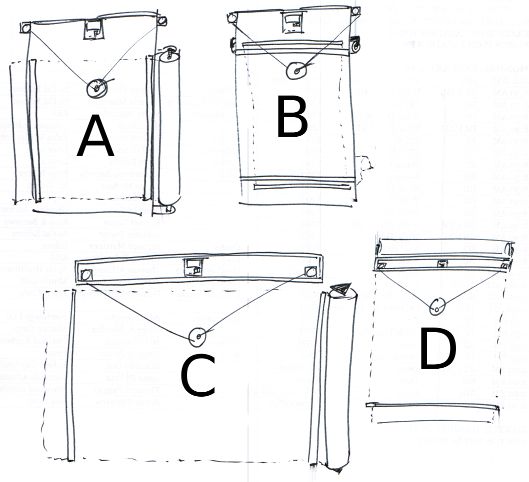
Above you can see some of my ideas for mounting a DrawBot to a wall. It is probably most ideal for a DrawBot to operate at a slight slope – so that a little bit of gravity is keeping the drawing gondola pressed against the drawing surface. That said, here’s my thought behind some of those designs.
Designs, Generally. Several of the designs above contemplate the drawing robot brain being housed inside a long thin box. I had tried housing my current DrawBot inside a box, but it just didn’t work very well. Since wiring would be easier if the motors are mounted near the robot brain and running the power cord to the robot would be easier if the brain were situated to one side, it might be most pleasing to use a wooden box that has a lid which can be flipped down over the front, rather than leaving the robot brain and motors exposed. One other interesting item is that while I’ve typically mounted the motors so that the motor shaft is pointed towards the wall with the spool on the outside, there’s no reason to design a clever mount which would orient the motor shaft perpendicular to the printing surface with the spool on the inside. This could result in keeping the fishing line a lot closer to the wall than would otherwise be possible.
Design A. This design features the motors, DrawBot brain, and roll of paper mounted directly to a piece of plywood essentially as my current set up exists. I figure I could pick up some cheap hardware store rulers and nail them to the board on the left and right side to keep the paper pressed against the DrawBot surface. While this is probably the easiest design to implement, it lacks the symmetry of the other designs.
Design B. This design features a similar motor and brain mount to Design A, except that the paper roll is mounted behind the board. This design also features a wide horizontal slot cut into the board near the top through which the paper roll could be fed. This would require the plywood board to be set off from the wall, which is not really that big a deal. One additional problem is that the best roll of paper I could find is actually a fair bit wider than the board itself. Of course, I could have someone chop down the roll of paper, but this seems like it would be a huge hassle.
Design C. This is wall-mounted system similar to something I first tried when I set up my DrawBot. I mounted the brain and the motors inside a long thin pine box I had lying around. I had tried a number of variations on this without much success.
Fishing line. I tried running the fishing line through holes in the bottom of the pine box, but the fishing line kept getting caught on the wood. I tried routing the fishing line through screw-in eyelets, but the fishing line would get caught on that too. In both instances the fishing line just wouldn’t run smoothly back and forth. If I tried this again, I would need to basically cut out the entire bottom of the box so that the fishing line would run off the motor and directly down onto the drawing surface. I think that unless I use bearings and pulleys, there’s no good way to route fishing line in a way that won’t be bothersome.
Robot Mounting. What I particularly like about this set up is that all the important bits are completely enclosed inside a box that could be mounted nearly anywhere. If the paper roll was not mounted to the wall and just a sheet of paper was used instead, the entire robot would become very portable.
Motor Mounting. Assuming the fishing line routing issue was just solved with bearings and pulleys, both motors could be set right very near to the robot brain in the center with a pulley on either end of the box. I’m not sure if it is is better to have all the weight in the center or somewhat distributed across the length of the box. That said, it would be a lot easier to deal with wiring if the parts were all close together.
Drawing Surface. This is the big problem with this design. Since the drawing surface is the wall and most walls have some sort of texture, it would cause a degree of randomness and unevenness to creep into the drawing itself. In some cases this might be desirable, interesting, or part of the effect – but I think I just prefer a drawing to be smooth unless I specifically cause it to be otherwise.
Paper Mounting. Assuming the robot was really installed on a wall, which does contradict somewhat with the desire to this design make the robot portable/modular, a paper roll could be mounted directly onto the wall, held in place by two hardware store rulers on either side. I suppose I could always put a big sheet of flat plastic behind the paper.
Design D. This wall-mounted system is very similar to Design C, except that the paper roll is mounted to the box housing the robot and the paper runs behind the box.
Aesthetics. I really like this design overall because it would be very compact, more “portable/modular” than Design C while still providing all of the functionality of Design C. Interestingly, it might actually be a lot better to mount the robot brain far to one side or the other. By doing so the AC adapter cord would not have to travel nearly as far to get to the brain.
Mounting Considerations. One big difference is that while Design C could be mounted with all of the mounting hardware hidden by the box itself, Design D might require all of the mounting hardware to be very far to either side of the box or outside the box entirely. This design would also only require one hardware store ruler to be placed on the wall, below the robot, since the top part of the paper would be kept flush against the wall by the robot box itself. This, of course, assumes that the robot would be mounted to the wall – but not so close that it would keep the paper from unrolling behind the box.
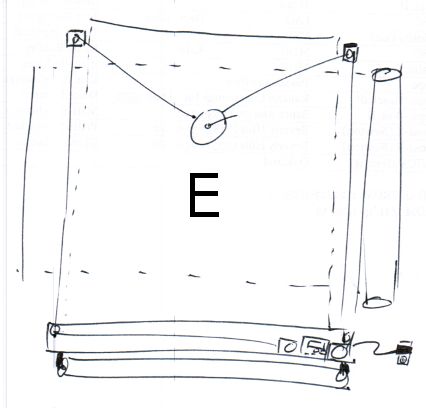
One more DrawBot design
Design E. As I was typing this up another idea occurred to me.
One of the problems I had with a box-mounted system was that getting power or a USB cable into the box was difficult. For any interesting sized drawing the box would have to be mounted several feet off the ground. The benefit of this design is that the paper roll could be mounted below the wooden box1 and the wooden box could be mounted near the floor – with easy access to an electrical outlet. The downside is that the brain is basically on the floor where it can get kicked and that you’re going to have route the fishing line up over the drawing and around pulleys on either side.
One thing about this particular design is that I’ve drawn the DrawBot brain and both motors off to one side of the box as suggested in the “Designs, Generally” section above.
Having gone through the trouble of sketching and articulating the various benefits to each system, I think my favorite so far is Design D, with a lid over the front of the box, and the brain and motors mounted off to one side to make routing power to the project a lot easier.
Default Series Title
Or, like some of the designs above, it could be mounted to the wall off to the side. [↩]
The 3D printed plastic case I have for my current DrawBot doesn’t fit very well2 and doesn’t look awesome as it is literally duct taped to the plywood. An awesome new brain upgrade deserves a sweet new plastic case. I might customize Sandy’s design by adding some dual-extruded black/white hotness to it.
Putty, sand, prime, and paint my big chunk of plywood so it is presentable
Though, really, since I would just paint the wood white anyhow, I’ll most likely just prime the wood twice and call it a day.
Reconsider beaded cord versus fishing line
I’ve been using fishing line for my DrawBot, but many others including Sandy use beaded cord.
Fishing line. Fishing line is great when you enjoy the process of drawing as much as the drawing itself. From more than a foot or two away the pen holder looks like it is just floating in space. It is also cheap and pretty easy to manage with just a spool attached to the stepper motor. The biggest downside is that since it is wound around a spool a full turn of the spool when it is full of fishing line will let out more line than when there is little fishing line left on the spool. Every time fishing line is pulled in, it adds very slightly to the diameter of the spool and will skew the drawing. There are a few ways to compensate for this. You could enter the diameter of just the spool, spool full of fishing line, or spool half-full of fishing line. Each different usage will basically skew the drawing slightly differently. Another, more complex, alternative is to try to compensate for the extra diameter caused by the fishing line by fiddling with the code itself to consider a different spool diameter depending upon how much fishing line has been reeled in or out. Since this is way beyond my current Arduino programming capabilities, I’m just leaving it here as food for thought.
Beaded cord. Beaded cord is also fairly cheap, and certainly way cheaper than using a toothed belt. Since a beaded cord with matching sprocket does not accumulate on the sprocket, you have to figure out some way to manage the beaded cord – even if it just to let it hang off the side of the robot. With a kid and a cat, long loose lengths of cord might be problematic. Now that my daughter is older, this is less of a consideration. Lastly, the beaded cord will allow you to consistently draw images without having to worry about the spool-fishing line-variable diameter problem.
As I’ve been thinking about exhibit a drawing robot at the upcoming Bay Area Maker Faire in May
Design, print, and attach a mount for a large roll of paper
Ideally, when I’m done with a print job I can pull the paper across the print surface, tear off the finished drawing, and have a fresh new piece of paper ready to go without having to spend a lot of time re-aligning and re-mounting paper.
While it would be super cool to have the roll of paper motorized, I have no delusions that I’m going to do this.
Design, print, and use a new gondola, complete with servo powered pen-lift
Although I have the servo ready to connect to my existing DrawBot, I never did this. My favorite looking drawing robot drawing techniques were all TSP single line art or single-line-shading, so there was never a need for a pen lift or servo. I basically never invested the time to improve my gondola to do much more than create reliable drawings. As it is the gondola is weighed down by a piece of wire poked through a ziplock baggie with half a dozen old batteries inside. I like this solution because it is essentially re-using old batteries as small modular weights of consistent mass. But, there are so many better ways to use old batteries as weights without it being ugly. Plus, with a servo enabled gondola, I’ll be able to explore the world of vector drawings. I should probably just create a Polargraph style gondola and call it a day, since Sandy has logged more hours with a drawing robot than anyone else I’ve heard of.
Route wires in a pleasing manner
As you might have figured out by now, my current DrawBot set up is hacky and ugly. I’d like to have my DrawBot set up so that it looks nice and not a tangle of wires leaning against the wall.
Sandy is responsible for having put together the best instructions for building a Polargraph/drawbot anywhere on the web. Sandy’s latest kit uses an Arduino Mega clone, a shield specifically designed by Sandy to provide all the Polargraph functions, two StepStick motor drivers, an SD card slot, socket for an XBee wireless module, connections for endstop and servo support, and – best of all – an LCD touch screen interface.
While my own DrawBot was built entirely from off-the-shelf parts, I’d like to make it really polished. At the moment my DrawBot does not look like much. It is two motors bolted to a chunk of plywood with some circuit boards in a plastic holder which is duct taped to the chunk of plywood. It works and is as reliable as the PC operating it, but it is far from pretty. Stay tuned for some new design ideas!
My RSS feed for Slashdot brought my attention to an article on Slate. The Slashdot summary stated:
This Slate article talks about a single line of code — 10 PRINT CHR$ (205.5 + RND (1)); : GOTO 10 — and how it manages to create a complicated maze without the use of a loop, variables and without very complicated syntax.
Even though that “one line” of code really is two lines and it really does use a loop, that short string of code is still very interesting. While the way the code generates a maze isn’t immediately intuitive, it becomes obvious once you watch a bit of the video above. All that code does is randomly kick out a forward slash or backward slash. Once they wrap around to the next line, they start to form what looks like a maze.
As a little exercise I created something similar using PHP. To make that work I had to use a fair bit of CSS to make it look decent. In any case, it occurred to me that this would be a wonderful project for a Polargraph! Draw a random forward slash or backslash, get to the end of the line and make a bunch more on the return line. How awesome would a huge paper roll of nothing but a giant maze look?
I think I may have found a project cool enough to show off at Maker Faire. :)
Last night and tonight I have been tinkering with Flexo, my Thing-O-Matic, to install Jetty’s Sailfish firmware update. The setup text is very helpful, but not particularly optimized for a Thing-O-Matic with a MK6 extruder. I also found that I had to heavily modify the “start.gcode” and “end.gcode” to keep my bot from shaking itself to pieces. 1
However, the results of combining Sailfish with ReplicatorG’s Print-O-Matic are impressive. Dutchmogul’s Keep, pictured above, was printed with a layer height of 0.15mm, 10% infill, all with a stock 0.5mm nozzle. That’s the very best resolution I’ve managed with my Thing-O-Matic, ever. At 0.15mm thick layers, I have a difficult time seeing the layers if the model is more than 6 inches from my face and the ridges on the vertical parts is difficult to discern with a fingertip.
Now that I’ve finished that print I think I can push my ‘bot’s print resolution farther. I’m willing to bet I can print down to 0.10mm layer height if I re-applied the Kapton tape and did a better job of leveling the print bed. Also, one of the acknowledged challenges with 3mm filament based extruders is the pressure buildup that can lead to imprecise plastic deposits when dealing with non-contiguous parts. 2 Dialing in the Skeinforge “Retraction” or the Sailfish “Deprime” settings dialed in would really help with complex prints.
The default “start.gcode” tried to home to the XY maximums and Z minimum – where there are no endstops. The default “end.gcode” did the same thing for some reason. I also had to modify the “start.gcode” so that the print head was better positioned for starting a print. [↩]
By this, I mean that when you’re printing two or more features that are not connected, say for example a table that is legs-side-up, an extruder will naturally ooze a little bit of plastic as it travels between legs, leaving a thin spider web like strand. The “retraction” setting in Skeinforge is used to combat this, and does so fairly effectively in the case of a stepper based extruder. That setting reverses the extruder motor quickly just after the print head leaves a leg and then quickly moves extra fast forward as it gets to the next leg, which prevents the spider web effect. [↩]
Doctor Who Christmas Special 2010: A Christmas Carol
Netflix has nearly all of the “new series” Doctor Who episodes available for online streaming. As a guy who grew up watching the show, having it on tap is just plain awesome. Unfortunately, Netflix does not carry one my favorite episodes ever – the Doctor Who Christmas Special from 2010 entitled, “A Christmas Carol.” You can’t get the DVD from Netflix and you can’t watch it online.
This morning I quickly checked my small-side-business SaaS site before heading off to work, only to find the thing that people actually pay to use was not working. Dropping everything, I quickly started hunting through code. I haven’t changed a single word of core logic on the site in about six months, so there’s no reason this problem should be occurring.
Except that whenever WordPress asks me if I want to update, I immediately do so. Sometimes really minor changes to WordPress functionality create huge tangles of CSS and HTML, as it did in this case. Once I tracked down the problem I quickly hacked together a solution and uploaded it back to the site. 2 Thankfully it’s now working as well as it did before I found this problem.
Because my site has been working so well for so long3 I’ve been loathe to build a better design for the logic. In the very long run, it will save me time, but in near future/short run of a few months all it will do is suck up time without demonstrating a tangible benefit. I suppose being less prone to breakage is a tangible benefit, but I spend less than 2 hours a year dealing with minor problems like this. The prospect of spending two months rewriting and then rechecking code to save 2 hours a year doesn’t seem like a worthwhile investment.
Frankly, what I need to do is come up with some other tangible benefits that when added with the existing fixes I need to perform will have a more tangible4 benefit, and then jump into building them all. Default Series Title
I don’t know where the original picture comes from, but I got it from this website. [↩]
And, really, it’s a nearly unforgivable hack. Rather than figuring out how to fix the problem in the plugin, I commented out the newly-bad code and hacked that same code directly into the website’s theme. I know, I know… nearly unforgivable. At least I didn’t try to hack the core. [↩]
The core logic of the site has been essentially unchanged since about 2008. [↩]