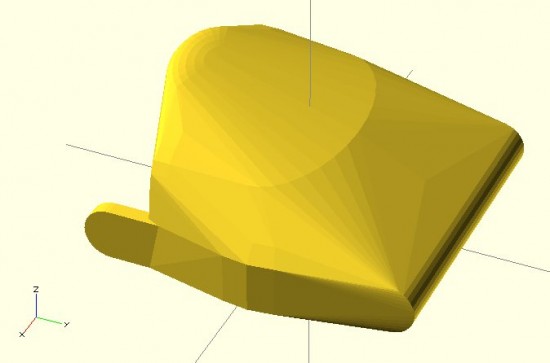
OpenSCAD Intermediates: How to Make Complex Organic Shapes

Cyborg Beast OpenSCAD prototype

Cyborg Beast OpenSCAD prototype

OpenSCAD tutorials for the MakerBot blog.  In that OpenSCAD tutorial series I covered the basics of the OpenSCAD interface, how to make 2D forms, how to make some basic 3D forms, how to position those forms in 3D space, the different ways to combine forms, how to create mashups of one or more existing STL’s and OpenSCAD forms, how to use modules to reuse your code to make your life easier, how to extrude flat 2D forms into 3D forms, and how to fix design problems.  One of the last tutorials was on how to make organic looking shapes using OpenSCAD.1  However, I have a few design tricks left to share.  A little over 18 months ago I left off the series suggesting as new topics.2 There’s one particular “trick” I am using a lot as I work on designing a printable parametric prosthetic. This trick is somewhat easier to explain using pictures.  Suppose you wanted to make a shape that looked something like a “jack,” but you wanted it to have curved surfaces at the center.  Let’s see what happens when we try to use the “hull()” command.  Do do this, we’ll make a sphere at the center and put eight more spheres around it.  The code for this example is basically irrelevant, but I’ll provide it anyhow.

sphere(r=10);
rotate([0,0,0]) translate([100,100,100*pow(2,0.5)/1.5]) sphere(r=10);
rotate([0,0,90]) translate([100,100,100*pow(2,0.5)/1.5]) sphere(r=10);
rotate([0,0,180]) translate([100,100,100*pow(2,0.5)/1.5]) sphere(r=10);
rotate([0,0,270]) translate([100,100,100*pow(2,0.5)/1.5]) sphere(r=10);
rotate([0,180,0]) translate([100,100,100*pow(2,0.5)/1.5]) sphere(r=10);
rotate([0,180,90]) translate([100,100,100*pow(2,0.5)/1.5]) sphere(r=10);
rotate([0,180,180]) translate([100,100,100*pow(2,0.5)/1.5]) sphere(r=10);
rotate([0,180,270]) translate([100,100,100*pow(2,0.5)/1.5]) sphere(r=10);

There’s a much easier way to create the 8 “orbiting” spheres, but that’s another post unto itself.  :)  Here’s what the above code will create:
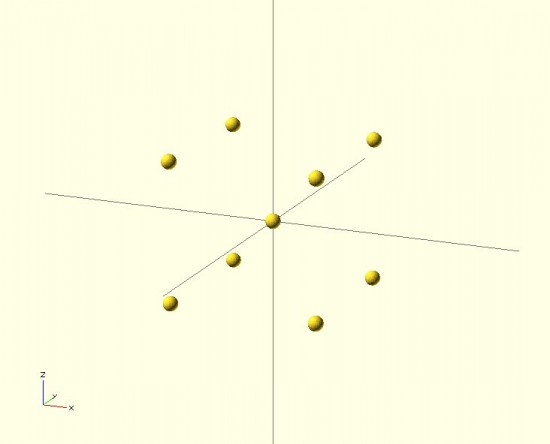
Nine little spheres (I named one of them Pluto!)

Nine little spheres (I named one of them Pluto!)

Now, let’s use the “hull()” command to wrap around these spheres.

hull()
{
sphere(r=10);
rotate([0,0,0]) translate([100,100,100*pow(2,0.5)/1.5]) sphere(r=10);
rotate([0,0,90]) translate([100,100,100*pow(2,0.5)/1.5]) sphere(r=10);
rotate([0,0,180]) translate([100,100,100*pow(2,0.5)/1.5]) sphere(r=10);
rotate([0,0,270]) translate([100,100,100*pow(2,0.5)/1.5]) sphere(r=10);
rotate([0,180,0]) translate([100,100,100*pow(2,0.5)/1.5]) sphere(r=10);
rotate([0,180,90]) translate([100,100,100*pow(2,0.5)/1.5]) sphere(r=10);
rotate([0,180,180]) translate([100,100,100*pow(2,0.5)/1.5]) sphere(r=10);
rotate([0,180,270]) translate([100,100,100*pow(2,0.5)/1.5]) sphere(r=10);
)

That code will make this:
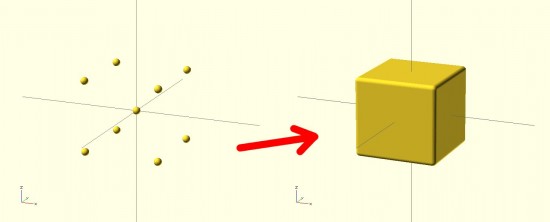
Nine spheres to... a box?

Nine spheres to… a box?

The result looks nothing like a jack! It looks more like a box with rounded edges. The limitation with the “hull()” command3 is that it connects all the outside points from the various shapes.  The result is more like what the objects would look like if you covered them in plastic wrap – but not what they would look like if you tried to use shrink wrap.4 However, our goal is to get a jack.  How should we go about this?  The same way we eat an elephant.56 We need to use “hull()” multiple times7 to connect the central sphere to the eight surrounding spheres.

hull() { sphere(r=10);
rotate([0,0,0]) translate([100,100,100*pow(2,0.5)/1.5]) sphere(r=10); }
hull() { sphere(r=10);
rotate([0,0,90]) translate([100,100,100*pow(2,0.5)/1.5]) sphere(r=10); }
hull() { sphere(r=10);
rotate([0,0,180]) translate([100,100,100*pow(2,0.5)/1.5]) sphere(r=10); }
hull() { sphere(r=10);
rotate([0,0,270]) translate([100,100,100*pow(2,0.5)/1.5]) sphere(r=10); }
hull() { sphere(r=10);
rotate([0,180,0]) translate([100,100,100*pow(2,0.5)/1.5]) sphere(r=10); }
hull() { sphere(r=10);
rotate([0,180,90]) translate([100,100,100*pow(2,0.5)/1.5]) sphere(r=10); }
hull() { sphere(r=10);
rotate([0,180,180]) translate([100,100,100*pow(2,0.5)/1.5]) sphere(r=10); }
hull() { sphere(r=10);
rotate([0,180,270]) translate([100,100,100*pow(2,0.5)/1.5]) sphere(r=10); }

The result would look like:
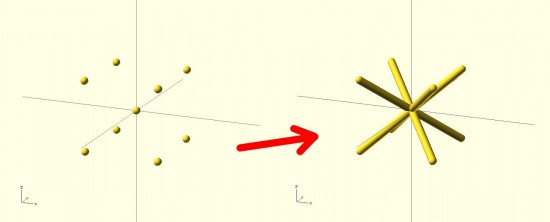
Much better!

Much better!

By breaking the overall design into pieces, you can use the “hull()” command to connect pieces of the design to one another in a seemingly organic fashion.  Here’s a set of pictures of my most recent work that uses these design tricks.

This slideshow requires JavaScript.

  1. Full list here:

    1. OpenSCAD Basics: The Setup
    2. OpenSCAD Basics: 2D Forms
    3. OpenSCAD Basics: 3D Forms
    4. OpenSCAD Basics: Manipulating Forms
    5. OpenSCAD Intermediates: Combining Forms
    6. OpenSCAD Intermediates: Mashups
    7. OpenSCAD Intermediates: Modularity
    8. OpenSCAD Intermediates: Extruding 2D Objects
    9. OpenSCAD Intermediates: Fixing Design Problems
    10. OpenSCAD Intermediates: How to Make Organic Shapes
    11. OpenSCAD Design Tips
    12. OpenSCAD Design Tips: How to Make a Customizable Thing

    []

  2. These are, in no particular order:

    • How to sketch an object with OpenSCAD
    • How to easily make regular solids – other than cubes and cylinders, like hexagons, pentagons, octagons, etc
    • How to easily make symmetrical solids
    • How to easily make irregular, but symmetrical solids

    []

  3. I almost typed “problem,” but in this case it probably is just a feature []
  4. That’s the best analogy I can come up with []
  5. One bite at a time. []
  6. It’s such a damn shame when a cool domain name is taken – and there’s nothing there.  Such as eatanelephant.com []
  7. 8 times []

On Designing in the Open

Designing in the Open

Designing in the Open

I like designing in the open.  This is not really the same thing as “open source” design, although I love that too.  An open source design means that you’re sharing your source files, ideally with lots of comments to explain what you’re doing and why.  I think of “designing in the open” as talking about1 all the experiments, design ideals, design choices, mistakes, dead ends, and breakthroughs that come along with working on an open source design.

These are really parallel and complimentary tracks.  If you’re designing in the open, anybody can come along, read through your notes, ideas that you’ve considered but not really explored, and build their own project based off your thoughts.  Open source projects allow anyone to come along, build your exact project, and make changes as they see fit.  The two together however, allow the next person to use your source and stand on your shoulders, to learn from all your mistakes, and truly grok the design.

Two of my projects “designed in the open” that I’ve done the most work on was a large wall hanging drawing robot2 and a tiny drawing robot.  At the time of this writing, I’ve got about 83 posts on the large drawing robot (including literally thousands of words about just about every aspect of the design of each plastic part) and 23 posts on the small drawing robot, exploring all the design ideas that didn’t pan out, different approaches other people used, and what did and didn’t work for me, and why.

When it came to building my own big drawing robot, Sandy Noble’s website and forums were absolutely invaluable.  Using these resources and with patient guidance and help from Sandy himself, I was able to build my own robot, making variations informed by the experiences of others.

Designing in the open is more than about just documentation.  Documentation tends to be more about explaining why something is the way it is and now not to go wrong.  It doesn’t tell people about all the mistakes and tragedies that went into the creation of the thing in first place.

So, why am I droning on about blogging about mistakes and dead ends?  I’m embarking on a new project where there has been some truly incredible work so far.  As I look at the designs, it is difficult for me to see what aspects of the designs are absolutely critical, which parts are vestigial remnants of earlier designs, and what parts are merely cosmetic.  When it came to working on my own big drawing robot, I tackled a similar problem3 by creating exhaustive lists of pretty much every variation I could find, examining the differences and similarities, and pondering/brainstorming about why different decisions were made.

Part of the problem with this new project is that so much of the content is in Google Plus or on Thingiverse, both of which are incredibly difficult to sift through for information.  Thingiverse is great for sharing design files, works in progress, and sharing instructions.  However, the comment system handled by Disqus is very finicky and doesn’t allow linking to specific comments.  Google Plus is a fair system for facilitating group discussions and comments, but it requires an invite, doesn’t allow “reshares,” and is pretty much impossible to link to for reference.

All that being said, while a blog is an excellent way for a very small number of people to share their work, it’s kind of terrible for larger collaborative discussions.  Although I haven’t tried collaborative work through a wiki, that might be a reasonable way forward.  While I don’t know the answer to the community conundrum, I know it is not Facebook or Google Plus.  Overall, the best system I’ve seen so far may be Sandy’s blog + forums.

In any case, to the extent you have an open source project you’re working on, please consider how your choice in community platform can facilitate designing in the open so that viewing and searching don’t require invitations/registrations, comments don’t require registrations or log ins, and easy linking to prior discussions and comments.

  1. Probably blogging about – but forums work well too []
  2. Based on Sandy Noble’s excellent Polargraph []
  3. Namely, lots of excellent designs, lots of documentation – but little information about why certain decisions were made []

Progress on Parametric Printable Prosthetic

This slideshow requires JavaScript.

So, I’ve been hacking away at an OpenSCAD sketch of the Cyborg Beast 3D printable DIY prosthetic.  At the moment I’m working on designing the left palm.1 I’m reasonably happy with the version so far.  I’ve also managed to separate out the cutouts for the hardware from the design of the hand itself.  The benefit to doing so is that it should later be possible to scale the hand up or down, but keep the hareware cutouts the same size.

It’s easy to print a hand, fingers, and thumb scaled to 110%, but finding Chicago screws that is 110% may be more difficult.  There’s still a LOT of work to do here, but I think this is a good start.  Below are the same three views of the two versions (OpenSCAD parametric and original Cyborg Beast).

This slideshow requires JavaScript.

As I’m going through and replicating the design aspects of the Cyborg Beast, more design issues crop up:

  1. The grooves where the fingers fit into the palm are either tapered or flared in a non-uniform manner.  To get a better idea of this by reviewing the two pictures below.
  2. The holes for the elastic cord to cause the fingers to return to the open position do not appear to be of uniform diameter, uniform distance apart, or equally centered in the knuckle blocks.

This slideshow requires JavaScript.

I can’t tell if these are critical design features2 or just design elements that don’t provide additional function or utility.  If you happen to know, your input would be greatly appreciated.

Default Series Title
  1. And, really, once the left palm is done it’s an easy to mirror this part to make a “right palm.” []
  2. I’m guessing not []

Measurements Required for DIY 3D Printed Hand Prosthetics

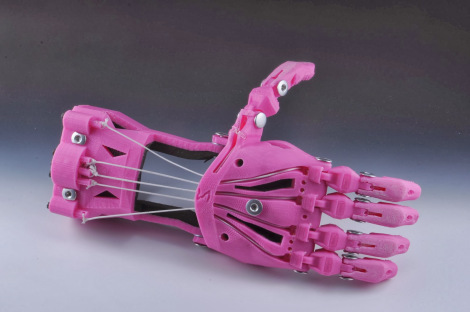
Cyborg Hand v7.0

Cyborg Hand v7.0

I’ve recently embarked upon a quest to create a parametric version of the e-NABLE prosthetic designs.  I’ve chosen the “Cyborg Beast” as it came highly recommended and I had the good fortune to meet one the main designers.

I have a habit of diving headfirst12 into a project I know absolutely nothing about and learning just enough to be dangerous as I go.3 Even if the results aren’t what would be called “successful” under normal circumstances, they do tend to be entertaining.

I generally get started by asking a ridiculous amount of questions.4 I have some guesses, but no concrete answers to the below.  If you know, I’d greatly appreciate any comments or replies.  Here’s a bunch to get us started:

  1. What are the minimum required measurements to create a suitable prosthetic, such as the Cyborg Beast?
    1. Knowing the minimum required measurements would allow a designer to better create a parametric design.
    2. The Cyborg Beast instructions refer the builder back to the measurement instructions for the Snap Together Robohand by Michael Curry aka Skimbal. These instructions indicate that all you need is the measurement of the width of the hand, where the hand is held flat with the fingers together, at the widest point on the knuckles.  Based upon the ratio between the subject’s knuckles and the stock Robohand knuckle block, all of the parts for the model are then scaled up or down.
    3. The ease of reference, the entire set of instructions for the Snap Together Robohand are as follows:
      1. Measure the length of the individual’s knuckles across the back of the hand

      2. from the index to pinky finger. (Example: 85mm)
      3. Add 5mm to your measurement to account for the thickness of the gauntlet.

        (Example: if the individual’s hand measures 85mm knuckle-to-knuckle, add 

        5mm for a total length of 90 mm).

      4. The knuckle block in the files you downloaded is 65mm. Divide your result by 

        65. (Example: 90/65 = 1.38).

      5. Multiply the answer times 100 to get a percentage. 

        (Example: 1.38 x100 = 138%).

      6. Scale all the parts of Robohand by this percentage before printing. This can b

        e done using the ‘Scale’ tool in Makerware.

    4. Are there any other measurements, besides the width of the hand at the knuckles, required to create a suitable custom prosthetic?
  2. How do these measurements inform a customized prosthetic design?
    1. Scaling all parts equally makes sense for a “snap together” design where all the parts, including the fasteners, are sized together.  When one is using stock parts (such as screws, elastic cord, and nylon cord)), this approach can end up requiring the builder to do a lot of post-printing work widening holes or trying to find wider screws.
    2. Other than scaling all parts equally, based upon knuckle measurements, is there any other modifications to the printable design required in order to create a useful prosthetic?
  3. How accurate do these measurements need to be in order to create a suitable prosthetic?
    1. Do the measurements need to be down to the micron?  Is within about 1mm or so good enough?
  4. For each required measurement, is it better to round it up or down?
    1. If the only required measurement is the width of the knuckles at the widest point, I suspect that it is probably better to round this figure up, rather than down.  I believe it would be much easier to add a little extra padding or tighten the velcro strapping a bit more.
  5. What are the important structural features of the Cyborg Beast?  As in, what parts, dimensions, and part relationships are absolutely critical to its proper function and fit?
    1. I’m very very weak in this area.  I just don’t know which parts are “load bearing” and are so critical to the function of the device that I should make special efforts to replicate them in my design.  Any suggestions here are greatly appreciated.
    2. I suspect that the critical functional features include part thickness (especially where separate parts meet – for strength and durability), the height and length of the “outcropping” on the back of the wrist which appears to provide the mechanical advantage which causes the fingers to constrict, and the tightening block on the gauntlet.
  6. What are the important design features of the Cyborg Beast?  As in, what parts, dimensions, and part relationships are critical to the suitability of this model over others?
    1. Again, I’m incredibly weak in this area.  I suspect that the overall organic shape to the model is one of its most stand-out features.  However, I would invite more informed comments and observations.
  7. What parts of the Cyborg Beast are the most improved?
  8. What parts of the Cyborg Beast are most in need of improvement?
Default Series Title
  1. Almost willy-nilly, if you will. []
  2. You will, won’t you? []
  3. I imagine this is what it is like to learn to fly. []
  4. If you don’t believe me, feel free to peruse this site where you fill find literally thousands of words on the smallest design variations on the smallest parts for a drawing robot []

Possibly Parametric Prosthetics

Cyborg Beast v7.0

Cyborg Beast v7.0

This last Friday I journeyed to the Autodesk offices at Pier 9 in San Francisco to attend a meeting for e-NABLE, a group devoted to developing, making, and distributing DIY prosthetics.  I have to admit that my own personal interests weren’t necessarily aligned with that of the entire group.  I’m sure those there would forgive my trespasses, but I am far more interested in making the prosthetics and in making it easier for others to make similar prosthetics than I am in the actual mechanics of building an organization that does these same things.

I came away from the meeting having met some amazing people doing amazing things, and with considerably more knowledge than that with which I arrived.1 Just as with the RepRap project, the daunting part of getting started in this field is wondering where the heck to get started.  There are so many different models being developed and so much information, that I just was not sure how to go about actually making such a prosthetic.

As frequent readers of this blog2 know, I like to treat this site as something of an online open notebook where I share my notes, thoughts, and ideas.  Thus, here are the most helpful things I learned as a result of this meeting:

  1. Where to Get Started
    1. Jonathan Schull, an associate professor at the Rochester Institute of Technology, was patient and kind enough to provide me with some pointers on where to get started with producing 3D printed prosthetics.  Jon suggested the Talon Hand for strength, the Cyborg Beast for general use, and the ODY Hand for young children.  The Cyborg Beast instructions refer one to the measurement instructions for the Snap Together Robohand by Michael Curry aka Skimbal.  The process, as far as I understand it, involves measuring the subject’s hand and scaling all of the parts up or down accordingly.
  2. Taking Measurements.
    1. Professor Jorge Zuniga, of Creighton University in Nebraska, is currently using a system for taking measurements that involves taking three photographs of a person’s upper extremities in different positions.  The photographs are taken with a ruler in the image, so that the measurements may be extrapolated.  In talking with Professor Zuniga, I learned that while this is a good way to get a lot of information very quickly (take three quick photographs), it can be labor intensive and time consuming to actually extrapolate the various measurements.
    2. It occurred to me that this sort of problem has actually been solved reasonably well.  Marty McGuire 3 and Amy Hurst created a system for using pictures of hands with standardized objects to extrapolate hand measurements for the creation of custom 3D printed objects.  In the case of their NickelForScale project, they used a photography setup and OpenCV to create custom rings.  While OpenCV isn’t exactly the easiest thing to dive into, one it was figured out could reap huge time savings in gathering the measurements necessary to create custom prosthetics.
  3. Customizing Printable Prosthetics
    1. The multi-step process of taking pictures of a subject’s hands, extrapolating the necessary measurements, calculating the scaling factor, scaling the files up or down, then printing seems fairly involved to me.  While none of these individual steps are actually that complex, it is entirely possible to automate much of this and lower the barrier to getting people involved.
    2. One interesting problem that is created by scaling parts is that certain parts of a design probably shouldn’t be scaled – such as the channels for routing cables or holes for the Chicago screws.4 This inadvertent scaling problem can be completely solved by use of a parametric modelling program, such as (my personal favorite) OpenSCAD.  The “trick” is to scale the model and distribute the various channels for routing cables and screw holes to the appropriate positions to match the new scale – without scaling the diameter of these voids.
    3. One of the really great things about the Cyborg Beast prosthetic model is its extremely realistic and organic appearance.  While OpenSCAD is definitely well suited to creating functional models, it is not as obvious how to create organic seeming solids.  Fortunately, MakerBot’s handsomest and most modest blogger5 posted a very comprehensive tutorial on creating organic solids with OpenSCAD.
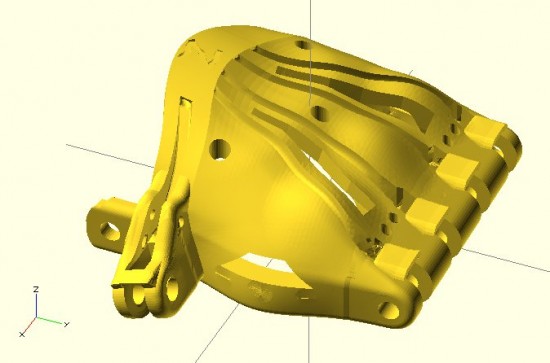
    4. Last night I got started on creating a parametric Cyborg Beast model.  While I’m not going for a completely faithful translation of the Cyborg Beast into a parametric model, I’m shooting for a reasonable facsimile of the most important structural and cosmetic features of the Cyborg Beast.  Below is a screenshot of this work in progress.  There’s no thumb joint in this model yet, but it’s coming along.
Cyborg Beast OpenSCAD prototype

Cyborg Beast OpenSCAD prototype

Obviously, there’s more work to do embellishing this model, including adding the thumb joint, hollowing out the underside, adding the knuckle stops for the fingers, and the voids for routing the cables and screws.  However, it’s not that bad for a little bit of quick OpenSCAD hackery.  After that’s done, the various other parts would need to be replicated in OpenSCAD as well.

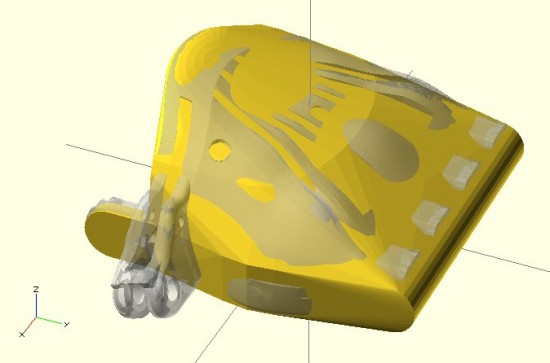
Cyborg Beast OpenSCAD prototype with original Cyborg Beast overlaid

Cyborg Beast OpenSCAD prototype with original Cyborg Beast overlaid

Default Series Title
  1. That is to say, a lot more than zero! []
  2. Both of you! []
  3. Don’t let the abandoned website fool you – he’s a busy guy moving fast making awesome things []
  4. Head’s up – Chicago screws have a slightly more common and slightly less SFW name []
  5. AHEM *cough* []

Fix a Fitbit Ultra Flashing Display

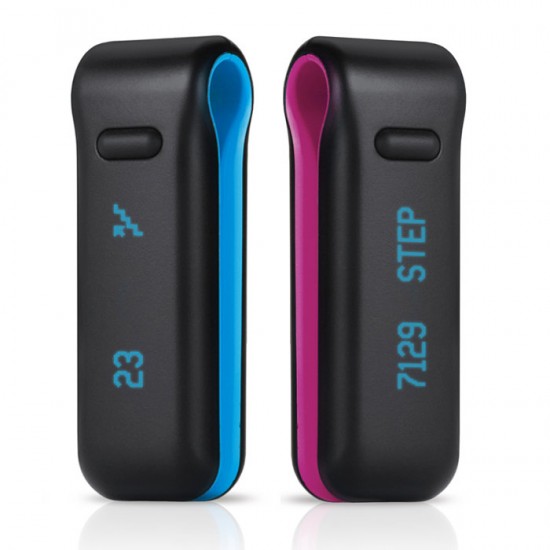
Fitbit Ultra

Fitbit Ultra

If you’re looking for a way to fix the flickering or flashing LCD display on your Fitbit Ultra, I’ve got a few tips to help you on your way.  This post is basically broken into three parts – how to revive a Fitbit Ultra, my experiences with Fitbit’s support, and an update about me.

1. How to Fix the Fitbit Ultra LCD Display Flashing “FITBIT 4.14”

I bought my Fitbit Ultra about 15 months ago and misplaced it about six months ago, only finding it again on Wednesday.  The device was entirely unresponsive, so I plugged it into the USB charging base overnight.  The next morning it would flicker and flash the LCD display saying only “FITBIT 4.14”.  Here’s what I did:

  • Found Fitbit Ultra, plugged into USB base overnight.  The result was the LCD display flickered and flashed only “FITBIT 4.14”.
  • Unplugged Fitbit, pressed the button, and discovered the only thing it would do is flicker “FITBIT 4.14”.
  • I plugged it back into the USB base, pressed the button, and it still flickered the same message.
  • With the Fitbit connected to the USB base, I turned the base upside down and inserted the end of a paperclip into the recessed reset button. The Fitbit still flickered the same message.
  • I let the Fitbit remain connected to the USB base for another entire day.  At the end of that day I discovered that I could cycle through the display options – but the time on the Fitbit was entirely wrong.
  • I re-downloaded the Fitbit Ultra software, re-installed it, re-logged into the software, and let it sync with the Fitbit.  After a few minutes of this, the Fitbit was back to life!

2. Experiences with Fitbit Support

In trying to revive my Fitbit, the first thing I tried was searching the Fitbit website and support forums, without success.  After that I reached out to Fitbit’s support team explaining I tried the basics.1 The response from Fitbit’s support was that their records reflected my Fitbit was out of warranty and that they were making a “a one-time offer, for one (1) Fitbit One Tracker” for $49.  I found this response incredibly disappointing.  I would have appreciated something, even a token effort at helping me to fix my Fitbit instead of an upsale.  I realize they’ve got a business to run, but offering “one-time offers” for upsales it not a suitable substitute for actual product support.  While I would assume a warranty would cover a product’s functions, I wouldn’t have expected that they would abandon support after the warranty period.

3. Personal Update

A little over a year ago I bought a Fitbit Ultra to help me track steps, activity, etc towards my ambition to lose weight and be more active.  While I tried to introduce more activity and made a point of checking out the steps I had logged, using an online food diary called FitDay.com was easily the most helpful thing for me.

Last year was very successful, overall.  From 222.5 pounds in January 2013 I dropped to a low of 193.0 in June.  Since that time I’ve slowly gained a some weight – back to 203.5 now.  The most important things I did to lose weight were to eat something for breakfast, walk a little more, and eat less.  I tried to cut out or cut back on potatoes, bread, pasta, and rice and increase eggs, cheese, yogurt, protein, nuts, fruits, vegetables, and drink more water.

In the months since June, I haven’t been walking as much, have been eating more delicious pizza, sandwiches, and burritos.  I want to feel a little remorseful about this, but I just can’t.  :)

  1. Restart, reinstall, reboot, lather, rinse, repeat, etc, etc, etc []

How NOT to Serve Chicken

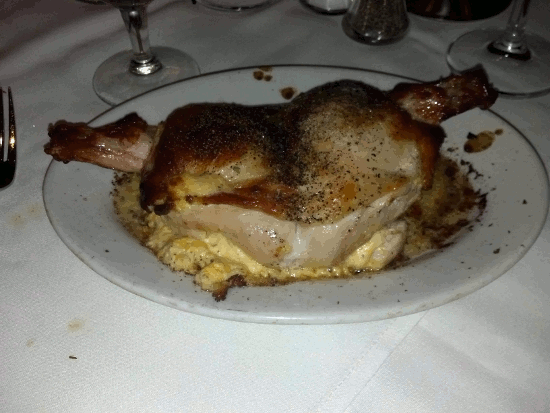
This is not how chicken should be served - shaped to look like a human child

This is not how chicken should be served – shaped to look like a human child

This last year the office Christmas party was held at Ruth’s Chris where I was served an unappetizing and inedible dish.1

Setting aside the profound service issues and the presentation, the dish was just not edible.  Now, I like cheese – I even like a lot of cheese.  But, there was so much cheese inside and underneath this piece of chicken that I was just not able to scrape enough of it off to be able to eat it without coating my entire mouth and tongue.  I only managed to eat a few bites before having to give up entirely.

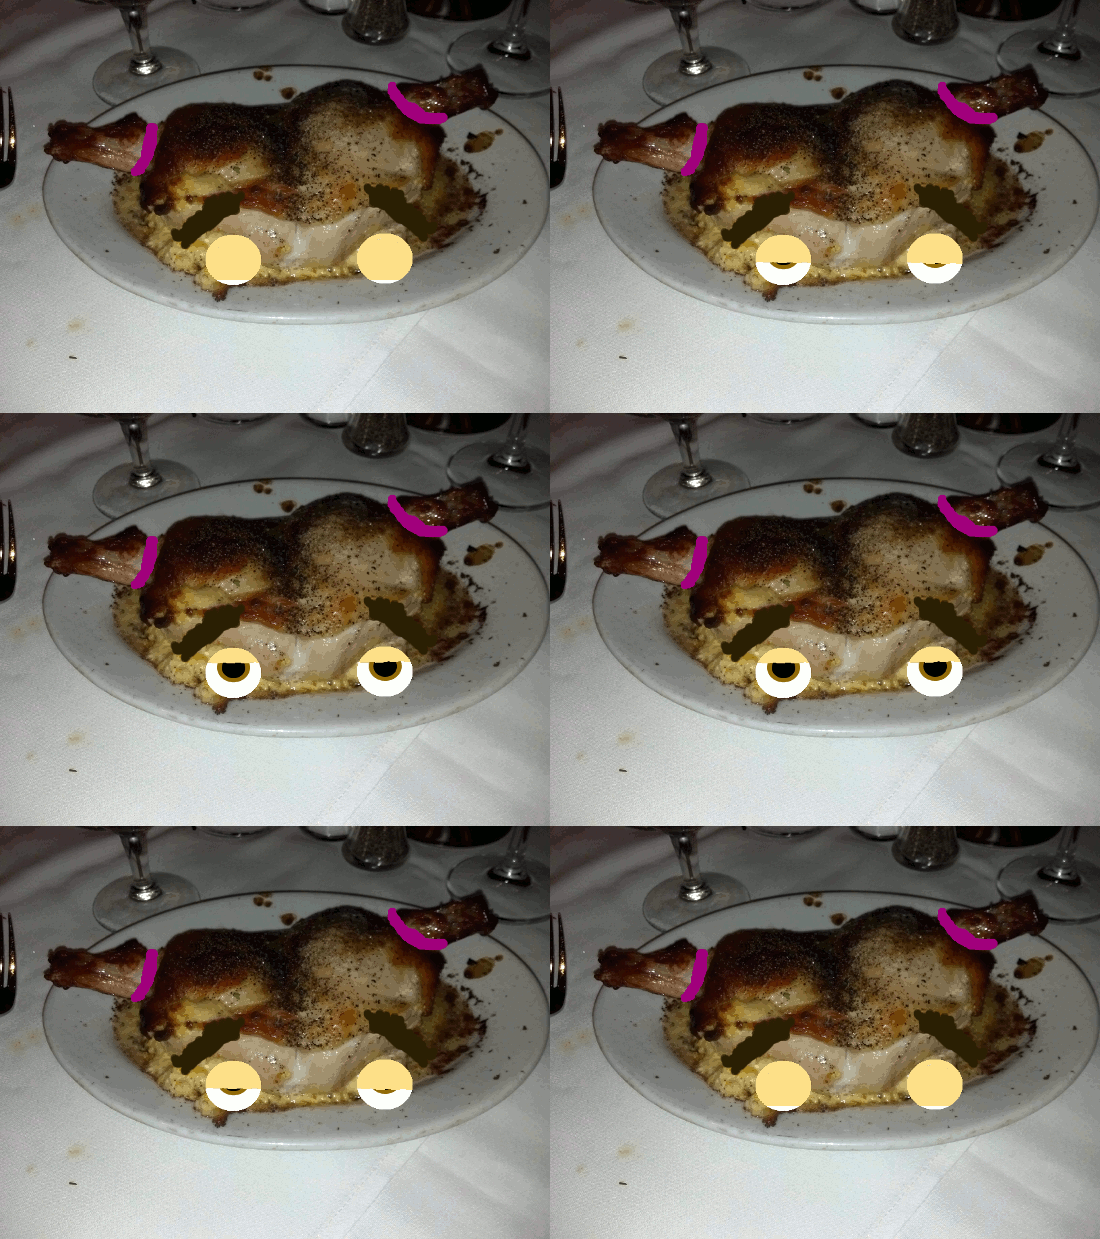
If the meal itself was inedible, the presentation was actually worse.  The dish looks like a little girl with pigtails was scalped, had her head was stuffed with cheese, and baked until golden brown.  Below is an animated GIF of what the dish looked like to me.

STOP LOOKING AT ME!

STOP LOOKING AT ME!

  1. Can you tell I’m overcompensating for not having actually posted last month? []

How to Make Awesome Cardboard Paper Mache Anything

Awesome Paper Mache Hats

Awesome Paper Mache Hats

A few weeks ago a friend of mine had a “bad movie night” where he was showing the film1Sharknado.”  Inspired by the theme for the party, I decided I had to wear a shark hat for the event.  After making my hat, my daughter requested a monkey hat.  This was not a request I could refuse.

I took pictures of the process to show you how you can make your own.  I haven’t ever tried to make paper mache hats before, so this was not only a lot of fun – but a great learning experience.  While I own the really great paper mache monster books by Dan Reeder, I only used them for inspiration and tried out a few new things on my own.

Even though I used this process to make hats, the directions here could easily be adapted to making anything out of paper mache.

1. Step 1: Gather Materials and Tools

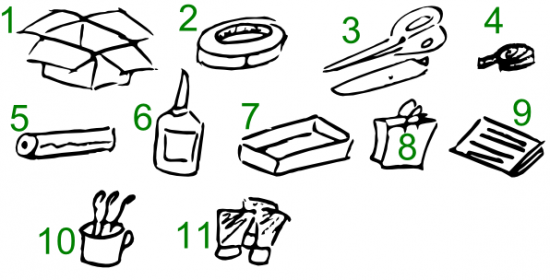
All the things you need to make your own awesome paper mache anything

All the things you need to make your own awesome paper mache anything

Here’s what you need to get started:

  1. Cardboard Boxes.  Cardboard forms the “skeleton” of the structure.  It’s cheap, ubiquitous, sturdy, and easy to cut and form.
  2. Masking Tape.  Once the cardboard has been cut, liberal use of masking tape will keep your creation together until it can be covered with paper mache.
  3. Scissors and Utility Knife.  Scissors can be very helpful in cutting cardboard or paper.  While scissors can be helpful, and appropriate for kids, I find a utility knife gets the job done faster.
  4. Measuring Tape.  If you’re not making a hat (or other apparel or armor) you won’t need this.  But it is helpful when making measurements.  ((In a pinch, you could just use a piece of yarn or string to mark lengths, and then put the yarn on the cardboard for reference.))
  5. Plastic Wrap.  Whether you’re working with gluey paper or paint, the process is messy.  I would recommend covering the work surface with plastic wrap.  I happened to have a really large plastic bag, which I taped directly to the table.
  6. Glue.  I just used a big bottle of Elmer’s white glue from the hardware store, but I’m pretty sure wood glue would have worked as well, if not better.  It’s also more versatile and sturdy.
  7. Plastic Tray.  The next time you get take-out or have a plastic liner from inside some packaging, save it.  It makes a great wide tray for mixing water and glue or when your project is dry, it is also great for mixing paints.
  8. Paper Grocery Bags.  The “twist” with this process is that I used torn up grocery bags, rather than the traditional newspaper.  It turned out this was a really good idea for a number of reasons.  Paper bags are a cheap and plentiful material.  When thoroughly wet strips of paper bags are easy to place, mold and shape. However, the most important features of paper bags is that they hold glue and water really well and then dry quickly into a sturdy hard shell.  In fact, they form such a sturdy surface that I only had to do a single layer of paper mache around the entire hat.  This means that you can quickly put down a single layer of paper bag strips all over your cardboard form, wait a few hours for it to dry, and then get to work finishing the project.
  9. Paper or Newspaper.  While grocery bags work really well to cover your cardboard form, they can leave some small gaps where they overlap.  When I found gaps in the project, I simply used a few thin strips of the newsprint style paper to cover the holes and smooth out spots on the rough paper bag layer.
  10. Cup of Water and Paintbrushes.  An old mug is best and pile of cheap dollar store brushes is probably fine.
  11. Paints.  I prefer acrylic paints.  They are cheap, can be diluted with water, easy to mix, they stay wet long enough for you to blend, but not so long that you have to wait days for it to dry.  They also clean up well with water.

2. Step 2: Create Cardboard Form

Process for creating awesome hat

Process for creating awesome hat

The process I used to create the cardboard forms for the hats was pretty quick and easy.  I measured the circumference of my daughter’s head and then the distance from her ears to the top of her head.  Using these measurements, I cut out a strip of cardboard as tall as the distance from her ears to the top of her head and as wide as the circumference of her head – with a little extra to allow for overlap.

This slideshow requires JavaScript.

In the pictures above you can see the strip of cardboard cut out and then taped into a cylinder with the masking tape.

This slideshow requires JavaScript.

Cut strips into the cardboard cylinder, fold them down, and add enough masking tape to mold it into a hat-shape.

3. Step 3: Add Embellishments

This slideshow requires JavaScript.

A paper mache hat is way more interesting with some kind of embellishment, like ears, shark fins, wings, or whatever else.  Here I cut ear shapes out of cardboard, curved them slightly, taped them to hold the curve, and then taped them to the hat.  When I made the shark hat, I cut a long slit into the hat through the tape and inserted the shark fin through the underside of the hat.  Don’t be afraid to use a lot of tape.

4. Step 4: Prepare the Work Surface, Paper Strips, and Glue Mixture

This slideshow requires JavaScript.

Cover the work surface with plastic sheeting.  I used a big plastic bag from a helium balloon order from my daughter’s birthday.  However, a big garbage bag or plastic wrap would also work well.  Paper bags from the grocery store work really well – but there are too thick in places.  Tear off the handles and pull the paper bag apart at the seams.  You’ll probably need to discard some of the sections where the the paper bag is too thick to use.

Add some glue (I used about a tablespoon) and warm water (about a half cup or so) to the plastic pan.  It should look like milk or heavy cream once you’ve mixed it up.

This slideshow requires JavaScript.

Completely soak the strips of paper bag in the glue mixture.  They should be completely soaked all the way through until they’re nearly translucent.  Unlike paper mache with thin pieces of newspaper, you won’t need to put layers and layers of paper on the form – just one layer where the pieces overlap a little should work fine.  The excess glue from the strips of paper will soak into the cardboard and help make the entire structure sturdy.

5. Step 5: Set Model to Dry, Patch Holes with Paper

This slideshow requires JavaScript.

Since the cardboard helps soak up the water, the entire structure should dry relatively quickly.  I put the shark hat outside in the sun for a few hours and it was ready for painting.  Once the hat is dry (or dry enough), you’ll probably notice some holes and gaps from the paper bag strips.  Tear up some newsprint paper, soak those in the gluey mixture, and cover and smooth out any defects.  Once these pieces dry, the project will be ready to paint!

6. Step 6: Paint to Suit

This slideshow requires JavaScript.

The great thing about acrylic paints is that they are so easy to work with.  They dry really quickly, so you can paint one side of the model, work on the other side, and then come back to the first side to add details.  In any case, just paint the project to suit and you’re done!

Each hat went together really quickly.  I put the cardboard form together in about 15 minutes, covered it with the gluey paper bag strips over maybe 30 minutes, let it dry for several hours, and then paint it over the course of maybe an hour.

If you make your own paper mache hat (or other sculpture), let me know in the comments!

  1. And I use the word “film” loosely here []