Blame Cyrozap

Cyrozap‘s recent vociferous comments about truncated feeds were basically on point.

He noticed that I had recently changed my RSS feed settings to serve up truncated posts, rather than full content.  I made this change in mostly because I was tired of dealing with content theft.  However, I’m reasonably sure this will probably not be an issue any longer. While the points made by those articles are certainly valid, I would point out that it is far easier to steal content from an RSS feed than it is to write a content scraper.  Having written both, once upon a time, I can attest to this from experience.  Truncated feeds may not be a deterrent to all – but it will deter those who are just using a WordPress plugin to suck down RSS content.

In any case, I left the RSS feed settings as they were – due to inertia and because I assumed no one would really notice.  But, since I haven’t had to deal with stolen content in a little while and at least one person prefers un-truncated feeds…  the long rambling RSS posts are back!

If you find my rambling babbling showing up in your RSS feed, well, you have Cryozap Cyrozap to thank.  :)

Update:  Cyrozap – sory fore mispellnig yoru mane.

Did you think this too?

I just read Nophead’s post about his Mendel making its 18th child.

First off, that’s an incredible feat.  Even under the best circumstances, the print time and amount of human intervention required of a Mendel as it builds the parts for replication is still considerable.  Eighteen more RepRaps in the world because of his hard work and determination.

Reading about his RepRap working on it’s 18th child, I just couldn’t help thinking about the Duggars.

New Design: Dalek Cookie Cutter

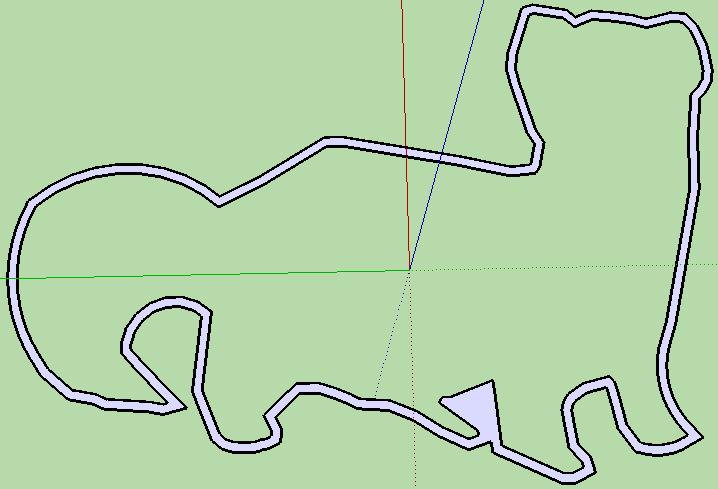
I’ve uploaded my designs for a Dalek cookie cutter to Thingiverse.

I don’t even eat that many cookies.  It’s just that these are just fun to design.  I realize there’s an SCAD Thing on Thingiverse for creating cookie cutters.  However, I’m just not familiar with SCAD and Sketchup with a few key STL plugins is SOOO easy to use.

My design process is essentially:

  1. Draw silhouette of object in Sketchup
  2. Use the “Offset” feature to create an outline of the object around the flat silhouette of the object
  3. Delete the interior outline
  4. Use the “Push/Pull” feature to raise the outline to about 2cm
  5. Export as an STL
  6. Run through NetFabb STL automatic repair
  7. Upload to Thingiverse with a witty description
  8. Write a blog post about it

I’ve posted a few times about useful Sketchup plugins, so if you’re getting started with Sketchup and MakerBot that’s a good place to start.

Save the Stoat! Eat a goat!

Soft-pawed albino stoat of Southern Wales

Soft-pawed albino stoat of Southern Wales

I must admit, until very recently I was completely unaware of the plight of the soft-pawed albino stoat of Southern Wales.

The story of these gentle weasels is a sad one indeed.  Once these stoats roamed the great plains of the Serengeti in herds so vast the sound of their collective padded footsteps was deafening.

But, highly prized and sought after for their sweet sweet tears these animals were hunted to the brink of extinction.  Even in this modern age there is a brisk underground black market trade for sad stoats.  Now, this once ubiquitous creature has been moved to the endangered species watch list by the combined efforts of a pharamecutical industry bent upon creating ever more potent drugs for keeping these animals on the brink of despair and a growing demand for stoat tacos fueled by a surge in molecular gastronomy.

If not for the Great Stoat Conservatory in South Wales, the soft-pawed albino Stoat would have all but vanished from the face of the Earth.  Here at GSCSW these ermines are protected from poachers where it is hoped their numbers may recover… in time.

Thank you to DaveD for bringing my attention to this fascinating mammal.

So, please take the time to make some of these delicious stoat cookies and remind your friends to save the stoat and eat a goat.

Spare parts

The last week has been a fruitful one for me, at least as far as printing things on my MakerBot is concerned.  I’ve designed, created derivatives, printed upgrades, updated the firmware, installed the latest (super sweet!) RepG, and even performed some maintenance.

One amusing and useful experiment was the serial production of the Z Axis Wobble Reducers by MakiYoshida.  Using my current settings I printed one.  Then I installed it and printed a second.  The second was a visibly better product.  I installed the second and printed a third.  The third was no better than the second.  I installed the third and printed a fourth.  I then installed the fourth… and didn’t bother to print with it.

Right now I have two of these wobble reducers installed on the front right and back left Z axes.  Installing one on the most warped rod (front right, for those of you playing at home) helped significantly.  Installing the second on the back left helped a little more.  Installing the third on the back right didn’t seem to make much of a difference, and may have been worse than the second print.  I didn’t realize why until I tried to install the fourth Z axis wobble reducer.

Once all of the wobble reducers were in place I found that the entire Z stage was too mobile – and would easily shift from left to right and back and forth.  When you have no wobble reducers one or more warped Z axis rods will force the entire stage out of whack.  When you have four wobble reducers, there is nothing keeping the Z stage steady.  Thus, the optimum number is between one and three.  However, I noticed that having two diagonally across from one another gave me enough wobble reduction to improve the print, but not so much flexibility that it could get pushed around in the middle of a print.

Part of the problem is that this particular wobble reducer will allow nearly unimpeded side-to-side motion.  However, these wobble reducers are also fantastic at compensating for a badly warped rod.  I suspect that mixing different kinds of wobble reducers might be my best bet.  I’m not really that interested in installing one of versions that requires precision rods, since it’s just one more thing I have to source for my MakerBot.  Ideally I can mix and match these two types of wobble reducers to improve the overall print.  The Z-axis floating arrester appears to keep the captive nut more … captive than the Z axis wobble reducers I have installed.  This may provide the exact combination of rigidity and flexibility I need to optimize my print quality and minimize layer shift as I print.

The upshot of all of this, and the reason for the post title, is that I now have two Z Axis Wobble Reducers by MakiYoshida that I’m not using.  Do you need one or two of these and feel like saving yourself the print time?  If so, drop me a line.

RepG – the best one of them all

Adam, if you read this – the latest RepG is AMAZING.  Getting to preview an STL, convert to GCode, and then to an S3G file all from the comfort of the friendly RepG UI is fantastic!

It’s not that I’m scared of the Skeinforge UI or anything.

It’s just that it stalks me while I sleep, steals my happy innocent dreams, and replaces them with a theater of shadow puppet parade of horrors.

Show me your llamas!

This llama cookie cutter doesn’t take much plastic to print, especially if you’ve got a heated build platform or are printing in PLA.  The surface area of the part that touches the build platform is so small you might be able to get away with no raft at all.

A few days ago I was explaining to a friend of mine that you can print anything with a MakerBot.  All you need is sufficient time, determination, and plastic. 1  What I would really like to show my friend is how the llama cookie cutter we designed has made it around the world in just a few days.

How about printing a llama cookie cutter and posting a picture?

  1. The prime examples of this would be the cathedral playset and the MakerBot MakerBot []

New design: Rubik’s Cube (sorta)

Rubik's Cube for Dummies

Rubik's Cube for Dummies

I’ve already posted about how much I like TomZ’s simplified version of a Rubik’s cube.  Only problem is that I wasn’t able to encourage my MakerBot to print it.  Taking into account some of my ideas, I’ve designed a derivative.  It’s 4:45am at the moment – not a good time to have my MakerBot tooting and beeping.  ;)

Here’s what I’ve done with this version:

  1. Oriented the STL so it is immediately printable
  2. Run the STL through NetFabb to make sure it is manifold
  3. Reduced the number of unique printed parts from 5 to 2
  4. Put the STL together in such a way that you can print up two of the STL’s for a total of 6 parts, ready to be assembled
  5. Shrunk-ified the nubs for that fit into the center pieces
  6. Enlargened the grooves for the nubs
  7. Oriented the three parts so that they would use a minimal raft
  8. Changed the design so it will accommodate a nut/bolt attachment system rather than several additional plastic parts that must be glued together

In a future iteration, I hope to change the middle pieces so that all you need to do is snap the two middle pieces together.  Also, I’d like to incorporate any design suggestions from people who have tested this version.