[I mean, the chutzpah of a man who starts a blog post… for the purpose of linking back to his own blog post from two months prior? Oh, young MakerBlock… You rascal!]
One of the nifty things about examining the designs of others is that looking at those designs can give one ideas for ways to improve those designs or come up with my own. In short, open source tech makes you smarter.
[How wild was it that I could write a blog post namechecking pretty much all the people in and around an open source project in a short blog post? All of the people mentioned below were super happy to help troubleshoot and get printers working. Gotta love open source – and the people committed to keeping these projects going. Plus, this was still the “wild west” of 3D printers. People were building printers, innovating, shipping, fixing, and trying new things constantly.]
There’s been some interesting discussion following We Alone On Earth’s post (Plus the updates)) in the comments. I think WAOE and the various commentors would probably agree that although anyone could build a working MakerBot Cupcake CNC from a kit with enough persistence and help, DIY kits1 just aren’t for everyone.
It’s the “help” part that is the most amazing and enabling aspect. There are not a lot of products out there where the best customer service actually comes from the customers themselves. We’ve collectively built up wiki, posted problems and solutions, taken pictures and videos. It probably took me about three months before I progressed from total newbie posting basic annoying questions to being able to help others with their problems. 2 With each shipment of MakerBots, the product gets better with customer innovations and input, customers improve the instructions and wiki, and there are even more people out there to help you.
Bre, Zach, Adam, and Marisol
Andrew Plumb aka Clothbot
Rick Pollack aka MakerGear for holding my hand in diagnosing a blown thermistor
Rick Pollack aka MakerGear and Neil Underwood aka Spacexula for talking me down from the ledge when I clogged my extruder
Scott Small aka Tox for PLA printing advice
Eberhard Rensch aka Zaggo and J. E. ‘jet’ Townsend for helping me create a mini-mug
Conrad Farnsworth for helping me figure out how to install my XY opto-endstops
It only took me about another month or so before I started posting regularly here. I find it’s a wider platform for annoying more people than just those that read the MakerBot Operators‘ group. [↩]
[A blog post about trouble shooting in the early days of MakerBot printers. It was entirely possible for a regular person to build and operate a MakerBot 3D printer – but if they weren’t already technically inclined, they’d have to really want it. I reallyreally wanted to have a 3D printer, and with the help of kind souls and absolutely stubborn pig-headedness, I was able to get mine working reasonably well. Sure, I had to rebuild the extruder every now and then – but that was just part of the maintenance cycle back then.]
You have nothing to feel guilty about for your WAOE post. You were frustrated with the time you were spending on a DIY kit and some of the limitations. I really liked two of the points you made in reply to my post on your MakerBot woes. First was that it may just be a matter of time before getting good Skeinforge settings isn’t as challenging. 1 Second was an analogy:
I’ve been thinking of MakerBot as ‘using linux before Ubuntu’. At first you had to build the kernel yourself and compile and manage your own packages, but eventually it got to the point where Grandma can use it.
As you note, this is an open source project. If there’s something you don’t like, dive in and fix it! I had a lot of trouble getting my X and Y axes tight, so I designed X and Y axes tensioners.
[This is an excellent example of the kinds of abandoned, nearly finished blog posts sitting around in my drafts folder. This was essentially a fully formed, fully edited, and formatted blog post that was relevant at the time. It’s hilariously still relevant in a world where electronics are less user-upgradeable and user-repairable than ever.]
I mentioned my experiences owning a first generation Rio PMP300 MP3 player. I liked that model because it was “upgradeable” – I could pop in a new SD chip for an additional 64 Megs of space. 1 This brings to mind different kinds of “upgradable” products:
Limited upgrades. My Rio could only be upgraded with a maximum of an additional 64 Megs. This made it comparatively insignificant to other market options fairly quickly. There’s just no reason why the Rio needed to limited to maximum SD card upgrade. It had great battery life and was a little bit hackable – I’d still be using it today2 if I could upgrade it in the 4-16Gig range. Limit a consumer’s upgrades and you basically guarantee they’ll be a consumer again in the future. Just not necessarily for that same company. ;)
Planned obsolescence. Perhaps it was Rio’s plan all along to create a product that would be useless as soon as a 128 Meg chip became widely available.
Scheduled updates. Antivirus software, antispyware software, and firewall software.
Service and subscription plans. Why would I update the maps in my GPS now that my trust ‘Droid has Google Maps?
Abandonment/lack of support. Any closed source/proprietary consumer product that gets abandoned is put in a tough spot. Perhaps if Rio had published the source for their firmware I could go back and use my old Rio. We’ll never know. Once most companies have moved on to a new product, there’s no reason for opening their old source code. In fact, they probably think of it as proprietary3 when really it’s just a festering chunk of old code that’s useless to everyone.
Expensive upgrades/refills. This is some of the worst kind of upgrade nonsense. Inkjet printer cartridges and razor refills are prime examples of offering a loss-leader/cheap entrance price in the hopes of sticking customers with expensive refills. This business model is specifically designed to trap the unwary. One of the most annoying side effects of this business model is the original product, the printer for instance, is only just barely more expensive then the refills.
Unique upgrades/proprietary connectors. This list just goes on and on. You must use their special batteries, special film, special applicator, unique power adapter, special charger, super special speedy charger or you’ll void the warranty. My personal favorite of the above is the “super special speedy charger.” Why would you make a slow charger, if not for the sole purpose of selling a better charger? Why not just charge a little more for your product and include a good charger??
Lock-in. Inkjet printer cartridges and razor refills are prime examples of offering a cheap entrance price in order to lock the consumer in with expensive refills.
Lack of future compatibility. It’s easy enough to make a product backwards compatible. You have all the information you need, namely existing products, in order to build backwards compatibility into your newest products. However, there’s precious little reason for most manufacturers to do so.
No upgrades. Can you imagine a product that could include an “upgrade path,” but doesn’t? Yeah, you can. They’re called the iPod, iPhone, and iPad. Why can’t you install a new battery, more memory, larger hard drive? Why doesn’t it have a USB port or expandable memory? I’ll tell you why. So that you have to invest in a more expensive model initially. This forces the consumer to choose between overspending initially on something they may never need and buying a product that will become useless too soon.
It’s amazing how insignificant that seems now. I routinely carry more than 100 times that in my pocket on a regular basis and more than 250 times that amount in my phone. [↩]
Is there a word for the feeling when you place an online order and the moment you hit “Purchase” you realize there was something else you wanted and now it’s too late? No? Um… me neither.
Since publishing a large blog post about my wishlist / shopping list for building a makerspace two days ago I’ve got two new things to add to the list. I wonder how best to maintain this list. While a wiki would be the best for maintaining evolving content, the tone of my posts tend to be a mix of useful things and nonsense and I’d have to heavily edit / format the content. Maybe one day I’ll get organized and create a page on this site that’s something of a shopping list with links back to the rambling posts.
While I don’t have a ton of uses for a hot foam cutter… but I did purchase some nichrome wire two years ago specifically to make one of these for … reasons I no longer recall. I made the purchase some time in October 2024, so it couldn’t have have been for Maker Faire and likely not for Halloween…
A little extra research brought me back down a rabbit hole to rediscover why I started thinking about hot wire foam cutting.
At Maker Faire 2023 I was excited to see Robert van de Walle’s “composite structures with low VOC materials” 2023 Maker Faire project. The project showed off how he would avoid the use of fiberglass and resins in favor of laminated paper using glue over an insulation foam structure.
Anyhow, I think I was researching these things after Maker Faire because of how miserable it was to cut sheets of foam with a craft knife which then lead to soooo much sanding. I figured in the future I could design something that would let me create almost a small hot wire cutter to consistently and easily cut shapes and beveled edges into foam.
This is likely to be a rambly kind of a post. I typed the blog title first, but, as Hector Barbosa might say, they’re more of what you’d call guidelines than actual titles. Fair warning – as at least one reader will point out, this may be some more AI bellybutton gazing.1
I basically stopped using Creative Commons pictures in my blog posts and websites a few years ago when I learned of some CopyLeft troll nonsense litigation. I did my best when using these pictures to provide proper attribution and even wrote a WordPress plugin to help others do the same.2 Learning that a picture from Flickr or posted for free use under Creative Commons could lead to abusive litigation and extortion was so disheartening that I pulled a lot of pictures from my various blogs and either left them with no images, broken images, or if they were very important to the post/page making something to go there. From that point, I generally trended towards using/making memes to add visual interest to the blog posts.
I was reminded of this after reading a well written post on Mastodon about various alternatives to using AI generated images in blog posts.3 While I don’t think these are all necessarily practical when it comes to finding an appropriate and aesthetically pleasing image to go along with a blog post, I thought this was a worthwhile and thought provoking suggestion.
I do like adding pictures because it adds a little bit of visual interest to what would otherwise be a wall of text. Many times, I will add a screenshot from OpenSCAD or a photo of a sketch / sketchbook page. And now, a short digression…
Someone far more pithy than I comment recently that twenty years ago regular people were sued for posting song lyrics, sharing MP3’s of music, and low quality movies, while these days people are becoming AI millionaires by shoveling the entire internet and the collected written works of the human race into machines.
…What should people opposed to AI slop do, then? Do we stop driving because of license plate scanners and stop going out in public because some asshole will be wearing Google Glass Goggles or Facebook Meta Glasses and feeding our information into facial recognition software? 45 I don’t share photos of myself or family on social media, but should we not store our photos in the cloud and avoid fun community events at the local library? Even writing this post, I’m unwillingly contributing the corpus that will be fed into the next version of an LLM.
I feel damned either way. If I don’t use any LLM, they will consume my writings and original pictures, use my original pictures to track me across the internet, sell me things or sell me to other things. If I do use an LLM it will do all of that plus train on my interactions.
What is the most defiant thing to do when this blog post is almost certainly going to be read by more web crawlers, spam robots, and LLM’s than humans? Should I only post new pictures to add visual interest to my posts at the expense of embedding even more meta data into each post? Is it more subversive to use an AI to generate a fitting copyright-free but soulless image that adds little new information to the algorithm’s endless hunger?
I don’t have answers to any of this.
As I was working yesterday another thought occurred to me. Where is the line between “software” and “LLM/AI”? I had just run optical character recognition on a large document to help figure out what was in it. All OCR is just pattern recognition, making trained “black box” guesses at what’s a given letter/word/pattern. I’ve never liked the auto-suggest “feature” of my phone’s texting app or gmail, but I like the auto-complete feature of LibreOffice when I start to type a date. I don’t mind when my text editor suggests the name of previously used variables and functions – it’s actually quite helpful.
Why am I comfortable with an heuristic’s OCR/autocompleting dates/autocompleting variable/function names, but I hate auto-suggesting messages? Perhaps because it’s no something I can turn off. I just know I find these kinds of “helpful suggestions” to be far more intrusive. Maybe I don’t mind these helpers in documents – but I don’t want them stepping the communications between myself and another human?
I don’t mind using an AI image generators for a stupid joke, but I hate seeing them in advertisements. I would never use an AI, local or otherwise, to write something to someone I loved, client, colleague, coworker – but I don’t mind it when I’m trying to wrap my mind around a new API, updating an old program when certain parts I’d written are now deprecated, or even writing something in a brand new language. It’s hard to tell if I’m justifying my uses or if there really is a decent use case for these things.
I guess I’m trying to come to terms with what kinds of AI/heuristic usages I like, am ambivalent towards, and those I hate – to better understand why I feel/think these ways.
TLDR: Take a picture, use Wikimedia Commons, screenshot from video game, lego diorama, use art supplies/image program to make a picture, stickers, pictures of a shelf. [↩]
This is why I generally rescale/blur/distort images before posting them online. But, I mean, how much time am I going to devote to this if I just want to share a quick picture of something? [↩]
A friend recently requested some less LLM-centric content. I’ve often said this blog is largely a lab notebook for various ideas or build log. It’s also merely a subset of the stuff swirling around in my brain than a dedication to any one topic. In any case, this post is dedicated to Pete.
I saw the above 3D printed box on Instagram. It looks like a wanted poster from the show “One Piece” of a character named Roronoa Zoro who carries three swords. The box contains a small post in the very center which seems very out of place – until the lights are dimmed and the light under the tip of the post is activated, revealing the light is blocked by the irregular edges of the box and casts a shadow of the silhouette of a figure holding three swords.
I’ve seen other implementations of this stereographic projection technique, but this was easily the coolest. The disparity between the size and shape of the box and shadow was almost startling.
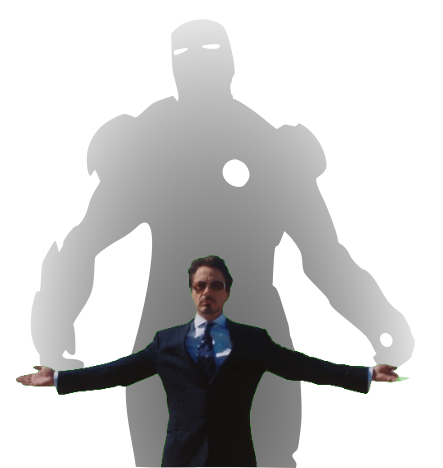
My mind went wild with ideas upon seeing this box. One of the first ideas I had related to some fan-made movie posters by Kevin Collert many years ago.1 Imagine a small projector / box of arbitrary shape that could project that kind of silhouette behind you?
Yeah, a Tony Stark cosplay is neat… but what if you had an inconspicuous stereographic projector on your back that threw up a huge Iron Man shadow behind you!?
This could be extended in any number of ways. A Luke Skywalker cosplay that casts a Darth Vader shadow, Bruce Banner with a Hulk, etc, etc. But, also, what about a shadow of a familiar? A little dragon perched behind you. Or two thugs standing to your side like evil shadow henchmen? Or a crowd of zombies? The neat part about the box / lamp shown on Instagram was that the box didn’t look like it would display that kind shadow of a shadow. It just looked like a box with weird edges to it.
But, how did they do it?
He makes a good point (iykyk)
I’m terrible at Blender. I’ve watched tutorials, tried to use it, but I just can’t wrap my feeble mind around it. My one string is the ability to make things in OpenSCAD. There are plenty of others who can make incredible things in it, but I’m no slouch. The code may not be pretty, but, well, as they say…
And, really, that’s all that counts
I started with a few assumptions.
The light source has to be a single point. If there were multiple LED’s or filaments, it would create fuzzy / duplicate shadow edges. This should be possible with a single bright LED.
The shadow is basically a cone. The edge of the shadow everywhere must be essentially some sort of a distorted cone, with the center point being the single point of light and the edges of the silhouette being the edge of the cone.
The top edge of the box must be where the cone intersects with the box. If we decide how far off the wall the point of light is and we know where we want the shadow to be and where the shadow edges are, we should be able to intersect the shadow-cone with a thin walled box.
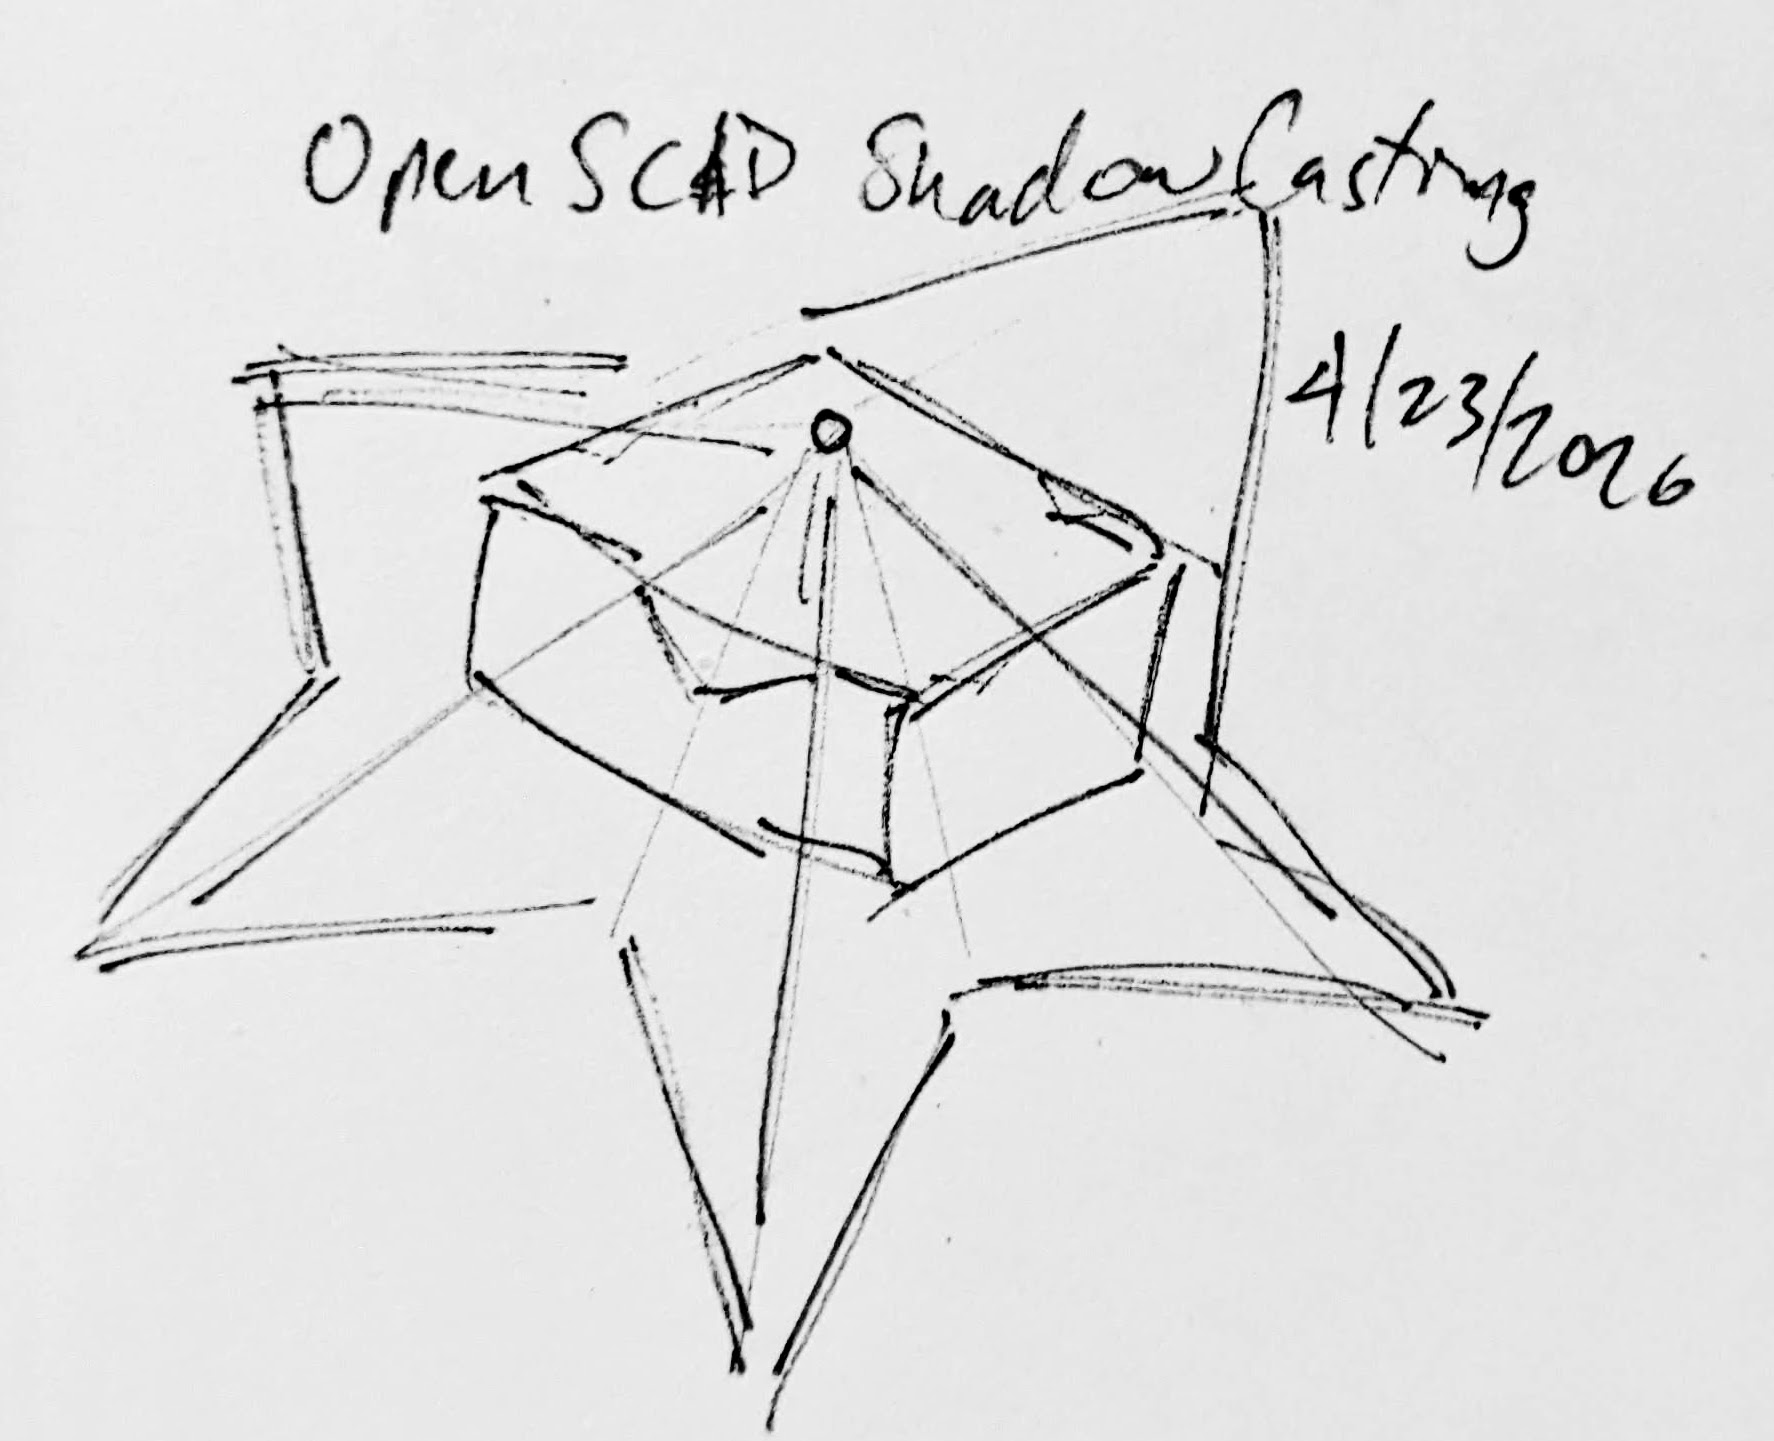
A rough sketch of the idea
Creating the box itself shouldn’t be that big a deal. It’s an easy few lines of OpenSCAD. Creating the arbitrary “cone” was initially a much harder problem. Now, if the design I was trying to create was very simple or entirely convex, I could just use the OpenSCAD hull function around an SVG of the desired shadow and a very small sphere for the point of light. Since a simple shape would be uninteresting, I knew that hull wasn’t going to work. For a while I tried really hard to build a python program that would work by creating a polyhedron built out of the large SVG in the desired location and a very small SVG at the light point – and stitching the sides together programmatically. If you’ve ever worked with the OpenSCAD polyhedron functions, you know what a pain it is. If you don’t define the faces in a certain order or order the faces properly, you’ll end up with flipped faces and a pile of useless triangles. Even when the faces were properly built, the result ended up being difficult for OpenSCAD to render since it involved so many points converging on so few points and weird little overlaps. It was a mess.
I’m listening…
You mean, all I have to do is RFTM? Apparently the linear_extrude function has a parameter called “scale” where you can define how small something should get as it is extruded. This is literally exactly what I needed.
I needed the shadow on the wall to be extruded off the wall as high as the point of light, but scaled down to that same point of light. But, would this work??? I haven’t printed it yet, but I believe it should.
This slideshow requires JavaScript.
From there, the next question is… does this OpenSCAD back-of-the-napkin sketch really work? Again, I’m not sure – I haven’t printed this for a few different reasons. If this design were printed “as is”, there would be a ton of overhangs and support material. I believe when you look at some of the pictures of the lamp lit up from the side, you can see the infill patterns on the sides. I can’t tell from these videos – but I suspect the easiest way to 3D print this box would be to do so in big flat panels. At the point you’re just trying to turn filament into 2D panels, why even bother printing it when you could lasercut it in a fraction of the time?
Let’s look at a few stills of the lamp.
This slideshow requires JavaScript.
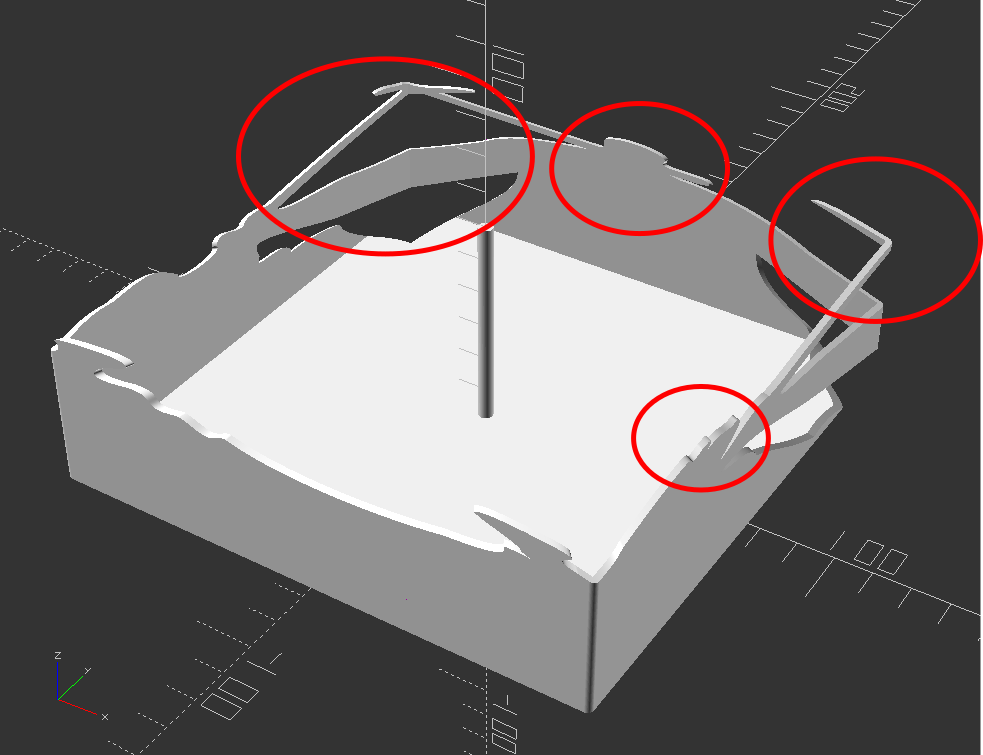
Now, for my quick mockup I just used a simple square shape – but you can definitely see the same features as in the lamp in the video stills. The head, the crossed sword tips at the left, the jagged edges on the bottom right, the floating sword on the right.
Common structural features circled
Given that the theory feels intuitive and sound and that my quick mockup proof of concept seems to have the same structural features as the lamp in the video… this seems like it would work.
If this quick mockup works, then why restrict ourselves to simple boxes? For a mass produced thing you just want to stamp out, a simple box just makes sense. You could lasercut the panels, slap them together, and churn them out all day long. But, the thing that you use to block the light and form the shadow could be any arbitrary shape. It could be a triangle, star, or something far more complex. Here’s another quick sketch:
This slideshow requires JavaScript.
Obviously, this would be a support structure nightmare. But, for a one-off project and a cool enough idea, I think it could definitely work!
His work has been stolen and slapped on so many dropshipped things that it was very difficult to find the original artist! [↩]
I have found that if I have an idea, it will keep swirling around my brain unless I get it out in some way. In a way, I’m exorcising myself to prevent these ideas from plaguing me further. It’s not so bad having ideas pile up in my brain, it’s just that as long as they’re floating around, I’m not able to adequately devote sufficient brain cycles to other tasks. I don’t know the reason for this – but my sense is that my brain will keep returning to these ideas, circulating and cycling them, because I don’t want to forget about them – and it can only truly relax once it knows the idea is somewhere it can’t be lost / forgotten.
A while back I had suggested the only good way I had to deal with these recirculating ideas was to either act on them (building / blogging) or killing them (organizing / bookmarking). This wasn’t exactly true.
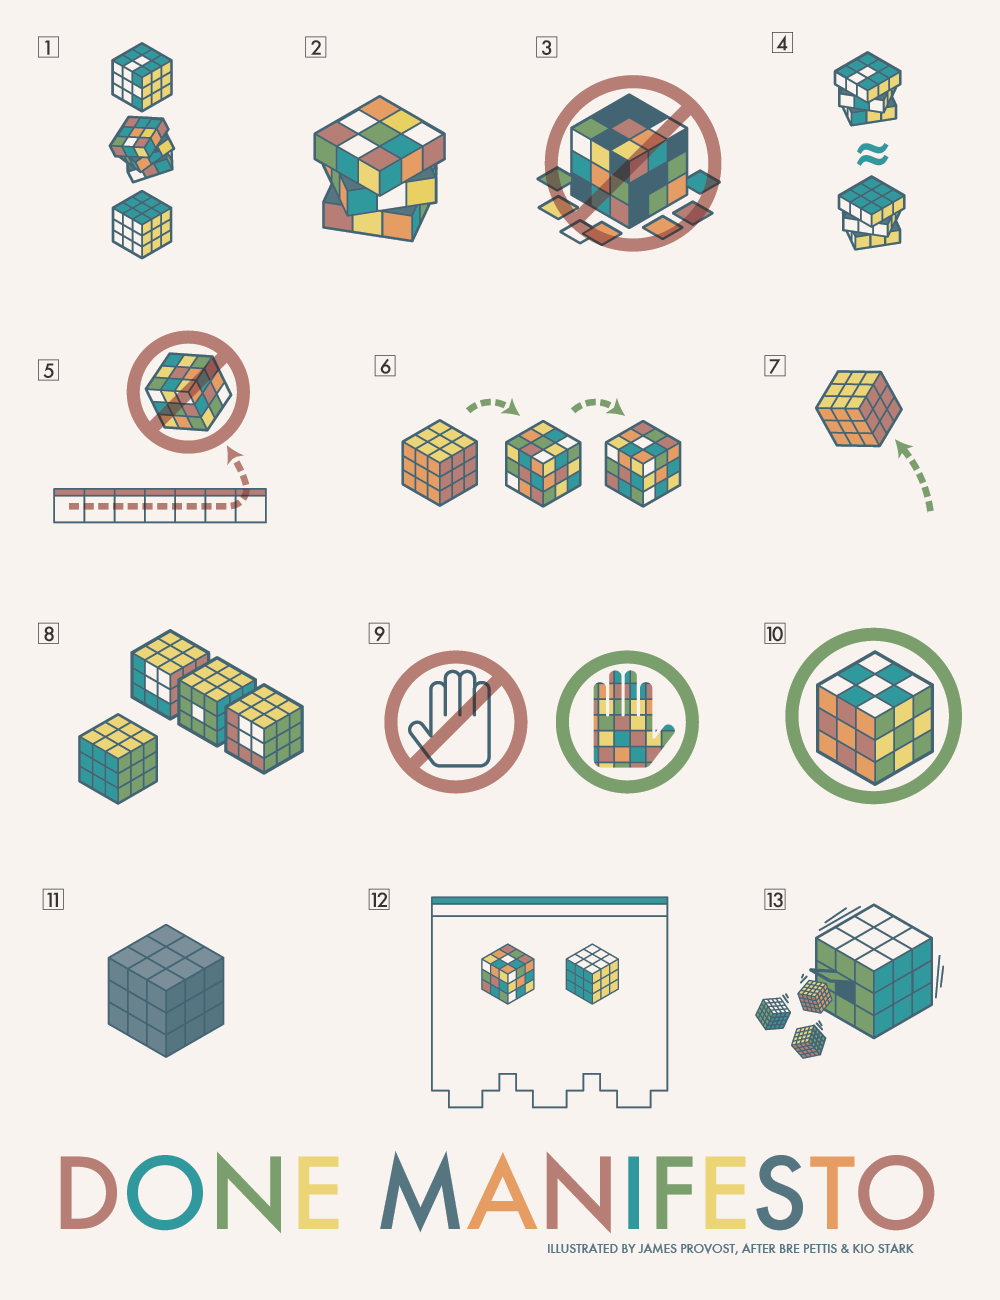
But, first, a digression. Many years ago Bre Pettis and Kio Stark created a “cult of done” manifesto, a short set of ideas about how to consider things “done,” written in 20 minutes since that’s all the time they had to write it. I think about this manifesto and this one particular poster implementation of it often.
James Provost’s Cult of Done Poster
I’m not sure what appeals to me so much about this manifesto. I don’t know that I agree with each element – but for something generated in 20 minutes, it’s pretty good. I guess the reason it comes back to my mind today, of all days, is that I happened to be looking back through my many blog posts with my eldest kiddo and was reminded of all the blogging I did here and at MakerBot.com and was reminded of those earlier, perhaps simpler and sillier, times.
Sometimes I can accidentally let years go by without talking to a friend. It’s not a good quality – but at least I’m able to recognize this personality trait. My way of keeping in touch with people is that when I see something that reminds me of them, I’ll send it to them. This isn’t so unusual … but sometimes I do this same thing with a slightly less pure motive. Sometimes when I have an idea or see something interesting, I don’t just store it in a bookmark or by writing it down… I consciously make an effort to store it in a friend’s brain.
Yes, I’m sharing a thing with a friend as a way to connect, offer something to them that I know they’ll be interested in, perhaps to give us something to talk about, but I admit that I also consciously share it with them in order to further store the same data within their brain and in our communication channels.1 Again, not my finest quality, but it’s not an entirely selfish quality either.2 The hilarious thing about this last way to done-ify something is that you could even store the data in the brain of someone you hated! Heck, you could rage-tweet it to someone. And, the stronger your reaction to them, the stronger the connection you would have to the memory of the thing!
Taking all that into consideration, here’s how I probably actually exorcise / done-ify things:
In the 7 years since I wrote a blog post about rescuing my Google Pixel from a boot loop people have started reaching out to me desperately looking for a way to fix their phones. This particularly horrible glitch happens at the worst time – when your phone storage is completely full of pictures and videos. In my case, we were on vacation and not near wifi when I’d happened to fill up the phone storage and it got stuck in a boot loop.1
Google Support was adamant there was no way to recover my data and my options were to factory wipe the phone myself or send it to them so they could do it. Of the resources found back in 2018, almost nothing survived Google’s march of “progress” and destruction of their own older resources. In this case the links to Google’s own Pixel support forums and links to resources no longer work – and there are no working Archive.org / Way Back Machine links.
Anyhow, if you’re stuck in the same situation as I was – without the resources and links I had back then, perhaps if you dig around you can still find a way?
“If you have a problem, if no one else can help, and if you can find them, maybe you can…”
Before you get started – a warning. I don’t currently have this problem and am trying to piece together how I fixed my problem 7 years ago on an older phone, using current guides that are no longer accessible. I haven’t verified any of these links and resources, I’m just some rando on the internet who is trying to help you out because some other internet randos helped me out a long time ago. Google has a nasty habit of deleting their own resources and shuffling things around. I don’t know the first thing about installing new operating systems on phones and following any of these links or suggestions might permanently damage your systems. But, as I mentioned before… I tried this because Google Support was beyond unhelpful and I was completely out of options.
You’ve been warned
The basic framework for the fix was:
Get the phone to “Recovery Mode” so at least isn’t not boot looping, overheating, and chewing up your battery.
If you have an unlocked phone, or a locked phone from Google which you could theoretically unlock over a terminal, you should be able to get the phone “Safe Mode” where it will be able to turn on and access the operating system, but with limited other apps useable.
I say “latest,” but I’m not an expert and am not currently having this problem. Perhaps it’s best to use the version which most closely matches your phone? Anyhow, I installed ADB on the root of my PC and then created a path to it with “SET PATH=%PATH%;c:\adb” so the operating system would know it could access those resources.
This would essentially be the same update that you might get when you let your phone download and install an update over night via WiFi – with the only difference that you’ve downloaded it onto your PC and are going to try to shove it back into the phone over a cable.
Try to “sideload” the OTA update back into the phone using ADB / Fastboot (I don’t remember the specific steps to do this – but since these resources are constantly being worked on, I assume someone has written a guide).
If this post helped you out or you found some resources helpful, please let me know so I can update this post and help others.
Good luck!
It was also overheating – which might have been a contributing factor the boot loop – or caused by the constant booting and looping [↩]
Sometimes I hate the algorithm and sometimes it shows me cool new robotics / mechanics / gadgets and makers. Aaed Musa has been working on something called a “Capstan Drive” which is a rope driven alternative to gears. By removing gears and teeth and replacing them with rope you cut down on noise, eliminate backlash, high torque, low inertia, and low cost – with the major costs being low range of movement and a vertical path for the rope to travel over. Aaed’s video is well worth a watch and blog well worth reading. But… if you want to get a sense of how the Capstan drive works…
Capstan drive in action
The benefit of a planetary gear is that it’s a very vertically compact method for increasing rotational speed at the cost of complexity. With a Capstan Drive (I don’t know if this is supposed to be capitalized) the rope needs to be wrapped around the thinner shaft several times to prevent slippage. As Aaed notes:
One question that I had when first exploring this reducer was “why doesn’t the rope slip if it’s just wrapped around the smaller drum?”. The answer to that question lies in the capstan equation. With each turn of rope on a drum, the amount of friction increases exponentially. With 3-5 turns of rope, there is enough friction for slipping to not be an issue.
Aaed indicated he was using Dyneema DM20 cord as it has almost no stretch to it. I wonder if something like fishing line would work?