Is that I tend to think up better ideas about what I want to build with my ‘bot. Seriously, the downtime is quite useful that way.
Tag: way
Working out
I would have thought that the PLA would have just worked out all of the black ABS out of the way already, but it’s still got the occasional black streak. Again, I don’t mind – I kinda like it. However, I would like to be able to build some pieces out of pure PLA. No matter, I’ll keep printing stripey non-cosmetic parts. :)
First and second test prints
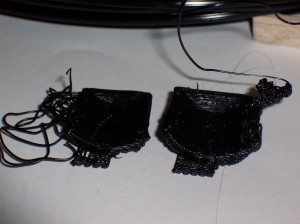
Well, I’m trying the traditional mini-mug!

Something tells me they’re not watertight. The first one (left) snapped off the foam-core raft part way through the build. The second one (right) got all gloppy and then snapped off the foam core raft part way through the build.
Except for the fact they’re not even close to done, the adhesion between the layers seems pretty good. The raft on the second one was a little gloppy which caused me to be a little apprehensive throughout the build. After a few layers the gloppiness evened out. However, it cropped up again, accumulated, got super gloppy, and ruined the build.
Suggestions?
Things I learned while soldering opto-endstops
The opto-endstops marked the very first parts I had to solder for this MakerBot. Not having soldering anything more complicated than two wires together, this was an adventure and learning experience. Here’s what I learned today:
- The 3-pin connectors used for two of the opto-endstops (on the Y-axis stage) are in the Generation 3 MakerBot Electronics Kit (Mostly Assembled) with some of the other connector bits. I was a little confused about this for a while.
- It helps to lay out all the little bits in an organized fashion beforehand.
- Keep a long thin rigid stick handy for bending delicate leads into the circuit board holes.
- Although I read the RepRap electronics fabrication guide and found it helpful, I still felt a little lost. I found the most effective way to solder the parts in was to:
- Get the soldering iron good and hot
- Put the leads through the holes
- Bend the leads a little so that they stayed in place
- Flipped the board over so the leads were sticking up
- Touched the solder to where I wanted the joint
- Gently stroked the solder with the soldering iron tip towards the joint
- This process seemed to create a pretty good joint
- You’re going to burn a finger at some point, accept it.1
- This almost goes without saying, but go slowly.
- Check and double check the orientation and placements.
- I found it helpful to take a large sheet of aluminum foil and shape it into a tray. This helped contain the parts I was working on and was a good way to catch the flying leads that I clipped off.
- I burned two. [↩]
